2014 Citroen DS5 light
[x] Cancel search: lightPage 91 of 372

89Comfort
Mats
Removable carpet protection.
move the seat fully back,
fit the mat in place,
engage the fixings by pressing down on
them.
Fitting
Removal
To remove the mat on the driver's side:
move the seat fully back,
disengage the fixings, leaving the fixing
pins in the floor carpet,
remove the mat.
Refitting
To refit the mat on the driver's side:
position the mat correctly,
refit the fixings by pressing,
check that the mat is secured correctly.
To avoid any risk of jamming of the
pedals:
- only use mats which are suited to
the fixings already present in the
vehicle; these fixings must be used,
- never fit one mat on top of another.
The use of mats not approved by
CITROËN may inter fere with access to
the pedals and hinder the operation of
the cruise control / speed limiter.
To use the cigarette lighter, press it in
and wait a few seconds until it pops out
automatically.
To connect a 12 V accessory (max power:
120 W), remove the cigarette lighter and
connect a suitable adaptor.
You can use this socket to connect a telephone
charger, a bottle warmer...
After use, put the cigarette lighter back into
place straight away.
Cigarette lighter /
12 V accessory
socket
Page 96 of 372

Heating and Ventilation
Controls
The incoming air follows various routes
depending on the controls selected by
the driver, the front passenger and rear
passengers.
The temperature control enables you to obtain
the level of comfort required by mixing the air of
the various circuits.
The air distribution control enables you to
select the air vents used in the passenger
compartment by the combined use of the
associated buttons.
The air flow control enables you to increase or
reduce the speed of the ventilation fan.
These controls are grouped together on control
panel A
on the centre console.
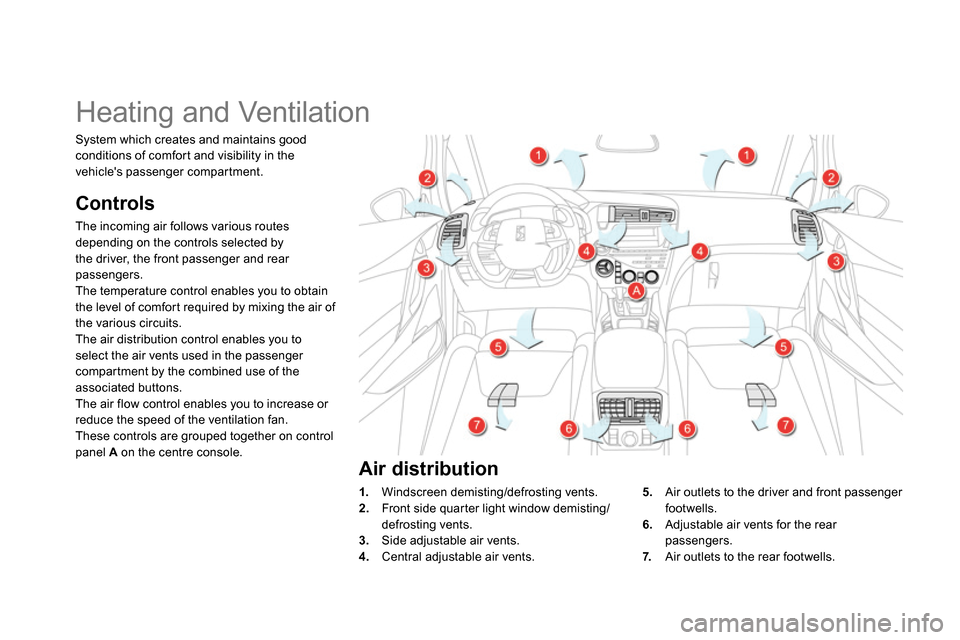
1.
Windscreen demisting/defrosting vents.
2.
Front side quarter light window demisting/
defrosting vents.
3.
Side adjustable air vents.
4.
Central adjustable air vents. System which creates and maintains good
conditions of comfort and visibility in the
vehicle's passenger compartment.
5.
Air outlets to the driver and front passenger
footwells.
6.
Adjustable air vents for the rear
passengers.
7.
Air outlets to the rear footwells.
Air distribution
Page 101 of 372

99Comfort
Switching the system off
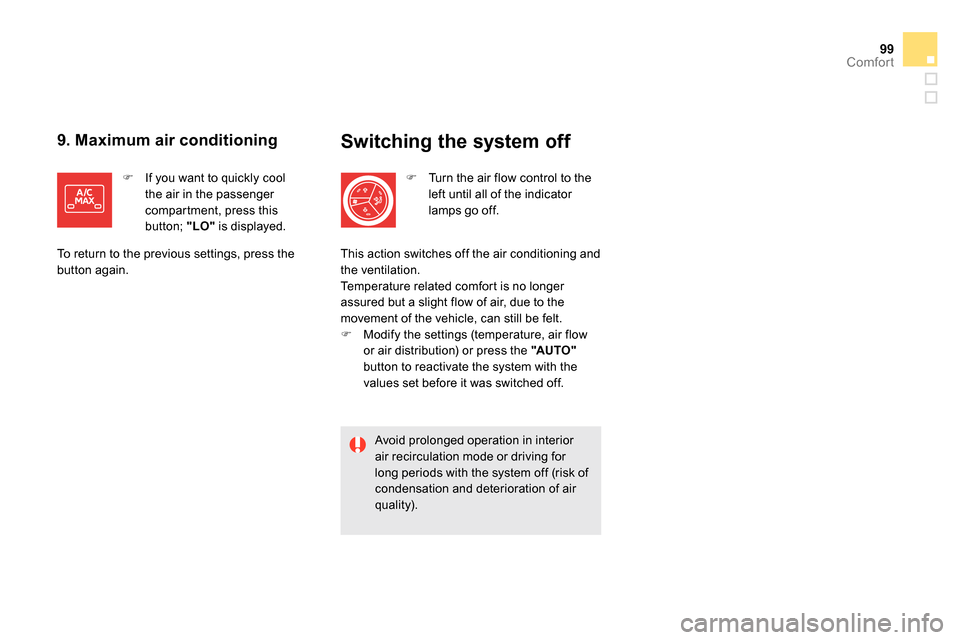
Turn the air flow control to the
left until all of the indicator
lamps go off.
Avoid prolonged operation in interior
air recirculation mode or driving for
long periods with the system off (risk of
condensation and deterioration of air
quality). This action switches off the air conditioning and
the ventilation.
Temperature related comfort is no longer
assured but a slight flow of air, due to the
movement of the vehicle, can still be felt.
Modify the settings (temperature, air flow
or air distribution) or press the "AUTO "
button to reactivate the system with the
values set before it was switched off.
9. Maximum air conditioning
If you want to quickly cool
the air in the passenger
compartment, press this
button; "LO"
is displayed.
To return to the previous settings, press the
button again.
Page 106 of 372

Starting-switching off the engine
Insert the electronic key in the reader.
Press the brake pedal for vehicles with
an automatic or electronic gearbox, or
fully declutch for vehicles with a manual
gearbox.
Starting using
the electronic key
Starting with the "Keyless
Entry and Starting" system
If one of the starting conditions is not
met, a reminder message appears in
the instrument panel screen. In some
circumstances, it is necessary to turn
the steering wheel slightly while pressing
the "START/STOP" button to assist
unlocking of the steering; a message
warns you when this is needed.
With a manual gearbox
, put the gear lever in neutral.
With an electronic gearbox
, put the gear lever in N
.
With an automatic gearbox
, put the gear lever in P
or N
.
For Diesel vehicles
, in
temperatures below zero the
engine will not start until the
preheater warning lamp has gone off.
If this warning lamp comes on after
pressing "START/STOP", you should
hold the brake or clutch pedal down
until the warning lamp goes off and
do not press the START/STOP button
again.
With the electronic key inside the vehicle
(it is not necessary to put it in the reader),
press the brake pedal for vehicles with
an automatic or electronic gearbox, or
fully declutch for vehicles with a manual
gearbox.
Press the " START/STOP
"
button.
The engine starts (see the
warning below for Diesel
vehicles).
Press the " START/STOP
"
button.
The engine starts (see the
warning below for Diesel
vehicles).
The "Keyless Entry and Starting" device
must be in the recognition zone.
For safety reasons, do not leave
this zone with the vehicle running.
Page 129 of 372

127Driving
Stop & Start
Operation
Going into engine STOP mode
The "ECO"
warning lamp comes on
in the instrument panel and the engine
goes into standby automatically:
- with a manual gearbox
, at speeds below
12 mph (20 km/h) or vehicle stationary with
the Blue HDi 120 version, when you place
the gear lever in neutral, and you release
the clutch pedal,
- with an electronic gearbox
, at speeds
below 5 mph (8 km/h), when you press
the brake pedal or put the gear lever in
position N
,
- with an automatic gearbox
, vehicle
stationary, when you press the brake pedal
or put the gear lever in position N
. If your vehicle is fitted with the system, a time
counter calculates the sum of the periods in
STOP mode during a journey. It resets itself to
zero every time the ignition is switched on with
the START/STOP button.
Never refuel with the engine in STOP
mode; you must switch off the ignition
with the START/STOP button.
For your comfort, during parking
maoeuvres, STOP mode is not
available for a few seconds after
coming out of reverse gear.
STOP mode does not affect the
functionality of the vehicle, such as for
example, braking, power steering...
Special cases: STOP mode not
available
STOP mode is not invoked when:
- the vehicle is on a steep slop (rising or
falling),
- the driver's door is open,
- the driver's seat belt is not fastened,
- the vehicle has not exceeded 6 mph
(10 km/h) since the last engine start using
the START/STOP button,
- the electric parking brake is applied or
being applied,
- the engine is needed to maintain a
comfortable temperature in the passenger
compartment,
- demisting is active,
- some special conditions (battery charge,
engine temperature, braking assistance,
ambient temperature...) where the engine is
needed to assure control of a system.
In this case, the "ECO"
warning lamp
flashes for a few seconds then goes
off. The Stop & Start system puts the engine temporarily into standby - STOP mode - during stops in the traffic (red lights, traffic jams, or other...).
The engine restarts automatically - START mode - as soon as you want to move off. The restart takes place instantly, quickly and silently.
Per fect for urban use, the Stop & Start system reduces fuel consumption and exhaust emissions as well as the noise level when stationary.
This operation is per fectly normal.
Page 132 of 372

Lane departure warning system
System which, using a camera which
recognises solid or broken lines, detects the
involuntary crossing of longitudinal traffic lane
markings on the ground.
To provide safe driving, the camera analyses
the image then, if the driver's attention drops,
triggers a warning if the vehicle drifts over
a lane marking (speed higher than 50 mph
(80 km/h)).
This system is par ticularly useful on motor ways
and main roads.
Activation
Press this button, the indicator
lamp comes on.
The lane departure warning system
cannot, in any circumstances, replace
the need for vigilance and responsibility
on the part of the driver.
Deactivation
You are warned by the vibration of the driver's
seat cushion:
- on the right-hand side, if the marking on
the ground has been crossed on the right,
- on the left-hand side, if the marking on the
ground has been crossed on the left.
No warning is transmitted while the direction
indicator is active and for approximately
20 seconds after the direction indicator is
switched off.
Detection - alert
Operating fault
The detection may be impeded:
- if the markings on the ground
are worn,
- if there is little contrast between the
markings on the ground and the
road surface,
- if the windscreen is dirty,
- in certain severe weather
conditions: fog, heavy rain, snow,
bright sunlight or direct exposure
to the sun (low sun, leaving a
tunnel, ...) and shade.
Press this button again, the
indicator lamp goes off. In the event of a fault, the indicator lamp in the
button flashes.
Contact a CITROËN dealer or a qualified
workshop.
The status of the system remains in the
memory when the ignition is switched off.
It is necessary to obser ve the driving
regulations and to take a break every
two hours.
Page 146 of 372

Lighting controls
System for selection and control of the various front and rear lamps providing the vehicle's lighting and signalling.
Main lighting
There are various lamps on the vehicle:
- sidelamps, to be seen,
- dipped beam headlamps to see without
dazzling other drivers,
- main beam headlamps to see clearly when
the road is clear,
- directional headlamps for improved
visibility when cornering.
Additional lighting
Other lamps are installed to fulfil the
requirements of particular driving conditions:
- rear foglamps to better signal the presence
of the vehicle in foggy conditions,
- front foglamps for better visibility in foggy
conditions and to improve lighting at
intersections and when parking,
- daytime running lamps to be seen during
the day.
Automatic lighting functions
Various automatic lighting functions are also
available depending on options:
- guide-me-home lighting,
- directional headlamps,
- welcome lighting,
- daytime running lamps,
- automatic illumination of headlamps,
- automatic headlamp dipping.
Page 147 of 372

145Visibility
Selection ring for main lighting
mode
Turn the ring to position the symbol required
facing the mark.
Lighting off.
Automatic illumination of headlamps.
Sidelamps only.
Dipped or main beam headlamps.
Dipping the headlamps
Pull the stalk to switch the lighting between
dipped / main beam headlamps.
In the lighting off and sidelamps modes, the
driver can switch on the main beam headlamps
temporarily ("headlamp flash") by maintaining a
pull on the stalk.
Displays
Illumination of the corresponding indicator lamp
in the instrument panel confirms the lighting
switched on.