Page 193 of 384

191Checks
Checking levels
Check all of these levels regularly, in line with the maintenance and warranty guide. Top them up if necessary, unless other wise indicated.
If a level drops si
gnificantly, have the corresponding system checked by a CITROËN dealer or a qualified workshop.
Oil level
Engine oil change
Refer to the maintenance and warranty guide
for details of the interval for this operation.
In order to maintain the reliabilit
y of the engine and emission control system, the use of additives in the engine oil is prohibited.
Oil specifi cation
The oil must be the correct grade for your
en
gine and conform to the manufacturer'srecommendations.
Brake fluid level
Changing the fl uid
Refer to the maintenance and warranty guidefor details of the inter val for this operation.
Fluid specifi cation
The brake fluid must conform to themanufacturer's recommendations and meet
the DOT4 l o w v i s c o s i ty / ISO 4925 Class 6standard.Th
e brake fluid level should be close
to the "MA X" mark. If it is not, check
the brake pad wear.The check is carried out either when
the ignition is switched on using the
oil level indicator in the instrumentpanel, or using the dipstick.
It is normal to top up the oil levelbetween two ser vices (or oil changes).CITROËN recommends that you check the level, and top up if necessary, every3 000 miles (5 000 kms). After topping up the oil, the check when switching on the ignition with the oil level indicator in the instrument panel is not valid during the 30 minutes after topping up.
Take care when working under the bonnet, as certain areas of the engine may be extremely hot (risk of burns) and the cooling fan could star t atany time (even with the ignition off).
It will onl
y be correct if the vehicle is on level ground and the engine has been off for more
than 30 minutes.
Page 196 of 384

Checks
12 V batteryAir filter and passenger compartment filter
Oil filter
Par ticle emission filter (Diesel)
Unless other wise indicated, check these components in accordance with the maintenance and warranty guide and according to your engine.
Other wise, have them checked b
y a CITROËN dealer or a qualified workshop.
The battery does not require any maintenance.
However, check that the terminals are clean
and correctl
y tightened, particularly in summer and winter.
Refer to the maintenance and
warranty guide for details of the replacement intervals for thesecomponents.
Re
place the oil filter each time the
engine oil is changed.
Refer to the maintenance and
warranty guide for details of the
replacement interval for this component. The presence of this label, in particular with
the Stop & Star t s
ystem, indicates the use of a specific 12 V lead-acid battery with special
technology and specification. The involvement
of a CITROËN dealer or a qualified workshop isessential when replacing or disconnecting the
battery. Th
e start of saturation of thepar ticle filter is indicated by the
temporary illumination of this warning lamp
accompanied by a message in the multi-function screen.
As soon as the traffic conditions permit,
regenerate the filter by driving at a speed of at
least 40 mph (60 km/h) until the warning lampgoes off.
If the warning lamp stays on, this indicates a
low additive level.
On a new vehicle, the first particlefilter regeneration operations may be accompanied by a "burning" smell, which is perfectly normal.
Following prolonged operation of thevehicle at very low speed or at idle, you may, in exceptional circumstances,notice the emission of water vapour at the exhaust on acceleration. This does not affect the behaviour of the vehicle or the environment. When carr
ying out work on the battery, refer
to the "12 V battery" section for details of theprecautions to be taken before disconnecting
the battery and following its reconnection.
Depending on the environment (e.g. dustyatmosphere) and the use of the vehicle (e.g. citydriving), replace them twice as often if necessar y.y
A clogged passenger compar tment filter may have
an adverse effect on the per formance of the air
conditioning system and generate undesirable odours.
Page 298 of 384

08MUSIC MEDIA PLAYERS
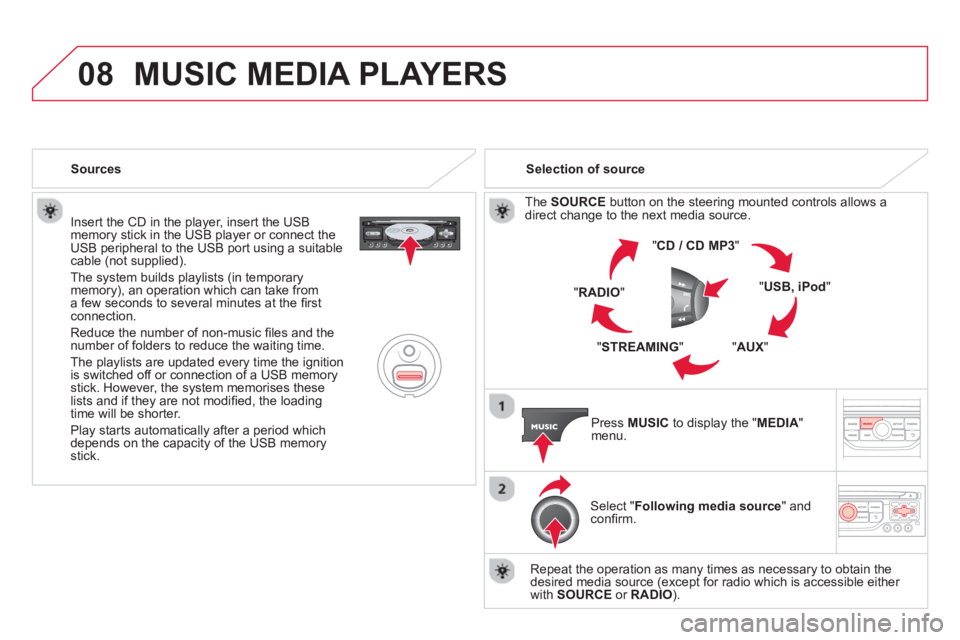
Insert the CD in the player, insert the USBmemory stick in the USB player or connect theUSB peripheral to the USB port using a suitablecable (not supplied)
.
The s
ystem builds playlists (in temporarymemory), an operation which can take froma few seconds to several minutes at the fi rstconnection.
R
educe the number of non-music fi les and the number of folders to reduce the waiting time.
The playlists are updated every time the ignition
is switched off or connection of a USB memory stick. However, the system memorises these
lists and if they are not modifi ed, the loadingtime will be shorter.
Pla
y starts automatically after a period which
depends on the capacity of the USB memory stick. Selection of source
Th
e SOURCE
button on the steering mounted controls allows adirect change to the next media source.
" CD / CD MP
3
"
"
USB, iPod"
"AUX
" "
STREAMING
" "RADIO
"
Pr
ess MUSICto display the "MEDIA
" menu.
Select "Following media source " and confi rm.
Repeat the operation as many times as necessary to obtain the
desired media source (except for radio which is accessible either
with SOURCE
or RADIO). Sources
Page 319 of 384

317
04 AUDIO
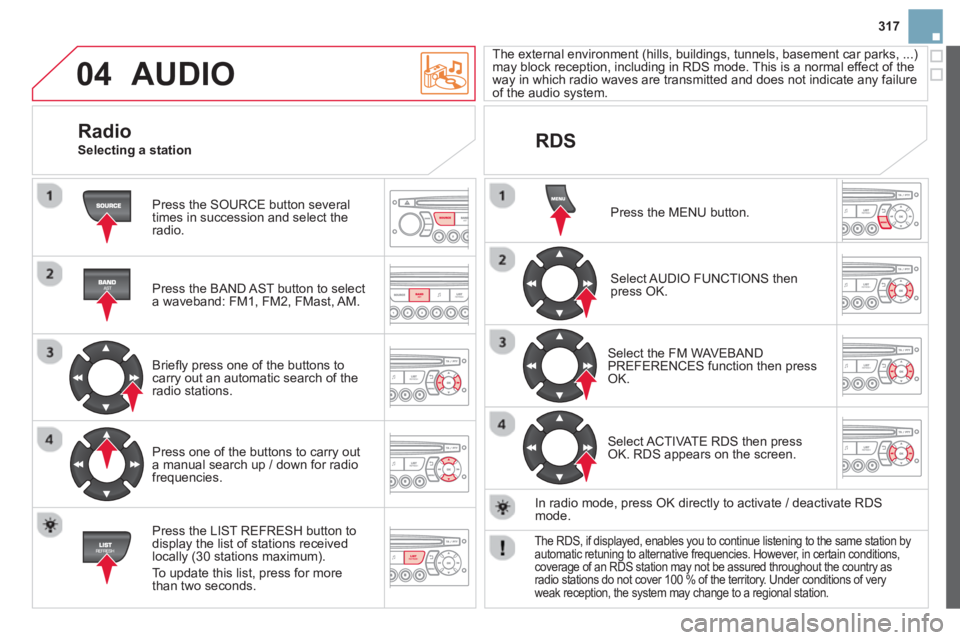
Press the SOURCE button several
times in succession and select theradio.
Press the BAND A
ST button to select
a waveband: FM1, FM2, FMast, AM.
Briefl
y press one of the buttons tocarry out an automatic search of theradio stations.
Press one o
f the buttons to carry out
a manual search up / down for radiofrequencies.
Press the LI
ST REFRESH button to
display the list of stations received
locally (30 stations maximum).
To update this list, press for more
t
han two seconds.
The external environment
(hills, buildings, tunnels, basement car parks, ...)may block reception, including in RDS mode. This is a normal effect of the
way in which radio waves are transmitted and does not indicate any failure of the audio system.
RDS
Radio
Selecting a station
Press the MENU button.
Select AUDIO FUNCTIONS thenpress OK.
Select the FM WAVEBANDPREFERENCES function then pressOK.
Select ACTIVATE RDS then pressOK. RDS appears on the screen.
In radio mode, press
OK directly to activate / deactivate RDSmode.
The RDS, if displayed, enables you to continue listening to the same station by automatic retuning to alternative frequencies. However, in certain conditions, coverage of an RDS station may not be assured throughout the country asradio stations do not cover 100 % of the territory. Under conditions of very
weak reception, the system may change to a regional station.
Page 365 of 384

7Access
Automatic mode
�)
In position 3
, press the control to begin
closing the roof.
When the roof is completely open, the
rear screen rests on the rear shelf.
Do not place any object on the rear
screen.
During automatic closing of the roof
in zone A
(position 2
to position 1
),
pressing the control stops the roof.
Complete closing of the roof between 1
and 0
can only be done in manual
mode.
Press and hold the control until the roof
is heard to lock.
If the roof does not lock correctly, it
opens again by a few centimetres. With
the engine running, operate the control
again.
If the problem persists, contact a
CITROËN dealer or a qualified workshop.
�)
Release the control: closing of the roof
continues up to position 2
.
�)
Between positions 2
and 1
, pressing the
control beyond the point of resistance
allows automatic closing of the roof to
position 1
.
�)
Between positions 1
and 0
, press and hold
the control until the roof closes fully.
During an operation in zone B
, an
instruction to stop the roof is not
possible.
Pressing the control reverses the
direction of movement of the roof,
whichever direction the control is
pressed.
This "anti-panic" function allows a quick
change in direction of movement of the
roof in the event if suddenly required.
Page:
< prev 1-8 9-16 17-24