Page 85 of 256

83
Stop & Start (e-VTi 68 engine)
Operation
Going into engine STOP mode
This indicator lamp comes on in the
instrument panel and the engine
goes into standby automatically:
-
w
hen stationary, in neutral, and you
release the clutch pedal.
Never refuel with the engine in STOP
mode; you must switch off the ignition
with the button. For smoother operation, during
parking manoeuvres STOP mode is
not available for a few seconds after
coming out of reverse gear.
STOP mode does not affect the
vehicle's systems, such as for example,
braking, power steering...
Special cases: STOP mode not
available
STOP mode is not invoked principally when:
- t he driver's door is open,
-
t
he driver's seat belt is not fastened,
-
t
he engine is needed to maintain a
comfortable temperature in the passenger
compartment,
-
d
emisting is active,
-
s
ome special conditions (battery charge,
engine temperature, braking assistance,
vehicle stopped on a steep gradient, high
altitude...) where the engine is needed to
assure control of a system.
The Stop & Start
system puts the engine temporarily into standby - STOP mode - during stops in the traffic (red lights, traffic jams, or other...).
The
engine restarts automatically - START mode - as soon as you want to move off. The restart takes place instantly, quickly and silently.
Per fect for urban use, the Stop & Start system reduces fuel consumption and exhaust emissions as well as the noise level when stationary.
Stop & Start time counters
A partial time counter counts the periods in
STOP mode during a journey.
It is displayed in the trip computer once the
Stop & Start acts.
Press one of the screen management buttons
to return to the previous display.
A global time counter counts the periods in
STOP mode since the last reset.
When it is displayed, press one of the screen
management buttons to reset the counter.
5
Driving
Page 185 of 256
01
In ACC mode or when starting the vehicle, the system comes on.
Use the button at bottom right of the screen for access to the main menus.
A second press returns the system to the last source activated, then press the virtual buttons
in the screen.
GENERAL OPERATION
In the event of prolonged exposure to sunlight and very hot conditions, the system may go into stand-by (screen and sound completely
off) for at least 5 minutes.
Return to normal operation takes place when the temperature in the passenger compartment drops.
183
Page 186 of 256
02
184Press to mute the sound.
A long press reinitialises the system. Volume (each source is
independent).
Select audio source (depending on version):
-
"FM" / "AM" / "DAB"* radio.
-
"USB" player
.
-
T
elephone connected by Bluetooth and with Bluetooth streaming.
-
Media player connected to the auxiliary socket (jack, cable not supplied).
Pressing with more than one finger is not recognised.
The screen can be used when wearing gloves.
FIRST STEPS
* Depending on equipment. To clean the screen, use a soft non-abrasive cloth (spectacles cloth) without any additional product or a damp cloth.
Do not use pointed objects on the screen.
Do not touch the screen with wet hands.
Short-cuts: using virtual buttons in the
top bar of the screen, it is possible to go
directly to the choice of audio source,
telephone functions or "Mirror Screen
®"
mode.
Page 193 of 256

04
191
Changing a radio frequency
RADIO
Select "FM". Press on "Audio source" to display the
carousel of sound sources.
Select the "Manual" tab to search for a station.
Press the step by step buttons, the automatic
buttons or turn the button at bottom right of
the screen to search for frequencies up or
down.
Preset a station
Select the "Presets" tab then make long press
on one of the numbered preset locations. Select a radio station or frequency
(refer to the "Changing a frequency" section).
Activate/ Deactivate RDS
Select "FM radio configuration ".
Press on "Audio source" to display the
carousel of audio sources.
Activate/deactivate "Change of regional
code".
RDS, if activated, allows you to continue listening to the same
station by automatic retuning to alternative frequencies. However
, in
certain conditions, coverage of an RDS station may not be assured
throughout the entire country as radio stations do not cover 100 % of
the territory. This explains the loss of reception of the station during
a journey. Select "FM".
Page 224 of 256
01
MODE
222
FIRST STEPS
On/Off.
Volume (each source is
independent).Select:
-
the next radio frequency up/
down automatically
.
-
the previous/next line in a list or
a menu.
-
the previous/next media folder
.
AM radio buttons 1 to 6: select a preset radio station.
FM buttons 1 to 5: select a preset radio station.
FM list: display the radio stations received.
Long press: preset a radio station.
Back: abandon current operation, up on level in the menu. Display menu and set options.
Rotate: scroll through a list or
change radio station.
Press: confirm the option displayed
in the screen.
Accept an incoming call.
Reject an incoming call.
End call. Select AM, FM and DAB*
wavebands.
Select the BTA (Bluetooth Audio)
and AUX source.
Audio system with Bluetooth®
* Depending on equipment.
Page 225 of 256
MODE
01
223
On/Off.
Volume (each source is
independent).
Select previous/next media folder.
AM radio buttons 1 to 6: select a preset radio station.
FM radio buttons 1 to 5: select a preset radio station.
FM
list: display the radio stations received.
Long press: preset a radio station.
Back: abandon the current operation, go up one level in a menu. Display menu and set options.
Rotate: scroll through a list or
change radio station.
Press: confirm the option displayed
in the screen.
Select:
-
the next radio frequency up/
down automatically
.
-
the previous/next line in a list or
a menu.
Select
AM and FM
wavebands.
Select the BTA (Bluetooth Audio)
and AUX source.
FIRST STEPS
Audio system
B4_en_Chap12b_Autoradio-Toyota-2_ed01-2014
Page 227 of 256

03
MODE
MODE
225
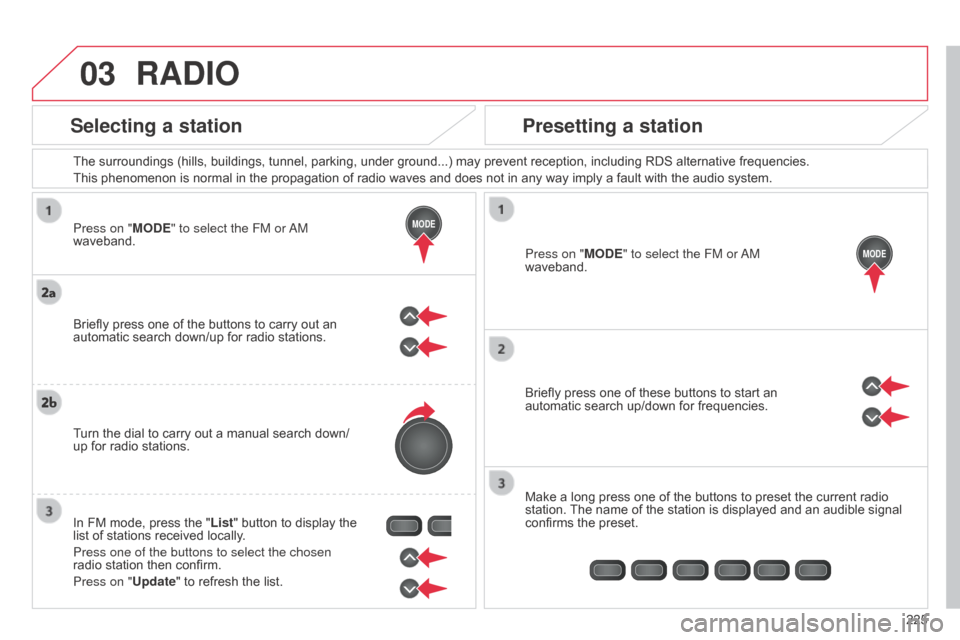
Press on "MODE" to select the FM or
a
M
waveband. The surroundings (hills, buildings, tunnel, parking, under ground...) may prevent reception, including RDS alternative frequencies.
This phenomenon is normal in the propagation of radio waves and does not in any way imply a fault with the audio system.
Press on "MODE" to select the FM or
a
M
waveband.
Briefly press one of these buttons to start an
automatic search up/down for frequencies.
Make a long press one of the buttons to preset the current radio
station. The name of the station is displayed and an audible signal
confirms the preset.
Briefly press one of the buttons to carry out an
automatic search down/up for radio stations.
Turn the dial to carry out a manual search down/
up for radio stations.
In FM mode, press the "List" button to display the
list of stations received locally.
Press one of the buttons to select the chosen
radio station then confirm.
Press on "Update" to refresh the list.
RADIO
Selecting a station
Presetting a station
B4_en_Chap12b_Autoradio-Toyota-2_ed01-2014
Page 229 of 256

03
MODE
227
RADIO
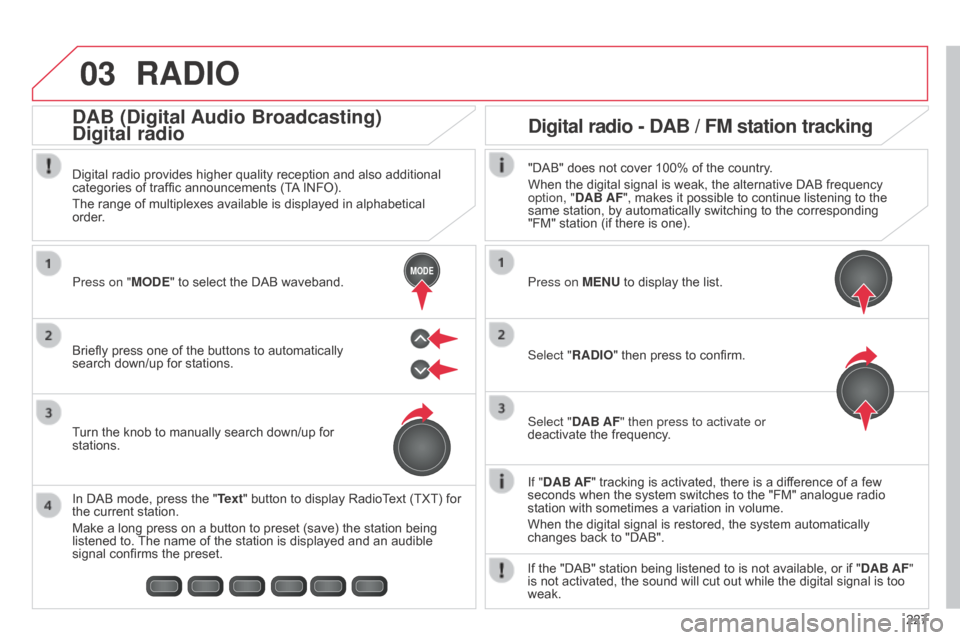
If "DAB AF" tracking is activated, there is a difference of a few
seconds when the system switches to the "FM" analogue radio
station with sometimes a variation in volume.
When the digital signal is restored, the system automatically
changes back to "DAB".
Briefly press one of the buttons to automatically
search down/up for stations. Press on "MODE" to select the DAB waveband.
In DAB mode, press the "Text" button to display RadioText (TXT) for
the current station.
Make a long press on a button to preset (save) the station being
listened to. The name of the station is displayed and an audible
signal confirms the preset. Turn the knob to manually search down/up for
stations. Digital radio provides higher quality reception and also additional
categories of traffic announcements (TA INFO).
The range of multiplexes available is displayed in alphabetical
order.
Press on MENU to display the list.
Select "RADIO" then press to confirm.
Select "DAB AF" then press to activate or
deactivate the frequency."DAB" does not cover 100% of the country.
When the digital signal is weak, the alternative DAB frequency
option, "DAB AF", makes it possible to continue listening to the
same station, by automatically switching to the corresponding
"FM" station (if there is one).
If the "DAB" station being listened to is not available, or if " DAB AF"
is not activated, the sound will cut out while the digital signal is too
weak.
Digital radio - DAB / FM station tracking
DAB (Digital Audio Broadcasting)
Digital radio
B4_en_Chap12b_Autoradio-Toyota-2_ed01-2014