2014 CHRYSLER TOWN AND COUNTRY clock setting
[x] Cancel search: clock settingPage 3 of 148

INTRODUCTION/WELCOME
WELCOME FROM CHRYSLER
GROUPLLC ..................3
CONTROLS AT A GLANCE
DRIVER COCKPIT...............6
INSTRUMENT CLUSTER ...........8
GETTING STARTED
KEYFOB ....................10
REMOTE START...............12
KEYLESS ENTER-N-GO™ ..........13
VEHICLE SECURITY ALARM ........16
SEATBELT ...................16
SUPPLEMENTAL RESTRAINT SYSTEM
(SRS)—AIRBAGS ...............17
CHILD RESTRAINTS .............18
FRONTSEATS ................22
REAR SEATS ..................23
HEATEDSEATS ................27
HEATED STEERING WHEEL ........28
TILT/TELESCOPING STEERING
COLUMN ...................28
ADJUSTABLE PEDALS ............29
OPERATING YOUR VEHICLE
ENGINE BREAK-IN
RECOMMENDATIONS............30
TURN SIGNAL/WIPER/WASHER/HIGH
BEAM LEVER .................30
HEADLIGHT SWITCH AND HALO
LIGHTSWITCH ................32
SPEED CONTROL ..............33
ELECTRONIC RANGE SELECTION (ERS) . . 35FUEL ECONOMY (ECON) MODE .....35
MANUAL CLIMATE CONTROLS ......36
THREE ZONE MANUAL CLIMATE
CONTROLS ..................37
THREE ZONE AUTOMATIC
TEMPERATURE CONTROLS (ATC) ....38
PARKSENSE® REAR PARK ASSIST .....40
PARKVIEW® REAR BACK-UP CAMERA...40
BLIND SPOT MONITORING WITH
REAR CROSS PATH .............40
POWER SLIDING SIDE DOORS .......41
POWERLIFTGATE ..............41
POWER SUNROOF .............42
WIND BUFFETING ..............43
ELECTRONICS
YOUR VEHICLE'S SOUND SYSTEM ....44
Uconnect® 130 . . ...............46
Uconnect® 130 WITH SiriusXM
SATELLITE RADIO ..............48 Uconnect® 430/430N
..............51
Uconnect® 730N ................60
SiriusXM SATELLITE RADIO/TRAVEL
LINK .......................71
STEERING WHEEL AUDIO CONTROLS..74
SETTING THE ANALOG CLOCK . . . . . 74
iPod®/USB/MP3 CONTROL .........75
Uconnect® PHONE ...............76
Uconnect® VOICE COMMAND .......78
Bluetooth® STREAMING AUDIO .......81
VIDEO ENTERTAINMENT
SYSTEM (VES™) ................81
ELECTRONIC VEHICLE INFORMATION
CENTER (EVIC) ................83
PROGRAMMABLE FEATURES .......84
UNIVERSAL GARAGE DOOR OPENER
(HomeLink®) . . ................85
POWER INVERTER ..............88
POWER OUTLETS ..............88
UTILITY
IN-FLOOR STORAGE — STOW'N GO® . . 90
ROOF LUGGAGE RACK ..........90
TRAILER TOWING WEIGHTS
(MAXIMUM TRAILER WEIGHT
RATINGS) ...................91
RECREATIONAL TOWING
(BEHIND MOTORHOME, ETC.) ......91
WHAT TO DO IN EMERGENCIES
ROADSIDE ASSISTANCE . .........92
INSTRUMENT CLUSTER WARNING
LIGHTS .....................92
IF YOUR ENGINE OVERHEATS . . . ....96
TIREFIT KIT ..................96
JACKING AND TIRE CHANGING ....102
JUMP-STARTING ..............111
SHIFT LEVER OVERRIDE ..........113
TOWING A DISABLED VEHICLE .....113
FREEING A STUCK VEHICLE . . . ....114
EVENT DATA RECORDER (EDR) . . . . . 115
MAINTAINING YOUR VEHICLE
OPENING THE HOOD ...........116
ADDING FUEL ................116
ENGINE COMPARTMENT .........118
FLUIDSANDCAPACITIES .........119
MAINTENANCE SCHEDULE .......120
MAINTENANCE RECORD .........124
FUSES .....................125
TIRE PRESSURES ...............128
WHEEL AND WHEEL TRIM CARE .....129
EXTERIOR BULBS ..............129
TABLE OF CONTENTS
Page 16 of 148

• If a Key Fob is detected in the vehicle when locking the vehicle using the power door lockswitch, the doors and liftgate will unlock and the horn will chirp three times. On the third
attempt, your Key Fob can be locked inside the vehicle.
• After pressing the Keyless Enter-N-Go™ LOCK button, you must wait two seconds before you can lock or unlock the vehicle using the door handle. This is done to allow you to check if
the vehicle is locked by pulling the door handle, without the vehicle reacting and unlocking.
• If a Keyless Enter-N-Go™ door handle has not been used for 72 hours, the Keyless Enter-N- Go™ feature for that handle may time out. Pulling the deactivated front door handle will
reactivate the door handle's Keyless Enter-N-Go™ feature.
Lock Or Unlock The Liftgate:
• With a valid Passive Entry RKE transmitter within 5 ft (1.5 m) of the liftgate, cycle the handleto open the liftgate and pull the liftgate open with one fluid motion.
NOTE:
• All doors will remain locked when the liftgate release handle is pressed regardless of the driver’s door unlock preference setting (“Unlock Driver Door 1st Press” or “Unlock All Doors
1st Press”).
• Refer to your Owner's Manual on the DVD for further information.
Installing And Removing The ENGINE START/STOP Button
Installing The Button
• Remove the Key Fob from the ignition switch.
• Insert the ENGINE START/STOP button into the ignition switch with the lettering facing up and readable.
• Press firmly on the center of the button to secure it into position.
Removing The Button
• The ENGINE START/STOP button can be removed from the ignition switch for Key
Fob use.
• Insert the metal part of the emergency key under the chrome bezel at the 6 o’clock
position and gently pry the button loose.
NOTE:
The ENGINE START/STOP button should
only be removed or inserted with the ignition in
the LOCK position (OFF position for Keyless
Enter-N-Go™).
GETTING STARTED
14
Page 48 of 148

Uconnect® 130
NOTE:
• Your radio has many features that add to the comfort and convenience for you and yourpassengers.
• Some of these radio features should not be used when driving because they take your eyes from the road or your attention from driving.
Clock Setting
1. Press and hold the TIME button until the hours blink.
2. Turn the TUNE/SCROLL control knob to set the hours.
3. Press the TUNE/SCROLL control knob until the minutes begin to blink.
4. Turn the TUNE/SCROLL control knob to set the minutes.
5. Press the TUNE/SCROLL control knob to save the changes.
6. Press any button/knob or wait five seconds to exit.
ELECTRONICS
46
Page 50 of 148

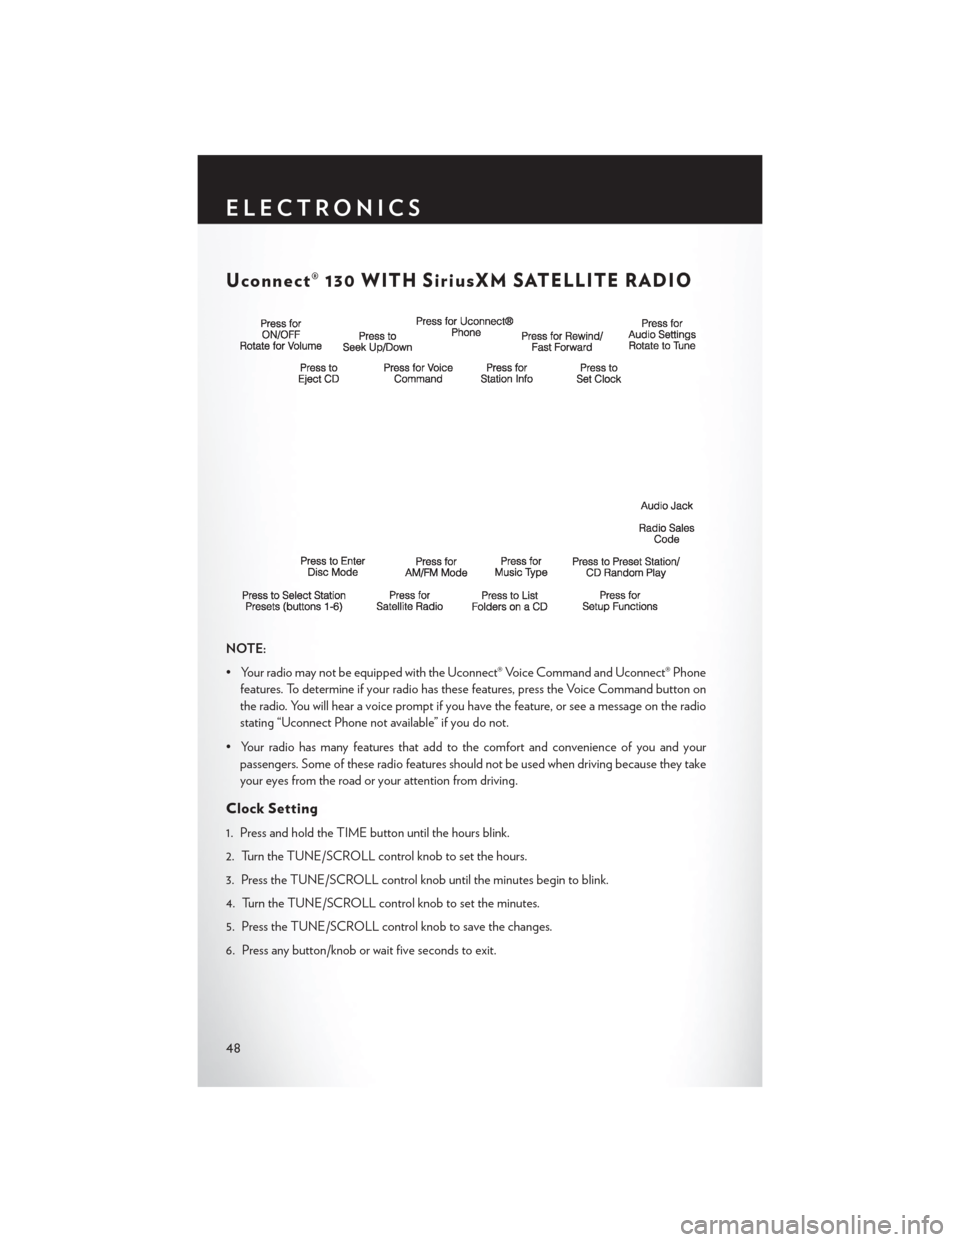
Uconnect® 130 WITH SiriusXM SATELLITE RADIO
NOTE:
• Your radio may not be equipped with the Uconnect® Voice Command and Uconnect® Phonefeatures. To determine if your radio has these features, press the Voice Command button on
the radio. You will hear a voice prompt if you have the feature, or see a message on the radio
stating “Uconnect Phone not available” if you do not.
• Your radio has many features that add to the comfort and convenience of you and your passengers. Some of these radio features should not be used when driving because they take
your eyes from the road or your attention from driving.
Clock Setting
1. Press and hold the TIME button until the hours blink.
2. Turn the TUNE/SCROLL control knob to set the hours.
3. Press the TUNE/SCROLL control knob until the minutes begin to blink.
4. Turn the TUNE/SCROLL control knob to set the minutes.
5. Press the TUNE/SCROLL control knob to save the changes.
6. Press any button/knob or wait five seconds to exit.
ELECTRONICS
48
Page 53 of 148

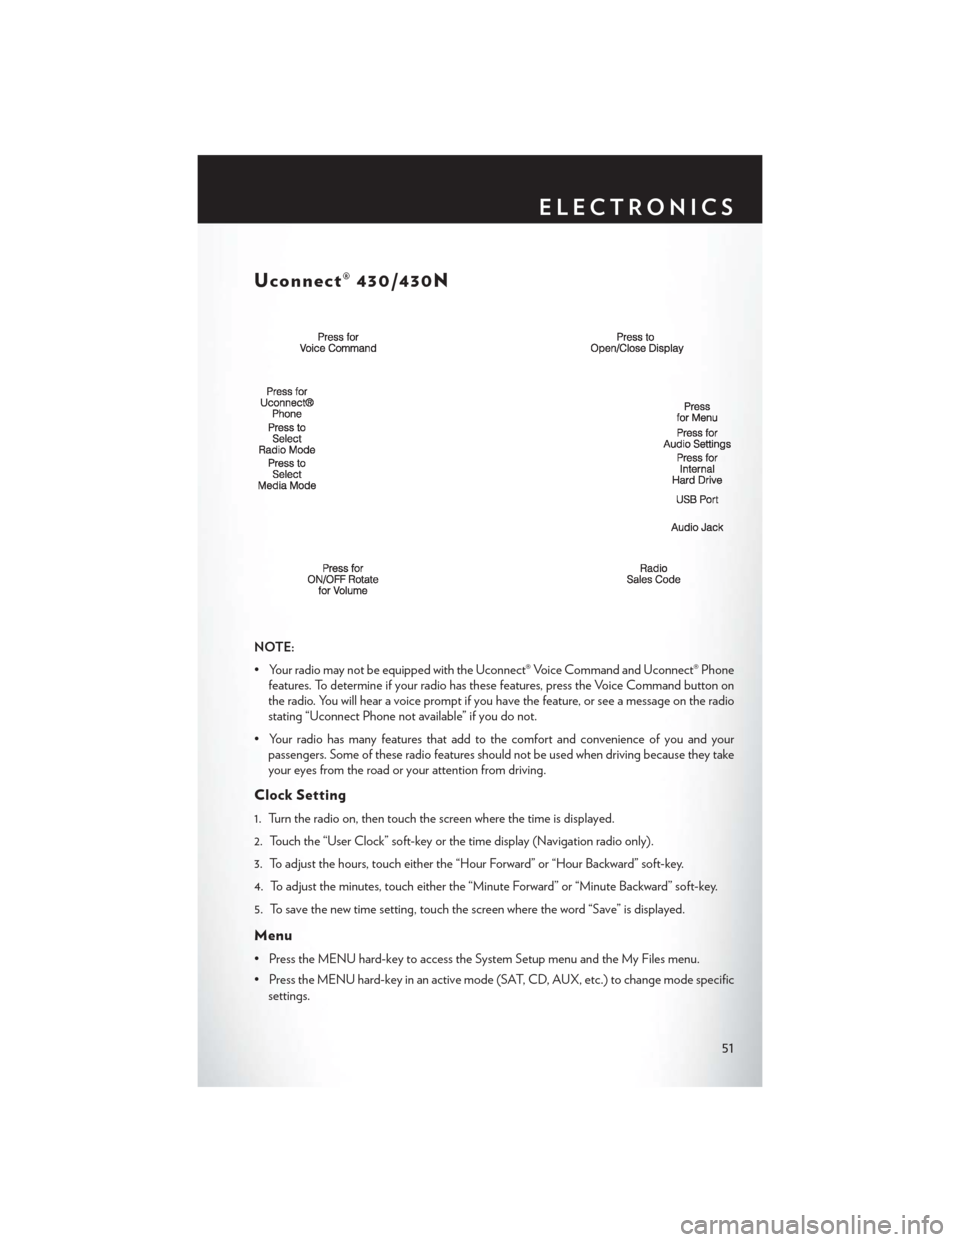
Uconnect® 430/430N
NOTE:
• Your radio may not be equipped with the Uconnect® Voice Command and Uconnect® Phonefeatures. To determine if your radio has these features, press the Voice Command button on
the radio. You will hear a voice prompt if you have the feature, or see a message on the radio
stating “Uconnect Phone not available” if you do not.
• Your radio has many features that add to the comfort and convenience of you and your passengers. Some of these radio features should not be used when driving because they take
your eyes from the road or your attention from driving.
Clock Setting
1. Turn the radio on, then touch the screen where the time is displayed.
2. Touch the “User Clock” soft-key or the time display (Navigation radio only).
3. To adjust the hours, touch either the “Hour Forward” or “Hour Backward” soft-key.
4. To adjust the minutes, touch either the “Minute Forward” or “Minute Backward” soft-key.
5. To save the new time setting, touch the screen where the word “Save” is displayed.
Menu
• Press the MENU hard-key to access the System Setup menu and the My Files menu.
• Press the MENU hard-key in an active mode (SAT, CD, AUX, etc.) to change mode specific
settings.
ELECTRONICS
51
Page 62 of 148

Acquiring Satellites
• The GPS Satellite strength bars indicate the strength of your satellite reception.
• Acquiring satellite signals can take a few minutes. When at least one of the bars is green, yourdevice has acquired satellite signals.
• You may experience delays receiving satellite signals when in areas with an obstructed view to the sky, such as garages, tunnels, or large cities with tall buildings.
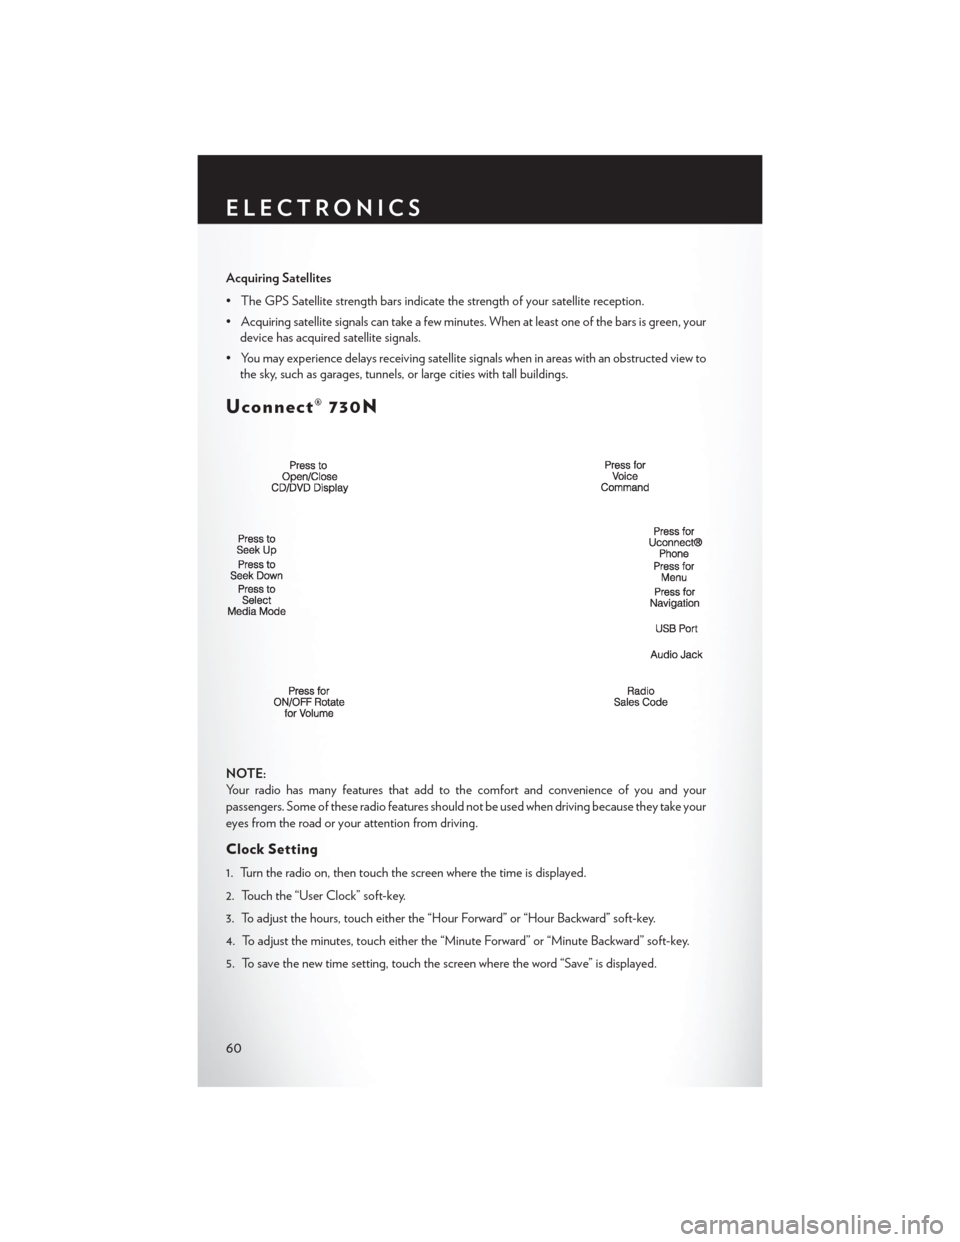
Uconnect® 730N
NOTE:
Your radio has many features that add to the comfort and convenience of you and your
passengers. Some of these radio features should not be used when driving because they take your
eyes from the road or your attention from driving.
Clock Setting
1. Turn the radio on, then touch the screen where the time is displayed.
2. Touch the “User Clock” soft-key.
3. To adjust the hours, touch either the “Hour Forward” or “Hour Backward” soft-key.
4. To adjust the minutes, touch either the “Minute Forward” or “Minute Backward” soft-key.
5. To save the new time setting, touch the screen where the word “Save” is displayed.
ELECTRONICS
60
Page 76 of 148

STEERING WHEEL AUDIO CONTROLS
• The steering wheel audio controls are located on the rear surface of the steering wheel.
Right Switch
• Press the switch up or down to increase ordecrease the volume.
• Press the button in the center to change modes AM/FM/CD/SAT.
Left Switch
• Press the switch up or down to search for thenext listenable station or select the next or
previous CD track.
• Press the button in the center to select the next preset station (radio) or to change CDs if equipped with a CD Changer.
SETTING THE ANALOG CLOCK
To set the analog clock at the top center of the instrument panel, press and hold the button until
the setting is correct.
Setting The Analog Clock
ELECTRONICS
74
Page 137 of 148

Airbag...................17
Airbag Light................95
Alarm Vehicle Security Alarm .........16
Alarm (Security Alarm) ..........16
Anti-Lock Warning Light .........94
Arming System (Security Alarm) ......16
Assistance Towing .............92
AudioJack.............47, 50, 55
Audio Settings .............47, 49
Audio Systems (Radio) ..........46
Automatic Headlights ...........32
Automatic High Beams ..........32
Automatic Temperature Control (ATC). . .38
Automatic Transmission Fluid Type ............. .119
Auxiliary Audio/Video Input Jacks .....82
Axle Fluid ................ .119
Back-UpCamera .............40
Blind Spot Monitoring ...........40
Brake Fluid ............... .119
Break-In Recommendations, New Vehicle ..............30
Bulb Replacement ............129
Calibration, Compass ...........83
Cargo Compartment Luggage Carrier ............90
CD (Compact Disc) Player ......47, 50
Change Oil Indicator ...........95
ChangingAFlatTire...........102
Charging System Light ..........94
Child Restraints CarSeat................18
Child Restraints ............18
Child Seat Installation ........19, 20
Installing Child Restraints Using
The Vehicle Seat Belt .........20
Lower Anchors And Tethers
For Children ............18, 19
ChildSeat.................19
Cleaning Wheels ............... .129
Clock ...................74
Clock Setting ............46, 48, 51 Cluster Warning/Indicator Lights
Anti-Lock Brake (ABS) Light .....94
Charging System Light ........94
Electronic Throttle Control (ETC)
Indicator Light .............95
Malfunction Indicator Light (MIL) . . .94
Oil Pressure Warning Light ......94
Tire Pressure Monitoring System
(TPMS) Light .............92
Compass Calibration ............83
Cooling System Coolant Capacity ...........119
Cruise Control (Speed Control) ......33
Cruise Light ................33
Customer Assistance ...........130
Defects, Reporting ............131
Dimmer Control ..............32
Dimmer Switch, Headlight .........32
Disabled Vehicle Towing ..........92
Disarming, Security System ........16
Driver Cockpit ...............6
Economy (Fuel) Mode ...........35
Electronics Your Vehicle's Sound System . . .44, 45
Electronic Speed Control (Cruise Control) ............33
Electronic Stability Control (ESC) .....92
Electronic Throttle Control Warning Light ..................
95
Electronic Vehicle Information Center (EVIC)...............83, 84
Emergency, In Case of Brake Warning Light ..........94
Freeing Vehicle When Stuck .....114
Jacking .............102,106
Overheating ..............96
Towing.................92
Emergency Key ..............10
Engine Break-In Recommendations ......30
Compartment ............ .118
Oil Selection .............119
Overheating ..............96
EventDataRecorder.......... .115
Exterior Lights ............. .129
INDEX
135