Page 361 of 590
9. SYNC
Press the Sync soft-key to toggle the Sync feature On/Off.
The Sync indicator is illuminated when this feature is
enabled. Sync is used to synchronize the passenger
temperature setting with the driver temperature setting.
Changing the passenger temperature setting while in
Sync will automatically exit this feature.
10. Blower Control
Blower control is used to regulate the amount of air
forced through the climate system. There are seven
blower speeds available. Adjusting the blower will cause
automatic mode to switch to manual operation. The
speeds can be selected using either hard-keys or soft-keys
as follows:
Hard-Key
The blower speed increases as you turn the control
clockwise from the lowest blower setting. The blower
speed decreases as you turn the knob counterclockwise.Soft-Key
Use the small blower icon to reduce the blower setting
and the large blower icon to increase the blower setting.
Blower can also be selected by pressing the blower bar
area between the icons.
11. Modes
The airflow distribution mode can be adjusted so air
comes from the instrument panel outlets, floor outlets,
demist outlets and defrost outlets. The Mode settings are
as follows:
•Panel Mode
Air comes from the outlets in the instrument
panel. Each of these outlets can be individually
adjusted to direct the flow of air. The air vanes of the
center outlets and outboard outlets can be moved up and
down or side to side to regulate airflow direction. There
4
UNDERSTANDING YOUR INSTRUMENT PANEL 359
Page 527 of 590
Cavity Cartridge Fuse Mini-FuseDescription
33 –15 Amp Blue Ignition Switch/Wireless Module
34 –10 Amp Red Steering Column Module/Clock
35 –10 Amp Red Battery Sensor
36 –– Fuse – Spare
37 –15 Amp Blue Radio
38 – 20 Amp Yellow Power Outlet Inside Arm Rest
40 –– Fuse – Spare
41 –– Fuse – Spare
42 30 Amp Pink – Rear Defrost
43 –
25 Amp NaturalRear Heated Seats/Steering Wheel
44 –10 Amp Red Park Assist/Blind Spot/Camera
45 –15 Amp Blue Cluster/Rearview Mirror/Compass
46 –10 Amp Red Adaptive Cruise Control
47 –10 Amp Red Adaptive Front Lighting
48 – 20 Amp Yellow Active Suspension7
MAINTAINING YOUR VEHICLE 525
Page 532 of 590
WARNING!
A transient high voltage occurs at the bulb sockets of
HID headlamps when the headlamp switch is turned
ON. It may cause serious electrical shock or electro-
cution if not serviced properly. See your authorized
dealer for service.
NOTE: On vehicles equipped with HID headlamps,
when the headlamps are turned on, there is a blue hue to
the lights. This diminishes and becomes more white after
approximately 10 seconds, as the system charges.
Standard Low Beam And High Beam Headlamp
1. Open the hood.
NOTE: Removal of the air cleaner filter housing may be
necessary prior to replacing bulbs in the headlamp
assembly on the driver side of the vehicle. 2. Reach behind the headlamp housing to access the
headlamp (outboard) bulb cap.
3. Firmly grasp the cap and rotate it counterclockwise to unlock it.
4. Twist the headlamp bulb assembly counterclockwise, and then pull it out of the headlamp assembly.
5. Disconnect the bulb from the wiring assembly and install the replacement bulb.
6. Reinstall the bulb and wiring assembly into the head- lamp assembly, and then turn it clockwise.
7. Install the headlamp bulb cap in the headlamp hous- ing and rotate it clockwise to lock it.
530 MAINTAINING YOUR VEHICLE
Page 533 of 590
CAUTION!
Do not touch the new bulb with your fingers. Oil
contamination will severely shorten bulb life. If the
bulb comes in contact with an oily surface, clean the
bulb with rubbing alcohol.
Front Turn Signal Lamps
1. Open the hood.
NOTE:Removal of the air cleaner filter housing may be
necessary prior to replacing bulbs in the headlamp
assembly on the driver side of the vehicle.
2. Reach behind the headlamp housing to access the turn signal (inboard) bulb cap.
3. Firmly grasp the cap and rotate it counterclockwise to unlock it. 4. Squeeze the two tabs on the side of the bulb socket and
pull straight out from the lamp assembly.
5. Disconnect the bulb from the wiring connector and install the replacement bulb.
6. Install the bulb and connector assembly straight into the lamp until it locks in place.
7. Install the turn signal bulb cap in the headlamp housing and rotate clockwise to lock in place.
Rear Backup Lamp And Turn Signal Lamps
1. Open the trunk.
2. Remove the trunk trim by removing the grocery hook(using a T-20 torque driver or similar tool), remove the
fastener, and pull back the weather strip.
3. Pull back the trunk liner to gain access to the tail lamp wing nuts.
7
MAINTAINING YOUR VEHICLE 531
Page 534 of 590
4. Remove the three wing nuts from the back of the taillamp assembly.
5. Pull the tail lamp assembly away from the vehicle enough to access the electrical connector.
6. Push the electrical connector locking tab to the side.
7. Disconnect the electrical connector.
8. Continue removing lamp from vehicle in order to access the bulb(s).
9. Turn the appropriate bulb and socket assembly coun- terclockwise to remove it from the tail lamp assembly.
10. Disconnect the bulb from the socket assembly and install the replacement bulb. 11. Reinstall the bulb and socket assembly into the tail
lamp assembly, and then turn it clockwise.
12. Reinstall the tail lamp assembly, fasteners, electrical connector, and trunk trim.
13. Close the trunk.
License Lamp
1. Remove the screws securing the lamp to the rear fascia.
2. Remove the bulb and socket assembly.
3. Disconnect the bulb from the socket assembly and install the replacement bulb.
532 MAINTAINING YOUR VEHICLE
Page 570 of 590
Break-In Recommendations, New Vehicle.........99
Brightness, Interior Lights ...................204
Bulb Replacement ........................ .528
Bulbs, Light ............................ .104
Camera, Rear ........................... .260
Capacities, Fluid ......................... .534
Caps, Filler Oil (Engine) .......................... .489
Power Steering ........................ .396
Radiator (Coolant Pressure) ................503
Carbon Monoxide Warning ..................101
Cargo Area Features ...................... .295
Cargo Compartment ...................... .295
Cargo (Vehicle Loading) ....................453
Car Washes ............................ .512
Cellular Phone .......................... .355
Certification Label ........................ .453
Chains, Tire ............................ .434Chart, Tire Sizing
........................ .413
Check Engine Light (Malfunction Indicator Light) . .306
Checking Your Vehicle For Safety ..............100
Checks, Safety .......................... .100
Child Restraint ............................75
Child Restraints Child Seat Installation .....................94
Install A LATCH-compatible Child Restraint .....89
Installing Child Restraints Using The Vehicle
Seat Belt ..............................91
Lower Anchors And Tethers For Children .......83
Child Safety Locks .........................33
Clean Air Gasoline ....................... .445
Cleaning Wheels .............................. .513
Climate Control ......................... .355
Clock ................................. .351
Coin Holder ............................ .291
Cold Weather Operation ....................374
568 INDEX
Page 584 of 590
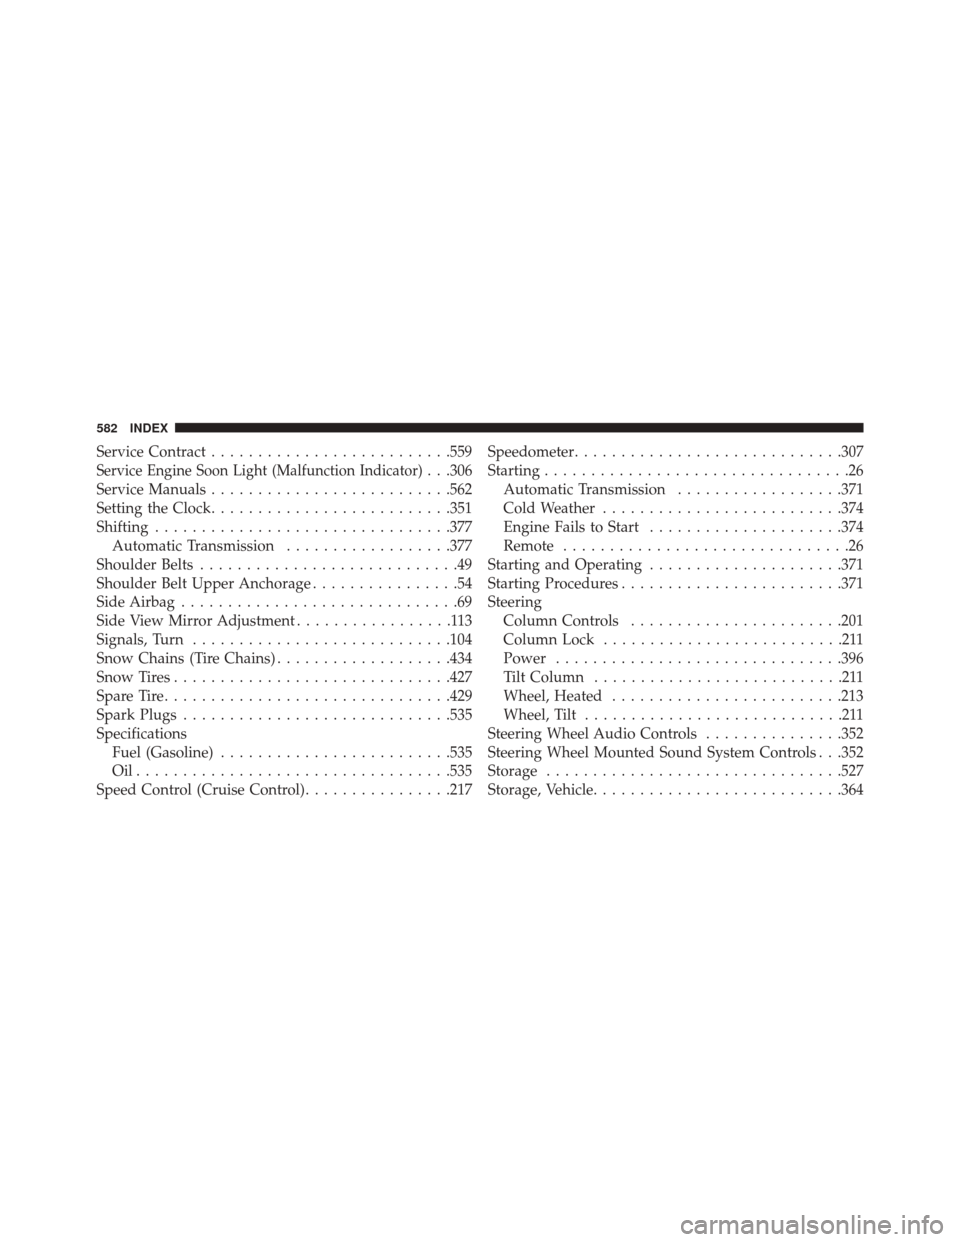
Service Contract......................... .559
Service Engine Soon Light (Malfunction Indicator). . .306
Service Manuals ......................... .562
Setting the Clock ......................... .351
Shifting ............................... .377
Automatic Transmission ..................377
Shoulder Belts ............................49
Shoulder Belt Upper Anchorage ................54
Side Airbag ..............................69
Side View Mirror Adjustment .................113
Signals, Turn ........................... .104
Snow Chains (Tire Chains) ...................434
Snow Tires ............................. .427
Spare Tire .............................. .429
Spark Plugs ............................ .535
Specifications Fuel (Gasoline) ........................ .535
Oil................................. .535
Speed Control (Cruise Control) ................217Speedometer
............................ .307
Starting .................................26
Automatic Transmission ..................371
Cold Weather ......................... .374
Engine Fails to Start .....................374
Remote ...............................26
Starting and Operating .....................371
Starting Procedures ....................... .371
Steering Column Controls ...................... .201
Column Lock ..........................211
Power .............................. .396
Tilt Column ...........................211
Wheel, Heated ........................ .213
Wheel, Tilt ............................211
Steering Wheel Audio Controls ...............352
Steering Wheel Mounted Sound System Controls . . .352
Storage ............................... .527
Storage, Vehicle .......................... .364
582 INDEX