2014 CHEVROLET TAHOE service indicator
[x] Cancel search: service indicatorPage 296 of 494
(38,1)Chevrolet Tahoe/Suburban Owner Manual (GMNA-Localizing-U.S./Canada/
Mexico-6081502) - 2014 - crc2 - 9/17/13
9-38 Driving and Operating
This will protect the transfer case
from possible damage and will only
allow the transfer case to respond to
one shift per 10 seconds. The
transfer case may stay in this mode
for up to three minutes.
Four-Wheel Drive (Single
Speed Automatic
Transfer Case)
If the vehicle has four-wheel drive,
you can send the engine's driving
power to all four wheels for extra
traction. Read the following before
using four-wheel drive.
Notice:Driving on clean, dry
pavement in Four-Wheel Drive
High for an extended period of
time may cause premature wear
on the vehicle's powertrain. Do
not drive on clean, dry pavement
in Four-Wheel Drive High for
extended periods of time. While driving on clean dry pavement
and during tight turns, you may
experience a vibration in the
steering system.
Front Axle
The front axle engages and
disengages automatically when you
shift the transfer case. Some delay
for the axle to engage or disengage
is normal.
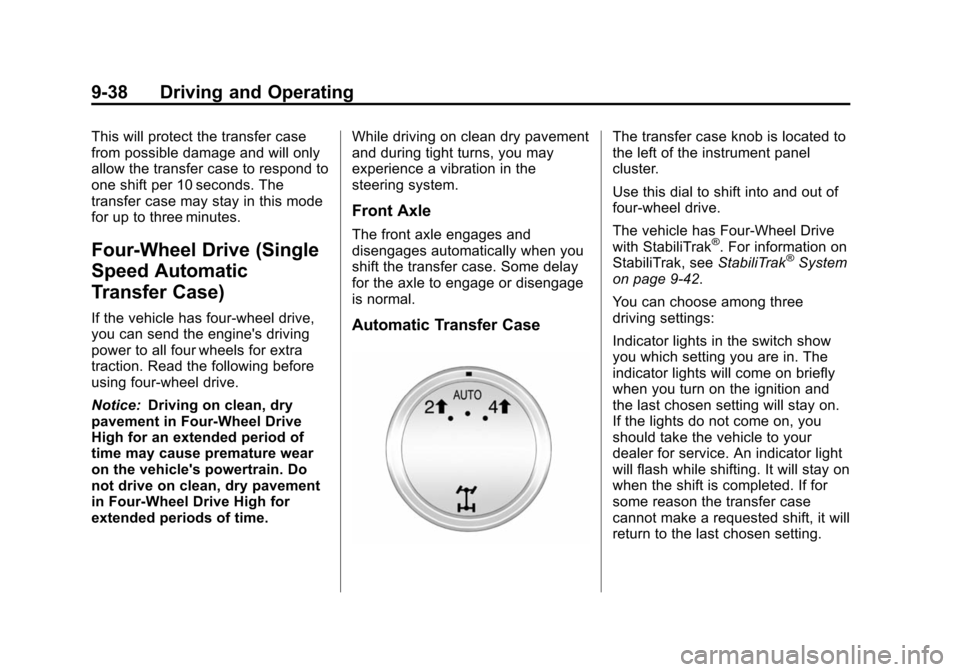
Automatic Transfer Case
The transfer case knob is located to
the left of the instrument panel
cluster.
Use this dial to shift into and out of
four-wheel drive.
The vehicle has Four-Wheel Drive
with StabiliTrak
®. For information on
StabiliTrak, see StabiliTrak®System
on page 9-42.
You can choose among three
driving settings:
Indicator lights in the switch show
you which setting you are in. The
indicator lights will come on briefly
when you turn on the ignition and
the last chosen setting will stay on.
If the lights do not come on, you
should take the vehicle to your
dealer for service. An indicator light
will flash while shifting. It will stay on
when the shift is completed. If for
some reason the transfer case
cannot make a requested shift, it will
return to the last chosen setting.
Page 297 of 494
(39,1)Chevrolet Tahoe/Suburban Owner Manual (GMNA-Localizing-U.S./Canada/
Mexico-6081502) - 2014 - crc2 - 9/17/13
Driving and Operating 9-39
2m(Two-Wheel Drive High):This
setting is used for driving in most
street and highway situations. The
front axle is not engaged in
two-wheel drive. This setting also
provides the best fuel economy.
AUTO (Automatic Four-Wheel
Drive): This setting is ideal for use
when road surface traction
conditions are variable. When
driving the vehicle in AUTO, the
front axle is engaged, and the
vehicle's power is sent to the front
and rear wheels automatically
based on driving conditions. Driving
in this mode results in slightly lower
fuel economy than Two-Wheel
Drive High.
4
m(Four-Wheel Drive High): Use
the Four-Wheel Drive High position
when you need extra traction, such
as on snowy or icy roads or in most
off-road situations. This setting also
engages the front axle to help drive
the vehicle. This is the best setting
to use when plowing snow. Service Four-Wheel Drive
If the SERVICE 4 WHEEL DRIVE
message stays on, you should take
the vehicle to your dealer for
service. See SERVICE 4 WHEEL
DRIVE message under
Transmission Messages on
page 5-42.
Shifting Into Four-Wheel Drive
High or AUTO (Automatic
Four-Wheel Drive)
Turn the knob to the Four-Wheel
Drive High or AUTO position. This
can be done at any speed. The
indicator light will flash while
shifting. It will remain on when the
shift is completed.
Shifting Into Two-Wheel
Drive High
Turn the knob to the Two-Wheel
Drive High position. This can be
done at any speed. The indicator
light will flash while shifting. It will
remain on when the shift is
completed.
Excessively shifting the transfer
case into or out of the different
modes may cause the transfer case
to enter the shift protection mode.
This will protect the transfer case
from possible damage and will only
allow the transfer case to respond to
one shift per 10 seconds. The
transfer case may stay in this mode
for up to three minutes.
Page 307 of 494

(49,1)Chevrolet Tahoe/Suburban Owner Manual (GMNA-Localizing-U.S./Canada/
Mexico-6081502) - 2014 - crc2 - 9/17/13
Driving and Operating 9-49
Turning the System On and Off
Press this button, located next to
the radio, to disable URPA.
The indicator light comes on and
PARK ASSIST OFF displays on the
Driver Information Center (DIC).
SeeObject Detection System
Messages on page 5-39.
When the System Does Not
Seem to Work Properly
The following messages may be
displayed on the DIC:
SERVICE PARK ASSIST: this
message occurs, take the vehicle to
your dealer for repair. PARK ASSIST OFF:
This message
occurs if the driver disables the
system or if the vehicle is driven
above 8 km/h (5 mph) in
R (Reverse).
PARK ASST BLOCKED SEE
OWNERS MANUAL: This
message can occur under the
following conditions:
.The ultrasonic sensors are not
clean. Keep the rear bumper
free of mud, dirt, snow, ice,
slush, and frost. The message
may not clear until frost or ice
has melted all around and inside
the sensor.
.A trailer is attached to the
vehicle, or a bicycle or an object
hanging out of the liftgate during
the current or last drive cycle.
URPA will return to normal
operation after it is determined
the object is removed. This
could take a few drive cycles.
.A tow bar is attached to the
vehicle. Other conditions may affect system
performance, such as vibrations
from a jackhammer or the
compression of air brakes on a very
large truck.
Side Blind Zone
Alert (SBZA)
If equipped, the Side Blind Zone
Alert system is a lane-changing aid
that assists drivers with avoiding
crashes that occur with vehicles in
the side blind zone (or spot) areas.
The SBZA warning display will light
up in the corresponding outside side
mirror and will flash if the turn signal
is on.
{Warning
SBZA does not alert the driver to
vehicles rapidly approaching
outside of the side blind zones,
pedestrians, bicyclists,
or animals. It may not provide
alerts when changing lanes under
(Continued)
Page 313 of 494

(55,1)Chevrolet Tahoe/Suburban Owner Manual (GMNA-Localizing-U.S./Canada/
Mexico-6081502) - 2014 - crc2 - 9/17/13
Driving and Operating 9-55
.A fast flash may indicate that the
display has been on for the
maximum allowable time during
a reverse cycle, or the display
has reached an Over
Temperature limit.
The fast flash conditions are
used to protect the video device
from high temperature
conditions. Once conditions
return to normal the device will
reset and the green indicator will
stop flashing.
During any of these fault conditions,
the display will be blank and the
indicator will flash while the vehicle
is in R (Reverse) or until the
conditions return to normal.
Press and hold
zwhen the left
indicator light is flashing to turn off
the video display along with the left
indicator light.
Fuel
Use of the recommended fuel is an
important part of the proper
maintenance of this vehicle. When
driving in the U.S., to help keep the
engine clean and maintain optimum
vehicle performance, we
recommend using TOP TIER
Detergent Gasolines. See
www.toptiergas.com for a list of TOP
TIER Detergent Gasolines.
If the vehicle has a yellow fuel cap,
E85 or FlexFuel can be used in the
vehicle. See E85 or FlexFuel on
page 9-57.
Recommended Fuel
Use regular unleaded gasoline with
a posted octane rating of 87 or
higher. If the octane rating is less
than 87, an audible knocking noise,
commonly referred to as spark
knock, might be heard when driving.
If this occurs, use a gasoline rated
at 87 octane or higher as soon as
possible. If heavy knocking is heard
when using gasoline rated at
87 octane or higher, the engine
needs service.
Use of Seasonal Fuels
Use summer and winter fuels in the
appropriate season. Driving or
starting could be affected if the
incorrect fuel is used. Drive the
vehicle with the engine running until
the fuel is a half tank or less, then
refuel with the current seasonal fuel.
Page 314 of 494
(56,1)Chevrolet Tahoe/Suburban Owner Manual (GMNA-Localizing-U.S./Canada/
Mexico-6081502) - 2014 - crc2 - 9/17/13
9-56 Driving and Operating
Prohibited Fuels
Gasolines containing oxygenates,
such as ethers and ethanol, as well
as reformulated gasolines are
available in some cities. If these
gasolines comply with the
previously described specification,
then they are acceptable to use.
However, E85 and other fuels
containing more than 15% ethanol
must be used only in FlexFuel
vehicles.
Notice:Do not use fuel
containing methanol. It can
corrode metal parts in the fuel
system and also damage plastic
and rubber parts. That damage
would not be covered under the
vehicle warranty.
Some gasolines that are not
reformulated for low emissions can
contain an octane-enhancing
additive called
methylcyclopentadienyl manganese
tricarbonyl (MMT). Do not use
gasolines with MMT as they can
reduce spark plug life and affect emission control system
performance. The malfunction
indicator lamp may turn on. If this
occurs, see your dealer for service.
Gasoline Specifications
At a minimum, gasoline should meet
ASTM specification D 4814. Some
gasolines contain an
octane-enhancing additive called
methylcyclopentadienyl manganese
tricarbonyl (MMT). We recommend
against the use of gasolines
containing MMT. See
“Prohibited
Fuels" in Recommended Fuel on
page 9-55.
California Fuel
Requirements
If the vehicle is certified to meet
California Emissions Standards, it is
designed to operate on fuels that
meet California specifications. See
the underhood emission control
label. If this fuel is not available in
states adopting California Emissions
Standards, the vehicle will operate satisfactorily on fuels meeting
federal specifications, but emission
control system performance might
be affected. The malfunction
indicator lamp could turn on and the
vehicle may not pass a smog-check
test. See
Malfunction Indicator
Lamp on page 5-19. If this occurs,
return to your authorized dealer for
diagnosis. If it is determined that the
condition is caused by the type of
fuel used, repairs may not be
covered by the vehicle warranty.
Fuels in Foreign
Countries
If planning to drive in countries
outside the U.S. or Canada, the
proper fuel might be hard to find.
Check regional auto club or fuel
retail brand websites for availability
in the country where driving. Never
use leaded gasoline, fuel containing
methanol, or any other fuel not
recommended. Costly repairs
caused by use of improper fuel
would not be covered by the vehicle
warranty.
Page 328 of 494
(70,1)Chevrolet Tahoe/Suburban Owner Manual (GMNA-Localizing-U.S./Canada/
Mexico-6081502) - 2014 - crc2 - 9/17/13
9-70 Driving and Operating
Electric Brake Control Wiring
Provisions
These wiring provisions are
included with the vehicle as part of
the trailer wiring package. These
provisions are for an electric brake
controller. The instrument panel
contains blunt cut wires near the
data link connector for the trailer
brake controller. The harness
contains the following wires:
.Dark Blue: Brake Signal to
Trailer Connector
.Red/Black: Battery
.Light Blue/White: Brake Switch
.White: Ground
It should be installed by your dealer
or a qualified service center.
If the vehicle is equipped with an
ITBC, the blunt cuts exist, but are
not connected further in the
harness. If an aftermarket trailer
brake controller is installed, the
ITBC must be disconnected. Do not power both ITBC and aftermarket
controllers to control the trailer
brakes at the same time.
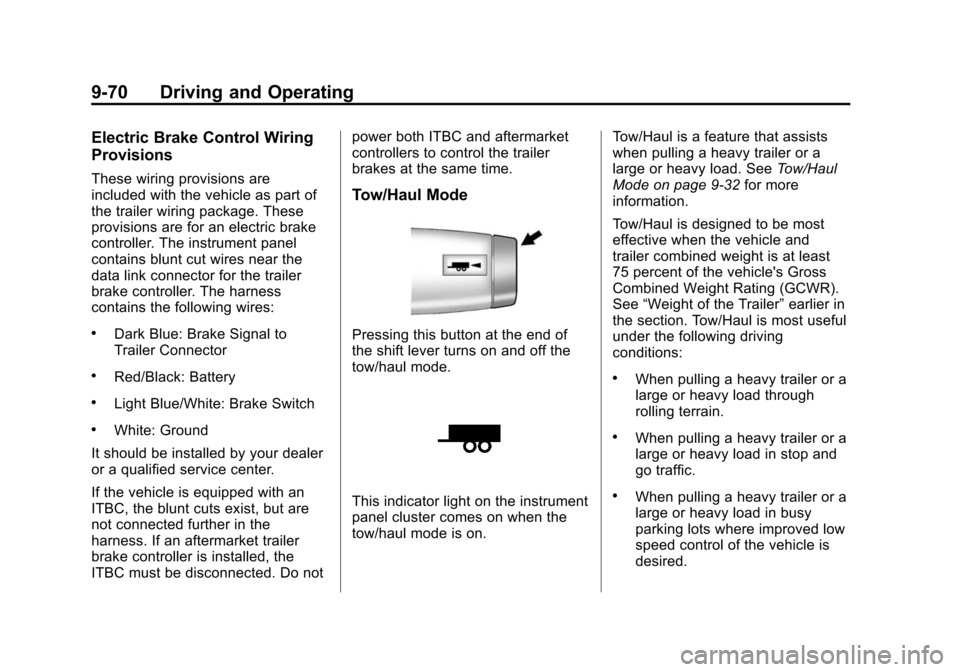
Tow/Haul Mode
Pressing this button at the end of
the shift lever turns on and off the
tow/haul mode.
This indicator light on the instrument
panel cluster comes on when the
tow/haul mode is on.
Tow/Haul is a feature that assists
when pulling a heavy trailer or a
large or heavy load. See
Tow/Haul
Mode on page 9-32 for more
information.
Tow/Haul is designed to be most
effective when the vehicle and
trailer combined weight is at least
75 percent of the vehicle's Gross
Combined Weight Rating (GCWR).
See “Weight of the Trailer” earlier in
the section. Tow/Haul is most useful
under the following driving
conditions:
.When pulling a heavy trailer or a
large or heavy load through
rolling terrain.
.When pulling a heavy trailer or a
large or heavy load in stop and
go traffic.
.When pulling a heavy trailer or a
large or heavy load in busy
parking lots where improved low
speed control of the vehicle is
desired.
Page 358 of 494
(18,1)Chevrolet Tahoe/Suburban Owner Manual (GMNA-Localizing-U.S./Canada/
Mexico-6081502) - 2014 - crc2 - 9/17/13
10-18 Vehicle Care
6. Verify coolant level after engineis shut off and the coolant is
cold. If necessary, repeat coolant
fill procedure Steps 1–6.
Notice: If the pressure cap is not
tightly installed, coolant loss and
possible engine damage may
occur. Be sure the cap is properly
and tightly secured.
Engine Overheating
The vehicle has several indicators
to warn of engine overheating.
There is a coolant temperature
gauge on your vehicle's instrument
panel. See Engine Coolant
Temperature Gauge on page 5-14.
In addition, ENGINE OVERHEATED
STOP ENGINE, ENGINE
OVERHEATED IDLE ENGINE, and
an ENGINE POWER IS REDUCED
message comes on in the Driver
Information Center (DIC) on the
instrument panel. See Engine
Cooling System Messages on
page 5-36 andEngine Power
Messages on page 5-38. If the decision is made not to lift the
hood when this warning appears,
but instead get service help right
away. See
Roadside Assistance
Program on page 13-5.
If the decision is made to lift the
hood, make sure the vehicle is
parked on a level surface.
Then check to see if the engine
cooling fans are running. If the
engine is overheating, both fans
should be running. If they are not,
do not continue to run the engine
and have the vehicle serviced.
Notice: Running the engine
without coolant may cause
damage or a fire. Vehicle damage
would not be covered by the
warranty. See Overheated Engine
Protection Operating Mode on
page 10-19 for information on
driving to a safe place in an
emergency.
If Steam Is Coming from the
Engine Compartment
{Warning
Steam from an overheated engine
can burn you badly, even if you
just open the hood. Stay away
from the engine if you see or hear
steam coming from it. Turn it off
and get everyone away from the
vehicle until it cools down. Wait
until there is no sign of steam or
coolant before you open
the hood.
If you keep driving when the
vehicles engine is overheated,
the liquids in it can catch fire. You
or others could be badly burned.
Stop the engine if it overheats,
and get out of the vehicle until the
engine is cool.
(Continued)
Page 394 of 494

(54,1)Chevrolet Tahoe/Suburban Owner Manual (GMNA-Localizing-U.S./Canada/
Mexico-6081502) - 2014 - crc2 - 9/17/13
10-54 Vehicle Care
malfunction light and the DIC
message should go off at the next
ignition cycle. The sensors are
matched to the tire/wheel positions,
using a TPMS relearn tool, in the
following order: driver side front tire,
passenger side front tire, passenger
side rear tire, and driver side rear.
See your dealer for service or to
purchase a relearn tool.
There are two minutes to match the
first tire/wheel position, and
five minutes overall to match all four
tire/wheel positions. If it takes
longer, the matching process stops
and must be restarted.
The TPMS sensor matching
process is:
1. Set the parking brake.
2. Turn the ignition to ON/RUN withthe engine off.
3. Press the Remote Keyless Entry (RKE) transmitter's
QandK
buttons at the same time for
approximately five seconds. The
horn sounds twice to signal the receiver is in relearn mode and
the TIRE LEARNING ACTIVE
message displays on the DIC
screen.
4. Start with the driver side front tire.
5. Place the relearn tool against the tire sidewall, near the valve
stem. Then press the button to
activate the TPMS sensor.
A horn chirp confirms that the
sensor identification code has
been matched to this tire and
wheel position.
6. Proceed to the passenger side front tire, and repeat the
procedure in Step 5.
7. Proceed to the passenger side rear tire, and repeat the
procedure in Step 5.
8. Proceed to the driver side rear tire, and repeat the procedure in
Step 5. The horn sounds two
times to indicate the sensor
identification code has been
matched to the driver side rear tire, and the TPMS sensor
matching process is no longer
active. The TIRE LEARNING
ACTIVE message on the DIC
display screen goes off.
9. Turn the ignition to LOCK/OFF.
10. Set all four tires to the recommended air pressure
level as indicated on the Tire
and Loading Information label.
Tire Inspection
We recommend that the tires,
including the spare tire, if the
vehicle has one, be inspected
for signs of wear or damage at
least once a month.
Replace the tire if:
.The indicators at three or
more places around the tire
can be seen.
.There is cord or fabric
showing through the tire's
rubber.