2014 CHEVROLET SS flat tire
[x] Cancel search: flat tirePage 342 of 422
Black plate (60,1)Chevrolet SS Sedan Owner Manual (GMNA-Localizing-U.S.-6014851) - 2014 -
1st Edition - 8/22/13
10-60 Vehicle Care
at a local dealer or in
accordance with local state
codes and practices.
23. Replace it with a new canister available from your dealer.
24. After temporarily sealing a tire using the tire sealant and
compressor kit, take the
vehicle to an authorized dealer
within 161 km (100 mi) of
driving to have the tire repaired
or replaced. Using the Tire Sealant and
Compressor Kit without Sealant to
Inflate a Tire (Not Punctured)
To use the air compressor to inflate
a tire with air only and not sealant:
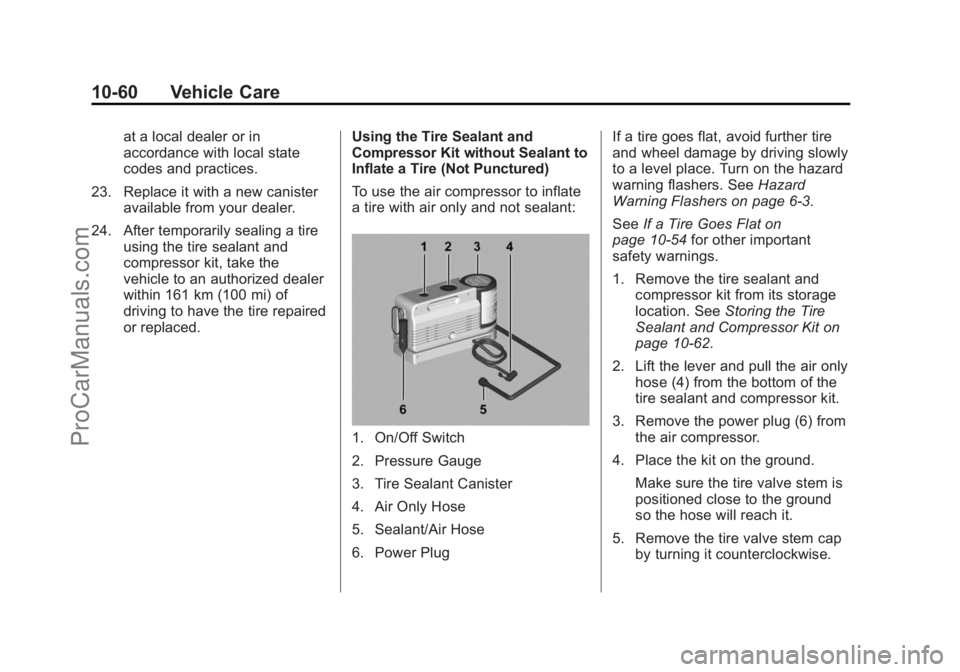
1. On/Off Switch
2. Pressure Gauge
3. Tire Sealant Canister
4. Air Only Hose
5. Sealant/Air Hose
6. Power Plug If a tire goes flat, avoid further tire
and wheel damage by driving slowly
to a level place. Turn on the hazard
warning flashers. See
Hazard
Warning Flashers on page 6-3.
See If a Tire Goes Flat on
page 10-54 for other important
safety warnings.
1. Remove the tire sealant and compressor kit from its storage
location. See Storing the Tire
Sealant and Compressor Kit on
page 10-62.
2. Lift the lever and pull the air only hose (4) from the bottom of the
tire sealant and compressor kit.
3. Remove the power plug (6) from the air compressor.
4. Place the kit on the ground. Make sure the tire valve stem is
positioned close to the ground
so the hose will reach it.
5. Remove the tire valve stem cap by turning it counterclockwise.
ProCarManuals.com
Page 343 of 422
Black plate (61,1)Chevrolet SS Sedan Owner Manual (GMNA-Localizing-U.S.-6014851) - 2014 -
1st Edition - 8/22/13
Vehicle Care 10-61
6. Attach the air only hose (4) ontothe tire valve stem and press the
lever down to secure it.
7. Plug the power plug (6) into the accessory power outlet in the
vehicle. Unplug all items from
other accessory power outlets.
See Power Outlets on page 5-4.
If the vehicle has an accessory
power outlet, do not use the
cigarette lighter.
If the vehicle only has a cigarette
lighter, use the cigarette lighter.
Do not pinch the power plug
cord in the door or window.
8. Start the vehicle. The vehicle must be running while using the
air compressor.
9. Switch the on/off switch (1) to the I position.
The compressor will inflate the
tire with air only. 10. Inflate the tire to the
recommended inflation
pressure using the pressure
gauge (2). The recommended
inflation pressure can be found
on the Tire and Loading
Information label. See Tire
Pressure on page 10-41.
The pressure gauge (2) may
read higher than the actual tire
pressure while the compressor
is on. Turn the compressor off
to get an accurate reading. The
compressor may be turned on/
off until the correct pressure is
reached.
11. Switch the on/off switch (1) to the O position.
Be careful while handling the
tire sealant and compressor kit
as it could be warm after
usage.
12. Unplug the power plug (6) and the air only hose (4).
13. Replace the tire valve stem cap. 14. Place the equipment in the
original storage location in the
vehicle.
Removal and Installation of the
Sealant Canister
After repairing a tire, replace the tire
sealant canister.
To remove the sealant canister:
1. Unlock the air only hose (4) from the tire sealant canister (3) by
pulling up on the lever.
2. Pull the air only hose (4) from the tire sealant canister (3).
3. Unwrap the sealant/air hose (5) from the air compressor.
ProCarManuals.com
Page 346 of 422
Black plate (64,1)Chevrolet SS Sedan Owner Manual (GMNA-Localizing-U.S.-6014851) - 2014 -
1st Edition - 8/22/13
10-64 Vehicle Care
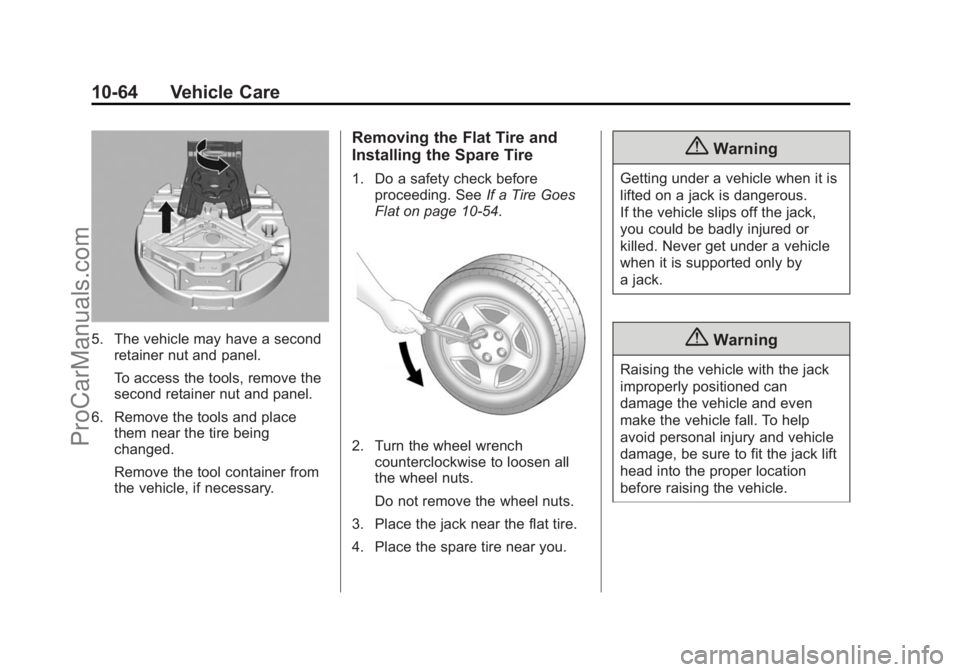
5. The vehicle may have a secondretainer nut and panel.
To access the tools, remove the
second retainer nut and panel.
6. Remove the tools and place them near the tire being
changed.
Remove the tool container from
the vehicle, if necessary.
Removing the Flat Tire and
Installing the Spare Tire
1. Do a safety check before
proceeding. See If a Tire Goes
Flat on page 10-54.
2. Turn the wheel wrench counterclockwise to loosen all
the wheel nuts.
Do not remove the wheel nuts.
3. Place the jack near the flat tire.
4. Place the spare tire near you.
{Warning
Getting under a vehicle when it is
lifted on a jack is dangerous.
If the vehicle slips off the jack,
you could be badly injured or
killed. Never get under a vehicle
when it is supported only by
a jack.
{Warning
Raising the vehicle with the jack
improperly positioned can
damage the vehicle and even
make the vehicle fall. To help
avoid personal injury and vehicle
damage, be sure to fit the jack lift
head into the proper location
before raising the vehicle.
ProCarManuals.com
Page 347 of 422
Black plate (65,1)Chevrolet SS Sedan Owner Manual (GMNA-Localizing-U.S.-6014851) - 2014 -
1st Edition - 8/22/13
Vehicle Care 10-65
{Warning
Lifting a vehicle and getting under
it to do maintenance or repairs is
dangerous without the
appropriate safety equipment and
training. If a jack is provided with
the vehicle, it is designed only for
changing a flat tire. If it is used for
anything else, you or others could
be badly injured or killed if the
vehicle slips off the jack. If a jack
is provided with the vehicle, only
use it for changing a flat tire.
5. Unfold the wheel wrench so it forms a right angle.
6. Slide the wheel wrench onto thedrive nut of the jack.
{Caution
Make sure that the jack lift head
is in the correct position or you
may damage your vehicle. The
repairs would not be covered by
your warranty.
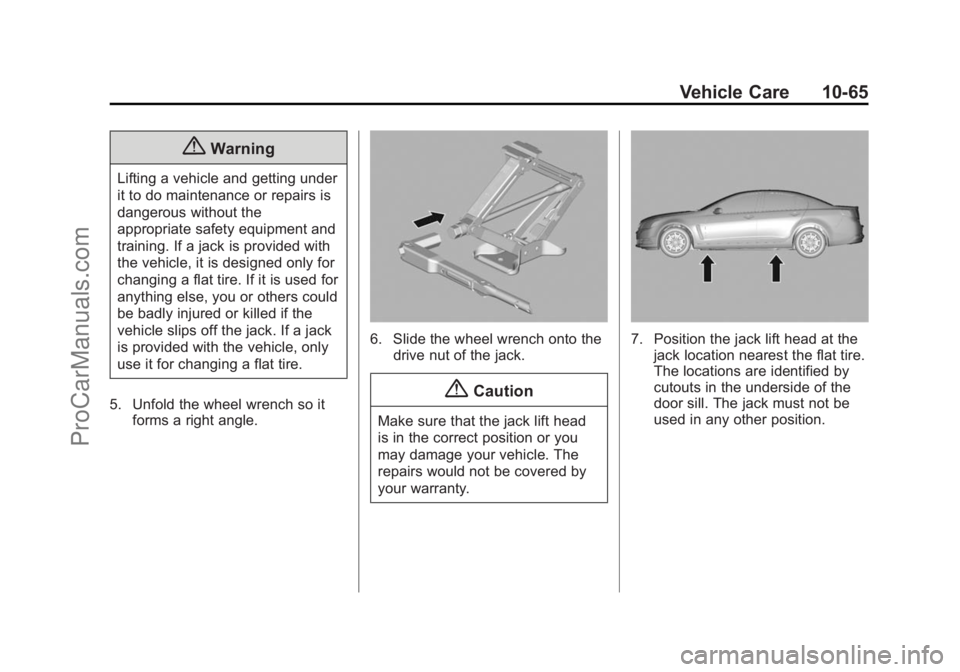
7. Position the jack lift head at thejack location nearest the flat tire.
The locations are identified by
cutouts in the underside of the
door sill. The jack must not be
used in any other position.
ProCarManuals.com
Page 348 of 422
Black plate (66,1)Chevrolet SS Sedan Owner Manual (GMNA-Localizing-U.S.-6014851) - 2014 -
1st Edition - 8/22/13
10-66 Vehicle Care
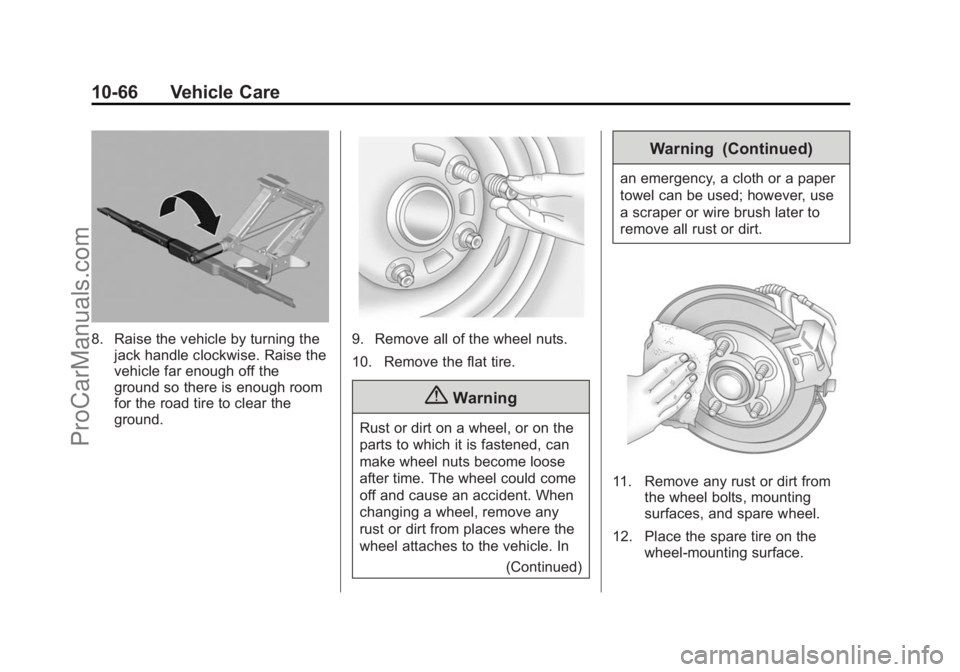
8. Raise the vehicle by turning thejack handle clockwise. Raise the
vehicle far enough off the
ground so there is enough room
for the road tire to clear the
ground.9. Remove all of the wheel nuts.
10. Remove the flat tire.
{Warning
Rust or dirt on a wheel, or on the
parts to which it is fastened, can
make wheel nuts become loose
after time. The wheel could come
off and cause an accident. When
changing a wheel, remove any
rust or dirt from places where the
wheel attaches to the vehicle. In
(Continued)
Warning (Continued)
an emergency, a cloth or a paper
towel can be used; however, use
a scraper or wire brush later to
remove all rust or dirt.
11. Remove any rust or dirt fromthe wheel bolts, mounting
surfaces, and spare wheel.
12. Place the spare tire on the wheel-mounting surface.
ProCarManuals.com
Page 350 of 422

Black plate (68,1)Chevrolet SS Sedan Owner Manual (GMNA-Localizing-U.S.-6014851) - 2014 -
1st Edition - 8/22/13
10-68 Vehicle Care
Storing a Flat or Spare Tire
and Tools
{Warning
Storing a jack, a tire, or other
equipment in the passenger
compartment of the vehicle could
cause injury. In a sudden stop or
collision, loose equipment could
strike someone. Store all these in
the proper place.
Replace the jack, tools, container
and flat tire in the trunk by reversing
the steps used to remove them.
Full-Size Spare Tire
If this vehicle came with a full-size
spare tire, it was fully inflated when
new, however, it can lose air over
time. Check the inflation pressure
regularly. See Tire Pressure on
page 10-41 andVehicle Load Limits
on page 9-10 for information
regarding proper tire inflation and
loading the vehicle. For instructions on how to remove, install, or store a
spare tire, see
Tire Changing on
page 10-63.
After installing the spare tire on the
vehicle, stop as soon as possible
and check that the spare is correctly
inflated. The spare tire is made to
perform well at speeds up to
112 km/h (70 mph) at the
recommended inflation pressure, so
you can finish your trip.
The full-size spare includes a TPMS
sensor. The TPMS will not monitor
or display the spare tire air pressure
until the tire/wheel is installed at one
of the four tire/wheel positions on
the vehicle and matched to the new
position. See Tire Pressure Monitor
Operation on page 10-43 for
information about matching the
spare tire to the TPMS.
Have the damaged or flat road tire
repaired or replaced and installed
back onto the vehicle as soon as
possible so the spare tire will be
available in case it is needed again. Do not mix tires and wheels of
different sizes, because they will not
fit. Keep the spare tire and its wheel
together.
ProCarManuals.com
Page 353 of 422

Black plate (71,1)Chevrolet SS Sedan Owner Manual (GMNA-Localizing-U.S.-6014851) - 2014 -
1st Edition - 8/22/13
Vehicle Care 10-71
6. Connect the other end of the redpositive (+) cable to the
positive (+) terminal of the good
battery.
7. Connect one end of the black negative (–) cable to the
negative (–) terminal of the good
battery.
8. Connect the other end of the black negative (–) cable to the
remote negative (–) post (2).
9. Start the engine in the vehicle with the good battery and run
the engine at idle speed for at
least four minutes.
10. Try to start the vehicle that had the dead battery. If it will not
start after a few tries, it
probably needs service.{Caution
If the jumper cables are
connected or removed in the
wrong order, electrical shorting
may occur and damage the
vehicle. The repairs would not be
covered by the vehicle warranty.
Always connect and remove the
jumper cables in the correct order,
making sure that the cables do
not touch each other or other
metal.
Jumper Cable Removal
Reverse the sequence exactly when
removing the jumper cables
Towing the Vehicle
{Caution
Incorrectly towing a disabled
vehicle may cause damage. The
damage would not be covered by
the vehicle warranty. Do not lash
or hook to the chassis
components —including the front
and rear subframes, suspension
control arms, and links —during
towing and recovery of a disabled
vehicle, or when securing the
vehicle. Use the proper nylon
strap harnesses around the tires
to secure the vehicle.
Have the vehicle towed on a flatbed
car carrier. A wheel lift tow truck
could damage the vehicle.
Consult your dealer or a
professional towing service if the
disabled vehicle must be towed.
ProCarManuals.com
Page 366 of 422

Black plate (2,1)Chevrolet SS Sedan Owner Manual (GMNA-Localizing-U.S.-6014851) - 2014 -
1st Edition - 8/22/13
11-2 Service and Maintenance
Because of the way people use
vehicles, maintenance needs vary.
There may need to be more
frequent checks and services.
Normal vehicle maintenance is for
vehicles that:
.Carry passengers and cargo
within recommended limits on
the Tire and Loading Information
label. SeeVehicle Load Limits
on page 9-10.
.Are driven on reasonable road
surfaces within legal driving
limits.
.Use the recommended fuel. See
Recommended Fuel on
page 9-46.
The Additional Required Services -
Severe are for vehicles that are:
.Mainly driven in heavy city traffic
in hot weather.
.Mainly driven in hilly or
mountainous terrain.
.Frequently towing a trailer.
.Used for high speed or
competitive driving.
.Used for taxi, police, or delivery
service.
Refer to the information in the
Maintenance Schedule Additional
Required Services - Severe chart.
{Warning
Performing maintenance work can
be dangerous and can cause
serious injury. Perform
maintenance work only if the
required information, proper tools,
and equipment are available.
If they are not, see your dealer to
have a trained technician do the
work. See Doing Your Own
Service Work on page 10-3.
Maintenance
Schedule
Owner Checks and Services
At Each Fuel Stop
.Check the engine oil level. See
Engine Oil on page 10-6.
Once a Month
.Check the tire inflation
pressures. See Tire Pressure on
page 10-41.
.Inspect the tires for wear. See
Tire Inspection on page 10-46.
.Check the windshield washer
fluid level. See Washer Fluid on
page 10-17.
Engine Oil Change
When the CHANGE ENGINE OIL
SOON message displays, have the
engine oil and filter changed within
the next 1 000 km/600 mi. If driven
under the best conditions, the
engine oil life system might not
indicate the need for vehicle service
ProCarManuals.com