2014 CHEVROLET SS clock
[x] Cancel search: clockPage 228 of 422

Black plate (2,1)Chevrolet SS Sedan Owner Manual (GMNA-Localizing-U.S.-6014851) - 2014 -
1st Edition - 8/22/13
8-2 Climate Controls
5. Front Defrost
6. ZONE
7. Passenger Temperature Control
8. Recirculation
9. Fan Control
10. Rear Window Defogger
Automatic Operation
AUTO (Automatic):When this
button is pressed, the system
automatically controls the inside
temperature, the air delivery mode,
the air conditioning compressor, and
the fan speed. When AUTO appears
in the display, the system is in full
automatic operation. If any of the
controls are manually adjusted, the
AUTO indicator turns off in the
display.
1. Press the AUTO button, if the AUTO indicator does not appear
on the display.
2. Adjust the temperature to a comfortable setting.
3. Adjust the air outlets as desired. 4. Let the system stabilize for a few
minutes.
In cold weather, the system starts in
the recirculation mode with the fan
off. As the engine warms up, warm
air is directed to the floor outlets,
before automatically changing to
bi-level mode with a reduced fan
speed.
Do not cover the solar sensor in the
center of the instrument panel, near
the windshield. See “Sensors”later
in this section.
The automatic climate control
system may not work as desired if
one or more of the instrument panel
outlets are closed.
Manual Operation
On/Off: Press9to turn the
system on or off.
9(Fan Control): Turn clockwise
or counterclockwise to increase or
decrease the fan speed. The fan
speed appears on the infotainment
display. Press the AUTO button to return to
automatic operation.
Driver and Passenger
Temperature Controls:
The
temperature can be adjusted
separately for the driver and the
passenger. Turn the temperature
controls clockwise or
counterclockwise to increase or
decrease the temperature.
The temperature setting between
21°C (70°F) and 23°C (74°F) is
recommended.
The temperature settings for each
side are shown in the temperature
control knob displays and the
infotainment display. If the
temperature control is past 30°C
(86°F), the display shows HI
(hottest). Turning it past 16°C
(61°F), shows LO (coolest).
ZONE: Press to synchronize the
driver and passenger temperatures.
Single-Zone Mode: All zones are
set to the same temperature. “Driver
has control” will be displayed on the
ProCarManuals.com
Page 281 of 422

Black plate (49,1)Chevrolet SS Sedan Owner Manual (GMNA-Localizing-U.S.-6014851) - 2014 -
1st Edition - 8/22/13
Driving and Operating 9-49
The fuel cap is behind a hinged fuel
door on the passenger side of the
vehicle. To open the fuel door, push
and release the rearward center
edge of the door.
When reinstalling the cap, turn it
clockwise until it clicks, otherwise
the malfunction indicator lamp may
turn on. SeeMalfunction Indicator
Lamp on page 5-12.
Be careful not to spill fuel. Do not
top off or overfill the tank and wait a
few seconds after you have finished
pumping before removing the
nozzle. Clean fuel from painted
surfaces as soon as possible. See
Exterior Care on page 10-72.
When replacing the fuel cap, turn it
clockwise until it clicks. Make sure
the cap is fully installed. The
diagnostic system can determine if
the fuel cap has been left off or
improperly installed. This would
allow fuel to evaporate into the
atmosphere. See Malfunction
Indicator Lamp on page 5-12.{Warning
If a fire starts while you are
refueling, do not remove the
nozzle. Shut off the flow of fuel by
shutting off the pump or by
notifying the station attendant.
Leave the area immediately.
{Caution
If a new fuel cap is needed, be
sure to get the right type of cap
from your dealer. The wrong type
of fuel cap might not fit properly,
might cause the malfunction
indicator lamp to light, and could
damage the fuel tank and
emissions system. See
Malfunction Indicator Lamp on
page 5-12.
Filling a Portable Fuel
Container
{Warning
Filling a portable fuel container
while it is in the vehicle can cause
fuel vapors that can ignite either
by static electricity or other
means. You or others could be
badly burned and the vehicle
could be damaged. Always:
.Use approved fuel
containers.
.Remove the container from
the vehicle, trunk, or pickup
bed before filling.
.Place the container on the
ground.
.Place the nozzle inside the fill
opening of the container
before dispensing fuel, and
(Continued)
ProCarManuals.com
Page 295 of 422

Black plate (13,1)Chevrolet SS Sedan Owner Manual (GMNA-Localizing-U.S.-6014851) - 2014 -
1st Edition - 8/22/13
Vehicle Care 10-13
Caution (Continued)
mixture can freeze and crack
engine cooling parts. The repairs
would not be covered by the
vehicle warranty. Use only the
proper mixture of engine coolant
for the cooling system. See
Recommended Fluids and
Lubricants on page 11-12.
Never dispose of engine coolant by
putting it in the trash, pouring it on
the ground, or pouring it into
sewers, streams or bodies of water.
Have the coolant changed by an
authorized service center, familiar
with legal requirements regarding
used coolant disposal. This will help
protect the environment and your
health.
Checking Coolant
The vehicle must be on a level
surface when checking the coolant
level. To check coolant:
1. Turn the ignition off.
2. Locate the coolant recovery
reservoir. See Engine
Compartment Overview on
page 10-5.
3. Turn the coolant recovery reservoir dipstick cap
counterclockwise and slowly pull
out the dipstick. There are
maximum and minimum
markings on the dipstick.
4. When the engine is cold, the
coolant level should be at or
above the minimum mark (1).
After the vehicle has been driven
and the engine is at normal
operating temperature, the level
should be somewhere between
half full and the maximum
mark (2).
5. If the coolant level is correct, replace the coolant recovery
reservoir dipstick cap and turn
clockwise to secure.
ProCarManuals.com
Page 296 of 422

Black plate (14,1)Chevrolet SS Sedan Owner Manual (GMNA-Localizing-U.S.-6014851) - 2014 -
1st Edition - 8/22/13
10-14 Vehicle Care
How to Add Coolant to the
Coolant Recovery Bottle
{Warning
You can be burned if you spill
coolant on hot engine parts.
Coolant contains ethylene glycol
and it will burn if the engine parts
are hot enough. Do not spill
coolant on a hot engine.
{Caution
This vehicle has a specific
coolant fill procedure. Failure to
follow this procedure could cause
the engine to overheat and be
severely damaged.
To add coolant:
1. Turn the engine coolant recovery reservoir dipstick cap
counterclockwise 1/8 of a turn
and slowly pull out the dipstick. 2. Pour the coolant into the engine
coolant recovery reservoir.
3. When the level is correct, as per the markings on the dipstick,
replace the coolant recovery
reservoir dipstick cap and turn
clockwise to secure.
How to Add Coolant to the
Radiator
{Warning
You can be burned if you spill
coolant on hot engine parts.
Coolant contains ethylene glycol
and it will burn if the engine parts
are hot enough. Do not spill
coolant on a hot engine.
{Caution
This vehicle has a specific
coolant fill procedure. Failure to
follow this procedure could cause
the engine to overheat and be
severely damaged.
{Warning
An electric engine cooling fan
under the hood can start up even
when the engine is not running
and can cause injury. Keep
hands, clothing, and tools away
from any underhood electric fan.
{Warning
Steam and scalding liquids from a
hot cooling system can blow out
and burn you badly. They are
(Continued)
ProCarManuals.com
Page 297 of 422

Black plate (15,1)Chevrolet SS Sedan Owner Manual (GMNA-Localizing-U.S.-6014851) - 2014 -
1st Edition - 8/22/13
Vehicle Care 10-15
Warning (Continued)
under pressure, and if you turn
the radiator cap—even a
little —they can come out at high
speed. Never turn the cap when
the cooling system, including the
radiator cap, is hot. Wait for the
cooling system and radiator cap
to cool if you ever have to turn
the pressure cap.
If no coolant is visible in the engine
coolant recovery reservoir, add
coolant as follows:
1. Locate the radiator cap. See Engine Compartment Overview
on page 10-5.
2. Cover the radiator cap with athick cloth and turn it slowly
counterclockwise and remove.
3. If there is no coolant visible or the level is low, slowly fill the
system through the radiator cap
opening with a 50/50 mixture of
clean, drinkable water and
DEX-COOL coolant until full.
Wait 30 seconds for the coolant
to settle and top off if the level
drops.
Do not spill coolant on the
accessory drive belts.
If a spill occurs, rinse the belt
with fresh water.
4. Start the engine.
5. With the engine idling, top off the coolant through the radiator cap
opening until full.
Wait 30 seconds for the coolant
to settle and top off if the level
drops. 6. Once the system is full, put the
radiator cap back on by turning
clockwise.
7. Turn the engine off.
8. Check the coolant level in the engine coolant recovery
reservoir and fill it until the level
is at the top mark on the dipstick
cap. Filling to this level provides
additional coolant to allow for
any air that may be left in the
cooling system.
ProCarManuals.com
Page 307 of 422

Black plate (25,1)Chevrolet SS Sedan Owner Manual (GMNA-Localizing-U.S.-6014851) - 2014 -
1st Edition - 8/22/13
Vehicle Care 10-25
License Plate Lamp
Lamp Assembly
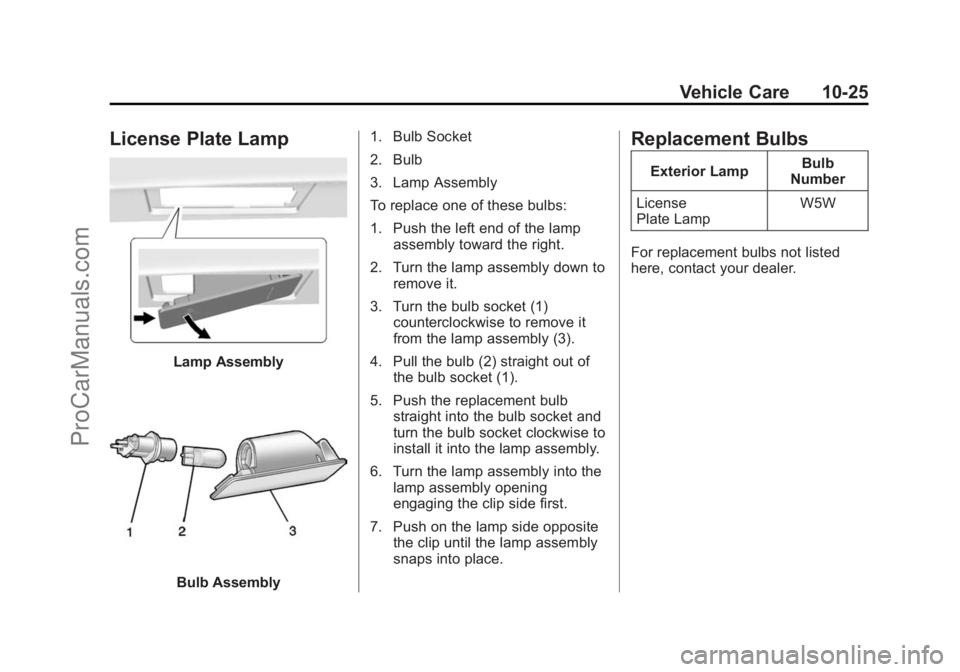
Bulb Assembly1. Bulb Socket
2. Bulb
3. Lamp Assembly
To replace one of these bulbs:
1. Push the left end of the lamp
assembly toward the right.
2. Turn the lamp assembly down to remove it.
3. Turn the bulb socket (1) counterclockwise to remove it
from the lamp assembly (3).
4. Pull the bulb (2) straight out of the bulb socket (1).
5. Push the replacement bulb straight into the bulb socket and
turn the bulb socket clockwise to
install it into the lamp assembly.
6. Turn the lamp assembly into the lamp assembly opening
engaging the clip side first.
7. Push on the lamp side opposite the clip until the lamp assembly
snaps into place.
Replacement Bulbs
Exterior Lamp Bulb
Number
License
Plate Lamp W5W
For replacement bulbs not listed
here, contact your dealer.
ProCarManuals.com
Page 314 of 422

Black plate (32,1)Chevrolet SS Sedan Owner Manual (GMNA-Localizing-U.S.-6014851) - 2014 -
1st Edition - 8/22/13
10-32 Vehicle Care
Rear Compartment Fuse
Block
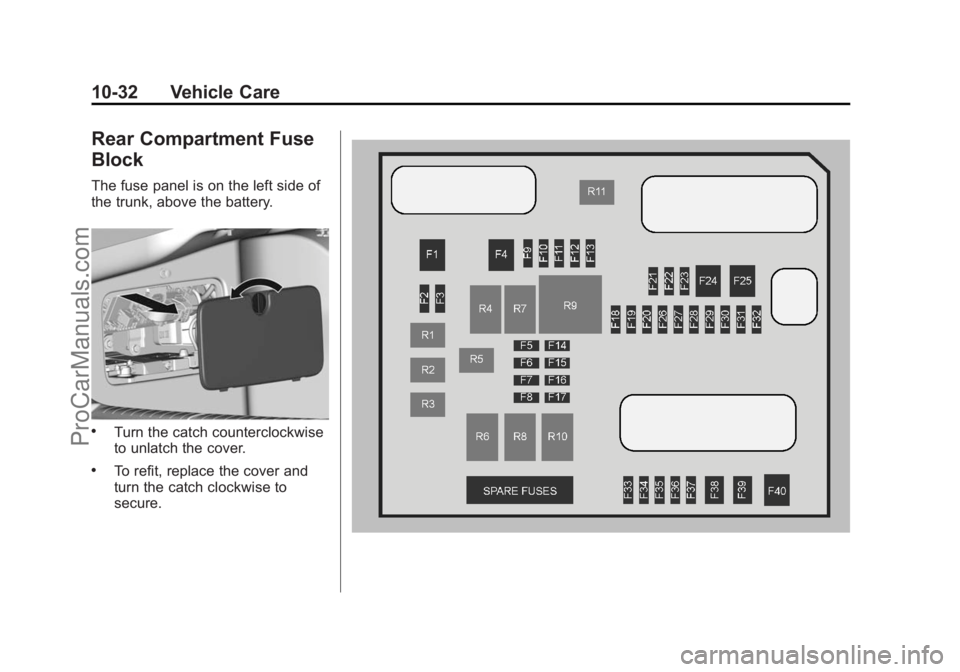
The fuse panel is on the left side of
the trunk, above the battery.
.Turn the catch counterclockwise
to unlatch the cover.
.To refit, replace the cover and
turn the catch clockwise to
secure.
ProCarManuals.com
Page 339 of 422

Black plate (57,1)Chevrolet SS Sedan Owner Manual (GMNA-Localizing-U.S.-6014851) - 2014 -
1st Edition - 8/22/13
Vehicle Care 10-57
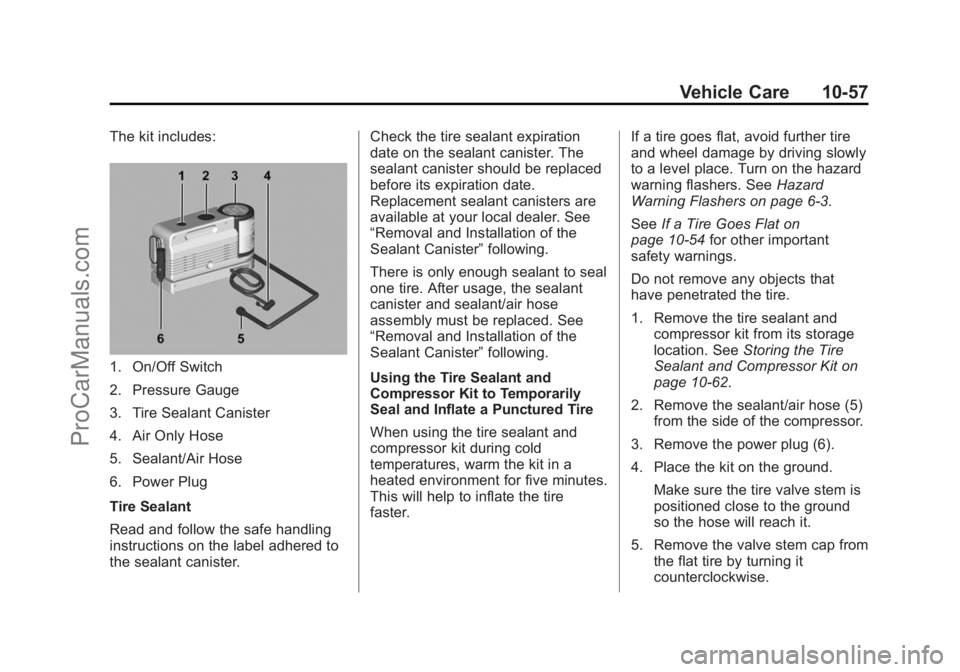
The kit includes:
1. On/Off Switch
2. Pressure Gauge
3. Tire Sealant Canister
4. Air Only Hose
5. Sealant/Air Hose
6. Power Plug
Tire Sealant
Read and follow the safe handling
instructions on the label adhered to
the sealant canister.Check the tire sealant expiration
date on the sealant canister. The
sealant canister should be replaced
before its expiration date.
Replacement sealant canisters are
available at your local dealer. See
“Removal and Installation of the
Sealant Canister”
following.
There is only enough sealant to seal
one tire. After usage, the sealant
canister and sealant/air hose
assembly must be replaced. See
“Removal and Installation of the
Sealant Canister” following.
Using the Tire Sealant and
Compressor Kit to Temporarily
Seal and Inflate a Punctured Tire
When using the tire sealant and
compressor kit during cold
temperatures, warm the kit in a
heated environment for five minutes.
This will help to inflate the tire
faster. If a tire goes flat, avoid further tire
and wheel damage by driving slowly
to a level place. Turn on the hazard
warning flashers. See
Hazard
Warning Flashers on page 6-3.
See If a Tire Goes Flat on
page 10-54 for other important
safety warnings.
Do not remove any objects that
have penetrated the tire.
1. Remove the tire sealant and compressor kit from its storage
location. See Storing the Tire
Sealant and Compressor Kit on
page 10-62.
2. Remove the sealant/air hose (5) from the side of the compressor.
3. Remove the power plug (6).
4. Place the kit on the ground. Make sure the tire valve stem is
positioned close to the ground
so the hose will reach it.
5. Remove the valve stem cap from the flat tire by turning it
counterclockwise.
ProCarManuals.com