2014 CHEVROLET SILVERADO ABS
[x] Cancel search: ABSPage 5 of 546

Black plate (5,1)Chevrolet Silverado Owner Manual (GMNA-Localizing-U.S./Canada/Mexico-
5853506) - 2014 - crc 2nd - 5/15/13
Introduction v
Vehicle Symbol Chart
Here are some additional symbols
that may be found on the vehicle
and what they mean. For more
information on the symbol, refer to
the Index.
0:Adjustable Pedals
9:Airbag Readiness Light
!:Antilock Brake System (ABS)
g:Audio Steering Wheel Controls
or OnStar®
$: Brake System Warning Light
":Charging System
I:Cruise Control
B: Engine Coolant Temperature
O:Exterior Lamps
#:Fog Lamps
.: Fuel Gauge
+:Fuses
3: Headlamp High/Low-Beam
Changer
(: Heated Steering Wheel
j:LATCH System Child
Restraints
*: Malfunction Indicator Lamp
::Oil Pressure
g:Outside Power Foldaway
Mirrors
O: Power
/:Remote Vehicle Start
>:Safety Belt Reminders
7:Tire Pressure Monitor
_: Tow/Haul Mode
d:Traction Control/StabiliTrak®
M:Windshield Washer Fluid
Page 86 of 546
Black plate (24,1)Chevrolet Silverado Owner Manual (GMNA-Localizing-U.S./Canada/Mexico-
5853506) - 2014 - crc 2nd - 5/15/13
3-24 Seats and Restraints
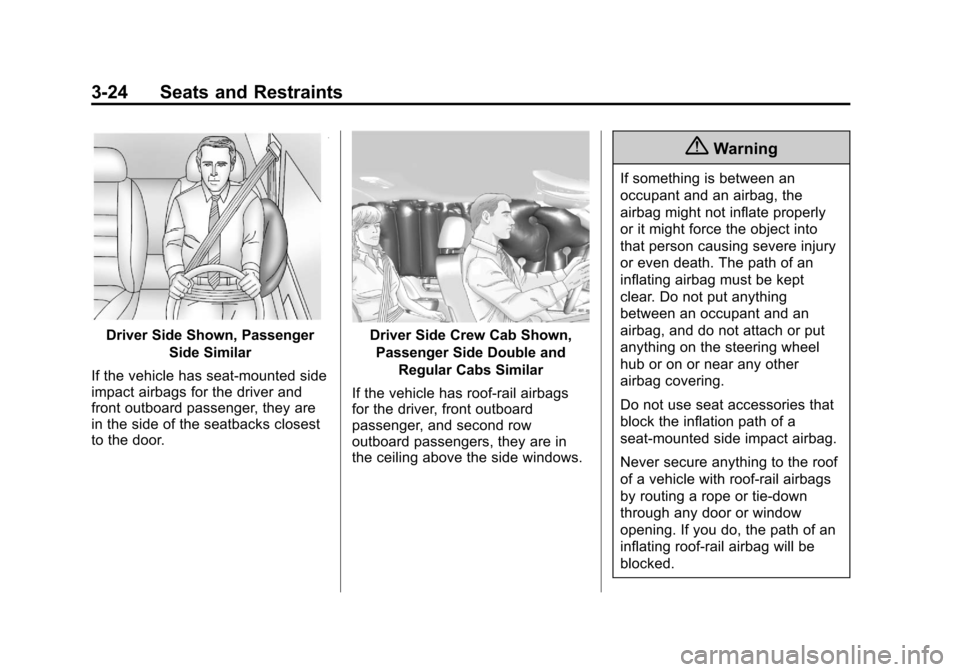
Driver Side Shown, PassengerSide Similar
If the vehicle has seat-mounted side
impact airbags for the driver and
front outboard passenger, they are
in the side of the seatbacks closest
to the door.Driver Side Crew Cab Shown, Passenger Side Double and Regular Cabs Similar
If the vehicle has roof-rail airbags
for the driver, front outboard
passenger, and second row
outboard passengers, they are in
the ceiling above the side windows.
{Warning
If something is between an
occupant and an airbag, the
airbag might not inflate properly
or it might force the object into
that person causing severe injury
or even death. The path of an
inflating airbag must be kept
clear. Do not put anything
between an occupant and an
airbag, and do not attach or put
anything on the steering wheel
hub or on or near any other
airbag covering.
Do not use seat accessories that
block the inflation path of a
seat-mounted side impact airbag.
Never secure anything to the roof
of a vehicle with roof-rail airbags
by routing a rope or tie‐down
through any door or window
opening. If you do, the path of an
inflating roof-rail airbag will be
blocked.
Page 111 of 546
Black plate (49,1)Chevrolet Silverado Owner Manual (GMNA-Localizing-U.S./Canada/Mexico-
5853506) - 2014 - crc 2nd - 5/15/13
Seats and Restraints 3-49
to use an anchor on the same side
of the vehicle as the seating
position where the child restraint will
be placed.
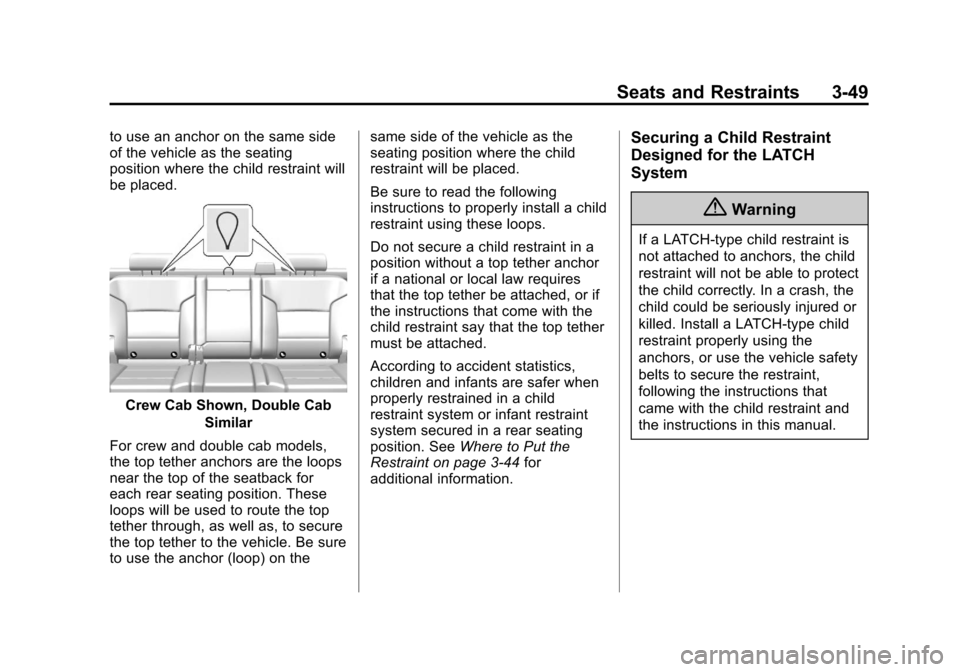
Crew Cab Shown, Double CabSimilar
For crew and double cab models,
the top tether anchors are the loops
near the top of the seatback for
each rear seating position. These
loops will be used to route the top
tether through, as well as, to secure
the top tether to the vehicle. Be sure
to use the anchor (loop) on the same side of the vehicle as the
seating position where the child
restraint will be placed.
Be sure to read the following
instructions to properly install a child
restraint using these loops.
Do not secure a child restraint in a
position without a top tether anchor
if a national or local law requires
that the top tether be attached, or if
the instructions that come with the
child restraint say that the top tether
must be attached.
According to accident statistics,
children and infants are safer when
properly restrained in a child
restraint system or infant restraint
system secured in a rear seating
position. See
Where to Put the
Restraint on page 3-44 for
additional information.
Securing a Child Restraint
Designed for the LATCH
System
{Warning
If a LATCH-type child restraint is
not attached to anchors, the child
restraint will not be able to protect
the child correctly. In a crash, the
child could be seriously injured or
killed. Install a LATCH-type child
restraint properly using the
anchors, or use the vehicle safety
belts to secure the restraint,
following the instructions that
came with the child restraint and
the instructions in this manual.
Page 112 of 546
Black plate (50,1)Chevrolet Silverado Owner Manual (GMNA-Localizing-U.S./Canada/Mexico-
5853506) - 2014 - crc 2nd - 5/15/13
3-50 Seats and Restraints
{Warning
Do not attach more than one child
restraint to a single anchor,
except for the center top tether
anchors in the crew and double
cabs. Attaching more than one
child restraint to a single anchor
could cause the anchor or
attachment to come loose or even
break during a crash. A child or
others could be injured. To reduce
the risk of serious or fatal injuries
during a crash, attach only one
child restraint per anchor.
{Warning
Children can be seriously injured
or strangled if a shoulder belt is
wrapped around their neck and
the safety belt continues to
tighten. Buckle any unused safety
belts behind the child restraint so(Continued)
Warning (Continued)
children cannot reach them. Pull
the shoulder belt all the way out
of the retractor to set the lock,
if the vehicle has one, after the
child restraint has been installed.
{Caution
Do not let the LATCH
attachments rub against the
vehicle’s safety belts. This may
damage these parts. If necessary,
move buckled safety belts to
avoid rubbing the LATCH
attachments.
Do not fold the empty rear seat
with a safety belt buckled. This
could damage the safety belt or
the seat. Unbuckle and return the
safety belt to its stowed position,
before folding the seat. If you need to secure more than one
child restraint in the rear seat, see
Where to Put the Restraint on
page 3-44.
This system is designed to make
installation of child restraints easier.
When using lower anchors, do not
use the vehicle's safety belts.
Instead use the vehicle's anchors
and child restraint attachments to
secure the restraints. Some
restraints also use another vehicle
anchor to secure a top tether.
Page 139 of 546
Black plate (1,1)Chevrolet Silverado Owner Manual (GMNA-Localizing-U.S./Canada/Mexico-
5853506) - 2014 - crc 2nd - 5/15/13
Instruments and Controls 5-1
Instruments and
Controls
Controls
Steering Wheel Adjustment . . . 5-2
Steering Wheel Controls . . . . . . 5-3
Heated Steering Wheel . . . . . . . 5-4
Horn . . . . . . . . . . . . . . . . . . . . . . . . . . 5-4
Windshield Wiper/Washer . . . . . 5-4
Compass . . . . . . . . . . . . . . . . . . . . . 5-5
Clock . . . . . . . . . . . . . . . . . . . . . . . . . 5-5
Power Outlets . . . . . . . . . . . . . . . . . 5-6
Warning Lights, Gauges, and
Indicators
Warning Lights, Gauges, andIndicators . . . . . . . . . . . . . . . . . . . . 5-9
Instrument Cluster . . . . . . . . . . . 5-10
Speedometer . . . . . . . . . . . . . . . . 5-13
Odometer . . . . . . . . . . . . . . . . . . . . 5-13
Trip Odometer . . . . . . . . . . . . . . . 5-13
Tachometer . . . . . . . . . . . . . . . . . . 5-13
Fuel Gauge . . . . . . . . . . . . . . . . . . 5-14
Engine Oil Pressure Gauge . . . . . . . . . . . . . . . . . . . . . . 5-15
Engine Coolant Temperature Gauge . . . . . . . . . . . . . . . . . . . . . . 5-16 Voltmeter Gauge . . . . . . . . . . . . . 5-16
Safety Belt Reminders . . . . . . . 5-17
Airbag Readiness Light . . . . . . 5-18
Airbag On-Off Light . . . . . . . . . . 5-19
Passenger Airbag Status
Indicator . . . . . . . . . . . . . . . . . . . . 5-20
Charging System Light . . . . . . 5-21
Malfunction Indicator Lamp . . . . . . . . . . . . . 5-22
Brake System Warning Light . . . . . . . . . . . . . . . . . . . . . . . 5-24
Antilock Brake System (ABS) Warning Light . . . . . . . . . . . . . . 5-25
Four-Wheel-Drive Light . . . . . . 5-25
Tow/Haul Mode Light . . . . . . . . 5-26
Hill Descent Control Light . . . . 5-26
Lane Departure Warning (LDW) Light . . . . . . . . . . . . . . . . 5-26
Vehicle Ahead Indicator . . . . . . 5-26
Traction Off Light . . . . . . . . . . . . 5-27
StabiliTrak
®OFF Light . . . . . . . 5-27
Traction Control System (TCS)/StabiliTrak
®Light . . . . 5-27
Tire Pressure Light . . . . . . . . . . 5-28
Low Fuel Warning Light . . . . . . 5-28
Security Light . . . . . . . . . . . . . . . . 5-29
High-Beam On Light . . . . . . . . . 5-29 Front Fog Lamp Light . . . . . . . . 5-29
Lamps On Reminder . . . . . . . . . 5-29
Cruise Control Light . . . . . . . . . 5-30
Information Displays
Driver Information Center
(DIC) (Base Level) . . . . . . . . . 5-30
Driver Information Center (DIC) (Uplevel) . . . . . . . . . . . . . 5-32
Vehicle Messages
Vehicle Messages . . . . . . . . . . . 5-35
Battery Voltage and ChargingMessages . . . . . . . . . . . . . . . . . . 5-35
Brake System Messages . . . . 5-36
Compass Messages . . . . . . . . . 5-36
Door Ajar Messages . . . . . . . . . 5-37
Engine Cooling System Messages . . . . . . . . . . . . . . . . . . 5-37
Engine Oil Messages . . . . . . . . 5-38
Engine Power Messages . . . . 5-38
Fuel System Messages . . . . . . 5-39
Key and Lock Messages . . . . . 5-39
Lamp Messages . . . . . . . . . . . . . 5-39
Object Detection System Messages . . . . . . . . . . . . . . . . . . 5-39
Ride Control System Messages . . . . . . . . . . . . . . . . . . 5-40
Airbag System Messages . . . . 5-41
Page 163 of 546
Black plate (25,1)Chevrolet Silverado Owner Manual (GMNA-Localizing-U.S./Canada/Mexico-
5853506) - 2014 - crc 2nd - 5/15/13
Instruments and Controls 5-25
If the light is still on, have the
vehicle towed for service. See
Towing the Vehicle on page 10-96.
{Warning
The brake system might not be
working properly if the brake
system warning light is on.
Driving with the brake system
warning light on can lead to a
crash. If the light is still on after
the vehicle has been pulled off
the road and carefully stopped,
have the vehicle towed for
service.
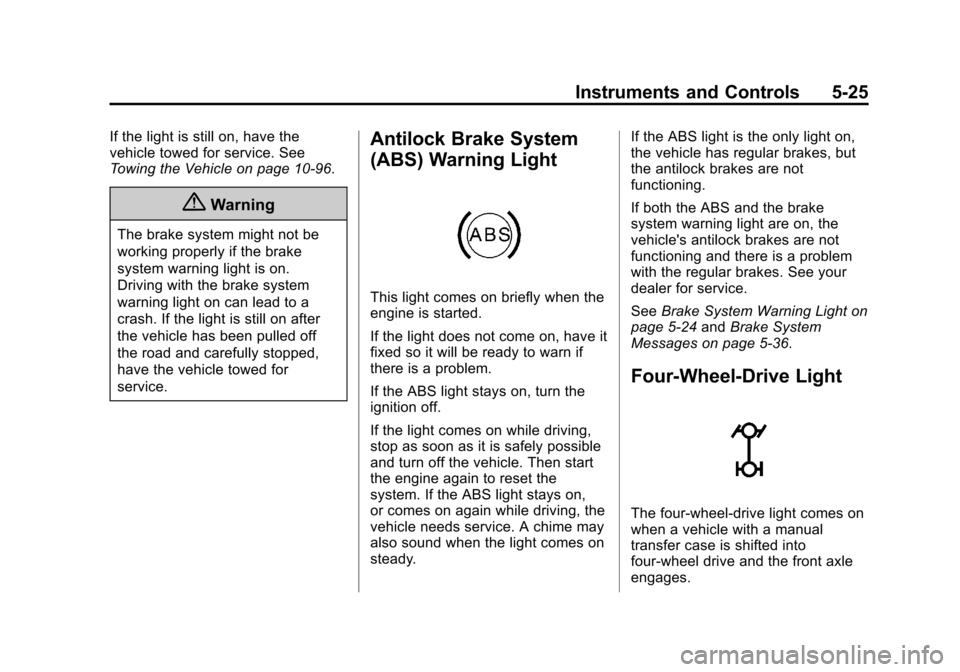
Antilock Brake System
(ABS) Warning Light
This light comes on briefly when the
engine is started.
If the light does not come on, have it
fixed so it will be ready to warn if
there is a problem.
If the ABS light stays on, turn the
ignition off.
If the light comes on while driving,
stop as soon as it is safely possible
and turn off the vehicle. Then start
the engine again to reset the
system. If the ABS light stays on,
or comes on again while driving, the
vehicle needs service. A chime may
also sound when the light comes on
steady.If the ABS light is the only light on,
the vehicle has regular brakes, but
the antilock brakes are not
functioning.
If both the ABS and the brake
system warning light are on, the
vehicle's antilock brakes are not
functioning and there is a problem
with the regular brakes. See your
dealer for service.
See
Brake System Warning Light on
page 5-24 andBrake System
Messages on page 5-36.
Four-Wheel-Drive Light
The four-wheel-drive light comes on
when a vehicle with a manual
transfer case is shifted into
four-wheel drive and the front axle
engages.
Page 268 of 546
Black plate (10,1)Chevrolet Silverado Owner Manual (GMNA-Localizing-U.S./Canada/Mexico-
5853506) - 2014 - crc 2nd - 5/15/13
8-10 Climate Controls
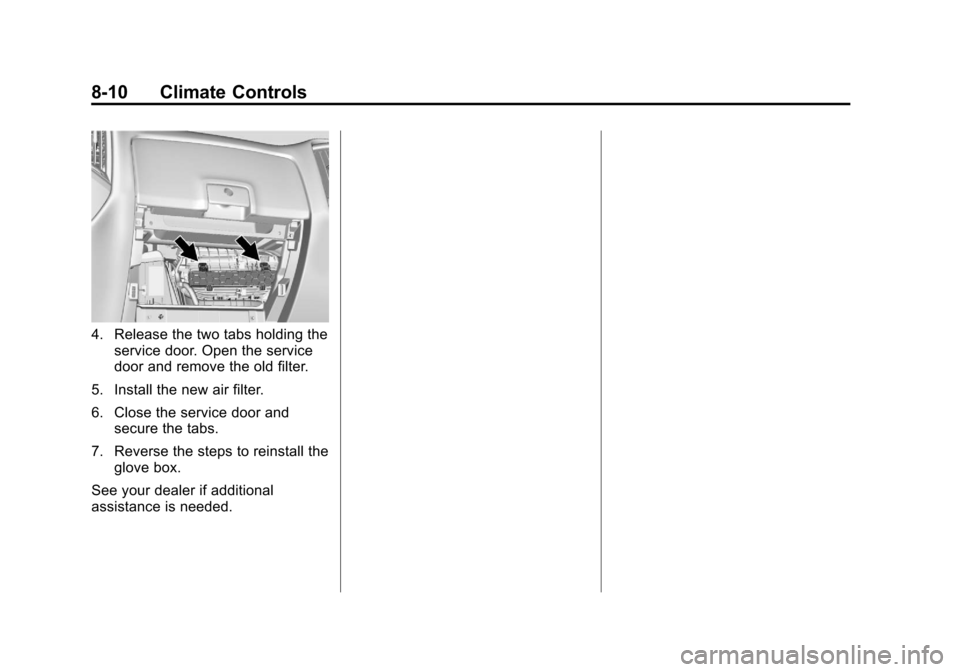
4. Release the two tabs holding theservice door. Open the service
door and remove the old filter.
5. Install the new air filter.
6. Close the service door and secure the tabs.
7. Reverse the steps to reinstall the glove box.
See your dealer if additional
assistance is needed.
Page 269 of 546
Black plate (1,1)Chevrolet Silverado Owner Manual (GMNA-Localizing-U.S./Canada/Mexico-
5853506) - 2014 - crc 2nd - 5/15/13
Driving and Operating 9-1
Driving and
Operating
Driving Information
Distracted Driving . . . . . . . . . . . . . 9-2
Defensive Driving . . . . . . . . . . . . . 9-3
Drunk Driving . . . . . . . . . . . . . . . . . 9-3
Control of a Vehicle . . . . . . . . . . . 9-3
Braking . . . . . . . . . . . . . . . . . . . . . . . 9-3
Steering . . . . . . . . . . . . . . . . . . . . . . . 9-4
Off-Road Recovery . . . . . . . . . . . . 9-5
Loss of Control . . . . . . . . . . . . . . . . 9-5
Off-Road Driving . . . . . . . . . . . . . . 9-6
Driving on Wet Roads . . . . . . . . 9-11
Highway Hypnosis . . . . . . . . . . . 9-12
Hill and Mountain Roads . . . . . 9-12
Winter Driving . . . . . . . . . . . . . . . 9-13
If the Vehicle Is Stuck . . . . . . . . 9-14
Vehicle Load Limits . . . . . . . . . . 9-16
Truck-Camper LoadingInformation . . . . . . . . . . . . . . . . . 9-22
Starting and Operating
New Vehicle Break-In . . . . . . . . 9-24
Adjustable Throttle and BrakePedal . . . . . . . . . . . . . . . . . . . . . . . 9-24
Ignition Positions . . . . . . . . . . . . 9-25 Starting the Engine . . . . . . . . . . 9-27
Fast Idle System . . . . . . . . . . . . . 9-28
Retained Accessory
Power (RAP) . . . . . . . . . . . . . . . 9-29
Engine Coolant Heater . . . . . . . 9-30
Shifting Into Park . . . . . . . . . . . . 9-30
Shifting out of Park . . . . . . . . . . 9-32
Parking (Manual
Transmission) . . . . . . . . . . . . . . 9-32
Parking over Things That Burn . . . . . . . . . . . . . . . . . . 9-33
Active Fuel Management
®. . . 9-33
Engine Exhaust
Engine Exhaust . . . . . . . . . . . . . . 9-33
Running the Vehicle While Parked . . . . . . . . . . . . . . . . . . . . . 9-34
Automatic Transmission
Automatic Transmission . . . . . 9-34
Manual Mode . . . . . . . . . . . . . . . . 9-37
Tow/Haul Mode . . . . . . . . . . . . . . 9-39
Manual Transmission
Manual Transmission . . . . . . . . 9-40
Drive Systems
Four-Wheel Drive . . . . . . . . . . . . 9-42
Brakes
Antilock Brake
System (ABS) . . . . . . . . . . . . . . 9-54
Parking Brake . . . . . . . . . . . . . . . 9-55
Brake Assist . . . . . . . . . . . . . . . . . 9-56
Hill Start Assist (HSA) . . . . . . . 9-57
Ride Control Systems
Traction Control/Electronic Stability Control . . . . . . . . . . . . 9-57
Hill Descent Control (HDC) . . . . . . . . . . . . . . 9-59
Locking Rear Axle . . . . . . . . . . . 9-60
Cruise Control
Cruise Control . . . . . . . . . . . . . . . 9-60
Driver Assistance Systems
Driver Assistance Systems . . . . . . . . . . . . . . . . . . . . 9-63
Assistance Systems for Parking or Backing . . . . . . . . . 9-64
Assistance Systems for Driving . . . . . . . . . . . . . . . . . . . . . 9-67
Forward Collision Alert (FCA) System . . . . . . . . . . . . . . . . . . . . . 9-67
Lane Departure Warning (LDW) . . . . . . . . . . . . . 9-70