2014 CHEVROLET SILVERADO fuel
[x] Cancel search: fuelPage 349 of 546
Black plate (81,1)Chevrolet Silverado Owner Manual (GMNA-Localizing-U.S./Canada/Mexico-
5853506) - 2014 - crc 2nd - 5/15/13
Driving and Operating 9-81
{Caution
Pulling a trailer improperly can
damage the vehicle and result in
costly repairs not covered by the
vehicle warranty. To pull a trailer
correctly, follow the advice in this
section and see your dealer for
important information about
towing a trailer with the vehicle.
To identify the trailering capacity of
the vehicle, read the information in
“Weight of the Trailer” later in this
section.
Trailering is different than just
driving the vehicle by itself.
Trailering means changes in
handling, acceleration, braking,
durability, and fuel economy.
Successful, safe trailering takes
correct equipment, and it has to be
used properly.
The following information has many
time-tested, important trailering tips
and safety rules. Many of these are important for your safety and that of
your passengers. Read this section
carefully before pulling a trailer.
Weight of the Trailer
How heavy can a trailer safely be?
It depends on how the rig is used.
Speed, altitude, road grades,
outside temperature, and how much
the vehicle is used to pull a trailer
are all important. It can depend on
any special equipment on the
vehicle, and the amount of tongue
weight the vehicle can carry. See
“Weight of the Trailer Tongue”
later
in this section for more information.
Trailer weight rating (TWR) is
calculated assuming the tow vehicle
has only the driver but all required
trailering equipment. Weight of
additional optional equipment,
passengers, and cargo in the tow
vehicle must be subtracted from the
trailer weight rating. For kingpin weight and trailer
tongue weight information, see
“Weight of the Trailer Tongue”
later
in this section.
Use the following chart to determine
how much the vehicle can weigh,
based upon the vehicle model and
options.
Weights listed apply for
conventional trailers and fifth-wheel
trailers unless otherwise noted.
Page 365 of 546
Black plate (97,1)Chevrolet Silverado Owner Manual (GMNA-Localizing-U.S./Canada/Mexico-
5853506) - 2014 - crc 2nd - 5/15/13
Driving and Operating 9-97
Operating the vehicle in Tow/Haul
when lightly loaded or with no trailer
at all will not cause damage.
However, there is no benefit to the
selection of Tow/Haul when the
vehicle is unloaded. Such a
selection when unloaded may result
in unpleasant engine and
transmission driving characteristics
and reduced fuel economy. Tow/
Haul is recommended only when
pulling a heavy trailer or a large or
heavy load.
Integrated Trailer Brake
Control System
The vehicle may have an Integrated
Trailer Brake Control (ITBC) system
for use with electric trailer brakes or
most electric-over-hydraulic trailer
brakes.This symbol is on the Trailer Brake
Control Panel on vehicles with an
Integrated Trailer Brake Control
system. The power output to the
trailer brakes is based on the
amount of brake pressure being
applied by the vehicle’s brake
system, and on the type of trailer
brakes detected. This available
power output to the trailer brakes
can be adjusted to a wide range of
trailering situations.
The ITBC system is integrated with
the vehicle’
s brake, antilock brake,
and StabiliTrak systems. In trailering
conditions that cause the vehicle’s
antilock brake or StabiliTrak
systems to activate, power sent to
the trailer's brakes will be
automatically adjusted to minimize
trailer wheel lock-up. This does not
imply that the trailer has StabiliTrak.
If the vehicle’s brake, antilock brake,
or StabiliTrak systems are not
functioning properly, the ITBC
system may not be fully functional
or may not function at all. Make sure all of these systems are fully
operational to ensure full
functionality of the ITBC system.
The ITBC system is powered
through the vehicle's electrical
system. Turning the ignition off will
also turn off the ITBC system. The
ITBC system is fully functional only
when the ignition is in ON/RUN.
{Warning
Connecting a trailer that has an
air brake system may result in
reduced or complete loss of trailer
braking. There may be an
increase in stopping distance or
trailer instability which could
result in personal injury or
damage to the vehicle, trailer,
or other property. Use the ITBC
system only with electric or
electric over hydraulic trailer
brakes.
Page 372 of 546
Black plate (104,1)Chevrolet Silverado Owner Manual (GMNA-Localizing-U.S./Canada/Mexico-
5853506) - 2014 - crc 2nd - 5/15/13
9-104 Driving and Operating
.The snow plow manufacturer or
installer can assist you in
determining the amount of rear
ballast required, to help make
sure the snowplow/vehicle
combination does not exceed
the GVW rating, the front and
rear axle ratings, and the front
and rear weight distribution ratio.
.The total vehicle must not
exceed the GVW rating.
Front axle reserve capacity is the
difference between the Gross Axle
Weight Rating (GAWR) and the front
axle weight of the vehicle with full
fuel and passengers. Basically, it is
the amount of weight that can be
added to the front axle before
reaching the front GAWR.
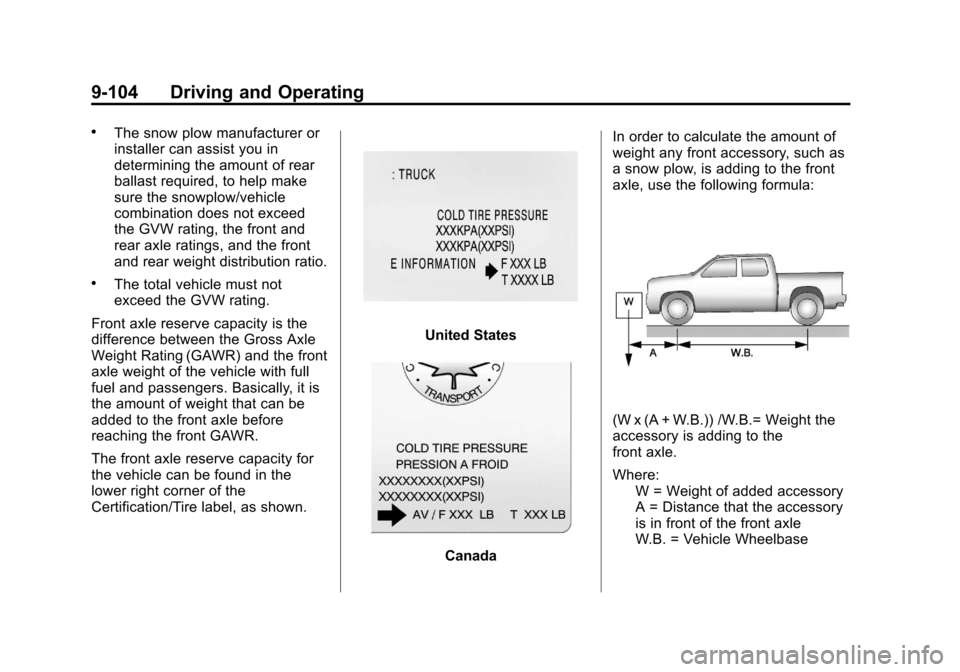
The front axle reserve capacity for
the vehicle can be found in the
lower right corner of the
Certification/Tire label, as shown.
United States
Canada In order to calculate the amount of
weight any front accessory, such as
a snow plow, is adding to the front
axle, use the following formula:
(W x (A + W.B.)) /W.B.= Weight the
accessory is adding to the
front axle.
Where:
W = Weight of added accessory
A = Distance that the accessory
is in front of the front axle
W.B. = Vehicle Wheelbase
Page 373 of 546
Black plate (105,1)Chevrolet Silverado Owner Manual (GMNA-Localizing-U.S./Canada/Mexico-
5853506) - 2014 - crc 2nd - 5/15/13
Driving and Operating 9-105
For example, adding a 318 kg
(700 lb) snow plow actually adds
more than 318 kg (700 lb) to the
front axle. Using the formula, if the
snow plow is 122 cm (4 ft) in front of
the front axle and the wheel base is
305 cm (10 ft), then:W = 318 kg (700 lb)
A = 122 cm (4 ft)
W.B. = 305 cm (10 ft)
(W x (A + W.B.)/W.B. =
(318 x (122 + 305))/305 = 445 kg
(980 lb)
So, if the front axle reserve capacity
is more than 445 kg (980 lb), the
snow plow could be added without
exceeding the front GAWR.
Heavier equipment can be added on
the front of the vehicle if it is
compensated for by carrying fewer
passengers or less cargo, or by
positioning cargo toward the rear.
This has the effect of reducing the
load on the front. However, the front
GAWR, rear GAWR, and Gross
Vehicle Weight Rating (GVWR) must
never be exceeded.{Warning
On some vehicles that have
certain front mounted equipment,
such as a snow plow, it may be
possible to load the front axle to
the front gross axle weight rating
(GAWR) but not have enough
weight on the rear axle to have
proper braking performance. If the
brakes cannot work properly, you
could have a crash. To help the
brakes work properly when a
snow plow is installed, always
follow the snow plow
manufacturer or installer's
recommendation for rear ballast
to ensure a proper front and rear
weight distribution ratio, even
though the actual front weight
may be less than the front
GAWR, and the total vehicle
weight is less than the gross
vehicle weight rating (GVWR).
Maintaining a proper front and (Continued)
Warning (Continued)
rear weight distribution ratio is
necessary to provide proper
braking performance.
Total vehicle reserve capacity is the
difference between the GVWR and
the weight of the truck with full fuel
and passengers. It is the amount of
weight that can be added to the
vehicle before reaching the GVWR.
Keep in mind that reserve capacity
numbers are intended as a guide
when selecting the amount of
equipment or cargo the truck can
carry. If unsure of the vehicle's front,
rear, or total weight, go to a weigh
station and weigh the vehicle. Your
dealer can also help with this.
The total vehicle reserve capacity
for the vehicle can be found in the
lower right corner of the
Certification/Tire label as shown
previously.
Page 385 of 546
Black plate (11,1)Chevrolet Silverado Owner Manual (GMNA-Localizing-U.S./Canada/Mexico-
5853506) - 2014 - crc 2nd - 5/15/13
Vehicle Care 10-11
Checking Engine Oil
It is a good idea to check the engine
oil level at each fuel fill. In order to
get an accurate reading, the vehicle
must be on level ground. The
engine oil dipstick handle is a loop.
SeeEngine Compartment Overview
on page 10-5 for the location of the
engine oil dipstick.
If a low oil message displays on the
DIC, it is important to park on level
ground to accurately measure the
oil level on the dipstick. Idling the
vehicle on steep grades for a long
time can influence the level sensing
accuracy.
Obtaining an accurate oil level
reading is essential:
1. If the engine has been running recently, turn off the engine and
allow several minutes for the oil
to drain back into the oil pan.
Checking the oil level too soon
after engine shutoff will not
provide an accurate oil level
reading.{Warning
The engine oil dipstick handle
may be hot; it could burn you.
Use a towel or glove to touch the
dipstick handle.
2. Pull out the dipstick and clean it with a paper towel or cloth, then
push it back in all the way.
Remove it again, keeping the tip
down, and check the level.
When to Add Engine Oil
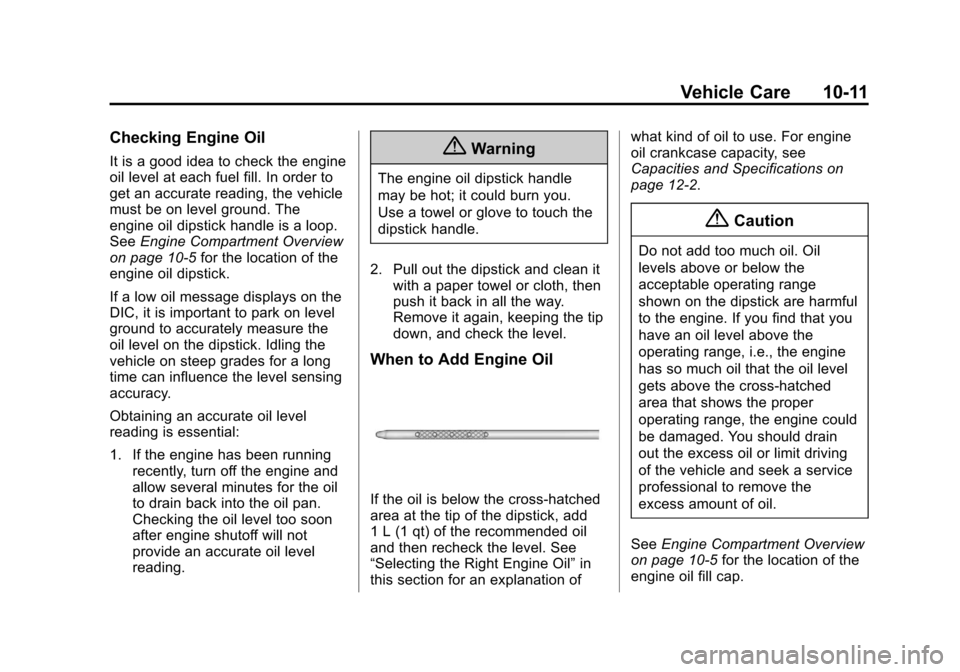
If the oil is below the cross-hatched
area at the tip of the dipstick, add
1 L (1 qt) of the recommended oil
and then recheck the level. See
“Selecting the Right Engine Oil” in
this section for an explanation of what kind of oil to use. For engine
oil crankcase capacity, see
Capacities and Specifications on
page 12-2.
{Caution
Do not add too much oil. Oil
levels above or below the
acceptable operating range
shown on the dipstick are harmful
to the engine. If you find that you
have an oil level above the
operating range, i.e., the engine
has so much oil that the oil level
gets above the cross-hatched
area that shows the proper
operating range, the engine could
be damaged. You should drain
out the excess oil or limit driving
of the vehicle and seek a service
professional to remove the
excess amount of oil.
See Engine Compartment Overview
on page 10-5 for the location of the
engine oil fill cap.
Page 400 of 546
Black plate (26,1)Chevrolet Silverado Owner Manual (GMNA-Localizing-U.S./Canada/Mexico-
5853506) - 2014 - crc 2nd - 5/15/13
10-26 Vehicle Care
as normal idle speed for at least
five minutes while the vehicle is
parked. If the warning is still there,
turn off the engine and get everyone
out of the vehicle until it cools down.
If there is no sign of steam, idle the
engine for five minutes while
parked. If the warning is still
displayed, turn off the engine until it
cools down.
Overheated Engine
Protection Operating
Mode (6.0L
V8 Engine Only)
If an overheated engine condition
exists and the ENGINE POWER IS
REDUCED message displays, an
overheat protection mode which
alternates firing groups of cylinders
helps to prevent engine damage. In
this mode, a loss in power and
engine performance will be noticed.
This operating mode allows the
vehicle to be driven to a safe place
in an emergency. Driving extendeddistances and/or towing a trailer in
the overheat protection mode
should be avoided.
{Caution
After driving in the overheated
engine protection operating
mode, the engine oil will be
severely degraded. Any repairs
performed before the engine is
cool may cause engine damage.
Allow the engine to cool before
attempting any repair. Repair the
cause of coolant loss, change the
oil, and reset the oil life system.
See
Engine Oil on page 10-10.
Engine Fan
If the vehicle has a clutched engine
cooling fan, when the clutch is
engaged, the fan spins faster to
provide more air to cool the engine.
In most everyday driving conditions,
the fan is spinning slower and the
clutch is not fully engaged. This
improves fuel economy and reduces fan noise. Under heavy vehicle
loading, trailer towing, and/or high
outside temperatures, the fan speed
increases as the clutch more fully
engages, so an increase in fan
noise may be heard. This is normal
and should not be mistaken as the
transmission slipping or making
extra shifts. It is merely the cooling
system functioning properly. The fan
will slow down when additional
cooling is not required and the
clutch disengages.
This fan noise may also be heard
when starting the engine. It will go
away as the fan clutch partially
disengages.
If the vehicle has electric cooling
fans, the fans may be heard
spinning at low speed during most
everyday driving. The fans may turn
off if no cooling is required. Under
heavy vehicle loading, trailer towing,
high outside temperatures,
or operation of the air conditioning
system, the fans may change to
high speed and an increase in fan
noise may be heard. This is normal
Page 420 of 546
Black plate (46,1)Chevrolet Silverado Owner Manual (GMNA-Localizing-U.S./Canada/Mexico-
5853506) - 2014 - crc 2nd - 5/15/13
10-46 Vehicle Care
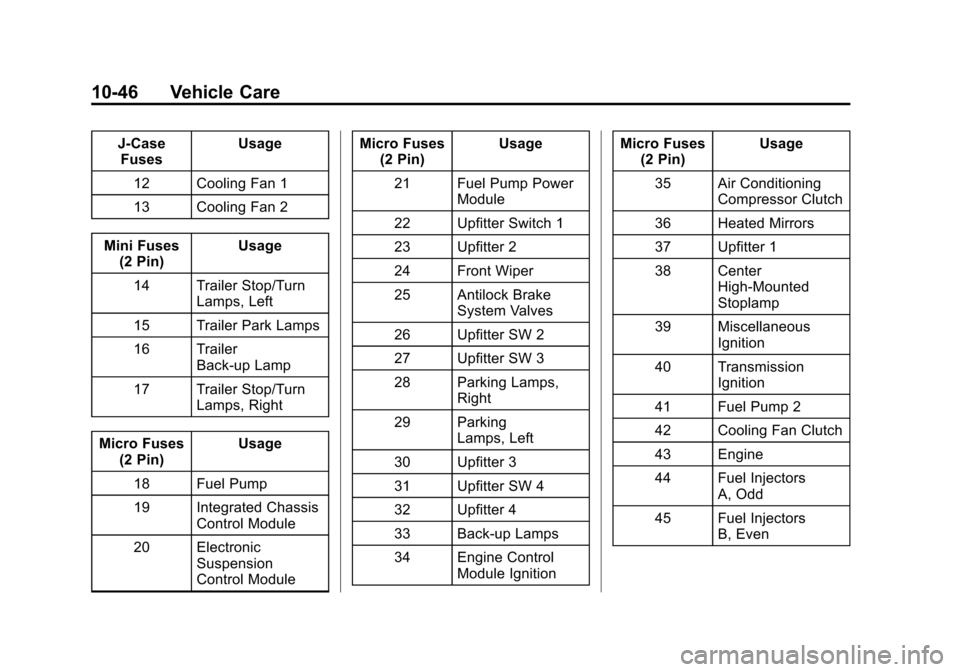
J-CaseFuses Usage
12 Cooling Fan 1
13 Cooling Fan 2
Mini Fuses (2 Pin) Usage
14 Trailer Stop/Turn Lamps, Left
15 Trailer Park Lamps
16 Trailer Back-up Lamp
17 Trailer Stop/Turn Lamps, Right
Micro Fuses (2 Pin) Usage
18 Fuel Pump
19 Integrated Chassis Control Module
20 Electronic Suspension
Control Module Micro Fuses
(2 Pin) Usage
21 Fuel Pump Power Module
22 Upfitter Switch 1
23 Upfitter 2
24 Front Wiper
25 Antilock Brake System Valves
26 Upfitter SW 2
27 Upfitter SW 3
28 Parking Lamps, Right
29 Parking Lamps, Left
30 Upfitter 3
31 Upfitter SW 4
32 Upfitter 4
33 Back-up Lamps
34 Engine Control Module Ignition Micro Fuses
(2 Pin) Usage
35 Air Conditioning Compressor Clutch
36 Heated Mirrors
37 Upfitter 1
38 Center High-Mounted
Stoplamp
39 Miscellaneous Ignition
40 Transmission Ignition
41 Fuel Pump 2
42 Cooling Fan Clutch
43 Engine
44 Fuel Injectors A, Odd
45 Fuel Injectors B, Even
Page 421 of 546
Black plate (47,1)Chevrolet Silverado Owner Manual (GMNA-Localizing-U.S./Canada/Mexico-
5853506) - 2014 - crc 2nd - 5/15/13
Vehicle Care 10-47
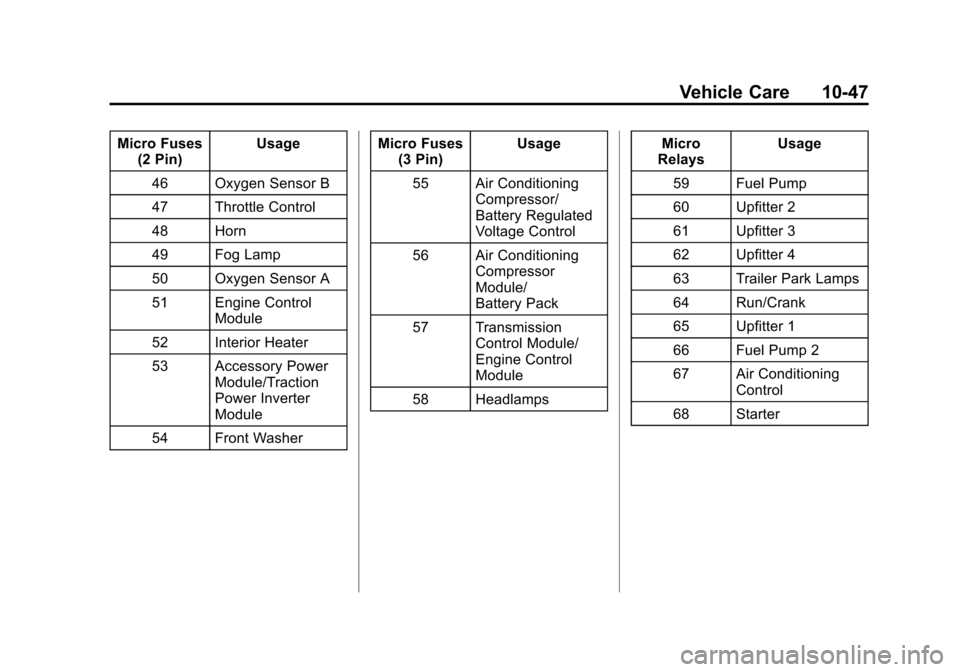
Micro Fuses(2 Pin) Usage
46 Oxygen Sensor B
47 Throttle Control
48 Horn
49 Fog Lamp
50 Oxygen Sensor A
51 Engine Control Module
52 Interior Heater
53 Accessory Power Module/Traction
Power Inverter
Module
54 Front Washer Micro Fuses
(3 Pin) Usage
55 Air Conditioning Compressor/
Battery Regulated
Voltage Control
56 Air Conditioning Compressor
Module/
Battery Pack
57 Transmission Control Module/
Engine Control
Module
58 Headlamps Micro
Relays Usage
59 Fuel Pump
60 Upfitter 2
61 Upfitter 3
62 Upfitter 4
63 Trailer Park Lamps
64 Run/Crank
65 Upfitter 1
66 Fuel Pump 2
67 Air Conditioning Control
68 Starter