2014 CHEVROLET SILVERADO ECU
[x] Cancel search: ECUPage 129 of 546

Black plate (67,1)Chevrolet Silverado Owner Manual (GMNA-Localizing-U.S./Canada/Mexico-
5853506) - 2014 - crc 2nd - 5/15/13
Seats and Restraints 3-67
Securing Child Restraints
(Rear Seat)
When securing a child restraint in a
rear seating position, study the
instructions that came with the child
restraint to make sure it is
compatible with this vehicle.
If the child restraint has the LATCH
system, seeLower Anchors and
Tethers for Children (LATCH
System) on page 3-45 for how and
where to install the child restraint
using LATCH. If a child restraint is
secured in the vehicle using a
safety belt and it uses a top tether,
see Lower Anchors and Tethers for
Children (LATCH System) on
page 3-45 for top tether anchor
locations.
Do not secure a child seat in a
position without a top tether anchor
if a national or local law requires
that the top tether be anchored, or if
the instructions that come with the
child restraint say that the top strap
must be anchored. In Canada, the law requires that
forward-facing child restraints have
a top tether, and that the tether be
attached.
If the child restraint does not have
the LATCH system, you will be
using the safety belt to secure the
child restraint in this position. Be
sure to follow the instructions that
came with the child restraint. Secure
the child in the child restraint when
and as the instructions say.
If more than one child restraint
needs to be installed in the rear
seat, be sure to read
Where to Put
the Restraint on page 3-44.
Double Cab
1. Remove the headrest prior to installing a forward-facing child
restraint in an outboard rear
seating position. See “Headrest
Removal and Reinstallation”
under Lower Anchors and
Tethers for Children (LATCH
System) on page 3-45. 2. Put the child restraint on
the seat.
3. Pick up the latch plate, and run the lap and shoulder portions of
the vehicle's safety belt through
or around the restraint. The child
restraint instructions will show
you how.
4. Push the latch plate into thebuckle until it clicks.
Position the release button on
the buckle so that the safety belt
could be quickly unbuckled if
necessary.
Page 130 of 546
Black plate (68,1)Chevrolet Silverado Owner Manual (GMNA-Localizing-U.S./Canada/Mexico-
5853506) - 2014 - crc 2nd - 5/15/13
3-68 Seats and Restraints
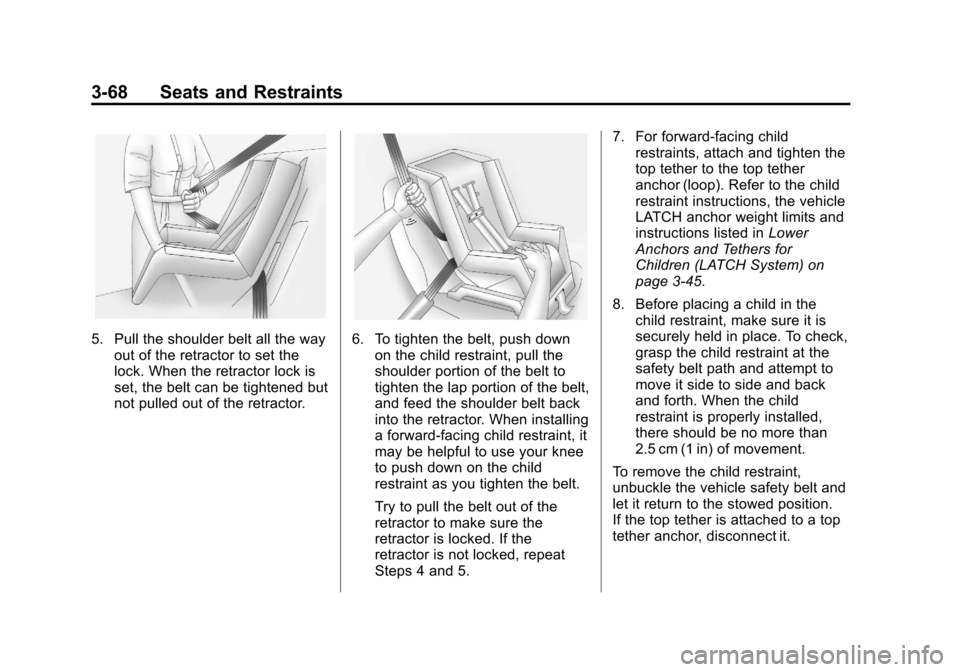
5. Pull the shoulder belt all the wayout of the retractor to set the
lock. When the retractor lock is
set, the belt can be tightened but
not pulled out of the retractor.6. To tighten the belt, push downon the child restraint, pull the
shoulder portion of the belt to
tighten the lap portion of the belt,
and feed the shoulder belt back
into the retractor. When installing
a forward-facing child restraint, it
may be helpful to use your knee
to push down on the child
restraint as you tighten the belt.
Try to pull the belt out of the
retractor to make sure the
retractor is locked. If the
retractor is not locked, repeat
Steps 4 and 5. 7. For forward-facing child
restraints, attach and tighten the
top tether to the top tether
anchor (loop). Refer to the child
restraint instructions, the vehicle
LATCH anchor weight limits and
instructions listed in Lower
Anchors and Tethers for
Children (LATCH System) on
page 3-45.
8. Before placing a child in the child restraint, make sure it is
securely held in place. To check,
grasp the child restraint at the
safety belt path and attempt to
move it side to side and back
and forth. When the child
restraint is properly installed,
there should be no more than
2.5 cm (1 in) of movement.
To remove the child restraint,
unbuckle the vehicle safety belt and
let it return to the stowed position.
If the top tether is attached to a top
tether anchor, disconnect it.
Page 132 of 546

Black plate (70,1)Chevrolet Silverado Owner Manual (GMNA-Localizing-U.S./Canada/Mexico-
5853506) - 2014 - crc 2nd - 5/15/13
3-70 Seats and Restraints
6. If the child restraint has a toptether, follow the child restraint
manufacturer's instructions
regarding the use of the top
tether. See Lower Anchors and
Tethers for Children (LATCH
System) on page 3-45 for more
information on using the top
tether anchors.
7. Before placing a child in the child restraint, make sure it is
securely held in place. To check,
grasp the child restraint at the
safety belt path and attempt to
move it side to side and back
and forth. When the child
restraint is properly installed,
there should be no more than
2.5 cm (1 in) of movement.
To remove the child restraint,
unbuckle the vehicle safety belt and
let it return to the stowed position.
If the top tether is attached to a top
tether anchor, disconnect it. For outboard rear seating positions,
if the child restraint cannot be
installed properly with the headrest
in place, the headrest may be
removed. See your dealer for
assistance with removal, and store
the removed headrest in a secure
place. When the child restraint is
removed, reinstall the headrest
before the seating position is used.
For reinstallation instructions, see
“Removing and Reinstalling
Headrests”
underLower Anchors
and Tethers for Children (LATCH
System) on page 3-45.
Page 134 of 546
Black plate (2,1)Chevrolet Silverado Owner Manual (GMNA-Localizing-U.S./Canada/Mexico-
5853506) - 2014 - crc 2nd - 5/15/13
4-2 Storage
Glove Box
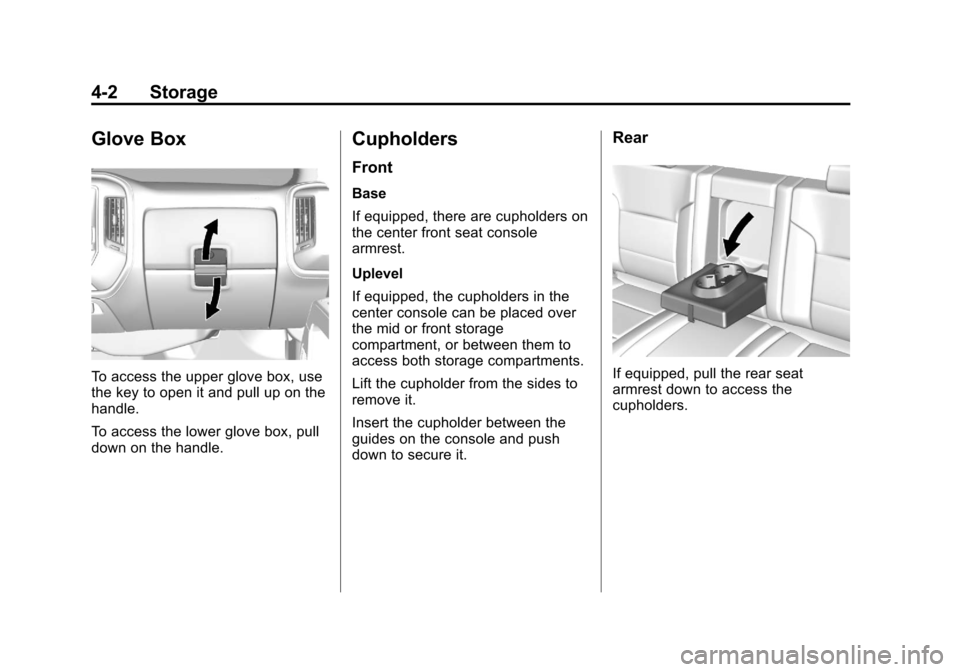
To access the upper glove box, use
the key to open it and pull up on the
handle.
To access the lower glove box, pull
down on the handle.
Cupholders
Front
Base
If equipped, there are cupholders on
the center front seat console
armrest.
Uplevel
If equipped, the cupholders in the
center console can be placed over
the mid or front storage
compartment, or between them to
access both storage compartments.
Lift the cupholder from the sides to
remove it.
Insert the cupholder between the
guides on the console and push
down to secure it.
Rear
If equipped, pull the rear seat
armrest down to access the
cupholders.
Page 139 of 546
Black plate (1,1)Chevrolet Silverado Owner Manual (GMNA-Localizing-U.S./Canada/Mexico-
5853506) - 2014 - crc 2nd - 5/15/13
Instruments and Controls 5-1
Instruments and
Controls
Controls
Steering Wheel Adjustment . . . 5-2
Steering Wheel Controls . . . . . . 5-3
Heated Steering Wheel . . . . . . . 5-4
Horn . . . . . . . . . . . . . . . . . . . . . . . . . . 5-4
Windshield Wiper/Washer . . . . . 5-4
Compass . . . . . . . . . . . . . . . . . . . . . 5-5
Clock . . . . . . . . . . . . . . . . . . . . . . . . . 5-5
Power Outlets . . . . . . . . . . . . . . . . . 5-6
Warning Lights, Gauges, and
Indicators
Warning Lights, Gauges, andIndicators . . . . . . . . . . . . . . . . . . . . 5-9
Instrument Cluster . . . . . . . . . . . 5-10
Speedometer . . . . . . . . . . . . . . . . 5-13
Odometer . . . . . . . . . . . . . . . . . . . . 5-13
Trip Odometer . . . . . . . . . . . . . . . 5-13
Tachometer . . . . . . . . . . . . . . . . . . 5-13
Fuel Gauge . . . . . . . . . . . . . . . . . . 5-14
Engine Oil Pressure Gauge . . . . . . . . . . . . . . . . . . . . . . 5-15
Engine Coolant Temperature Gauge . . . . . . . . . . . . . . . . . . . . . . 5-16 Voltmeter Gauge . . . . . . . . . . . . . 5-16
Safety Belt Reminders . . . . . . . 5-17
Airbag Readiness Light . . . . . . 5-18
Airbag On-Off Light . . . . . . . . . . 5-19
Passenger Airbag Status
Indicator . . . . . . . . . . . . . . . . . . . . 5-20
Charging System Light . . . . . . 5-21
Malfunction Indicator Lamp . . . . . . . . . . . . . 5-22
Brake System Warning Light . . . . . . . . . . . . . . . . . . . . . . . 5-24
Antilock Brake System (ABS) Warning Light . . . . . . . . . . . . . . 5-25
Four-Wheel-Drive Light . . . . . . 5-25
Tow/Haul Mode Light . . . . . . . . 5-26
Hill Descent Control Light . . . . 5-26
Lane Departure Warning (LDW) Light . . . . . . . . . . . . . . . . 5-26
Vehicle Ahead Indicator . . . . . . 5-26
Traction Off Light . . . . . . . . . . . . 5-27
StabiliTrak
®OFF Light . . . . . . . 5-27
Traction Control System (TCS)/StabiliTrak
®Light . . . . 5-27
Tire Pressure Light . . . . . . . . . . 5-28
Low Fuel Warning Light . . . . . . 5-28
Security Light . . . . . . . . . . . . . . . . 5-29
High-Beam On Light . . . . . . . . . 5-29 Front Fog Lamp Light . . . . . . . . 5-29
Lamps On Reminder . . . . . . . . . 5-29
Cruise Control Light . . . . . . . . . 5-30
Information Displays
Driver Information Center
(DIC) (Base Level) . . . . . . . . . 5-30
Driver Information Center (DIC) (Uplevel) . . . . . . . . . . . . . 5-32
Vehicle Messages
Vehicle Messages . . . . . . . . . . . 5-35
Battery Voltage and ChargingMessages . . . . . . . . . . . . . . . . . . 5-35
Brake System Messages . . . . 5-36
Compass Messages . . . . . . . . . 5-36
Door Ajar Messages . . . . . . . . . 5-37
Engine Cooling System Messages . . . . . . . . . . . . . . . . . . 5-37
Engine Oil Messages . . . . . . . . 5-38
Engine Power Messages . . . . 5-38
Fuel System Messages . . . . . . 5-39
Key and Lock Messages . . . . . 5-39
Lamp Messages . . . . . . . . . . . . . 5-39
Object Detection System Messages . . . . . . . . . . . . . . . . . . 5-39
Ride Control System Messages . . . . . . . . . . . . . . . . . . 5-40
Airbag System Messages . . . . 5-41
Page 140 of 546
Black plate (2,1)Chevrolet Silverado Owner Manual (GMNA-Localizing-U.S./Canada/Mexico-
5853506) - 2014 - crc 2nd - 5/15/13
5-2 Instruments and Controls
Security Messages . . . . . . . . . . 5-41
Steering SystemMessages . . . . . . . . . . . . . . . . . . 5-42
Tire Messages . . . . . . . . . . . . . . . 5-42
Transmission Messages . . . . . 5-43
Vehicle Reminder Messages . . . . . . . . . . . . . . . . . . 5-44
Vehicle Speed Messages . . . . 5-45
Washer Fluid Messages . . . . . 5-45
Vehicle Personalization
Vehicle Personalization . . . . . . 5-46
Universal Remote System
Universal Remote System . . . 5-52
Universal Remote System Programming . . . . . . . . . . . . . . . 5-52
Universal Remote System Operation . . . . . . . . . . . . . . . . . . 5-54
Controls
Steering Wheel
Adjustment
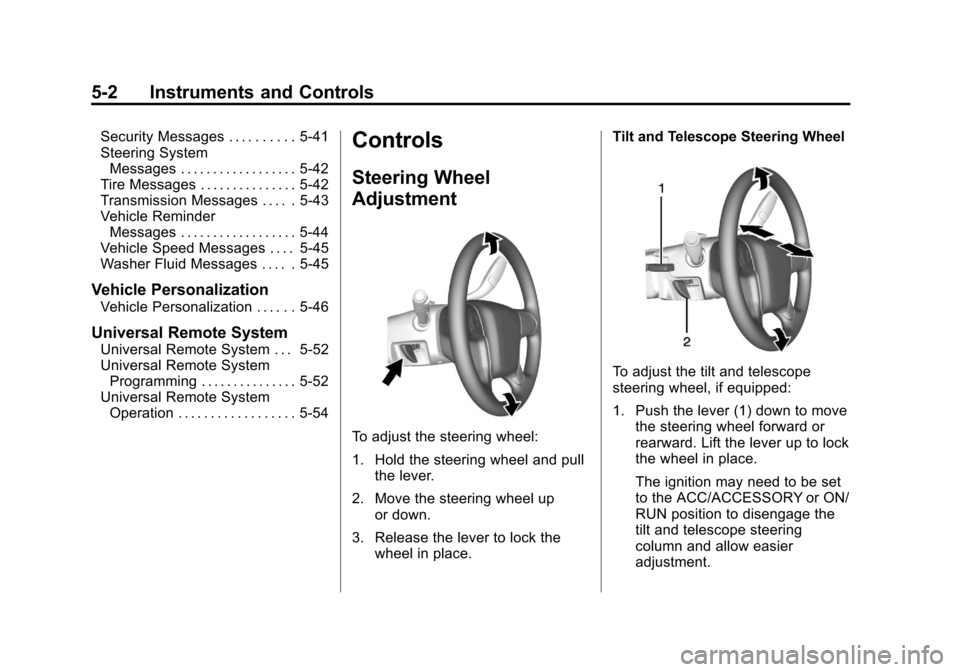
To adjust the steering wheel:
1. Hold the steering wheel and pull
the lever.
2. Move the steering wheel up or down.
3. Release the lever to lock the wheel in place. Tilt and Telescope Steering Wheel
To adjust the tilt and telescope
steering wheel, if equipped:
1. Push the lever (1) down to move
the steering wheel forward or
rearward. Lift the lever up to lock
the wheel in place.
The ignition may need to be set
to the ACC/ACCESSORY or ON/
RUN position to disengage the
tilt and telescope steering
column and allow easier
adjustment.
Page 167 of 546
Black plate (29,1)Chevrolet Silverado Owner Manual (GMNA-Localizing-U.S./Canada/Mexico-
5853506) - 2014 - crc 2nd - 5/15/13
Instruments and Controls 5-29
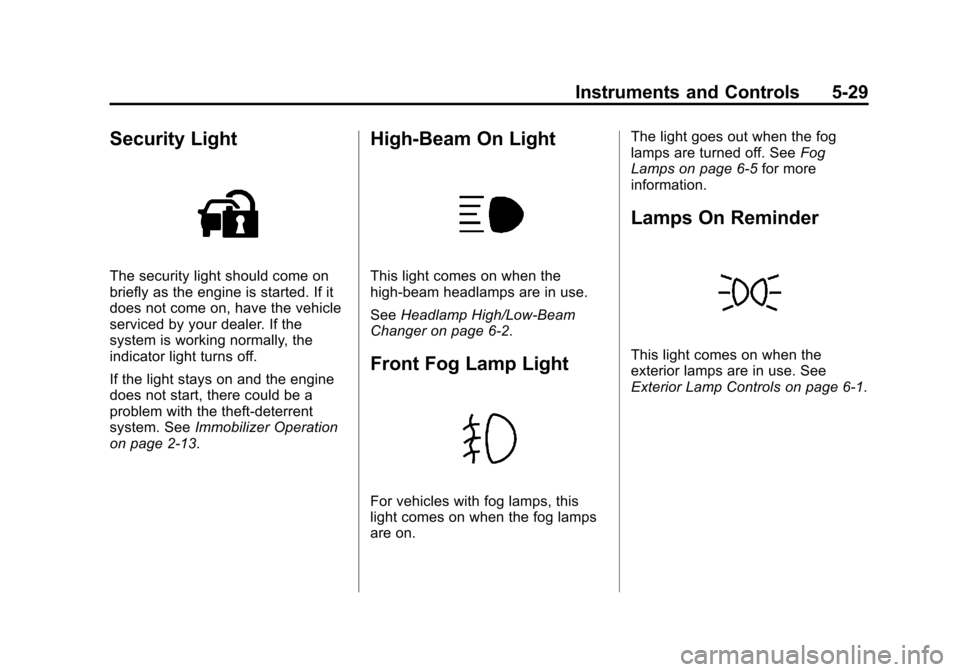
Security Light
The security light should come on
briefly as the engine is started. If it
does not come on, have the vehicle
serviced by your dealer. If the
system is working normally, the
indicator light turns off.
If the light stays on and the engine
does not start, there could be a
problem with the theft-deterrent
system. SeeImmobilizer Operation
on page 2-13.
High-Beam On Light
This light comes on when the
high-beam headlamps are in use.
See Headlamp High/Low-Beam
Changer on page 6-2.
Front Fog Lamp Light
For vehicles with fog lamps, this
light comes on when the fog lamps
are on. The light goes out when the fog
lamps are turned off. See
Fog
Lamps on page 6-5 for more
information.
Lamps On Reminder
This light comes on when the
exterior lamps are in use. See
Exterior Lamp Controls on page 6-1.
Page 179 of 546
Black plate (41,1)Chevrolet Silverado Owner Manual (GMNA-Localizing-U.S./Canada/Mexico-
5853506) - 2014 - crc 2nd - 5/15/13
Instruments and Controls 5-41
TRACTION CONTROL ON
This message displays when the
traction control is active. See
Traction Control/Electronic Stability
Control on page 9-57.
STABILITRAK OFF
This message displays when the
StabiliTrak system has been turned
off. Adjust your driving accordingly.
To limit wheel spin and realize the
full benefits of the stability
enhancement system, you should
normally leave StabiliTrak on. See
Traction Control/Electronic Stability
Control on page 9-57.
STABILITRAK OFF may also
display when the stability control
has been automatically disabled.
Several conditions can cause this
message to appear:
.If the system is overheating,
which could occur if StabiliTrak
activates continuously for an
extended period of time.
.If the brake system warning light
is on. SeeBrake System
Warning Light on page 5-24.
.If the stability system takes
longer than usual to complete its
diagnostic checks due to driving
conditions.
.If an engine or vehicle-related
problem has been detected and
the vehicle needs service. See
your dealer.
.If the transfer case is in
Four-Wheel Drive Low.
The message turns off as soon as
the conditions that caused the
message to be displayed are no
longer present.
Airbag System Messages
SERVICE AIR BAG
This message displays if there is a
problem with the airbag system.
Have your dealer inspect the
system for problems. See Airbag
Readiness Light on page 5-18 and
Airbag System on page 3-21 for
more information.
Security Messages
SERVICE THEFT DETERRENT
SYSTEM
This message displays when there
is a problem with the theft-deterrent
system. The vehicle may or may not
restart so you may want to take the
vehicle to your dealer before turning
off the engine. See Immobilizer
Operation on page 2-13 for more
information.