2014 CHEVROLET SILVERADO power steering
[x] Cancel search: power steeringPage 324 of 546
Black plate (56,1)Chevrolet Silverado Owner Manual (GMNA-Localizing-U.S./Canada/Mexico-
5853506) - 2014 - crc 2nd - 5/15/13
9-56 Driving and Operating
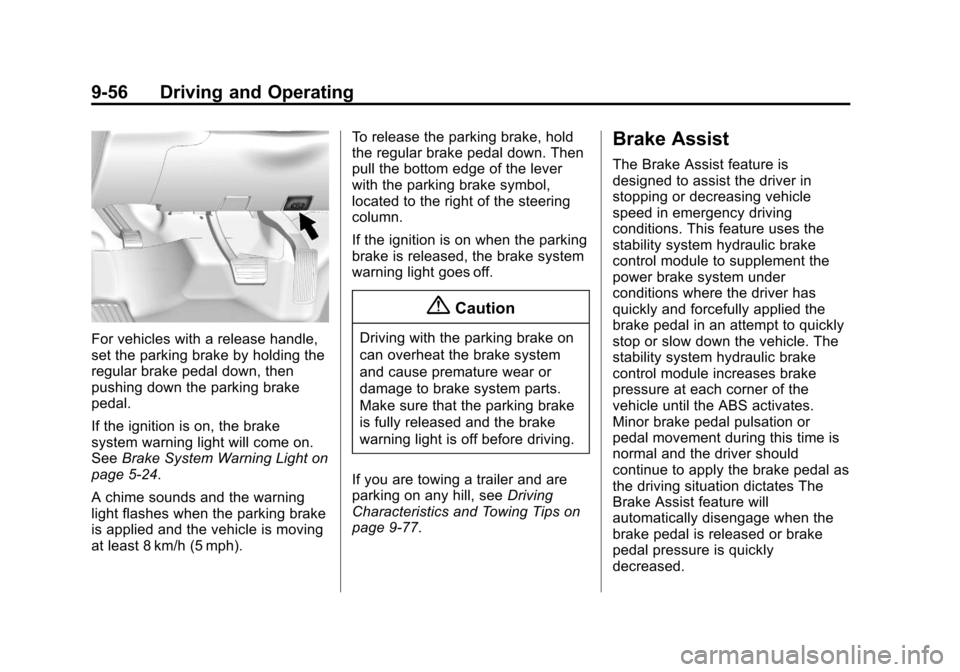
For vehicles with a release handle,
set the parking brake by holding the
regular brake pedal down, then
pushing down the parking brake
pedal.
If the ignition is on, the brake
system warning light will come on.
SeeBrake System Warning Light on
page 5-24.
A chime sounds and the warning
light flashes when the parking brake
is applied and the vehicle is moving
at least 8 km/h (5 mph). To release the parking brake, hold
the regular brake pedal down. Then
pull the bottom edge of the lever
with the parking brake symbol,
located to the right of the steering
column.
If the ignition is on when the parking
brake is released, the brake system
warning light goes off.
{Caution
Driving with the parking brake on
can overheat the brake system
and cause premature wear or
damage to brake system parts.
Make sure that the parking brake
is fully released and the brake
warning light is off before driving.
If you are towing a trailer and are
parking on any hill, see Driving
Characteristics and Towing Tips on
page 9-77.
Brake Assist
The Brake Assist feature is
designed to assist the driver in
stopping or decreasing vehicle
speed in emergency driving
conditions. This feature uses the
stability system hydraulic brake
control module to supplement the
power brake system under
conditions where the driver has
quickly and forcefully applied the
brake pedal in an attempt to quickly
stop or slow down the vehicle. The
stability system hydraulic brake
control module increases brake
pressure at each corner of the
vehicle until the ABS activates.
Minor brake pedal pulsation or
pedal movement during this time is
normal and the driver should
continue to apply the brake pedal as
the driving situation dictates The
Brake Assist feature will
automatically disengage when the
brake pedal is released or brake
pedal pressure is quickly
decreased.
Page 366 of 546
Black plate (98,1)Chevrolet Silverado Owner Manual (GMNA-Localizing-U.S./Canada/Mexico-
5853506) - 2014 - crc 2nd - 5/15/13
9-98 Driving and Operating
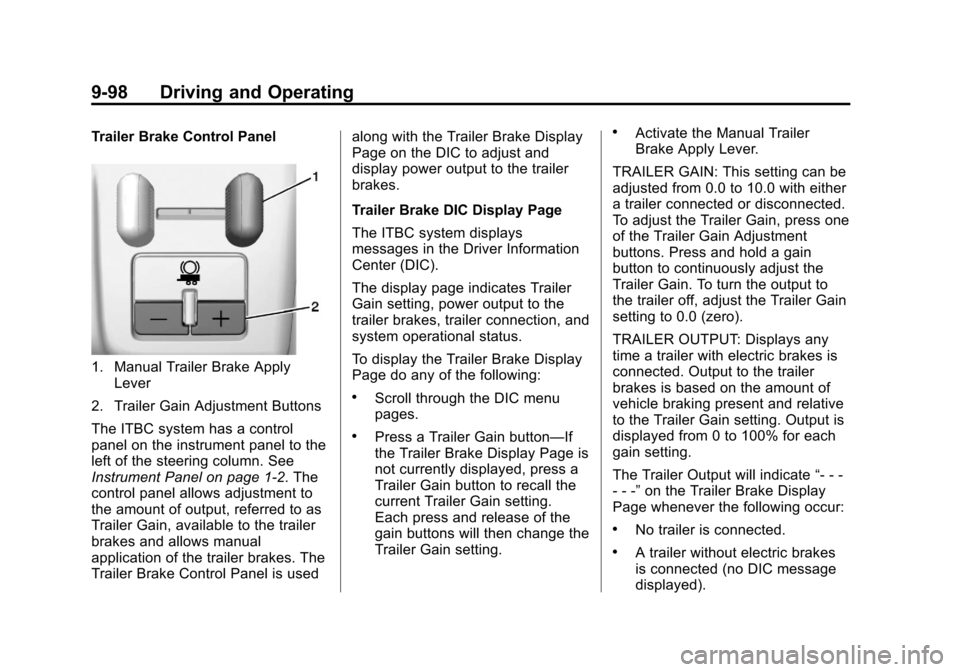
Trailer Brake Control Panel
1. Manual Trailer Brake ApplyLever
2. Trailer Gain Adjustment Buttons
The ITBC system has a control
panel on the instrument panel to the
left of the steering column. See
Instrument Panel on page 1-2. The
control panel allows adjustment to
the amount of output, referred to as
Trailer Gain, available to the trailer
brakes and allows manual
application of the trailer brakes. The
Trailer Brake Control Panel is used along with the Trailer Brake Display
Page on the DIC to adjust and
display power output to the trailer
brakes.
Trailer Brake DIC Display Page
The ITBC system displays
messages in the Driver Information
Center (DIC).
The display page indicates Trailer
Gain setting, power output to the
trailer brakes, trailer connection, and
system operational status.
To display the Trailer Brake Display
Page do any of the following:
.Scroll through the DIC menu
pages.
.Press a Trailer Gain button—If
the Trailer Brake Display Page is
not currently displayed, press a
Trailer Gain button to recall the
current Trailer Gain setting.
Each press and release of the
gain buttons will then change the
Trailer Gain setting.
.Activate the Manual Trailer
Brake Apply Lever.
TRAILER GAIN: This setting can be
adjusted from 0.0 to 10.0 with either
a trailer connected or disconnected.
To adjust the Trailer Gain, press one
of the Trailer Gain Adjustment
buttons. Press and hold a gain
button to continuously adjust the
Trailer Gain. To turn the output to
the trailer off, adjust the Trailer Gain
setting to 0.0 (zero).
TRAILER OUTPUT: Displays any
time a trailer with electric brakes is
connected. Output to the trailer
brakes is based on the amount of
vehicle braking present and relative
to the Trailer Gain setting. Output is
displayed from 0 to 100% for each
gain setting.
The Trailer Output will indicate “- - -
- - -” on the Trailer Brake Display
Page whenever the following occur:
.No trailer is connected.
.A trailer without electric brakes
is connected (no DIC message
displayed).
Page 375 of 546
Black plate (1,1)Chevrolet Silverado Owner Manual (GMNA-Localizing-U.S./Canada/Mexico-
5853506) - 2014 - crc 2nd - 5/15/13
Vehicle Care 10-1
Vehicle Care
General Information
General Information . . . . . . . . . . 10-2
California Proposition65 Warning . . . . . . . . . . . . . . . . . 10-2
California Perchlorate Materials Requirements . . . . 10-3
Accessories and Modifications . . . . . . . . . . . . . . . 10-3
Vehicle Checks
Doing Your OwnService Work . . . . . . . . . . . . . . . 10-3
Hood . . . . . . . . . . . . . . . . . . . . . . . . 10-4
Engine Compartment Overview . . . . . . . . . . . . . . . . . . . 10-5
Engine Oil . . . . . . . . . . . . . . . . . . 10-10
Engine Oil Life System . . . . . 10-13
Automatic Transmission Fluid . . . . . . . . . . . . . . . . . . . . . . 10-14
Manual Transmission Fluid . . . . . . . . . . . . . . . . . . . . . . 10-17
Hydraulic Clutch . . . . . . . . . . . . 10-18
Engine Air Cleaner/Filter . . . . 10-18
Cooling System . . . . . . . . . . . . 10-19
Engine Coolant . . . . . . . . . . . . . 10-21
Engine Overheating . . . . . . . . 10-24 Overheated Engine
Protection Operating Mode
(6.0L V8 Engine Only) . . . . . 10-26
Engine Fan . . . . . . . . . . . . . . . . . 10-26
Power Steering Fluid (4.3L V6, 5.3L V8, and 6.2L
V8 Engines) . . . . . . . . . . . . . . . 10-27
Power Steering Fluid (6.0L V8 and 6.6L
V8 Engines) . . . . . . . . . . . . . . . 10-27
Washer Fluid . . . . . . . . . . . . . . . 10-28
Brakes . . . . . . . . . . . . . . . . . . . . . 10-29
Brake Fluid . . . . . . . . . . . . . . . . . 10-30
Battery . . . . . . . . . . . . . . . . . . . . . 10-31
Four-Wheel Drive . . . . . . . . . . . 10-32
Front Axle . . . . . . . . . . . . . . . . . . 10-33
Rear Axle . . . . . . . . . . . . . . . . . . 10-34
Noise Control System . . . . . . 10-35
Starter Switch Check . . . . . . . 10-36
Automatic Transmission Shift Lock Control Function
Check . . . . . . . . . . . . . . . . . . . . . 10-37
Ignition Transmission Lock Check . . . . . . . . . . . . . . . . . . . . . 10-37
Park Brake and P (Park) Mechanism Check . . . . . . . . 10-38
Wiper Blade Replacement . . . . . . . . . . . . . . 10-38
Glass Replacement . . . . . . . . 10-39
Headlamp Aiming
Headlamp Aiming . . . . . . . . . . 10-39
Bulb Replacement
Bulb Replacement . . . . . . . . . . 10-39
Halogen Bulbs . . . . . . . . . . . . . . 10-39
Headlamps, Front Turn Signal, Sidemarker, and
Parking Lamps . . . . . . . . . . . . 10-40
Fog Lamps . . . . . . . . . . . . . . . . . 10-40
Taillamps (Chassis Cab Models) . . . . . . . . . . . . . . . . . . . 10-41
Taillamps, Turn Signal, Stoplamps, and Back-Up
Lamps . . . . . . . . . . . . . . . . . . . . 10-41
Center High-Mounted Stoplamp (CHMSL) and
Cargo Lamp . . . . . . . . . . . . . . 10-42
License Plate Lamp . . . . . . . . 10-42
Replacement Bulbs . . . . . . . . . 10-42
Electrical System
Electrical System Overload . . . . . . . . . . . . . . . . . . 10-43
Fuses . . . . . . . . . . . . . . . . . . . . . . 10-43
Page 384 of 546
Black plate (10,1)Chevrolet Silverado Owner Manual (GMNA-Localizing-U.S./Canada/Mexico-
5853506) - 2014 - crc 2nd - 5/15/13
10-10 Vehicle Care
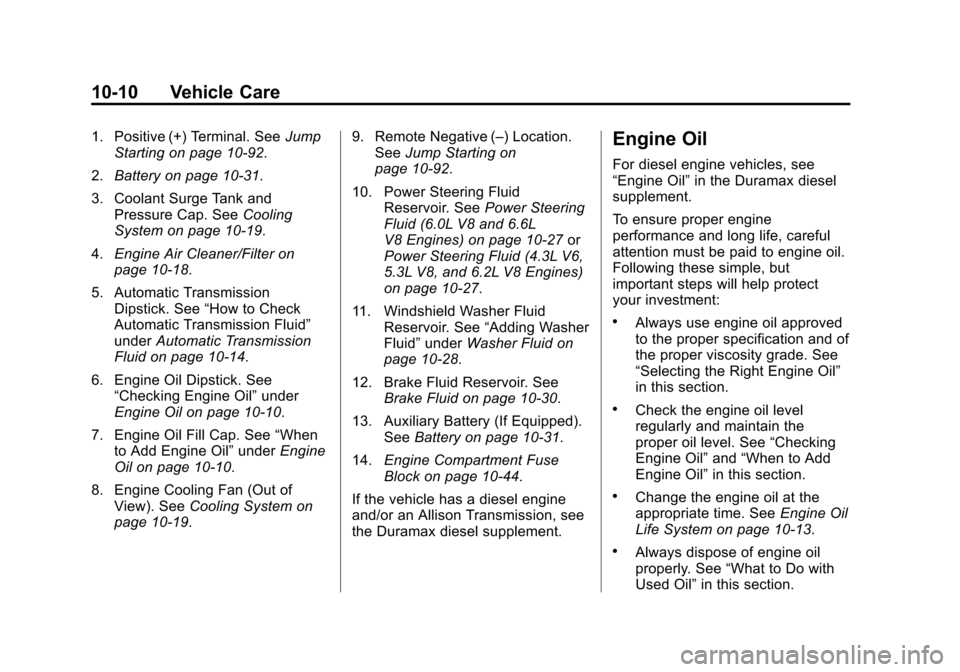
1. Positive (+) Terminal. SeeJump
Starting on page 10-92.
2. Battery on page 10-31.
3. Coolant Surge Tank and Pressure Cap. See Cooling
System on page 10-19.
4. Engine Air Cleaner/Filter on
page 10-18.
5. Automatic Transmission Dipstick. See “How to Check
Automatic Transmission Fluid”
under Automatic Transmission
Fluid on page 10-14.
6. Engine Oil Dipstick. See “Checking Engine Oil” under
Engine Oil on page 10-10.
7. Engine Oil Fill Cap. See “When
to Add Engine Oil” underEngine
Oil on page 10-10.
8. Engine Cooling Fan (Out of View). See Cooling System on
page 10-19. 9. Remote Negative (–) Location.
See Jump Starting on
page 10-92.
10. Power Steering Fluid Reservoir. See Power Steering
Fluid (6.0L V8 and 6.6L
V8 Engines) on page 10-27 or
Power Steering Fluid (4.3L V6,
5.3L V8, and 6.2L V8 Engines)
on page 10-27.
11. Windshield Washer Fluid Reservoir. See “Adding Washer
Fluid” under Washer Fluid on
page 10-28.
12. Brake Fluid Reservoir. See Brake Fluid on page 10-30.
13. Auxiliary Battery (If Equipped). SeeBattery on page 10-31.
14. Engine Compartment Fuse
Block on page 10-44.
If the vehicle has a diesel engine
and/or an Allison Transmission, see
the Duramax diesel supplement.Engine Oil
For diesel engine vehicles, see
“Engine Oil” in the Duramax diesel
supplement.
To ensure proper engine
performance and long life, careful
attention must be paid to engine oil.
Following these simple, but
important steps will help protect
your investment:
.Always use engine oil approved
to the proper specification and of
the proper viscosity grade. See
“Selecting the Right Engine Oil”
in this section.
.Check the engine oil level
regularly and maintain the
proper oil level. See “Checking
Engine Oil” and“When to Add
Engine Oil” in this section.
.Change the engine oil at the
appropriate time. See Engine Oil
Life System on page 10-13.
.Always dispose of engine oil
properly. See “What to Do with
Used Oil” in this section.
Page 401 of 546
Black plate (27,1)Chevrolet Silverado Owner Manual (GMNA-Localizing-U.S./Canada/Mexico-
5853506) - 2014 - crc 2nd - 5/15/13
Vehicle Care 10-27
and indicates that the cooling
system is functioning properly. The
fans will change to low speed when
additional cooling is no longer
required.
The electric engine cooling fans
may run after the engine has been
turned. off. This is normal and no
service is required.
Power Steering Fluid
(4.3L V6, 5.3L V8, and
6.2L V8 Engines)
The vehicle has electric power
steering and does not use power
steering fluid.
Power Steering Fluid
(6.0L V8 and 6.6L
V8 Engines)
SeeEngine Compartment Overview
on page 10-5 for reservoir location.
When to Check Power Steering
Fluid
It is not necessary to regularly
check power steering fluid unless
there is a leak suspected in the
system or an unusual noise is
heard. A fluid loss in this system
could indicate a problem. Have the
system inspected and repaired.
How to Check Power Steering
Fluid
To check the power steering fluid:
1. Turn the key off and let the
engine compartment cool down.
2. Wipe the cap and the top of the reservoir clean.
3. Unscrew the cap and wipe the dipstick with a clean rag.
4. Replace the cap and completely tighten it.
5. Remove the cap again and look at the fluid level on the dipstick.
The level should be at the FULL
COLD mark. If necessary, add only
enough fluid to bring the level up to
the mark.
What to Use
To determine what kind of fluid to
use, see Recommended Fluids and
Lubricants on page 11-12. Always
use the proper fluid.
Page 424 of 546
Black plate (50,1)Chevrolet Silverado Owner Manual (GMNA-Localizing-U.S./Canada/Mexico-
5853506) - 2014 - crc 2nd - 5/15/13
10-50 Vehicle Care
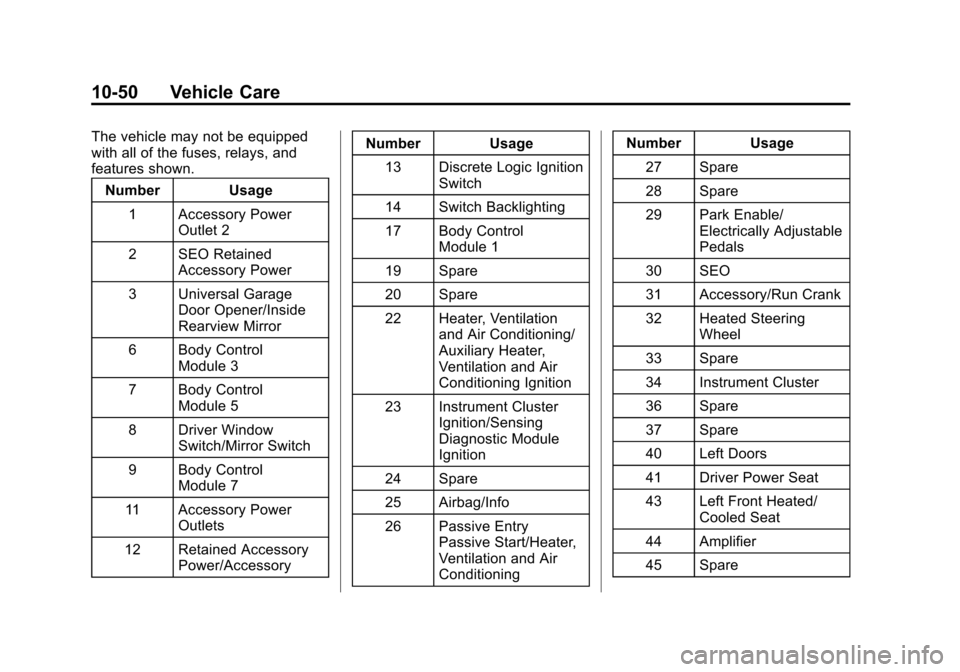
The vehicle may not be equipped
with all of the fuses, relays, and
features shown.Number Usage
1 Accessory Power Outlet 2
2 SEO Retained Accessory Power
3 Universal Garage Door Opener/Inside
Rearview Mirror
6 Body Control Module 3
7 Body Control Module 5
8 Driver Window Switch/Mirror Switch
9 Body Control Module 7
11 Accessory Power Outlets
12 Retained Accessory Power/Accessory Number Usage
13 Discrete Logic Ignition Switch
14 Switch Backlighting
17 Body Control Module 1
19 Spare
20 Spare
22 Heater, Ventilation and Air Conditioning/
Auxiliary Heater,
Ventilation and Air
Conditioning Ignition
23 Instrument Cluster Ignition/Sensing
Diagnostic Module
Ignition
24 Spare
25 Airbag/Info
26 Passive Entry Passive Start/Heater,
Ventilation and Air
Conditioning Number Usage
27 Spare
28 Spare
29 Park Enable/ Electrically Adjustable
Pedals
30 SEO
31 Accessory/Run Crank
32 Heated Steering Wheel
33 Spare
34 Instrument Cluster
36 Spare
37 Spare
40 Left Doors
41 Driver Power Seat
43 Left Front Heated/ Cooled Seat
44 Amplifier
45 Spare
Page 427 of 546
Black plate (53,1)Chevrolet Silverado Owner Manual (GMNA-Localizing-U.S./Canada/Mexico-
5853506) - 2014 - crc 2nd - 5/15/13
Vehicle Care 10-53
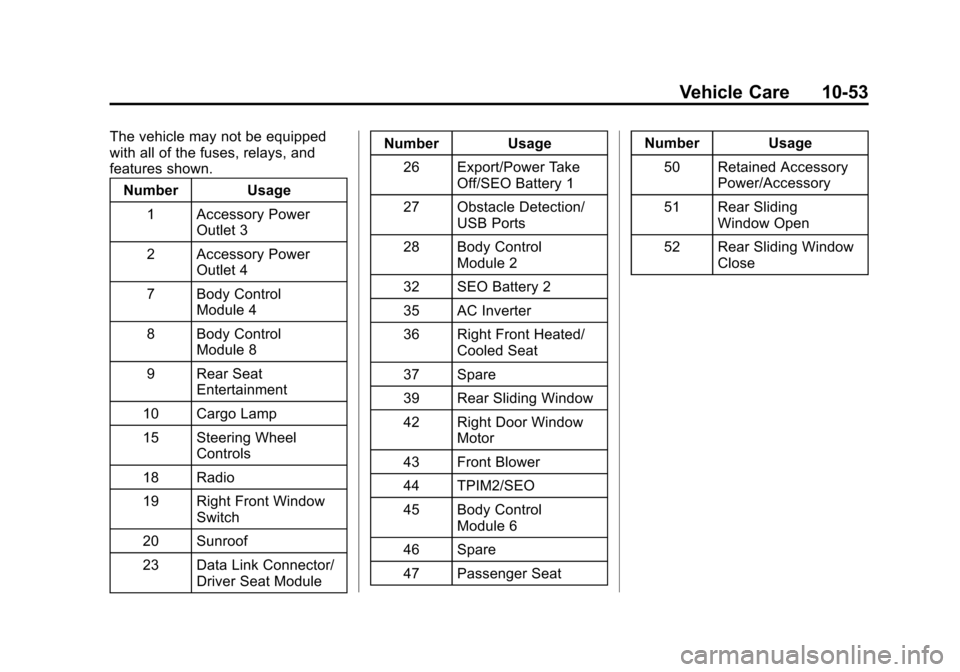
The vehicle may not be equipped
with all of the fuses, relays, and
features shown.Number Usage
1 Accessory Power Outlet 3
2 Accessory Power Outlet 4
7 Body Control Module 4
8 Body Control Module 8
9 Rear Seat Entertainment
10 Cargo Lamp
15 Steering Wheel Controls
18 Radio
19 Right Front Window Switch
20 Sunroof
23 Data Link Connector/ Driver Seat Module Number Usage
26 Export/Power Take Off/SEO Battery 1
27 Obstacle Detection/ USB Ports
28 Body Control Module 2
32 SEO Battery 2
35 AC Inverter
36 Right Front Heated/ Cooled Seat
37 Spare
39 Rear Sliding Window
42 Right Door Window Motor
43 Front Blower
44 TPIM2/SEO
45 Body Control Module 6
46 Spare
47 Passenger Seat Number Usage
50 Retained Accessory Power/Accessory
51 Rear Sliding Window Open
52 Rear Sliding Window Close
Page 477 of 546
Black plate (103,1)Chevrolet Silverado Owner Manual (GMNA-Localizing-U.S./Canada/Mexico-
5853506) - 2014 - crc 2nd - 5/15/13
Vehicle Care 10-103
Caution (Continued)
or sodium chloride. These
chlorides are used on roads for
conditions such as ice and dust.
Always wash the chrome with
soap and water after exposure.
{Caution
To avoid surface damage, do not
use strong soaps, chemicals,
abrasive polishes, cleaners,
brushes, or cleaners that contain
acid on aluminum or
chrome-plated wheels. Use only
approved cleaners. Also, never
drive a vehicle with aluminum or
chrome-plated wheels through an
automatic car wash that uses
silicone carbide tire cleaning
brushes. Damage could occur
and the repairs would not be
covered by the vehicle warranty.
Steering, Suspension, and
Chassis Components
Visually inspect the front and rear
suspension and steering system for
damaged, loose, or missing parts or
signs of wear. Inspect hydraulic
power steering systems for proper
hook-up, binding, leaks, cracks,
chafing, etc. Visually check constant
velocity joints, rubber boots, and
axle seals for leaks.
Body Component Lubrication
Lubricate all key lock cylinders,
hood hinges, liftgate hinges, and the
steel fuel door hinge unless the
components are plastic. Applying
silicone grease on weatherstrips
with a clean cloth will make them
last longer, seal better, and not stick
or squeak.
Underbody Maintenance
At least twice a year, Spring and
Fall, use plain water to flush dirt and
debris from the vehicle's underbody.
Your dealer or an underbody carwashing system can do this. If not
removed, rust and corrosion can
develop.
Sheet Metal Damage
If the vehicle is damaged and
requires sheet metal repair or
replacement, make sure the body
repair shop applies anti-corrosion
material to parts repaired or
replaced to restore corrosion
protection.
Original manufacturer replacement
parts will provide the corrosion
protection while maintaining the
vehicle warranty.
Finish Damage
Quickly repair minor chips and
scratches with touch-up materials
available from your dealer to avoid
corrosion. Larger areas of finish
damage can be corrected in your
dealer's body and paint shop.