2014 CHEVROLET SILVERADO 1500 automatic transmission fluid
[x] Cancel search: automatic transmission fluidPage 168 of 542
Black plate (32,1)Chevrolet Silverado Owner Manual (GMNA-Localizing-U.S./Canada/Mexico-
5853506) - 2014 - CRC 3rd Edition - 8/28/13
5-32 Instruments and Controls
the next oil change. To reset the
engine oil life system, seeEngine
Oil Life System on page 10-13.
Transmission Fluid Temperature
The temperature of the automatic
transmission fluid displays in either
degrees Celsius (°C) or degrees
Fahrenheit (°F).
Trailer Brake
On vehicles with the Integrated
Trailer Brake Control (ITBC) system,
turn the trip odometer reset stem
until TRAILER GAIN and TRAILER
OUTPUT displays.
TRAILER GAIN shows the Trailer
Gain setting. This setting can be
adjusted from 0.0 to 10.0 with either
a trailer connected or disconnected.
TRAILER OUTPUT shows the
power output to the trailer any time
a trailer with electric brakes is
connected. Output is displayed as a
bar graph. Dashes may appear in
the TRAILER OUTPUT display if a
trailer is not connected. Hourmeter
This display shows the total number
of hours the engine has run.
Unit
This will change the displays on the
instrument cluster and DIC to either
metric or English (US)
measurements. To change the units,
press the trip odometer reset stem
when UNITS is displayed to enter
the Unit menu. Turn the trip
odometer reset stem to switch
between English and metric. Press
the trip odometer reset stem when
the desired setting is displayed.
Compass
The vehicle may have a compass in
the Driver Information Center (DIC).
See
Compass on page 5-5.
Driver Information Center
(DIC) (Uplevel)
The DIC displays are shown in the
center of the instrument cluster in
the Info app. See Instrument Cluster
on page 5-10. The displays show
the status of many vehicle systems.
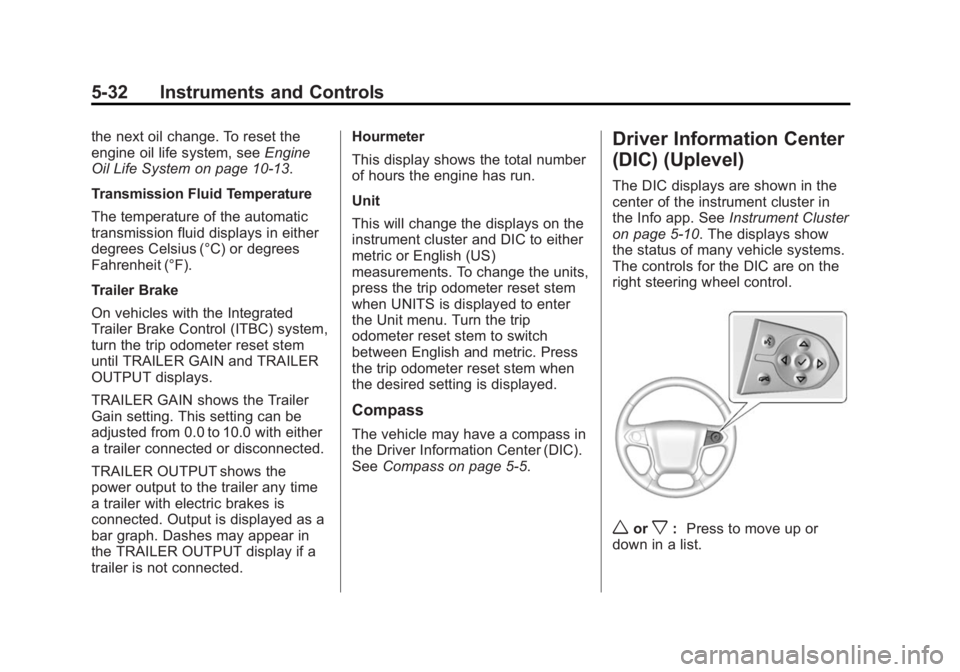
The controls for the DIC are on the
right steering wheel control.
worx: Press to move up or
down in a list.
Page 171 of 542
Black plate (35,1)Chevrolet Silverado Owner Manual (GMNA-Localizing-U.S./Canada/Mexico-
5853506) - 2014 - CRC 3rd Edition - 8/28/13
Instruments and Controls 5-35
Engine Hours:Shows the total
number of hours the engine has run.
Transmission Fluid
Temperature: Shows the
temperature of the automatic
transmission fluid in either degrees
Celsius (°C) or degrees
Fahrenheit (°F).
Trailer Brake (If Equipped): On
vehicles with the Integrated Trailer
Brake Control (ITBC) system, the
trailer brake display appears in
the DIC.
TRAILER GAIN shows the trailer
gain setting. This setting can be
adjusted from 0.0 to 10.0 with either
a trailer connected or disconnected.
OUTPUT shows the power output to
the trailer any time a trailer with
electric brakes is connected. Output
is displayed as a bar graph. Dashes
may appear in the OUTPUT display
if a trailer is not connected.
Blank Page: Shows no
information.Vehicle Messages
Messages displayed on the DIC
indicate the status of the vehicle or
some action may be needed to
correct a condition. Multiple
messages may appear one after
another.
The messages that do not require
immediate action can be
acknowledged and cleared by
pressing
Vor the trip odometer
reset stem on the base cluster.
The messages that require
immediate action cannot be cleared
until that action is performed.
All messages should be taken
seriously and clearing the message
does not correct the problem.
The following are the possible
messages and some information
about them.
If the vehicle has a diesel engine,
see the Duramax diesel
supplement.
Battery Voltage and
Charging Messages
BATTERY LOW START
VEHICLE
When the vehicle’ s battery is
severely discharged, this message
will display and four chimes will
sound. Start the vehicle
immediately. If the vehicle is not
started and the battery continues to
discharge, the climate controls,
heated seats, and audio systems
will shut off and the vehicle may
require a jump start. These systems
will function again after the vehicle
is started.
BATTERY SAVER ACTIVE
This message displays when the
battery voltage drops below
expected levels and features are
disabled. Turn off all unnecessary
accessory features.
Page 344 of 542
Black plate (78,1)Chevrolet Silverado Owner Manual (GMNA-Localizing-U.S./Canada/Mexico-
5853506) - 2014 - CRC 3rd Edition - 8/28/13
9-78 Driving and Operating
If parking the rig on a hill:
1. Press the brake pedal, but donot shift into P (Park) yet. Turn
the wheels into the curb if facing
downhill or into traffic if facing
uphill.
2. Have someone place chocks under the trailer wheels.
3. When the wheel chocks are in place, release the regular brakes
until the chocks absorb the load.
4. Reapply the brake pedal. Then apply the parking brake and shift
into P (Park).
5. Release the brake pedal.
Leaving After Parking on a Hill
1. Apply and hold the brake pedal.
2. Start the engine.
3. Shift into a gear.
4. Release the parking brake.
5. Let up on the brake pedal.
6. Drive slowly until the trailer is clear of the chocks. 7. Stop and have someone pick up
and store the chocks.
Maintenance when Trailer
Towing
The vehicle needs service more
often when pulling a trailer. See
Maintenance Schedule on
page 11-3. Things that are
especially important in trailer
operation are automatic
transmission fluid, engine oil, axle
lubricant, belts, cooling system, and
brake system. It is a good idea to
inspect these before and during
the trip.
Check periodically to see that all
hitch nuts and bolts are tight.
Trailer Towing
If the vehicle has a diesel engine,
see the Duramax diesel
supplement.
If the vehicle is bi-fuel, see the
bi-fuel supplement. Do not tow a trailer during break-in.
See
New Vehicle Break-In on
page 9-23.
{Warning
The driver can lose control when
pulling a trailer if the correct
equipment is not used or the
vehicle is not driven properly. For
example, if the trailer is too
heavy, the brakes may not work
well or even at all. The driver and
passengers could be seriously
injured. The vehicle may also be
damaged; the resulting repairs
would not be covered by the
vehicle warranty. Pull a trailer
only if all the steps in this section
have been followed. Ask your
dealer for advice and information
about towing a trailer with the
vehicle.
Page 371 of 542
Black plate (1,1)Chevrolet Silverado Owner Manual (GMNA-Localizing-U.S./Canada/Mexico-
5853506) - 2014 - CRC 3rd Edition - 8/29/13
Vehicle Care 10-1
Vehicle Care
General Information
General Information . . . . . . . . . . 10-2
California Proposition65 Warning . . . . . . . . . . . . . . . . . 10-2
California Perchlorate Materials Requirements . . . . 10-3
Accessories and Modifications . . . . . . . . . . . . . . . 10-3
Vehicle Checks
Doing Your OwnService Work . . . . . . . . . . . . . . . 10-3
Hood . . . . . . . . . . . . . . . . . . . . . . . . 10-4
Engine Compartment Overview . . . . . . . . . . . . . . . . . . . 10-5
Engine Oil . . . . . . . . . . . . . . . . . . 10-10
Engine Oil Life System . . . . . 10-13
Automatic Transmission Fluid . . . . . . . . . . . . . . . . . . . . . . 10-14
Manual Transmission Fluid . . . . . . . . . . . . . . . . . . . . . . 10-17
Hydraulic Clutch . . . . . . . . . . . . 10-17
Engine Air Cleaner/Filter . . . . 10-18
Cooling System . . . . . . . . . . . . 10-19
Engine Coolant . . . . . . . . . . . . . 10-20
Engine Overheating . . . . . . . . 10-23 Overheated Engine
Protection Operating Mode
(6.0L V8 Engine Only) . . . . . 10-25
Engine Fan . . . . . . . . . . . . . . . . . 10-26
Power Steering Fluid (1500 Series) . . . . . . . . . . . . . . . . . . . . 10-26
Power Steering Fluid (2500/ 3500 Series) . . . . . . . . . . . . . . 10-26
Washer Fluid . . . . . . . . . . . . . . . 10-27
Brakes . . . . . . . . . . . . . . . . . . . . . 10-28
Brake Fluid . . . . . . . . . . . . . . . . . 10-29
Battery . . . . . . . . . . . . . . . . . . . . . 10-31
Four-Wheel Drive . . . . . . . . . . . 10-31
Front Axle . . . . . . . . . . . . . . . . . . 10-33
Rear Axle . . . . . . . . . . . . . . . . . . 10-34
Noise Control System . . . . . . 10-35
Starter Switch Check . . . . . . . 10-36
Automatic Transmission Shift Lock Control Function
Check . . . . . . . . . . . . . . . . . . . . . 10-37
Ignition Transmission Lock Check . . . . . . . . . . . . . . . . . . . . . 10-37
Park Brake and P (Park) Mechanism Check . . . . . . . . 10-37
Wiper Blade Replacement . . . . . . . . . . . . . . 10-38
Glass Replacement . . . . . . . . 10-38
Headlamp Aiming
Headlamp Aiming . . . . . . . . . . 10-39
Bulb Replacement
Bulb Replacement . . . . . . . . . . 10-39
Halogen Bulbs . . . . . . . . . . . . . . 10-39
Headlamps, Front Turn Signal, Sidemarker, and
Parking Lamps . . . . . . . . . . . . 10-39
Fog Lamps . . . . . . . . . . . . . . . . . 10-40
Taillamps (Chassis Cab Models) . . . . . . . . . . . . . . . . . . . 10-40
Taillamps, Turn Signal, Stoplamps, and Back-Up
Lamps . . . . . . . . . . . . . . . . . . . . 10-41
Center High-Mounted Stoplamp (CHMSL) and
Cargo Lamp . . . . . . . . . . . . . . 10-41
License Plate Lamp . . . . . . . . 10-42
Replacement Bulbs . . . . . . . . . 10-42
Electrical System
Electrical System Overload . . . . . . . . . . . . . . . . . . 10-43
Fuses . . . . . . . . . . . . . . . . . . . . . . 10-43
Page 376 of 542
Black plate (6,1)Chevrolet Silverado Owner Manual (GMNA-Localizing-U.S./Canada/Mexico-
5853506) - 2014 - CRC 3rd Edition - 8/29/13
10-6 Vehicle Care
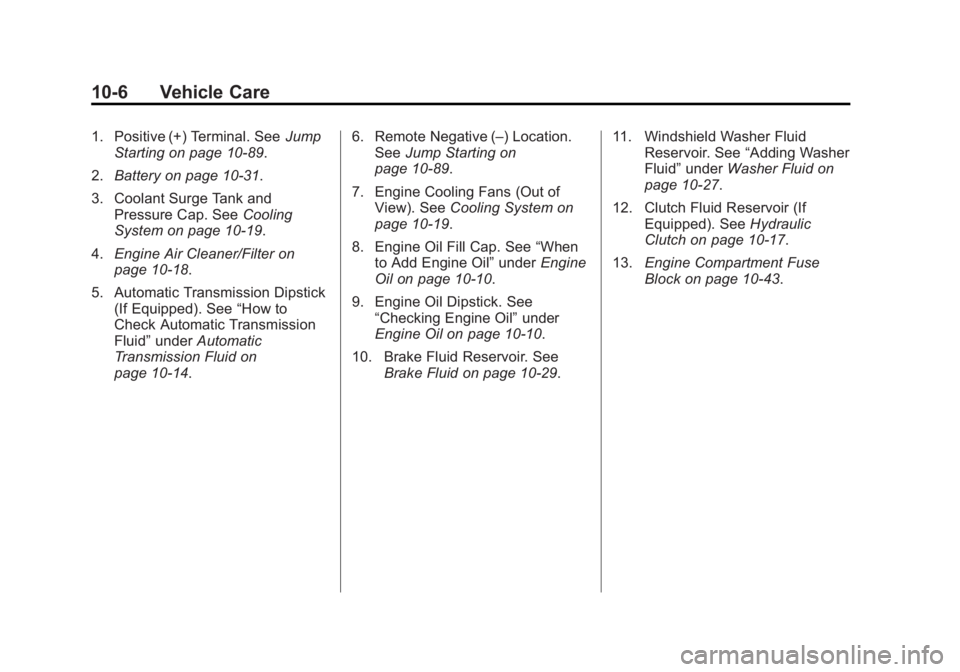
1. Positive (+) Terminal. SeeJump
Starting on page 10-89.
2. Battery on page 10-31.
3. Coolant Surge Tank and Pressure Cap. See Cooling
System on page 10-19.
4. Engine Air Cleaner/Filter on
page 10-18.
5. Automatic Transmission Dipstick (If Equipped). See “How to
Check Automatic Transmission
Fluid” under Automatic
Transmission Fluid on
page 10-14. 6. Remote Negative (–) Location.
See Jump Starting on
page 10-89.
7. Engine Cooling Fans (Out of View). See Cooling System on
page 10-19.
8. Engine Oil Fill Cap. See “When
to Add Engine Oil” underEngine
Oil on page 10-10.
9. Engine Oil Dipstick. See “Checking Engine Oil” under
Engine Oil on page 10-10.
10. Brake Fluid Reservoir. See Brake Fluid on page 10-29. 11. Windshield Washer Fluid
Reservoir. See “Adding Washer
Fluid” under Washer Fluid on
page 10-27.
12. Clutch Fluid Reservoir (If Equipped). See Hydraulic
Clutch on page 10-17.
13. Engine Compartment Fuse
Block on page 10-43.
Page 378 of 542
Black plate (8,1)Chevrolet Silverado Owner Manual (GMNA-Localizing-U.S./Canada/Mexico-
5853506) - 2014 - CRC 3rd Edition - 8/29/13
10-8 Vehicle Care
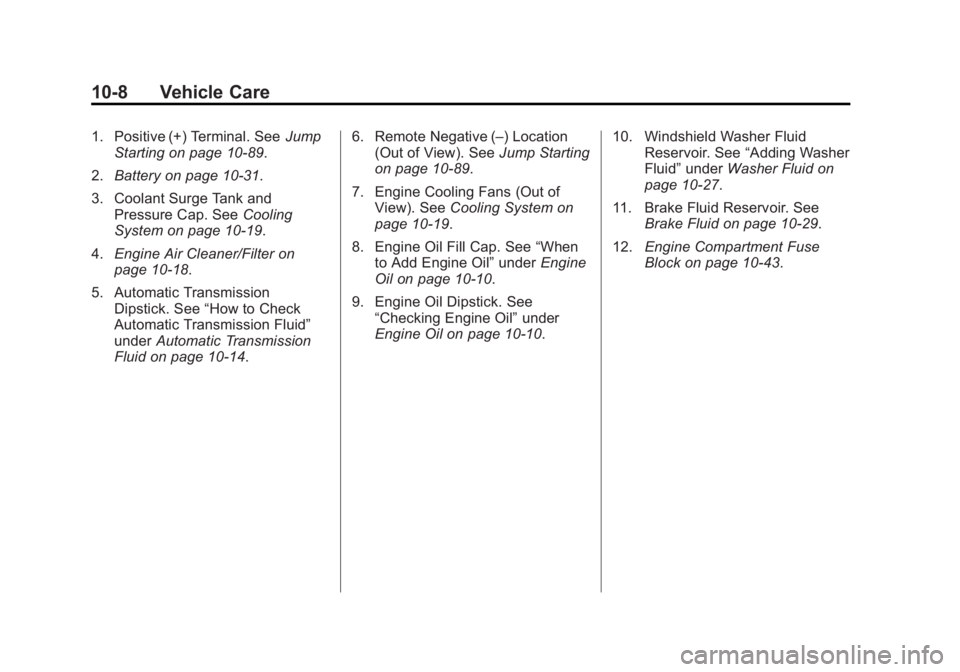
1. Positive (+) Terminal. SeeJump
Starting on page 10-89.
2. Battery on page 10-31.
3. Coolant Surge Tank and Pressure Cap. See Cooling
System on page 10-19.
4. Engine Air Cleaner/Filter on
page 10-18.
5. Automatic Transmission Dipstick. See “How to Check
Automatic Transmission Fluid”
under Automatic Transmission
Fluid on page 10-14. 6. Remote Negative (–) Location
(Out of View). See Jump Starting
on page 10-89.
7. Engine Cooling Fans (Out of View). See Cooling System on
page 10-19.
8. Engine Oil Fill Cap. See “When
to Add Engine Oil” underEngine
Oil on page 10-10.
9. Engine Oil Dipstick. See “Checking Engine Oil” under
Engine Oil on page 10-10. 10. Windshield Washer Fluid
Reservoir. See “Adding Washer
Fluid” under Washer Fluid on
page 10-27.
11. Brake Fluid Reservoir. See Brake Fluid on page 10-29.
12. Engine Compartment Fuse
Block on page 10-43.
Page 380 of 542
Black plate (10,1)Chevrolet Silverado Owner Manual (GMNA-Localizing-U.S./Canada/Mexico-
5853506) - 2014 - CRC 3rd Edition - 8/29/13
10-10 Vehicle Care
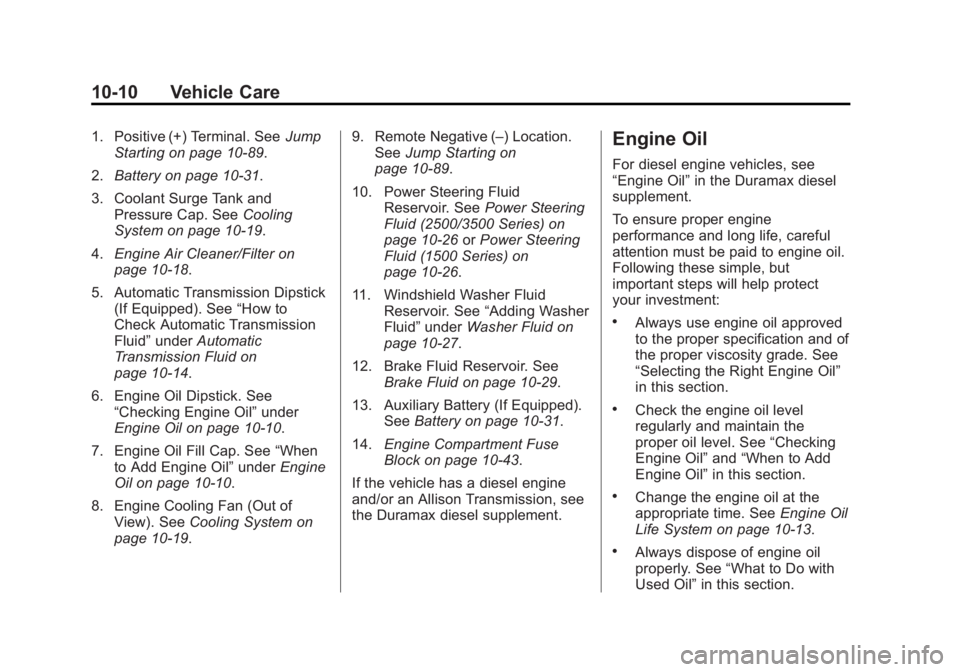
1. Positive (+) Terminal. SeeJump
Starting on page 10-89.
2. Battery on page 10-31.
3. Coolant Surge Tank and Pressure Cap. See Cooling
System on page 10-19.
4. Engine Air Cleaner/Filter on
page 10-18.
5. Automatic Transmission Dipstick (If Equipped). See “How to
Check Automatic Transmission
Fluid” under Automatic
Transmission Fluid on
page 10-14.
6. Engine Oil Dipstick. See “Checking Engine Oil” under
Engine Oil on page 10-10.
7. Engine Oil Fill Cap. See “When
to Add Engine Oil” underEngine
Oil on page 10-10.
8. Engine Cooling Fan (Out of View). See Cooling System on
page 10-19. 9. Remote Negative (–) Location.
See Jump Starting on
page 10-89.
10. Power Steering Fluid Reservoir. See Power Steering
Fluid (2500/3500 Series) on
page 10-26 orPower Steering
Fluid (1500 Series) on
page 10-26.
11. Windshield Washer Fluid Reservoir. See “Adding Washer
Fluid” under Washer Fluid on
page 10-27.
12. Brake Fluid Reservoir. See Brake Fluid on page 10-29.
13. Auxiliary Battery (If Equipped). SeeBattery on page 10-31.
14. Engine Compartment Fuse
Block on page 10-43.
If the vehicle has a diesel engine
and/or an Allison Transmission, see
the Duramax diesel supplement.Engine Oil
For diesel engine vehicles, see
“Engine Oil” in the Duramax diesel
supplement.
To ensure proper engine
performance and long life, careful
attention must be paid to engine oil.
Following these simple, but
important steps will help protect
your investment:
.Always use engine oil approved
to the proper specification and of
the proper viscosity grade. See
“Selecting the Right Engine Oil”
in this section.
.Check the engine oil level
regularly and maintain the
proper oil level. See “Checking
Engine Oil” and“When to Add
Engine Oil” in this section.
.Change the engine oil at the
appropriate time. See Engine Oil
Life System on page 10-13.
.Always dispose of engine oil
properly. See “What to Do with
Used Oil” in this section.
Page 384 of 542
Black plate (14,1)Chevrolet Silverado Owner Manual (GMNA-Localizing-U.S./Canada/Mexico-
5853506) - 2014 - CRC 3rd Edition - 8/29/13
10-14 Vehicle Care
How to Reset the Engine Oil
Life System
Reset the system whenever the
engine oil is changed so that the
system can calculate the next
engine oil change. Always reset the
engine oil life to 100% after every oil
change. It will not reset itself. To
reset the engine oil life system:
1. Display the OIL LIFEREMAINING on the DIC. If the
vehicle does not have DIC
buttons, the vehicle must be in
P (Park) to access this display.
See Driver Information Center
(DIC) (Base Level) on page 5-30
or Driver Information Center
(DIC) (Uplevel) on page 5-32.
2. Press and hold
V, or the trip
odometer reset stem if the
vehicle does not have DIC
buttons, for several seconds.
The oil life will change to 100%. The oil life system can also be reset
as follows:
1. Turn the ignition to ON/RUN with
the engine off.
2. Fully press the accelerator pedal slowly three times within
five seconds.
3. Display the OIL LIFE REMAINING on the DIC. If the
display shows 100%, the system
is reset.
If the vehicle has a CHANGE
ENGINE OIL SOON message and it
comes back on when the vehicle is
started and/or the OIL LIFE
REMAINING is near 0%, the engine
oil life system has not been reset.
Repeat the procedure.
Automatic Transmission
Fluid
When to Check and Change
Automatic Transmission Fluid
It is usually not necessary to check
the transmission fluid level. The only
reason for fluid loss is a
transmission leak or overheated
transmission. If a small leak is
suspected, then use the following
checking procedures to check the
fluid level. However, if there is a
large leak, then it may be necessary
to have the vehicle towed to a
dealer service department and have
it repaired before driving the vehicle
further.
{Caution
Use of the incorrect automatic
transmission fluid may damage
the vehicle, and the damage may
not be covered by the vehicle
warranty. Always use the (Continued)