2014 CHEVROLET SILVERADO 1500 maintenance
[x] Cancel search: maintenancePage 400 of 542
Black plate (30,1)Chevrolet Silverado Owner Manual (GMNA-Localizing-U.S./Canada/Mexico-
5853506) - 2014 - CRC 3rd Edition - 8/29/13
10-30 Vehicle Care
{Warning
If too much brake fluid is added, it
can spill on the engine and burn,
if the engine is hot enough. You
or others could be burned, and
the vehicle could be damaged.
Add brake fluid only when work is
done on the brake hydraulic
system. See“Checking Brake
Fluid” in this section.
When the brake fluid falls to a low
level, the brake warning light comes
on. See Brake System Warning
Light on page 5-24.
Refer to the Maintenance Schedule
to determine when to check the
brake fluid. See Maintenance
Schedule on page 11-3.
Checking Brake Fluid
Check brake fluid by looking at the
brake fluid reservoir. See Engine
Compartment Overview on
page 10-5.
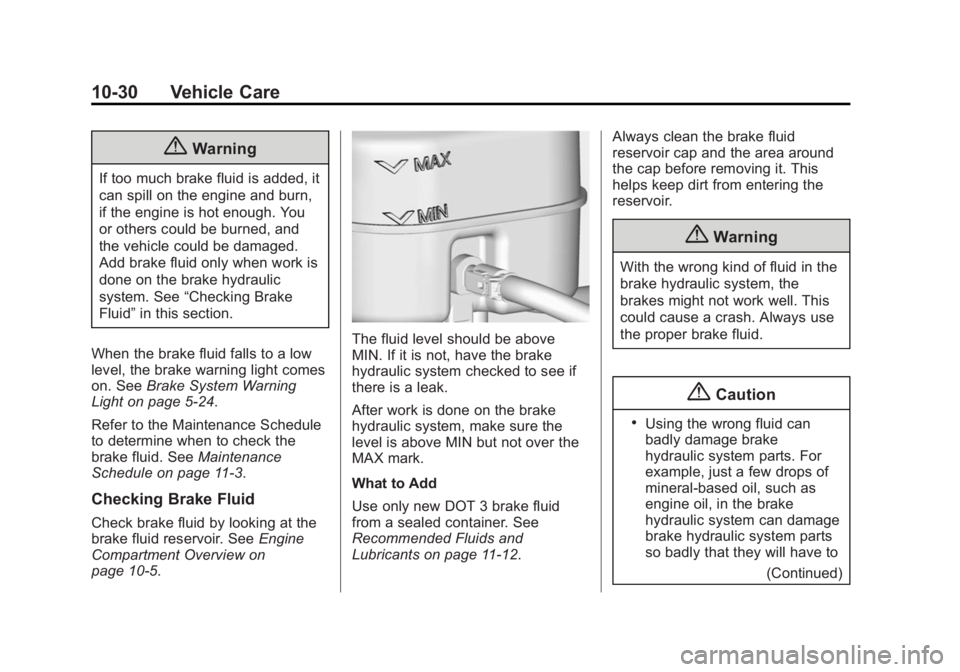
The fluid level should be above
MIN. If it is not, have the brake
hydraulic system checked to see if
there is a leak.
After work is done on the brake
hydraulic system, make sure the
level is above MIN but not over the
MAX mark.
What to Add
Use only new DOT 3 brake fluid
from a sealed container. See
Recommended Fluids and
Lubricants on page 11-12. Always clean the brake fluid
reservoir cap and the area around
the cap before removing it. This
helps keep dirt from entering the
reservoir.
{Warning
With the wrong kind of fluid in the
brake hydraulic system, the
brakes might not work well. This
could cause a crash. Always use
the proper brake fluid.
{Caution
.Using the wrong fluid can
badly damage brake
hydraulic system parts. For
example, just a few drops of
mineral-based oil, such as
engine oil, in the brake
hydraulic system can damage
brake hydraulic system parts
so badly that they will have to
(Continued)
Page 401 of 542
Black plate (31,1)Chevrolet Silverado Owner Manual (GMNA-Localizing-U.S./Canada/Mexico-
5853506) - 2014 - CRC 3rd Edition - 8/29/13
Vehicle Care 10-31
Caution (Continued)
be replaced. Do not let
someone put in the wrong
kind of fluid.
.If brake fluid is spilled on the
vehicle's painted surfaces,
the paint finish can be
damaged. Be careful not to
spill brake fluid on the
vehicle. If you do, wash it off
immediately.
Battery
Refer to the replacement number
shown on the original battery label
when a new battery is needed. See
Engine Compartment Overview on
page 10-5for battery location.
{Warning
Battery posts, terminals, and
related accessories contain lead
and lead compounds, chemicals
known to the State of California to
cause cancer and reproductive
harm. Wash hands after handling.
Vehicle Storage
{Warning
Batteries have acid that can burn
you and gas that can explode.
You can be badly hurt if you are
not careful. See Jump Starting on
page 10-89 for tips on working
around a battery without
getting hurt.
Infrequent Usage: Remove the
black, negative (−) cable from the
battery to keep the battery from
running down. Extended Storage: Remove the
black, negative (−) cable from the
battery or use a battery trickle
charger.
Four-Wheel Drive
Transfer Case
When to Check Lubricant
Refer to
Maintenance Schedule on
page 11-3 to determine when to
check the lubricant.
Page 403 of 542
Black plate (33,1)Chevrolet Silverado Owner Manual (GMNA-Localizing-U.S./Canada/Mexico-
5853506) - 2014 - CRC 3rd Edition - 8/29/13
Vehicle Care 10-33
When to Change Lubricant
Refer toMaintenance Schedule on
page 11-3 to determine how often to
change the lubricant.
What to Use
Refer to Recommended Fluids and
Lubricants on page 11-12 to
determine what kind of lubricant
to use.
Front Axle
When to Check and Change
Lubricant
It is not necessary to regularly
check front axle fluid unless a leak
is suspected, or an unusual noise is
heard. A fluid loss could indicate a
problem. Have it inspected and
repaired.
How to Check Lubricant
To get an accurate reading, the
vehicle should be on a level
surface.1500 Series
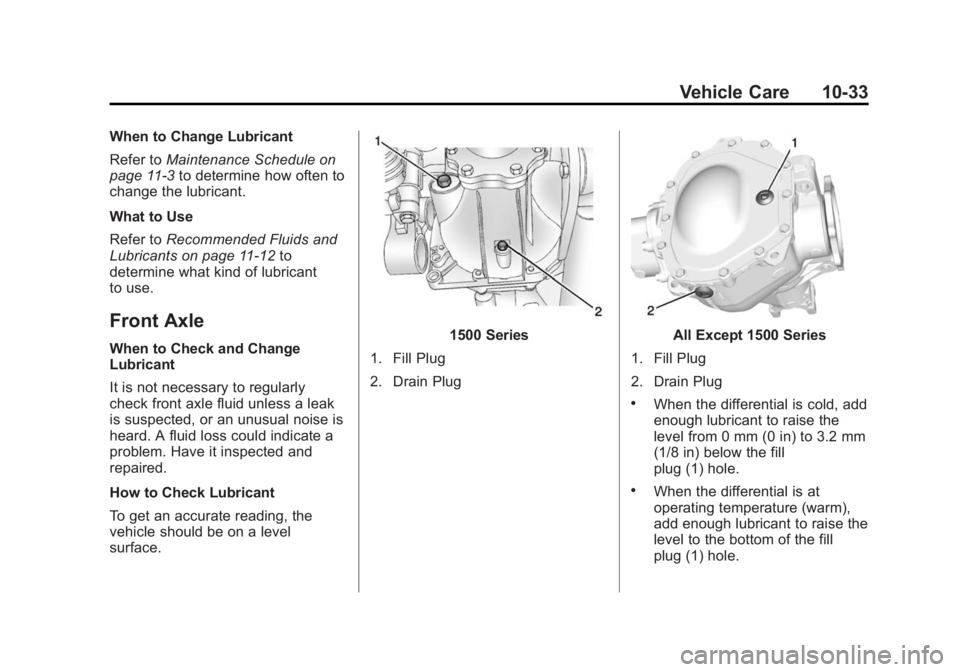
1. Fill Plug
2. Drain PlugAll Except 1500 Series
1. Fill Plug
2. Drain Plug
.When the differential is cold, add
enough lubricant to raise the
level from 0 mm (0 in) to 3.2 mm
(1/8 in) below the fill
plug (1) hole.
.When the differential is at
operating temperature (warm),
add enough lubricant to raise the
level to the bottom of the fill
plug (1) hole.
Page 405 of 542
Black plate (35,1)Chevrolet Silverado Owner Manual (GMNA-Localizing-U.S./Canada/Mexico-
5853506) - 2014 - CRC 3rd Edition - 8/29/13
Vehicle Care 10-35
To get an accurate reading, the
vehicle should be on a level
surface.
.For all 4.3L and 5.3L 1500
Series applications, the proper
level is 1.0 mm to 19.0 mm
(0.04 in to 0.7 in) below the
bottom of the fill hole, located on
the rear axle. Add only enough
fluid to reach the proper level.
.For 6.2L 1500 Series
applications, the proper level is
from 15 mm to 40 mm (0.6 in to
1.6 in) below the bottom of the
fill plug hole, located on the rear
axle. Add only enough fluid to
reach the proper level.
.For all 6.0L 2500HD Series
applications, the proper level is
from 0 mm to 13 mm (0 to 0.5 in)
below the bottom of the fill plug
hole, located on the rear axle.
Add only enough fluid to reach
the proper level.
.For all 6.6L Duramax Diesel
2500HD Series applications and
all 3500 Series applications, theproper level is from 17 mm to
21 mm (0.6 in to 0.8 in) below
the bottom of the fill plug hole,
located on the rear axle. Add
only enough fluid to reach the
proper level.
What to Use
Refer to
Recommended Fluids and
Lubricants on page 11-12 to
determine what kind of lubricant
to use.
Noise Control System
The following information relates to
compliance with federal noise
emission standards for vehicles with
a Gross Vehicle Weight Rating
(GVWR) of more than 4 536 kg
(10,000 lb). The noise control
system warranty is given in your
warranty manual.
These standards apply only to
vehicles sold in the United States. Federal law prohibits the following
acts or the causing thereof:
1. The removal or rendering
inoperative by any person, other
than for purposes of
maintenance, repair or
replacement, of any device or
element of design incorporated
into any new vehicle for the
purpose of noise control, prior to
its sale or delivery to the ultimate
purchaser or while it is in use; or
2. The use of the vehicle after such device or element of design has
been removed or rendered
inoperative by any person.
Among those acts presumed to
constitute tampering are the acts
listed below.
Insulation:
Removal of the noise shields or any
underhood insulation.
Page 408 of 542
Black plate (38,1)Chevrolet Silverado Owner Manual (GMNA-Localizing-U.S./Canada/Mexico-
5853506) - 2014 - CRC 3rd Edition - 8/29/13
10-38 Vehicle Care
.To check the P (Park)
mechanism's holding ability:
With the engine running, shift to
P (Park). Then release the
parking brake followed by the
regular brake.
Contact your dealer if service is
required.
Wiper Blade Replacement
Windshield wiper blades should be
inspected for wear or cracking. See
Maintenance Schedule on
page 11-3.
Replacement blades come in
different types and are removed in
different ways. For proper
windshield wiper blade length and
type, see Maintenance
Replacement Parts on page 11-15.
{Caution
Allowing the wiper arm to touch
the windshield when no wiper
blade is installed could damage
the windshield. Any damage that
occurs would not be covered by
your warranty. Do not allow the
wiper arm to touch the windshield.
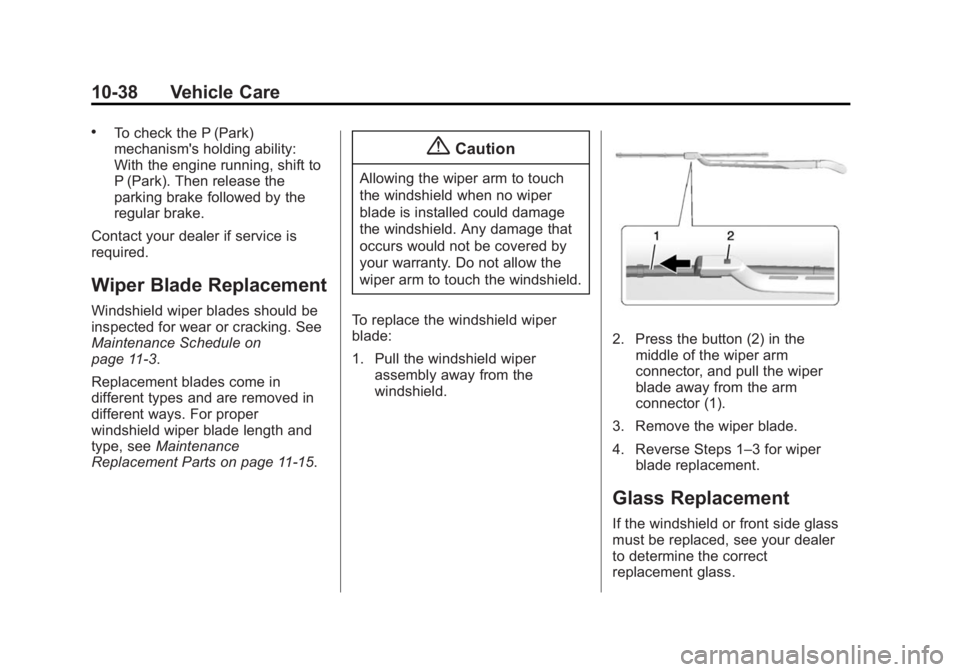
To replace the windshield wiper
blade:
1. Pull the windshield wiper assembly away from the
windshield.
2. Press the button (2) in themiddle of the wiper arm
connector, and pull the wiper
blade away from the arm
connector (1).
3. Remove the wiper blade.
4. Reverse Steps 1–3 for wiper blade replacement.
Glass Replacement
If the windshield or front side glass
must be replaced, see your dealer
to determine the correct
replacement glass.
Page 432 of 542
Black plate (62,1)Chevrolet Silverado Owner Manual (GMNA-Localizing-U.S./Canada/Mexico-
5853506) - 2014 - CRC 3rd Edition - 8/29/13
10-62 Vehicle Care
Check the tire inflation pressure
when the tires are cold, meaning
the vehicle has not been driven
for at least three hours or no
more than 1.6 km (1 mi).
Remove the valve cap from the
tire valve stem. Press the tire
gauge firmly onto the valve to
get a pressure measurement.
If the cold tire inflation pressure
matches the recommended
pressure on the Tire and
Loading Information label, no
further adjustment is necessary.
If the inflation pressure is low,
add air until the recommended
pressure is reached. If the
inflation pressure is high, press
on the metal stem in the center
of the tire valve to release air.
Re-check the tire pressure with
the tire gauge.
Return the valve caps on the
valve stems to prevent leaks
and keep out dirt and moisture.Tire Pressure Monitor
System
The Tire Pressure Monitor System
(TPMS) uses radio and sensor
technology to check tire pressure
levels. The TPMS sensors monitor
the air pressure in your tires and
transmit tire pressure readings to a
receiver located in the vehicle.
Each tire, including the spare (if
provided), should be checked
monthly when cold and inflated to
the inflation pressure recommended
by the vehicle manufacturer on the
vehicle placard or tire inflation
pressure label. (If your vehicle has
tires of a different size than the size
indicated on the vehicle placard or
tire inflation pressure label, you
should determine the proper tire
inflation pressure for those tires.)
As an added safety feature, your
vehicle has been equipped with a
tire pressure monitoring system
(TPMS) that illuminates a low tirepressure telltale when one or more
of your tires is significantly
under-inflated.
Accordingly, when the low tire
pressure telltale illuminates, you
should stop and check your tires as
soon as possible, and inflate them
to the proper pressure. Driving on a
significantly under-inflated tire
causes the tire to overheat and can
lead to tire failure. Under-inflation
also reduces fuel efficiency and tire
tread life, and may affect the
vehicle's handling and stopping
ability.
Please note that the TPMS is not a
substitute for proper tire
maintenance, and it is the driver's
responsibility to maintain correct tire
pressure, even if under-inflation has
not reached the level to trigger
illumination of the TPMS low tire
pressure telltale.
Your vehicle has also been
equipped with a TPMS malfunction
indicator to indicate when the
system is not operating properly.
Page 434 of 542
Black plate (64,1)Chevrolet Silverado Owner Manual (GMNA-Localizing-U.S./Canada/Mexico-
5853506) - 2014 - CRC 3rd Edition - 8/29/13
10-64 Vehicle Care
air pressure is getting low and
needs to be inflated to the proper
pressure.
A Tire and Loading Information label
shows the size of the original
equipment tires and the correct
inflation pressure for the tires when
they are cold. SeeVehicle Load
Limits on page 9-15, for an example
of the Tire and Loading Information
label and its location. Also see Tire
Pressure on page 10-61.
The TPMS can warn about a low
tire pressure condition but it does
not replace normal tire
maintenance. See Tire Inspection
on page 10-66, Tire Rotation on
page 10-67 andTires on
page 10-52.{Caution
Tire sealant materials are not all
the same. A non-approved tire
sealant could damage the TPMS
sensors. TPMS sensor damage
caused by using an incorrect tire
sealant is not covered by the
vehicle warranty. Always use only
the GM approved tire sealant
available through your dealer or
included in the vehicle.
TPMS Malfunction Light and
Message
The TPMS will not function properly
if one or more of the TPMS sensors
are missing or inoperable. When the
system detects a malfunction, the
low tire pressure warning light
flashes for about one minute and
then stays on for the remainder of
the ignition cycle. A DIC warning
message also displays. The
malfunction light and DIC warning
message come on at each ignition
cycle until the problem is corrected.
Some of the conditions that can
cause these to come on are:
.One of the road tires has been
replaced with the spare tire. The
spare tire does not have a
TPMS sensor. The malfunction
light and the DIC message
should go off after the road tire
is replaced and the sensor
matching process is performed
successfully. See "TPMS Sensor
Matching Process" later in this
section.
Page 437 of 542
Black plate (67,1)Chevrolet Silverado Owner Manual (GMNA-Localizing-U.S./Canada/Mexico-
5853506) - 2014 - CRC 3rd Edition - 8/29/13
Vehicle Care 10-67
.The tire has a bump, bulge,
or split.
.The tire has a puncture, cut,
or other damage that cannot
be repaired well because of
the size or location of the
damage.
Tire Rotation
Tires should be rotated every
12 000 km (7,500 mi). See
Maintenance Schedule on
page 11-3.
Tires are rotated to achieve a
uniform wear for all tires. The
first rotation is the most
important.
Anytime unusual wear is
noticed, rotate the tires as soon
as possible, check for proper tire
inflation pressure, and check for
damaged tires or wheels. If the
unusual wear continues after the
rotation, check the wheelalignment. See
When It Is Time
for New Tires on page 10-69
and Wheel Replacement on
page 10-74.
If your vehicle has dual rear
wheels, also see Dual Tire
Rotation on page 10-69.
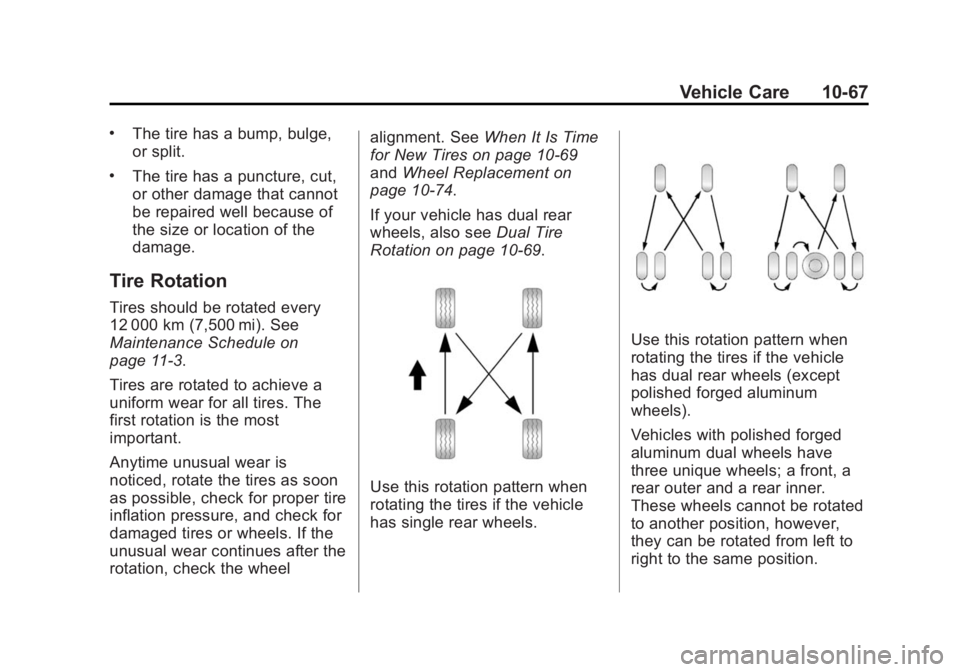
Use this rotation pattern when
rotating the tires if the vehicle
has single rear wheels.
Use this rotation pattern when
rotating the tires if the vehicle
has dual rear wheels (except
polished forged aluminum
wheels).
Vehicles with polished forged
aluminum dual wheels have
three unique wheels; a front, a
rear outer and a rear inner.
These wheels cannot be rotated
to another position, however,
they can be rotated from left to
right to the same position.