2014 CHEVROLET SILVERADO 1500 clock
[x] Cancel search: clockPage 258 of 542
Black plate (2,1)Chevrolet Silverado Owner Manual (GMNA-Localizing-U.S./Canada/Mexico-
5853506) - 2014 - CRC 3rd Edition - 8/29/13
8-2 Climate Controls
9(Fan Control):Turn clockwise
or counterclockwise to increase or
decrease the fan speed. Turn the
knob all the way counterclockwise
to turn the fan off.
Air Delivery Mode Control: Press
Y,\,[, or-to change the
direction of the airflow. An indicator
light comes on in the selected mode
button.
Y(Vent): Air is directed to the
instrument panel outlets.
\(Bi-Level): Air is divided
between the instrument panel and
floor outlets.
[(Floor): Air is directed to the
floor outlets, with some air directed
to the windshield, side window, and
second row floor outlets.
-(Defog): This mode clears the
windows of fog or moisture. Air is
directed to the windshield, floor
outlets, and side window vents.
0(Defrost): Press to clear the
windshield of fog or frost more
quickly. Air is directed to the
windshield and the side window
vents. The system automatically
forces outside air into the vehicle.
Do not drive the vehicle until all the
windows are clear.
See Air Vents on page 8-8.
@(Recirculation): Press to turn
on recirculation. An indicator light
comes on. Air is recirculated to
quickly cool the inside of the
vehicle. It can also be used to help
reduce outside air and odors that
enter the vehicle.
Page 259 of 542
Black plate (3,1)Chevrolet Silverado Owner Manual (GMNA-Localizing-U.S./Canada/Mexico-
5853506) - 2014 - CRC 3rd Edition - 8/29/13
Climate Controls 8-3
Climate Control Systems (with Air Conditioning)
With this system the heating, cooling, and ventilation can be controlled.
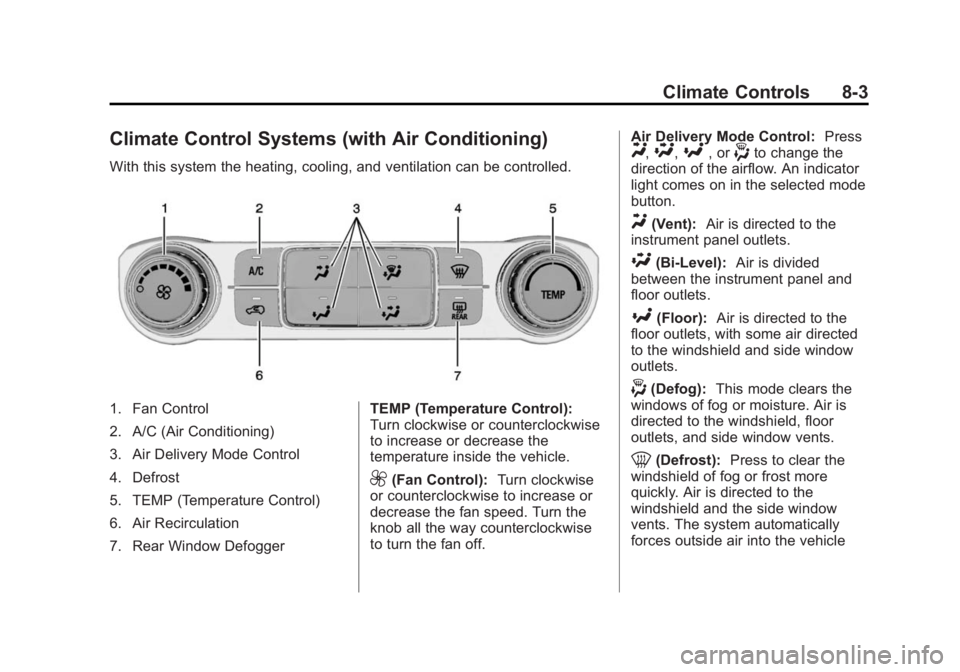
1. Fan Control
2. A/C (Air Conditioning)
3. Air Delivery Mode Control
4. Defrost
5. TEMP (Temperature Control)
6. Air Recirculation
7. Rear Window DefoggerTEMP (Temperature Control):
Turn clockwise or counterclockwise
to increase or decrease the
temperature inside the vehicle.
9(Fan Control):
Turn clockwise
or counterclockwise to increase or
decrease the fan speed. Turn the
knob all the way counterclockwise
to turn the fan off. Air Delivery Mode Control:
Press
Y,\,[, or-to change the
direction of the airflow. An indicator
light comes on in the selected mode
button.
Y(Vent): Air is directed to the
instrument panel outlets.
\(Bi-Level): Air is divided
between the instrument panel and
floor outlets.
[(Floor): Air is directed to the
floor outlets, with some air directed
to the windshield and side window
outlets.
-(Defog): This mode clears the
windows of fog or moisture. Air is
directed to the windshield, floor
outlets, and side window vents.
0(Defrost): Press to clear the
windshield of fog or frost more
quickly. Air is directed to the
windshield and the side window
vents. The system automatically
forces outside air into the vehicle
Page 262 of 542
Black plate (6,1)Chevrolet Silverado Owner Manual (GMNA-Localizing-U.S./Canada/Mexico-
5853506) - 2014 - CRC 3rd Edition - 8/29/13
8-6 Climate Controls
The recirculation light will not come
on when automatically controlled.
Press
@to manually select
recirculation; press it again to select
outside air.
Do not cover the solar sensor on the
top of the instrument panel near the
windshield. This sensor regulates
air temperature based on sun load.
See “Sensors” later in this section.
Manual Operation
O(On/Off): Press to turn the
climate control system on or off.
Outside air still enters the vehicle,
and is directed to the floor. This
direction can be changed by
pressing the air delivery mode.
9(Fan Control): Turn clockwise
or counterclockwise to increase or
decrease the fan speed. Press the
knob to turn the fan off.
Press AUTO to return to automatic
operation. Driver and Passenger
Temperature Control:
The
temperature can be adjusted
separately for the driver and
passenger.
Turn the knob clockwise or
counterclockwise to increase or
decrease the driver or passenger
temperature setting.
SYNC (Synchronized
Temperature): Press to link the
passenger temperature setting to
the driver setting. The SYNC
indicator light will turn on. When the
passenger setting is adjusted, the
SYNC indicator light is off.
The driver side or passenger side
temperature display shows the
temperature setting increasing or
decreasing.
Air Delivery Mode Control: Press
Y,\,[, or-to change the
direction of the airflow. An indicator
light comes on in the selected mode
button. Changing the mode cancels the
automatic operation and the system
goes into manual mode. Press
AUTO to return to automatic
operation.
Y(Vent):
Air is directed to the
instrument panel outlets.
\(Bi-Level): Air is divided
between the instrument panel and
floor outlets. Some air is directed
toward the windshield and side
window outlets.
[(Floor): Air is directed to the
floor outlets, with some to the
windshield, side window outlets, and
second row floor outlets.
-(Defog): This mode clears the
windows of fog or moisture. Air is
directed to the windshield, floor
outlets, and side window vents. The
system automatically forces outside
air into the vehicle and the air
conditioning compressor will run,
unless the outside temperature is
close to freezing.
Page 314 of 542
Black plate (48,1)Chevrolet Silverado Owner Manual (GMNA-Localizing-U.S./Canada/Mexico-
5853506) - 2014 - CRC 3rd Edition - 8/28/13
9-48 Driving and Operating
less than 5 km/h (3 mph), and the
transmission in N (Neutral), attempt
the shift again.
Shifting into N (Neutral)
To shift the transfer case to
N (Neutral):
1. Make sure the vehicle is parkedso that it will not roll.
2. Set the parking brake and press and hold the regular brake
pedal. See Parking Brake on
page 9-54.
3. Start the vehicle or turn the ignition to ON/RUN.
4. Shift the transmission to N (Neutral).
5. Shift the transfer case to Two-Wheel Drive High.
6. Turn the transfer case dial clockwise to N (Neutral) until it
stops and hold it there until the
N (Neutral) light starts blinking.
This will take at least
10 seconds. Then slowly release
the dial to the Four-Wheel Drive Low position. The N (Neutral)
light will come on when the
transfer case shift to N (Neutral)
is complete.
7. If the engine is running, verify that the transfer case is in
N (Neutral) by shifting the
transmission to R (Reverse) for
one second, then shift the
transmission to D (Drive) for
one second.
8. Turn the ignition to ACC/ ACCESSORY, which will turn the
engine off.
9. Place the transmission shift lever in P (Park).
10. Release the parking brake prior to moving the vehicle.
11. Turn the ignition to LOCK/OFF.
Shifting Out of N (Neutral)
To shift the transfer case out of
N (Neutral):
1. Set the parking brake and apply the regular brake pedal. 2. Turn the ignition to ON/RUN with
the engine off, and shift the
transmission to N (Neutral).
3. Turn the transfer case dial to Two-Wheel Drive High.
After the transfer case has
shifted out of N (Neutral), the
N (Neutral) light will go out.
4. Release the parking brake prior to moving the vehicle.
{Caution
Shifting the transmission into gear
before the requested mode
indicator light has stopped
flashing could damage the
transfer case. To help avoid
damaging the vehicle, always wait
for the mode indicator lights to
stop flashing before shifting the
transmission into gear.
5. Start the engine and shift the transmission to the desired
position.
Page 318 of 542
Black plate (52,1)Chevrolet Silverado Owner Manual (GMNA-Localizing-U.S./Canada/Mexico-
5853506) - 2014 - CRC 3rd Edition - 8/28/13
9-52 Driving and Operating
If the knob is turned to the
Four-Wheel Drive High, AUTO,
or Two-Wheel Drive High switch
position when the vehicle is in gear
and/or moving more than
5 km/h (3 mph), the Four-Wheel
Drive High, AUTO, or Two-Wheel
Drive High indicator light will flash
for 30 seconds but will not complete
the shift. With the vehicle moving
less than 5 km/h (3 mph), and the
transmission in N (Neutral), attempt
the shift again.
Shifting into N (Neutral)
To shift the transfer case to
N (Neutral):
1. Make sure the vehicle is parkedso that it will not roll.
2. Set the parking brake and apply the regular brake pedal. See
Parking Brake on page 9-54.
3. Start the vehicle or turn the ignition to ON/RUN.
4. Put the transmission in N (Neutral). 5. Shift the transfer case to
Two-Wheel Drive High.
6. Turn the transfer case dial clockwise to N (Neutral) until it
stops and hold it there until the
N (Neutral) light starts blinking.
This will take at least
10 seconds. Then slowly release
the dial to the Four-Wheel Drive
Low position. The N (Neutral)
light will come on when the
transfer case shift to N (Neutral)
is complete.
7. If the engine is running, make sure that the transfer case is in
N (Neutral) by shifting the
transmission to R (Reverse) for
one second, then shift the
transmission to D (Drive) for
one second.
8. Turn the ignition to ACC/ ACCESSORY, which will turn the
engine off.
9. Place the transmission shift lever in P (Park). 10. Release the parking brake prior
to moving the vehicle.
11. Turn the ignition to LOCK/OFF.
Shifting Out of N (Neutral)
To shift out of N (Neutral):
1. Set the parking brake and apply the regular brake pedal.
2. Turn the ignition to ON/RUN with the engine off, and shift the
transmission to N (Neutral).
3. Turn the transfer case dial to Two-Wheel Drive High,
Four-Wheel Drive High,
or AUTO.
After the transfer case has
shifted out of N (Neutral), the
N (Neutral) light will go out.
4. Release the parking brake prior to moving the vehicle.
Page 340 of 542
Black plate (74,1)Chevrolet Silverado Owner Manual (GMNA-Localizing-U.S./Canada/Mexico-
5853506) - 2014 - CRC 3rd Edition - 8/28/13
9-74 Driving and Operating
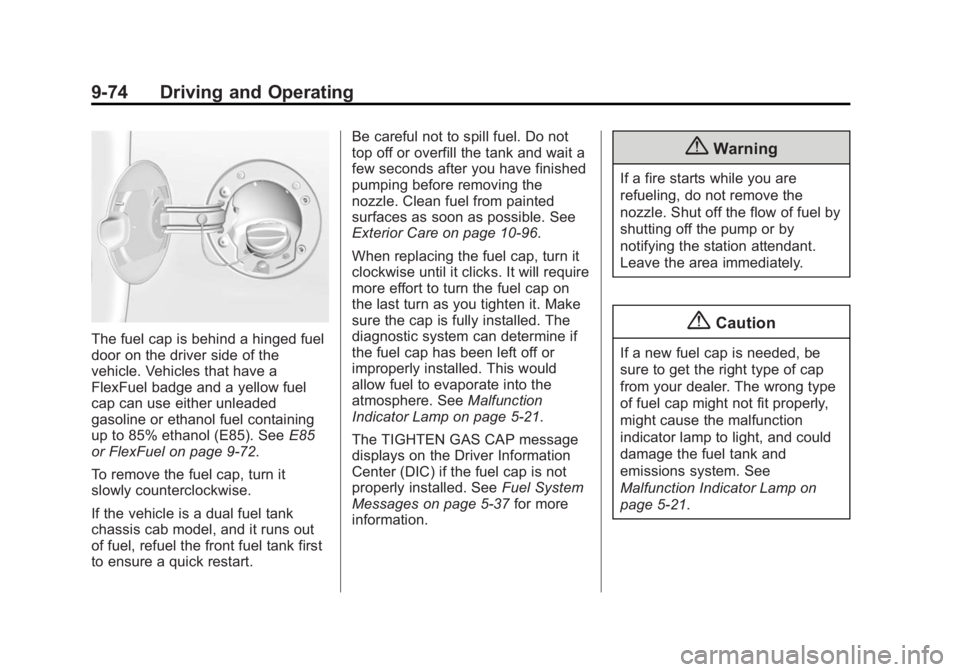
The fuel cap is behind a hinged fuel
door on the driver side of the
vehicle. Vehicles that have a
FlexFuel badge and a yellow fuel
cap can use either unleaded
gasoline or ethanol fuel containing
up to 85% ethanol (E85). SeeE85
or FlexFuel on page 9-72.
To remove the fuel cap, turn it
slowly counterclockwise.
If the vehicle is a dual fuel tank
chassis cab model, and it runs out
of fuel, refuel the front fuel tank first
to ensure a quick restart. Be careful not to spill fuel. Do not
top off or overfill the tank and wait a
few seconds after you have finished
pumping before removing the
nozzle. Clean fuel from painted
surfaces as soon as possible. See
Exterior Care on page 10-96.
When replacing the fuel cap, turn it
clockwise until it clicks. It will require
more effort to turn the fuel cap on
the last turn as you tighten it. Make
sure the cap is fully installed. The
diagnostic system can determine if
the fuel cap has been left off or
improperly installed. This would
allow fuel to evaporate into the
atmosphere. See
Malfunction
Indicator Lamp on page 5-21.
The TIGHTEN GAS CAP message
displays on the Driver Information
Center (DIC) if the fuel cap is not
properly installed. See Fuel System
Messages on page 5-37 for more
information.
{Warning
If a fire starts while you are
refueling, do not remove the
nozzle. Shut off the flow of fuel by
shutting off the pump or by
notifying the station attendant.
Leave the area immediately.
{Caution
If a new fuel cap is needed, be
sure to get the right type of cap
from your dealer. The wrong type
of fuel cap might not fit properly,
might cause the malfunction
indicator lamp to light, and could
damage the fuel tank and
emissions system. See
Malfunction Indicator Lamp on
page 5-21.
Page 393 of 542
Black plate (23,1)Chevrolet Silverado Owner Manual (GMNA-Localizing-U.S./Canada/Mexico-
5853506) - 2014 - CRC 3rd Edition - 8/29/13
Vehicle Care 10-23
Warning (Continued)
the cap when the cooling system,
including the surge tank pressure
cap, is hot. Wait for the cooling
system and surge tank pressure
cap to cool.
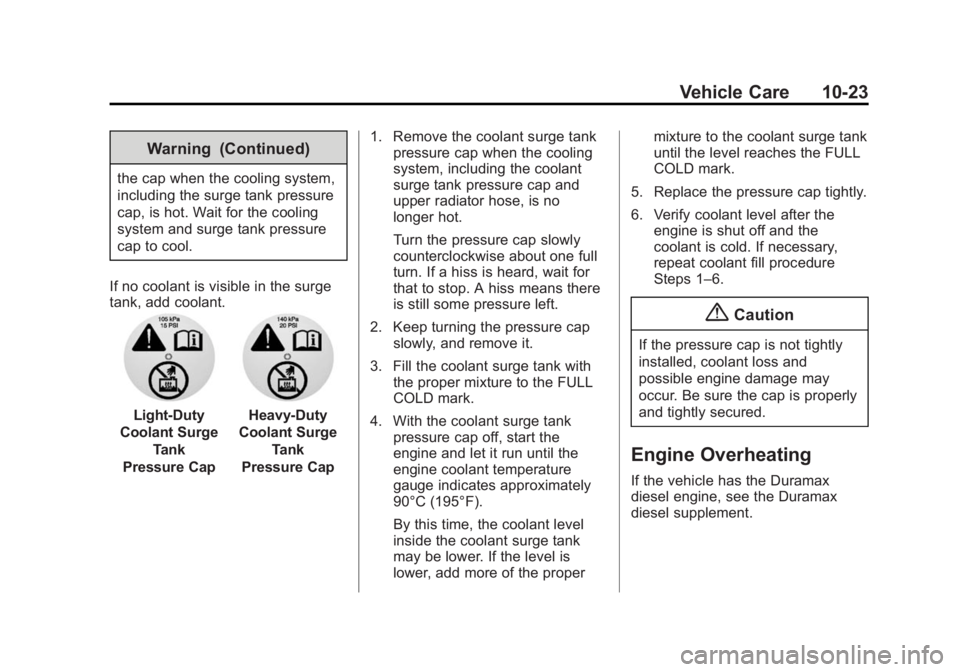
If no coolant is visible in the surge
tank, add coolant.
Light-Duty
Coolant Surge Tank
Pressure CapHeavy-Duty
Coolant Surge Tank
Pressure Cap 1. Remove the coolant surge tank
pressure cap when the cooling
system, including the coolant
surge tank pressure cap and
upper radiator hose, is no
longer hot.
Turn the pressure cap slowly
counterclockwise about one full
turn. If a hiss is heard, wait for
that to stop. A hiss means there
is still some pressure left.
2. Keep turning the pressure cap slowly, and remove it.
3. Fill the coolant surge tank with the proper mixture to the FULL
COLD mark.
4. With the coolant surge tank pressure cap off, start the
engine and let it run until the
engine coolant temperature
gauge indicates approximately
90°C (195°F).
By this time, the coolant level
inside the coolant surge tank
may be lower. If the level is
lower, add more of the proper mixture to the coolant surge tank
until the level reaches the FULL
COLD mark.
5. Replace the pressure cap tightly.
6. Verify coolant level after the engine is shut off and the
coolant is cold. If necessary,
repeat coolant fill procedure
Steps 1–6.
{Caution
If the pressure cap is not tightly
installed, coolant loss and
possible engine damage may
occur. Be sure the cap is properly
and tightly secured.
Engine Overheating
If the vehicle has the Duramax
diesel engine, see the Duramax
diesel supplement.
Page 410 of 542
Black plate (40,1)Chevrolet Silverado Owner Manual (GMNA-Localizing-U.S./Canada/Mexico-
5853506) - 2014 - CRC 3rd Edition - 8/29/13
10-40 Vehicle Care
Headlamp
1. Open the hood.
2. Remove the headlamp bulbassembly cover by turning it
counterclockwise.
3. Turn the bulb socket counterclockwise to remove it
from the headlamp assembly
and pull it straight out.
4. Unplug the electrical connector from the old bulb by releasing
the clip on the bulb socket.
Turn Signal/Sidemarker/
Parking Lamp
1. Open the hood.
2. If replacing a bulb on the
passenger side, remove the
engine air cleaner.
3. Turn the bulb socket counterclockwise to remove it
from the headlamp assembly
and pull it straight out.
4. Remove the bulb by pulling it straight out of the bulb socket.
Fog Lamps
To replace the front fog lamp bulb:
1. Locate the fog lamp under thefront bumper.
2. Disconnect the electrical connector from the fog lamp bulb
assembly by pressing the
connector release.
3. Remove the bulb from the housing by squeezing the two
release tabs and pulling it
straight out of the assembly.
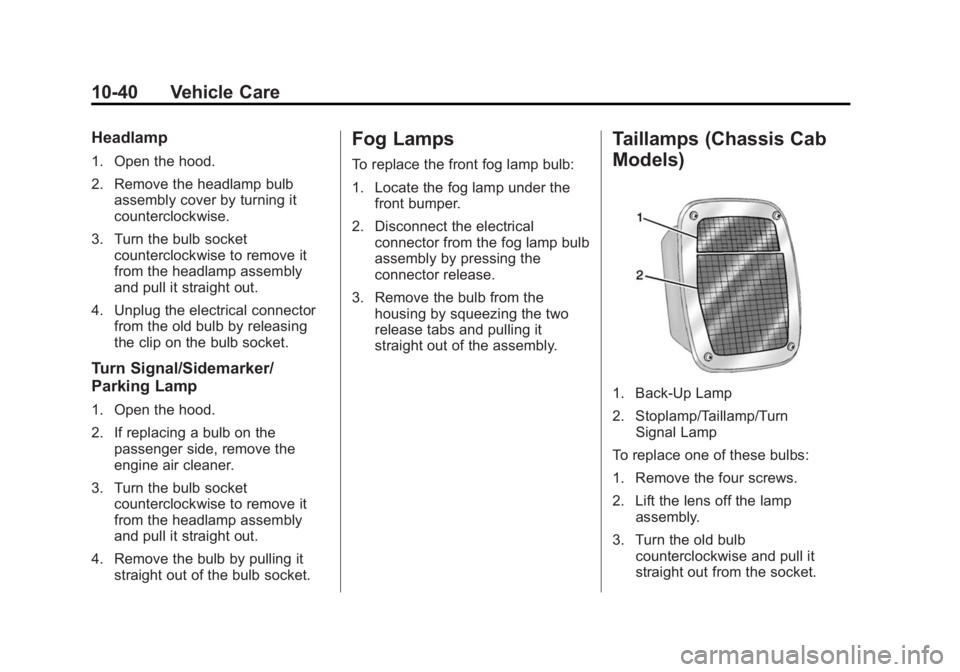
Taillamps (Chassis Cab
Models)
1. Back-Up Lamp
2. Stoplamp/Taillamp/TurnSignal Lamp
To replace one of these bulbs:
1. Remove the four screws.
2. Lift the lens off the lamp assembly.
3. Turn the old bulb counterclockwise and pull it
straight out from the socket.