2014 CHEVROLET SILVERADO 1500 tow
[x] Cancel search: towPage 456 of 542
Black plate (86,1)Chevrolet Silverado Owner Manual (GMNA-Localizing-U.S./Canada/Mexico-
5853506) - 2014 - CRC 3rd Edition - 8/29/13
10-86 Vehicle Care
have a tire removed or serviced.
SeeCapacities and Specifications
on page 12-2.
When reinstalling the regular wheel
and tire, also reinstall either the
center cap, or bolt-on hub cap,
depending on what the vehicle is
equipped with. For center caps,
place the cap on the wheel and tap
it into place until it seats flush with
the wheel. The cap only goes on
one way. Be sure to line up the tab
on the center cap with the
indentation on the wheel. For
bolt-on hub caps, align the plastic
nut caps with the wheel nuts and
then tighten by hand. Then use the
wheel wrench to tighten.Storing a Flat or Spare Tire
and Tools
{Warning
Storing a jack, a tire, or other
equipment in the passenger
compartment of the vehicle could
cause injury. In a sudden stop or
collision, loose equipment could
strike someone. Store all these in
the proper place.
{Caution
Storing an aluminum wheel with a
flat tire under your vehicle for an
extended period of time or with
the valve stem pointing up can
damage the wheel. Always stow
the wheel with the valve stem
pointing down and have the
wheel/tire repaired as soon as
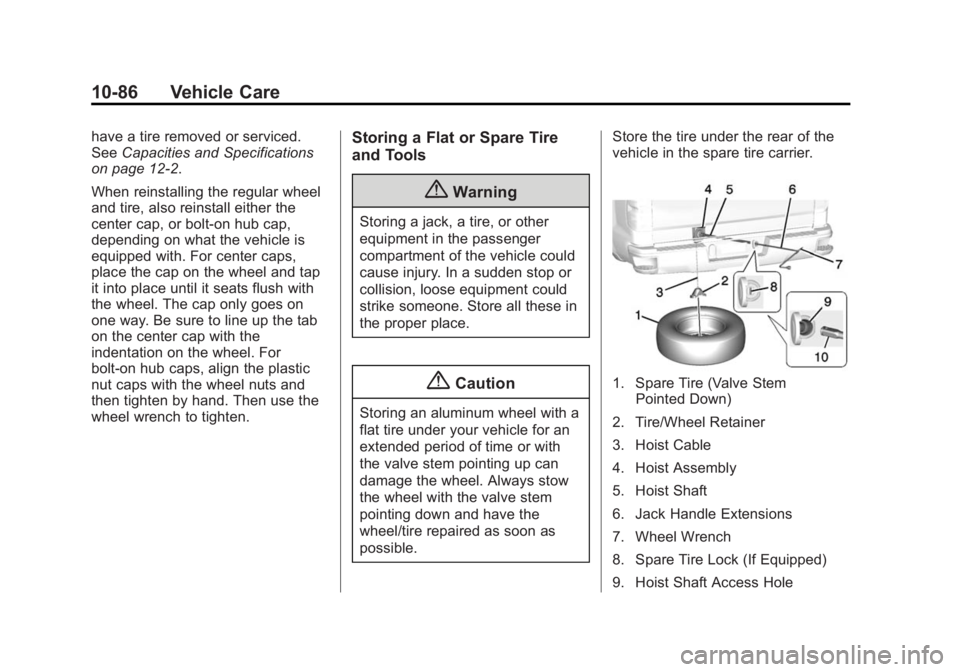
possible. Store the tire under the rear of the
vehicle in the spare tire carrier.
1. Spare Tire (Valve Stem
Pointed Down)
2. Tire/Wheel Retainer
3. Hoist Cable
4. Hoist Assembly
5. Hoist Shaft
6. Jack Handle Extensions
7. Wheel Wrench
8. Spare Tire Lock (If Equipped)
9. Hoist Shaft Access Hole
Page 458 of 542
Black plate (88,1)Chevrolet Silverado Owner Manual (GMNA-Localizing-U.S./Canada/Mexico-
5853506) - 2014 - CRC 3rd Edition - 8/29/13
10-88 Vehicle Care
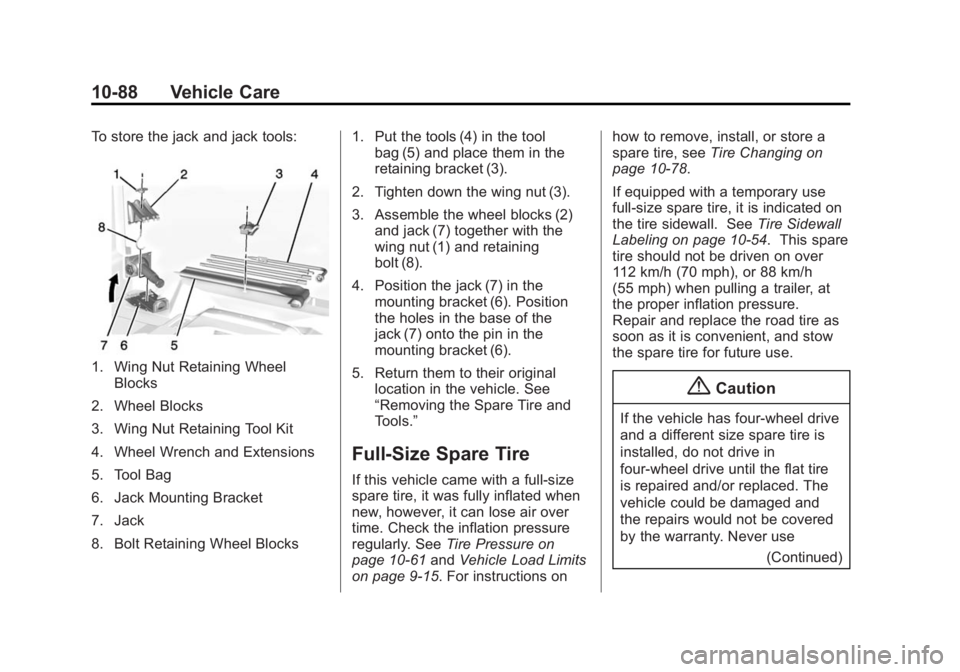
To store the jack and jack tools:
1. Wing Nut Retaining WheelBlocks
2. Wheel Blocks
3. Wing Nut Retaining Tool Kit
4. Wheel Wrench and Extensions
5. Tool Bag
6. Jack Mounting Bracket
7. Jack
8. Bolt Retaining Wheel Blocks 1. Put the tools (4) in the tool
bag (5) and place them in the
retaining bracket (3).
2. Tighten down the wing nut (3).
3. Assemble the wheel blocks (2) and jack (7) together with the
wing nut (1) and retaining
bolt (8).
4. Position the jack (7) in the mounting bracket (6). Position
the holes in the base of the
jack (7) onto the pin in the
mounting bracket (6).
5. Return them to their original location in the vehicle. See
“Removing the Spare Tire and
Tools.”
Full-Size Spare Tire
If this vehicle came with a full-size
spare tire, it was fully inflated when
new, however, it can lose air over
time. Check the inflation pressure
regularly. See Tire Pressure on
page 10-61 andVehicle Load Limits
on page 9-15. For instructions on how to remove, install, or store a
spare tire, see
Tire Changing on
page 10-78.
If equipped with a temporary use
full-size spare tire, it is indicated on
the tire sidewall. See Tire Sidewall
Labeling on page 10-54. This spare
tire should not be driven on over
112 km/h (70 mph), or 88 km/h
(55 mph) when pulling a trailer, at
the proper inflation pressure.
Repair and replace the road tire as
soon as it is convenient, and stow
the spare tire for future use.
{Caution
If the vehicle has four-wheel drive
and a different size spare tire is
installed, do not drive in
four-wheel drive until the flat tire
is repaired and/or replaced. The
vehicle could be damaged and
the repairs would not be covered
by the warranty. Never use
(Continued)
Page 464 of 542
Black plate (94,1)Chevrolet Silverado Owner Manual (GMNA-Localizing-U.S./Canada/Mexico-
5853506) - 2014 - CRC 3rd Edition - 8/29/13
10-94 Vehicle Care
Towing the Vehicle
{Caution
Incorrectly towing a disabled
vehicle may cause damage. The
damage would not be covered by
the vehicle warranty. Do not lash
or hook to the chassis
components—including the front
and rear subframes, suspension
control arms, and links —during
towing and recovery of a disabled
vehicle, or when securing the
vehicle. Use the proper nylon
strap harnesses around the tires
to secure the vehicle.
Have the vehicle towed on a flatbed
car carrier or a wheel lift tow truck.
If a wheel lift tow truck is used, the
drive wheels cannot contact the
road while the vehicle is being
towed. A wheel dolly must be used
to lift all drive wheels off the ground. Consult your dealer or a
professional towing service if the
disabled vehicle must be towed.
To tow the vehicle behind another
vehicle for recreational purposes,
such as behind a motor home, see
“Recreational Vehicle Towing”
following.
Recreational Vehicle
Towing
Recreational vehicle towing means
towing the vehicle behind another
vehicle, such as a motor home. The
two most common types of
recreational vehicle towing are
known as dinghy towing and dolly
towing. Dinghy towing is towing the
vehicle with all four wheels on the
ground. Dolly towing is towing the
vehicle with two wheels on the
ground and two wheels up on a
device known as a dolly.
Here are some important things to
consider before recreational vehicle
towing:
.What is the towing capacity of
the towing vehicle? Be sure to
read the tow vehicle
manufacturer's
recommendations.
.What is the distance that will be
traveled? Some vehicles have
restrictions on how far and how
long they can tow.
.Is the proper towing equipment
going to be used? See your
dealer or trailering professional
for additional advice and
equipment recommendations.
.Is the vehicle ready to be
towed? Just as preparing the
vehicle for a long trip, make sure
the vehicle is prepared to be
towed.
Page 465 of 542
Black plate (95,1)Chevrolet Silverado Owner Manual (GMNA-Localizing-U.S./Canada/Mexico-
5853506) - 2014 - CRC 3rd Edition - 8/29/13
Vehicle Care 10-95
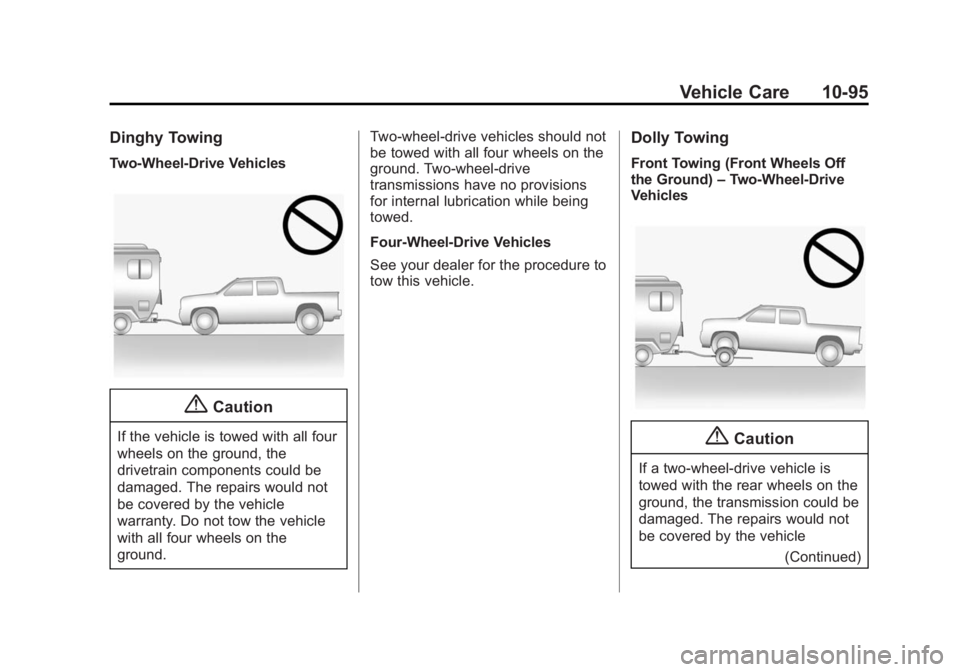
Dinghy Towing
Two-Wheel-Drive Vehicles
{Caution
If the vehicle is towed with all four
wheels on the ground, the
drivetrain components could be
damaged. The repairs would not
be covered by the vehicle
warranty. Do not tow the vehicle
with all four wheels on the
ground.Two-wheel-drive vehicles should not
be towed with all four wheels on the
ground. Two-wheel-drive
transmissions have no provisions
for internal lubrication while being
towed.
Four-Wheel-Drive Vehicles
See your dealer for the procedure to
tow this vehicle.
Dolly Towing
Front Towing (Front Wheels Off
the Ground)
–Two-Wheel-Drive
Vehicles
{Caution
If a two-wheel-drive vehicle is
towed with the rear wheels on the
ground, the transmission could be
damaged. The repairs would not
be covered by the vehicle
(Continued)
Page 466 of 542
Black plate (96,1)Chevrolet Silverado Owner Manual (GMNA-Localizing-U.S./Canada/Mexico-
5853506) - 2014 - CRC 3rd Edition - 8/29/13
10-96 Vehicle Care
Caution (Continued)
warranty. Never tow the vehicle
with the rear wheels on the
ground.
Two-wheel-drive vehicles should not
be towed with the rear wheels on
the ground. Two-wheel-drive
transmissions have no provisions
for internal lubrication while being
towed.
To dolly tow a two-wheel-drive
vehicle, the vehicle must be towed
with the rear wheels on the dolly.
See “Rear Towing (Rear Wheels Off
the Ground)” later in this section for
more information.
Front Towing (Front Wheels Off
the Ground) –Four-Wheel-Drive
Vehicles
See your dealer for the procedure to
tow this vehicle.
Rear Towing (Rear Wheels Off
the Ground)
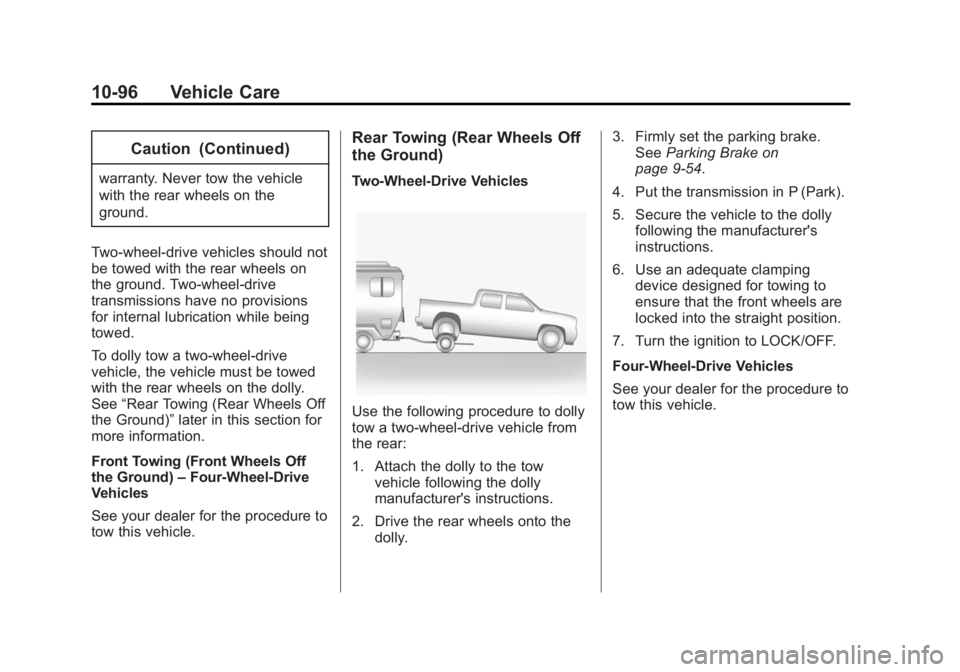
Two-Wheel-Drive Vehicles
Use the following procedure to dolly
tow a two-wheel-drive vehicle from
the rear:
1. Attach the dolly to the tow
vehicle following the dolly
manufacturer's instructions.
2. Drive the rear wheels onto the dolly. 3. Firmly set the parking brake.
See Parking Brake on
page 9-54.
4. Put the transmission in P (Park).
5. Secure the vehicle to the dolly following the manufacturer's
instructions.
6. Use an adequate clamping device designed for towing to
ensure that the front wheels are
locked into the straight position.
7. Turn the ignition to LOCK/OFF.
Four-Wheel-Drive Vehicles
See your dealer for the procedure to
tow this vehicle.
Page 467 of 542
Black plate (97,1)Chevrolet Silverado Owner Manual (GMNA-Localizing-U.S./Canada/Mexico-
5853506) - 2014 - CRC 3rd Edition - 8/29/13
Vehicle Care 10-97
Appearance Care
Exterior Care
Locks
Locks are lubricated at the factory.
Use a de-icing agent only when
absolutely necessary, and have the
locks greased after using. See
Recommended Fluids and
Lubricants on page 11-12.
Washing the Vehicle
To preserve the vehicle's finish,
wash it often and out of direct
sunlight.
{Caution
Do not use petroleum-based,
acidic, or abrasive cleaning
agents as they can damage the
vehicle's paint, metal, or plastic
parts. If damage occurs, it would
not be covered by the vehicle
warranty. Approved cleaning(Continued)
Caution (Continued)
products can be obtained from
your dealer. Follow all
manufacturer directions regarding
correct product usage, necessary
safety precautions, and
appropriate disposal of any
vehicle care product.
{Caution
Avoid using high-pressure
washes closer than 30 cm (12 in)
to the surface of the vehicle. Use
of power washers exceeding
8,274 kPa (1,200 psi) can result
in damage or removal of paint
and decals.
This symbol
eis on any
underhood compartment electrical
center that should not be power washed. This could cause damage
that would not be covered by the
vehicle warranty.
If using an automatic car wash,
follow with the car wash
instructions. The windshield wiper
and rear window wiper, if equipped,
must be off. Remove any
accessories that may be damaged
or interfere with the car wash
equipment.
Rinse the vehicle well, before
washing and after, to remove all
cleaning agents completely. If they
are allowed to dry on the surface,
they could stain.
Dry the finish with a soft, clean
chamois or an all-cotton towel to
avoid surface scratches and water
spotting.
Finish Care
Application of aftermarket clearcoat
sealant/wax materials is not
recommended. If painted surfaces
are damaged, see your dealer to
have the damage assessed and
Page 470 of 542
Black plate (100,1)Chevrolet Silverado Owner Manual (GMNA-Localizing-U.S./Canada/Mexico-
5853506) - 2014 - CRC 3rd Edition - 8/29/13
10-100 Vehicle Care
Clean rubber blades using a lint-free
cloth or paper towel soaked with
windshield washer fluid or a mild
detergent. Wash the windshield
thoroughly when cleaning the
blades. Bugs, road grime, sap, and
a buildup of vehicle wash/wax
treatments may cause wiper
streaking.
Replace the wiper blades if they are
worn or damaged. Damage can be
caused by extreme dusty
conditions, sand, salt, heat, sun,
snow, and ice.
Weatherstrips
Apply Dielectric silicone grease on
weatherstrips to make them last
longer, seal better, and not stick or
squeak. Lubricate weatherstrips
once a year. Hot, dry climates may
require more frequent application.
Black marks from rubber material on
painted surfaces can be removed by
rubbing with a clean cloth. See
Recommended Fluids and
Lubricants on page 11-12.
Tires
Use a stiff brush with tire cleaner to
clean the tires.
{Caution
Using petroleum-based tire
dressing products on the vehicle
may damage the paint finish and/
or tires. When applying a tire
dressing, always wipe off any
overspray from all painted
surfaces on the vehicle.
Wheels and Trim—Aluminum
or Chrome
Use a soft, clean cloth with mild
soap and water to clean the wheels.
After rinsing thoroughly with clean
water, dry with a soft, clean towel.
A wax may then be applied.
{Caution
Chrome wheels and other chrome
trim may be damaged if the
vehicle is not washed after driving
on roads that have been sprayed
with magnesium, calcium,
or sodium chloride. These
chlorides are used on roads for
conditions such as ice and dust.
Always wash the chrome with
soap and water after exposure.
{Caution
To avoid surface damage, do not
use strong soaps, chemicals,
abrasive polishes, cleaners,
brushes, or cleaners that contain
acid on aluminum or
chrome-plated wheels. Use only
approved cleaners. Also, never
drive a vehicle with aluminum or
chrome-plated wheels through an
(Continued)
Page 473 of 542
Black plate (103,1)Chevrolet Silverado Owner Manual (GMNA-Localizing-U.S./Canada/Mexico-
5853506) - 2014 - CRC 3rd Edition - 8/29/13
Vehicle Care 10-103
{Caution
To prevent scratching, never use
abrasive cleaners on automotive
glass. Abrasive cleaners or
aggressive cleaning may damage
the rear window defogger.
Cleaning the windshield with water
during the first three to six months
of ownership will reduce tendency
to fog.
Speaker Covers
Vacuum around a speaker cover
gently, so that the speaker will not
be damaged. Clean spots with just
water and mild soap.
Coated Moldings
Coated moldings should be cleaned.
.When lightly soiled, wipe with a
sponge or soft lint-free cloth
dampened with water.
.When heavily soiled, use warm
soapy water.
Fabric/Carpet/Suede
Start by vacuuming the surface
using a soft brush attachment. If a
rotating brush attachment is being
used during vacuuming, only use it
on the floor carpet. Before cleaning,
gently remove as much of the soil
as possible using one of the
following techniques:
.Gently blot liquids with a paper
towel. Continue blotting until no
more soil can be removed.
.For solid soils, remove as much
as possible prior to vacuuming.
To clean:
1. Saturate a clean lint-free colorfast cloth with water.
Microfiber cloth is recommended
to prevent lint transfer to the
fabric or carpet.
2. Remove excess moisture by gently wringing until water does
not drip from the cleaning cloth. 3. Start on the outside edge of the
soil and gently rub toward the
center. Rotate the cleaning cloth
to a clean area frequently to
prevent forcing the soil in to the
fabric.
4. Continue gently rubbing the soiled area until there is no
longer any color transfer from
the soil to the cleaning cloth.
5. If the soil is not completely removed, use a mild soap
solution followed only by plain
water.
If the soil is not completely
removed, it may be necessary to
use a commercial upholstery
cleaner or spot lifter. Test a small
hidden area for colorfastness before
using a commercial upholstery
cleaner or spot lifter. If ring
formation occurs, clean the entire
fabric or carpet.
Following the cleaning process, a
paper towel can be used to blot
excess moisture.