2014 CHEVROLET MALIBU automatic transmission
[x] Cancel search: automatic transmissionPage 263 of 428
Black plate (1,1)Chevrolet Malibu Owner Manual (GMNA-Localizing-U.S./Canada/Mexico-
6081487) - 2014 - CRC - 11/19/13
Vehicle Care 10-1
Vehicle Care
General Information
General Information . . . . . . . . . . 10-2
California Proposition65 Warning . . . . . . . . . . . . . . . . . 10-2
California Perchlorate Materials Requirements . . . . 10-3
Accessories and Modifications . . . . . . . . . . . . . . . 10-3
Vehicle Checks
Doing Your OwnService Work . . . . . . . . . . . . . . . 10-3
Hood . . . . . . . . . . . . . . . . . . . . . . . . 10-4
Engine Compartment Overview . . . . . . . . . . . . . . . . . . . 10-5
Engine Oil . . . . . . . . . . . . . . . . . . 10-10
Engine Oil Life System . . . . . 10-12
Automatic Transmission Fluid . . . . . . . . . . . . . . . . . . . . . . 10-13
Engine Air Cleaner/Filter . . . . 10-13
Cooling System . . . . . . . . . . . . 10-16
Engine Coolant . . . . . . . . . . . . . 10-17
Engine Overheating . . . . . . . . 10-20
Washer Fluid . . . . . . . . . . . . . . . 10-21
Brakes . . . . . . . . . . . . . . . . . . . . . 10-22
Brake Fluid . . . . . . . . . . . . . . . . . 10-23 Battery . . . . . . . . . . . . . . . . . . . . . 10-24
Starter Switch Check . . . . . . . 10-26
Automatic Transmission Shift
Lock Control Function
Check . . . . . . . . . . . . . . . . . . . . . 10-26
Ignition Transmission Lock Check . . . . . . . . . . . . . . . . . . . . . 10-27
Park Brake and P (Park) Mechanism Check . . . . . . . . 10-27
Wiper Blade Replacement . . . . . . . . . . . . . . 10-27
Headlamp Aiming
Headlamp Aiming . . . . . . . . . . 10-28
Bulb Replacement
Bulb Replacement . . . . . . . . . . 10-29
Halogen Bulbs . . . . . . . . . . . . . . 10-29
High Intensity Discharge(HID) Lighting . . . . . . . . . . . . . 10-29
LED Lighting . . . . . . . . . . . . . . . 10-29
Headlamps, Front Turn Signal, Sidemarker, and
Parking Lamps . . . . . . . . . . . . 10-29
Fog Lamps . . . . . . . . . . . . . . . . . 10-33
Taillamps, Turn Signal, Stoplamps, and Back-Up
Lamps (LS and LT) . . . . . . . . 10-33 Taillamps, Turn Signal,
Stoplamps, and Back-Up
Lamps (LTZ) . . . . . . . . . . . . . . 10-34
License Plate Lamp . . . . . . . . 10-36
Replacement Bulbs . . . . . . . . . 10-36
Electrical System
High Voltage Devices and Wiring . . . . . . . . . . . . . . . . . . . . . 10-37
Electrical System Overload . . . . . . . . . . . . . . . . . . 10-37
Fuses . . . . . . . . . . . . . . . . . . . . . . 10-38
Engine Compartment Fuse Block . . . . . . . . . . . . . . . . . . . . . 10-38
Instrument Panel Fuse Block . . . . . . . . . . . . . . . . . . . . . 10-42
Wheels and Tires
Tires . . . . . . . . . . . . . . . . . . . . . . . . 10-44
All-Season Tires . . . . . . . . . . . . 10-45
Winter Tires . . . . . . . . . . . . . . . . 10-46
Summer Tires . . . . . . . . . . . . . . 10-46
Tire Sidewall Labeling . . . . . . 10-46
Tire Designations . . . . . . . . . . . 10-49
Tire Terminology andDefinitions . . . . . . . . . . . . . . . . 10-50
Tire Pressure . . . . . . . . . . . . . . . 10-53
Tire Pressure for High-Speed Operation . . . . . . . . . . . . . . . . . 10-54
Page 270 of 428

Black plate (8,1)Chevrolet Malibu Owner Manual (GMNA-Localizing-U.S./Canada/Mexico-
6081487) - 2014 - CRC - 11/19/13
10-8 Vehicle Care
1.Engine Air Cleaner/Filter on
page 10-13.
2. Engine Cover.
3. Engine Cooling Fans (Out of View). See Cooling System on
page 10-16.
4. Engine Oil Dipstick. See Engine
Oil on page 10-10.
5. Engine Oil Fill Cap. See Engine
Oil on page 10-10. 6. High Voltage Cable (Orange
Color).
7. Transmission Fluid Cap (Out of View). See Automatic
Transmission Fluid on
page 10-13.
8. Brake Fluid Reservoir. See Brakes on page 10-22.
9. Battery (Under Cover). See Battery on page 10-24. 10. Coolant Surge Tank and
Pressure Cap. See Engine
Coolant on page 10-17.
11. Engine Compartment Fuse
Block on page 10-38.
12. Windshield Washer Fluid Reservoir. See Washer Fluid
on page 10-21.
Page 275 of 428
Black plate (13,1)Chevrolet Malibu Owner Manual (GMNA-Localizing-U.S./Canada/Mexico-
6081487) - 2014 - CRC - 11/19/13
Vehicle Care 10-13
When the system has calculated
that oil life has been diminished, it
indicates that an oil change is
necessary. A CHANGE ENGINE
OIL SOON message comes on. See
Engine Oil Messages on page 5-29.
Change the oil as soon as possible
within the next 1 000 km (600 mi).
It is possible that, if driving under
the best conditions, the oil life
system might indicate that an oil
change is not necessary for up to a
year. The engine oil and filter must
be changed at least once a year
and, at this time, the system must
be reset. Your dealer has trained
service people who will perform this
work and reset the system. It is also
important to check the oil regularly
over the course of an oil drain
interval and keep it at the proper
level.
If the system is ever reset
accidentally, the oil must be
changed at 5 000 km (3,000 mi)
since the last oil change.
Remember to reset the oil life
system whenever the oil is changed.How to Reset the Engine Oil
Life System
Reset the system whenever the
engine oil is changed so that the
system can calculate the next
engine oil change. To reset the
system:
1. Turn the ignition to ON/RUN withthe engine off.
2. Press the DIC MENU button on the turn signal lever to enter the
Vehicle Information Menu. Use
the thumbwheel to scroll through
the menu items until you reach
REMAINING OIL LIFE.
3. Press the SET/CLR button to reset the oil life at 100%.
4. Turn the ignition to LOCK/OFF.
The system is reset when the
CHANGE ENGINE OIL SOON
message is off and the REMAINING
OIL LIFE 100% message is
displayed. If the CHANGE ENGINE OIL SOON
message comes back on when the
vehicle is started, the engine oil life
system has not been reset. Repeat
the procedure.
Automatic Transmission
Fluid
It is not necessary to check the
transmission fluid level.
A transmission fluid leak is the only
reason for fluid loss. If a leak
occurs, take the vehicle to your
dealer and have it repaired as soon
as possible.
Change the fluid at the intervals
listed in
Maintenance Schedule on
page 11-3, and be sure to use the
fluid listed in Recommended Fluids
and Lubricants on page 11-12.
Engine Air Cleaner/Filter
The engine air cleaner/filter is in the
engine compartment on the
passenger side of the vehicle. See
Engine Compartment Overview on
page 10-5.
Page 288 of 428
Black plate (26,1)Chevrolet Malibu Owner Manual (GMNA-Localizing-U.S./Canada/Mexico-
6081487) - 2014 - CRC - 11/19/13
10-26 Vehicle Care
Vehicle Storage
{Warning
Batteries have acid that can burn
you and gas that can explode.
You can be badly hurt if you are
not careful. SeeJump Starting
(On-board with eAssist Only) on
page 10-91 orJump Starting (with
or without eAssist) on page 10-92
for tips on working around a
battery without getting hurt.
Infrequent Usage: Remove the
12-volt battery black, negative (−)
cable from the battery to keep the
battery from running down.
Extended Storage: Remove the
12-volt battery black, negative (−)
cable from the battery or use a
battery trickle charger.
Remember to reconnect the battery
when ready to drive the vehicle.
Starter Switch Check
{Warning
When you are doing this
inspection, the vehicle could
move suddenly. If the vehicle
moves, you or others could be
injured.
1. Before starting this check, be sure there is enough room
around the vehicle.
2. Apply both the parking brake and the regular brake.
Do not use the accelerator
pedal, and be ready to turn off
the engine immediately if it
starts.
3. Try to start the engine in each gear. The vehicle should start
only in P (Park) or N (Neutral).
If the vehicle starts in any other
position, contact your dealer for
service.
Automatic Transmission
Shift Lock Control
Function Check
{Warning
When you are doing this
inspection, the vehicle could
move suddenly. If the vehicle
moves, you or others could be
injured.
1. Before starting this check, be sure there is enough room
around the vehicle. It should be
parked on a level surface.
2. Apply the parking brake. Be ready to apply the regular brake
immediately if the vehicle begins
to move.
Page 312 of 428
Black plate (50,1)Chevrolet Malibu Owner Manual (GMNA-Localizing-U.S./Canada/Mexico-
6081487) - 2014 - CRC - 11/19/13
10-50 Vehicle Care
(4) Construction Code:A
letter code is used to indicate
the type of ply construction in
the tire. The letter R means
radial ply construction; the
letter D means diagonal or bias
ply construction; and the letter B
means belted-bias ply
construction.
(5) Rim Diameter
:Diameter of
the wheel in inches.
(6) Service Description
:
These characters represent the
load index and speed rating of
the tire. The load index
represents the load carrying
capacity a tire is certified to
carry. The speed rating is the
maximum speed a tire is
certified to carry a load.
Tire Terminology and
Definitions
Air Pressure:The amount of
air inside the tire pressing
outward on each square inch of
the tire. Air pressure is
expressed in kPa (kilopascal)
or psi (pounds per square inch).
Accessory Weight
:The
combined weight of optional
accessories. Some examples of
optional accessories are
automatic transmission, power
windows, power seats, and air
conditioning.
Aspect Ratio
:The relationship
of a tire's height to its width.
Belt
:A rubber coated layer of
cords between the plies and the
tread. Cords may be made from
steel or other reinforcing
materials. Bead
:The tire bead contains
steel wires wrapped by steel
cords that hold the tire onto
the rim.
Bias Ply Tire
:A pneumatic tire
in which the plies are laid at
alternate angles less than
90 degrees to the centerline of
the tread.
Cold Tire Pressure
:The
amount of air pressure in a tire,
measured in kPa (kilopascal)
or psi (pounds per square inch)
before a tire has built up heat
from driving. See Tire Pressure
on page 10-53.
Curb Weight
:The weight of a
motor vehicle with standard and
optional equipment including the
maximum capacity of fuel, oil,
and coolant, but without
passengers and cargo.
Page 330 of 428
Black plate (68,1)Chevrolet Malibu Owner Manual (GMNA-Localizing-U.S./Canada/Mexico-
6081487) - 2014 - CRC - 11/19/13
10-68 Vehicle Care
{Warning
Changing a tire can be
dangerous. The vehicle can slip
off the jack and roll over or fall
causing injury or death. Find a
level place to change the tire. To
help prevent the vehicle from
moving:1. Set the parking brake firmly.
2. Put an automatic transmission in P (Park) or a
manual transmission in
1 (First) or R (Reverse).
3. Turn off the engine and do not restart while the vehicle
is raised.
4. Do not allow passengers to remain in the vehicle.
5. Place wheel blocks on both sides of the tire at the
opposite corner of the tire
being changed. This vehicle may come with a jack
and spare tire or a tire sealant and
compressor kit. To use the jacking
equipment to change a spare tire
safely, follow the instructions below.
Then see
Tire Changing on
page 10-84. To use the tire sealant
and compressor kit, see Tire
Sealant and Compressor Kit (With
Pressure Relief Button) on
page 10-69 orTire Sealant and
Compressor Kit (With Pressure
Deflation Button) on page 10-76.
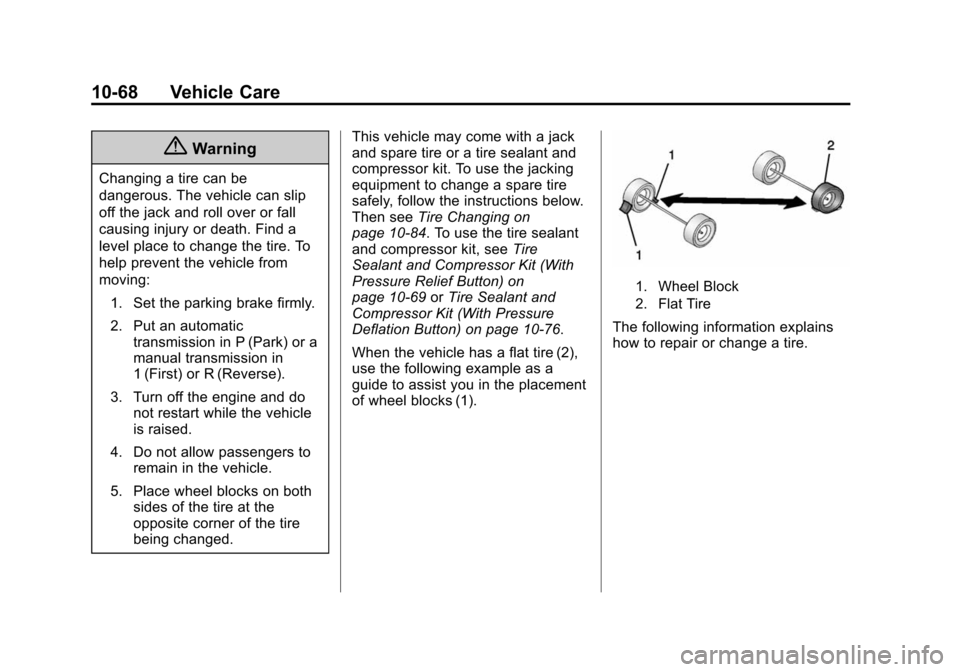
When the vehicle has a flat tire (2),
use the following example as a
guide to assist you in the placement
of wheel blocks (1).
1. Wheel Block
2. Flat Tire
The following information explains
how to repair or change a tire.
Page 355 of 428
Black plate (93,1)Chevrolet Malibu Owner Manual (GMNA-Localizing-U.S./Canada/Mexico-
6081487) - 2014 - CRC - 11/19/13
Vehicle Care 10-93
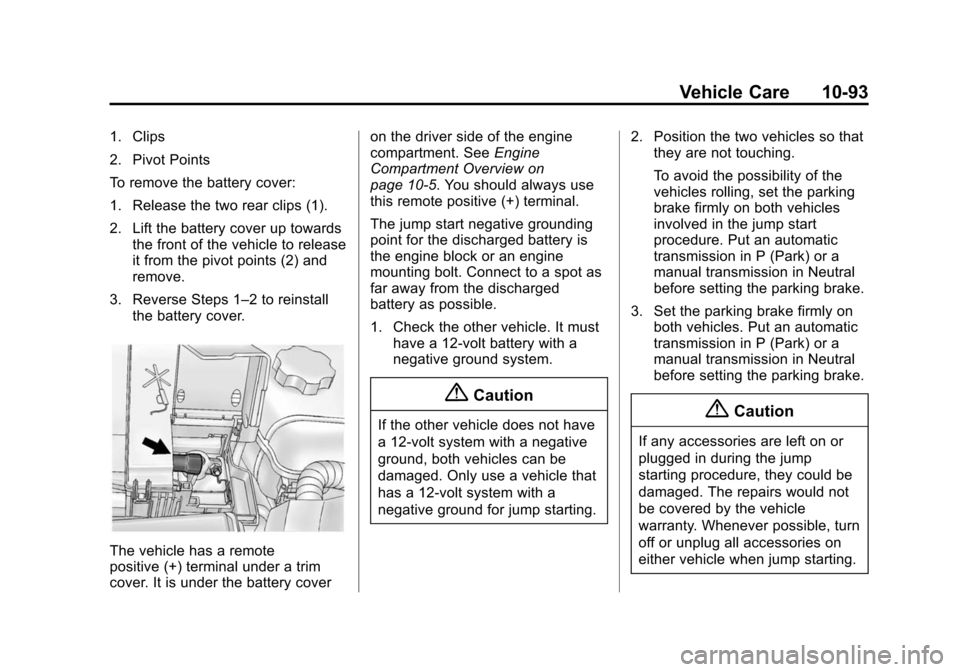
1. Clips
2. Pivot Points
To remove the battery cover:
1. Release the two rear clips (1).
2. Lift the battery cover up towardsthe front of the vehicle to release
it from the pivot points (2) and
remove.
3. Reverse Steps 1–2 to reinstall the battery cover.
The vehicle has a remote
positive (+) terminal under a trim
cover. It is under the battery cover on the driver side of the engine
compartment. See
Engine
Compartment Overview on
page 10-5. You should always use
this remote positive (+) terminal.
The jump start negative grounding
point for the discharged battery is
the engine block or an engine
mounting bolt. Connect to a spot as
far away from the discharged
battery as possible.
1. Check the other vehicle. It must have a 12-volt battery with a
negative ground system.
{Caution
If the other vehicle does not have
a 12-volt system with a negative
ground, both vehicles can be
damaged. Only use a vehicle that
has a 12-volt system with a
negative ground for jump starting. 2. Position the two vehicles so that
they are not touching.
To avoid the possibility of the
vehicles rolling, set the parking
brake firmly on both vehicles
involved in the jump start
procedure. Put an automatic
transmission in P (Park) or a
manual transmission in Neutral
before setting the parking brake.
3. Set the parking brake firmly on both vehicles. Put an automatic
transmission in P (Park) or a
manual transmission in Neutral
before setting the parking brake.{Caution
If any accessories are left on or
plugged in during the jump
starting procedure, they could be
damaged. The repairs would not
be covered by the vehicle
warranty. Whenever possible, turn
off or unplug all accessories on
either vehicle when jump starting.
Page 372 of 428

Black plate (4,1)Chevrolet Malibu Owner Manual (GMNA-Localizing-U.S./Canada/Mexico-
6081487) - 2014 - CRC - 11/19/13
11-4 Service and Maintenance
.Visually inspect steering,
suspension, and chassis
components for damaged, loose,
or missing parts or signs of
wear. SeeExterior Care on
page 10-98.
.Check restraint system
components. See Safety System
Check on page 3-17.
.Visually inspect fuel system for
damage or leaks.
.Visually inspect exhaust system
and nearby heat shields for
loose or damaged parts.
.Lubricate body components. See
Exterior Care on page 10-98.
.Check starter switch. See Starter
Switch Check on page 10-26.
.Check automatic transmission
shift lock control function. See
Automatic Transmission Shift
Lock Control Function Check on
page 10-26.
.Check ignition transmission lock
(If equipped with a key type
ignition). See Ignition
Transmission Lock Check on
page 10-27.
.Check parking brake and
automatic transmission park
mechanism. See Park Brake and
P (Park) Mechanism Check on
page 10-27.
.Check accelerator pedal for
damage, high effort, or binding.
Replace if needed.
.Visually inspect gas strut for
signs of wear, cracks, or other
damage. Check the hold open
ability of the strut. See your
dealer if service is required.
.Check tire sealant expiration
date, if equipped. See Tire
Sealant and Compressor Kit
(With Pressure Relief Button) on
page 10-69 orTire Sealant and
Compressor Kit (With Pressure
Deflation Button) on page 10-76.
.Inspect sunroof track and seal,
if equipped. See Sunroof on
page 2-23.