2014 CHEVROLET MALIBU radio controls
[x] Cancel search: radio controlsPage 134 of 428
Black plate (24,1)Chevrolet Malibu Owner Manual (GMNA-Localizing-U.S./Canada/Mexico-
6081487) - 2014 - CRC - 11/19/13
5-24 Instruments and Controls
Driver Information
Center (DIC)
The DIC displays information about
the vehicle. It also displays warning
messages if a system problem is
detected. SeeVehicle Messages on
page 5-27. All messages appear in
the DIC display in the center of the
instrument cluster.
The vehicle may also have features
that can be customized through the
controls on the radio. See Vehicle
Personalization on page 5-34.
DIC Operation and Displays
The DIC has different displays,
which can be accessed by using the
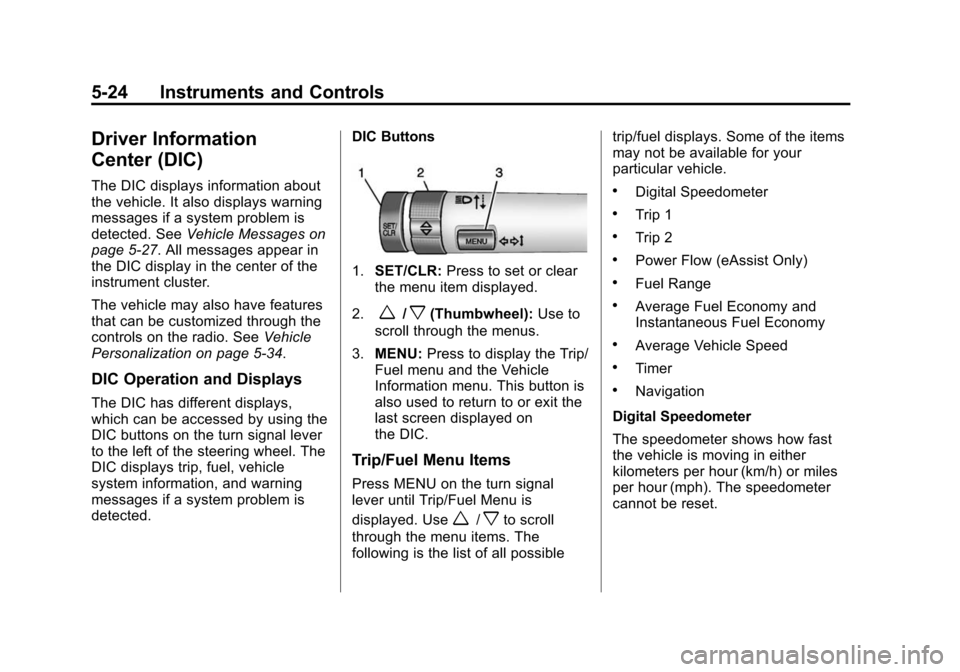
DIC buttons on the turn signal lever
to the left of the steering wheel. The
DIC displays trip, fuel, vehicle
system information, and warning
messages if a system problem is
detected. DIC Buttons
1.
SET/CLR: Press to set or clear
the menu item displayed.
2.
w/x(Thumbwheel): Use to
scroll through the menus.
3. MENU: Press to display the Trip/
Fuel menu and the Vehicle
Information menu. This button is
also used to return to or exit the
last screen displayed on
the DIC.
Trip/Fuel Menu Items
Press MENU on the turn signal
lever until Trip/Fuel Menu is
displayed. Use
w/xto scroll
through the menu items. The
following is the list of all possible trip/fuel displays. Some of the items
may not be available for your
particular vehicle.
.Digital Speedometer
.Trip 1
.Trip 2
.Power Flow (eAssist Only)
.Fuel Range
.Average Fuel Economy and
Instantaneous Fuel Economy
.Average Vehicle Speed
.Timer
.Navigation
Digital Speedometer
The speedometer shows how fast
the vehicle is moving in either
kilometers per hour (km/h) or miles
per hour (mph). The speedometer
cannot be reset.
Page 150 of 428
Black plate (40,1)Chevrolet Malibu Owner Manual (GMNA-Localizing-U.S./Canada/Mexico-
6081487) - 2014 - CRC - 11/19/13
5-40 Instruments and Controls
Return to Factory Settings
Select Return to Factory Settings for
the option to return all vehicle
personalization to the default
settings. Turn the TUNE/MENU
knob to select Yes or No. Press
TUNE/MENU to confirm and go
back to the last menu.
Universal Remote
System
SeeRadio Frequency Statement on
page 13-15.
Universal Remote System
Programming
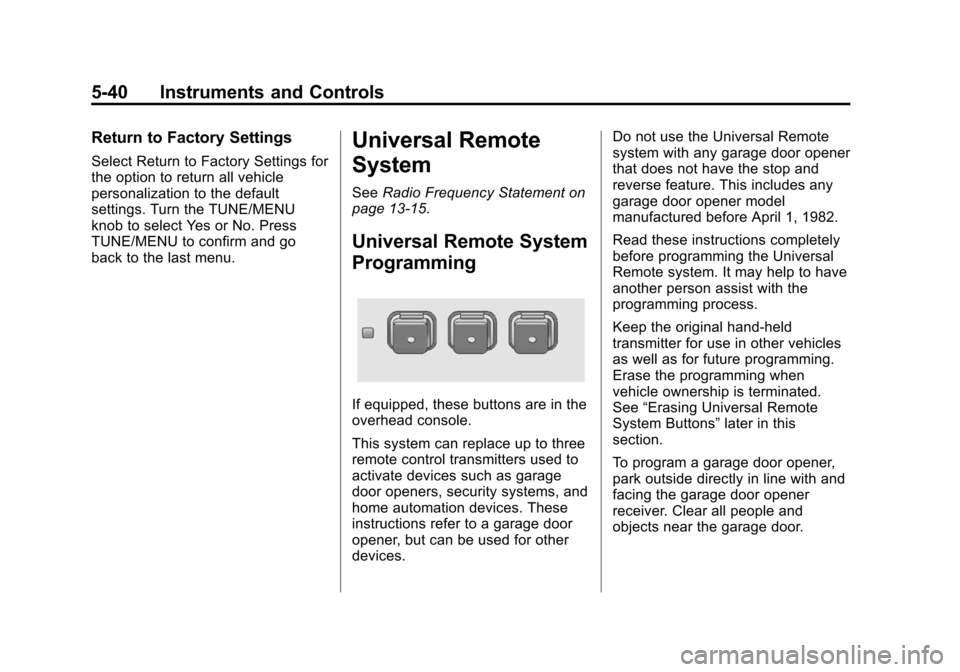
If equipped, these buttons are in the
overhead console.
This system can replace up to three
remote control transmitters used to
activate devices such as garage
door openers, security systems, and
home automation devices. These
instructions refer to a garage door
opener, but can be used for other
devices. Do not use the Universal Remote
system with any garage door opener
that does not have the stop and
reverse feature. This includes any
garage door opener model
manufactured before April 1, 1982.
Read these instructions completely
before programming the Universal
Remote system. It may help to have
another person assist with the
programming process.
Keep the original hand-held
transmitter for use in other vehicles
as well as for future programming.
Erase the programming when
vehicle ownership is terminated.
See
“Erasing Universal Remote
System Buttons” later in this
section.
To program a garage door opener,
park outside directly in line with and
facing the garage door opener
receiver. Clear all people and
objects near the garage door.
Page 151 of 428
Black plate (41,1)Chevrolet Malibu Owner Manual (GMNA-Localizing-U.S./Canada/Mexico-
6081487) - 2014 - CRC - 11/19/13
Instruments and Controls 5-41
Make sure the hand-held transmitter
has a new battery for quick and
accurate transmission of the
radio-frequency signal.
Programming the Universal
Remote System
For questions or help programming
the Universal Remote system, call
1-800-355-3515 or see
www.homelink.com.
Programming involves
time-sensitive actions, and may time
out causing the procedure to be
repeated.
To program up to three devices:
1. Hold the end of the hand-heldtransmitter about 3 to 8 cm
(1 to 3 in) away from the
Universal Remote system
buttons with the indicator light in
view. The hand-held transmitter
was supplied by the
manufacturer of the garage door
opener receiver. 2. At the same time, press and
hold both the hand-held
transmitter button and one of the
three Universal Remote system
buttons to be used to operate
the garage door. Do not release
either button until the indicator
light changes from a slow to a
rapid flash. Then release both
buttons.
Some garage door openers may
require substitution of Step 2
with the procedure under “Radio
Signals for Canada and Some
Gate Operators” later in this
section.
3. Press and hold the newly programmed Universal Remote
system button for five seconds
while watching the indicator light
and garage door activation.
.If the indicator light stays on
continuously or the garage
door moves when the
button is pressed, then programming is complete.
There is no need to
complete Steps 4–6.
.If the indicator light does
not come on or the garage
door does not move, a
second button press may
be required. For a second
time, press and hold the
newly programmed button
for five seconds. If the light
stays on or the garage door
moves, programming is
complete.
.If the indicator light blinks
rapidly for two seconds,
then changes to a solid light
and the garage door does
not move, continue with
programming Steps 4–6.
Page 152 of 428
Black plate (42,1)Chevrolet Malibu Owner Manual (GMNA-Localizing-U.S./Canada/Mexico-
6081487) - 2014 - CRC - 11/19/13
5-42 Instruments and Controls
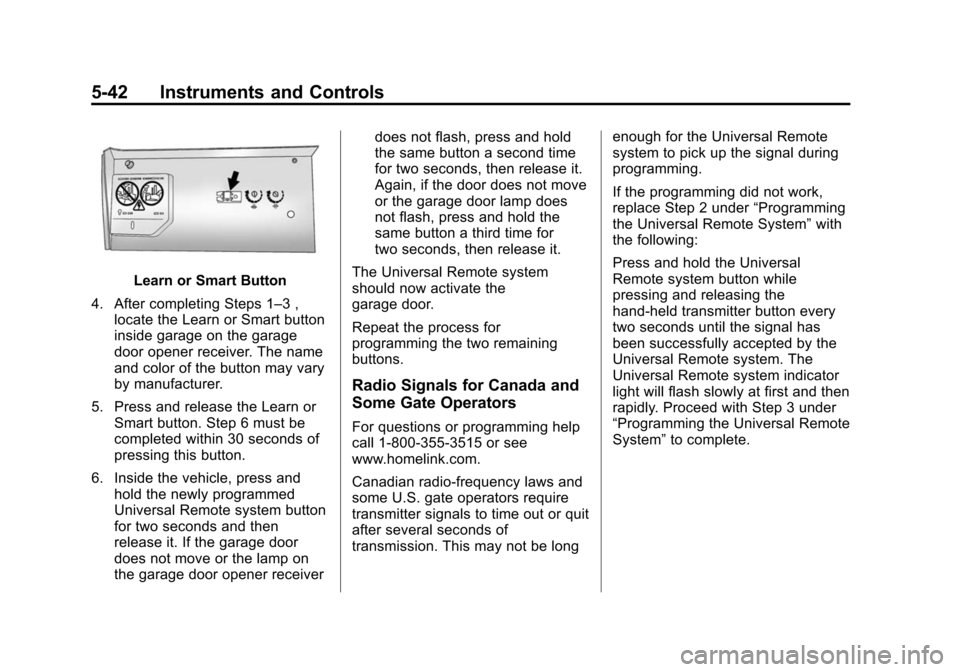
Learn or Smart Button
4. After completing Steps 1–3 , locate the Learn or Smart button
inside garage on the garage
door opener receiver. The name
and color of the button may vary
by manufacturer.
5. Press and release the Learn or Smart button. Step 6 must be
completed within 30 seconds of
pressing this button.
6. Inside the vehicle, press and hold the newly programmed
Universal Remote system button
for two seconds and then
release it. If the garage door
does not move or the lamp on
the garage door opener receiver does not flash, press and hold
the same button a second time
for two seconds, then release it.
Again, if the door does not move
or the garage door lamp does
not flash, press and hold the
same button a third time for
two seconds, then release it.
The Universal Remote system
should now activate the
garage door.
Repeat the process for
programming the two remaining
buttons.
Radio Signals for Canada and
Some Gate Operators
For questions or programming help
call 1-800-355-3515 or see
www.homelink.com.
Canadian radio-frequency laws and
some U.S. gate operators require
transmitter signals to time out or quit
after several seconds of
transmission. This may not be long enough for the Universal Remote
system to pick up the signal during
programming.
If the programming did not work,
replace Step 2 under
“Programming
the Universal Remote System” with
the following:
Press and hold the Universal
Remote system button while
pressing and releasing the
hand-held transmitter button every
two seconds until the signal has
been successfully accepted by the
Universal Remote system. The
Universal Remote system indicator
light will flash slowly at first and then
rapidly. Proceed with Step 3 under
“Programming the Universal Remote
System” to complete.
Page 163 of 428
Black plate (1,1)Chevrolet Malibu Owner Manual (GMNA-Localizing-U.S./Canada/Mexico-
6081487) - 2014 - CRC - 11/19/13
Infotainment System 7-1
Infotainment
System
Introduction
Infotainment . . . . . . . . . . . . . . . . . . . 7-1
Theft-Deterrent Feature . . . . . . . 7-2
Overview . . . . . . . . . . . . . . . . . . . . . . 7-3
Operation . . . . . . . . . . . . . . . . . . . . . 7-5
Radio
AM-FM Radio . . . . . . . . . . . . . . . . . 7-9
Satellite Radio . . . . . . . . . . . . . . . 7-11
Radio Reception . . . . . . . . . . . . . 7-13
Backglass Antenna . . . . . . . . . . 7-14
Multi-Band Antenna . . . . . . . . . . 7-14
Audio Players
CD Player . . . . . . . . . . . . . . . . . . . 7-15
Auxiliary Devices . . . . . . . . . . . . 7-16
Phone
Bluetooth (Overview) . . . . . . . . 7-21
Bluetooth (InfotainmentControls) . . . . . . . . . . . . . . . . . . . 7-23
Bluetooth (Voice Recognition) . . . . . . . . . . . . . . . 7-26
Introduction
Infotainment
Determine which radio the vehicle
has. For the radio without
connectivity, read the following
pages to become familiar with its
features. For radios with
connectivity, see the infotainment
manual.
{Warning
Taking your eyes off the road for
extended periods could cause a
crash resulting in injury or death
to you or others. Do not give
extended attention to infotainment
tasks while driving. This system provides access to
many audio and non-audio listings.
To minimize taking your eyes off the
road while driving, do the following
while the vehicle is parked:
.Become familiar with the
operation and controls of the
audio system.
.Set up the tone, speaker
adjustments, and preset radio
stations.
See Defensive Driving on page 9-3.
Page 185 of 428
Black plate (23,1)Chevrolet Malibu Owner Manual (GMNA-Localizing-U.S./Canada/Mexico-
6081487) - 2014 - CRC - 11/19/13
Infotainment System 7-23
VOL/Oknob during a call to
change the volume level. The
adjusted volume level remains in
memory for later calls. The system
maintains a minimum volume level.
Other Information
The Bluetooth®word mark and
logos are owned by the Bluetooth®
SIG, Inc. and any use of such marks
by General Motors is under license.
Other trademarks and trade names
are those of their respective owners.
See Radio Frequency Statement on
page 13-15.
Bluetooth (Infotainment
Controls)
To navigate the menu system using
the infotainment controls, see
Overview on page 7-3.
Pairing
If equipped, a Bluetooth-enabled
cell phone must be paired to the
Bluetooth system and then
connected to the vehicle before it can be used. See your cell phone
manufacturer's user guide for
Bluetooth functions before pairing
the cell phone. If a Bluetooth phone
is not connected, calls will be made
using OnStar Hands-Free Calling,
if available. See
OnStar Overview
on page 14-1.
Pairing Information
.A Bluetooth phone with MP3
capability cannot be paired to
the vehicle as a phone and an
MP3 player at the same time.
Pairing as a MP3 player may not
be available on all vehicles.
.Up to five cell phones can be
paired to the Bluetooth system.
.The pairing process is disabled
when the vehicle is moving.
.Pairing only needs to be
completed once, unless the
pairing information on the cell
phone changes or the cell phone
is deleted from the system.
.Only one paired cell phone can
be connected to the Bluetooth
system at a time.
.If multiple paired cell phones are
within range of the system, the
system connects to the first
available paired cell phone in the
order that they were first paired
to the system. To connect to a
different paired phone, see
“Connecting to a Different
Phone” later in this section.
Pairing a Phone
1. Press the CONFIG button.
2. Select Phone Settings or Bluetooth Settings.
3. Select Bluetooth.
4. Select Pair Device (Phone). A four-digit Personal
Identification Number (PIN)
appears on the display. The PIN
is used in Step 6.
Page 305 of 428
Black plate (43,1)Chevrolet Malibu Owner Manual (GMNA-Localizing-U.S./Canada/Mexico-
6081487) - 2014 - CRC - 11/19/13
Vehicle Care 10-43
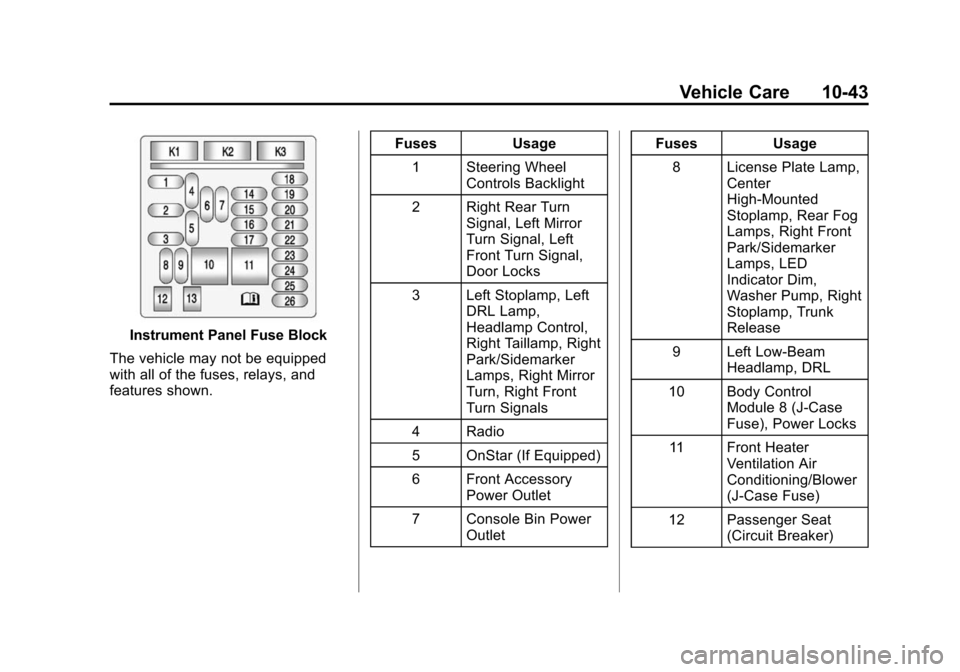
Instrument Panel Fuse Block
The vehicle may not be equipped
with all of the fuses, relays, and
features shown. Fuses Usage
1 Steering Wheel Controls Backlight
2 Right Rear Turn Signal, Left Mirror
Turn Signal, Left
Front Turn Signal,
Door Locks
3 Left Stoplamp, Left DRL Lamp,
Headlamp Control,
Right Taillamp, Right
Park/Sidemarker
Lamps, Right Mirror
Turn, Right Front
Turn Signals
4 Radio
5 OnStar (If Equipped)
6 Front Accessory Power Outlet
7 Console Bin Power Outlet Fuses Usage
8 License Plate Lamp, Center
High-Mounted
Stoplamp, Rear Fog
Lamps, Right Front
Park/Sidemarker
Lamps, LED
Indicator Dim,
Washer Pump, Right
Stoplamp, Trunk
Release
9 Left Low-Beam Headlamp, DRL
10 Body Control Module 8 (J-Case
Fuse), Power Locks
11 Front Heater Ventilation Air
Conditioning/Blower
(J-Case Fuse)
12 Passenger Seat (Circuit Breaker)
Page 424 of 428

Black plate (10,1)Chevrolet Malibu Owner Manual (GMNA-Localizing-U.S./Canada/Mexico-
6081487) - 2014 - CRC - 11/19/13
i-10 INDEX
S
Safety Belts . . . . . . . . . . . . . . . . . . . 3-11Care . . . . . . . . . . . . . . . . . . . . . . . . . . 3-18
Extender . . . . . . . . . . . . . . . . . . . . . . 3-17
How to Wear Safety BeltsProperly . . . . . . . . . . . . . . . . . . . . . 3-12
Lap-Shoulder Belt . . . . . . . . . . . . 3-13
Reminders . . . . . . . . . . . . . . . . . . . . 5-12
Replacing after a Crash . . . . . . 3-18
Use During Pregnancy . . . . . . . . 3-17
Safety Defects Reporting
Canadian Government . . . . . . 13-13
General Motors . . . . . . . . . . . . . 13-13
U.S. Government . . . . . . . . . . . 13-12
Safety Locks . . . . . . . . . . . . . . . . . . . 2-13
Safety System Check . . . . . . . . . . 3-17
Satellite Radio . . . . . . . . . . . . . . . . . 7-11
Scheduling Appointments . . . . . . 13-7
Sealant Kit, Tire . . . . . . .10-69, 10-76
Seats Adjustment, Front . . . . . . . . . . . . . . 3-3
Head Restraints . . . . . . . . . . . . . . . 3-2
Heated Front . . . . . . . . . . . . . . . . . . 3-7
Lumbar Adjustment, Front . . . . . 3-4
Memory . . . . . . . . . . . . . . . . . . . . . . . . 3-6 Seats (cont'd)
Power Adjustment, Front . . . . . . 3-4
Rear . . . . . . . . . . . . . . . . . . . . . . . . . . . 3-9
Reclining Seatbacks . . . . . . . . . . . 3-4
Securing Child Restraints . . . . . . . . . . . . . . 3-47, 3-49
Security Light . . . . . . . . . . . . . . . . . . . . . . . . . . 5-22
Messages . . . . . . . . . . . . . . . . . . . . 5-32
OnStar
®. . . . . . . . . . . . . . . . . . . . . . 14-2
Vehicle . . . . . . . . . . . . . . . . . . . . . . . 2-16
Vehicle Alarm . . . . . . . . . . . . . . . . . 2-16
Service . . . . . . . . . . . . . . . . . . . . . . . . 8-10 Accessories and
Modifications . . . . . . . . . . . . . . . . 10-3
Doing Your Own Work . . . . . . . . 10-3
Engine Soon Light . . . . . . . . . . . . 5-14
Maintenance Records . . . . . . .11-14
Maintenance, General Information . . . . . . . . . . . . . . . . . . 11-1
Parts Identification Label . . . . . 12-1
Publications Ordering Information . . . . . . . . . . . . . . . . .13-11
Scheduling Appointments . . . . . 13-7
Vehicle Messages . . . . . . . . . . . . 5-32
Servicing the Airbag . . . . . . . . . . . 3-30 Shift Lock Control Function
Check, Automatic
Transmission . . . . . . . . . . . . . . . . 10-26
Shifting Into Park . . . . . . . . . . . . . . . . . . . . . . 9-23
Out of Park . . . . . . . . . . . . . . . . . . . 9-25
Side Blind Zone
Alert (SBZA) . . . . . . . . . . . . . . . . . 9-41
Signals, Turn and Lane-Change . . . . . . . . . . . . . . . . . 6-4
Spare Tire
Compact . . . . . . . . . . . . . . . . . . . . 10-90
Specifications and Capacities . . . . . . . . . . . . . . . . . . . . 12-2
Speedometer . . . . . . . . . . . . . . . . . . 5-10
StabiliTrak OFF Light . . . . . . . . . . . . . . . . . . . . . 5-19
Start Assist, Hills . . . . . . . . . . . . . . 9-32
Start Vehicle, Remote . . . . . . . . . . 2-9
Starter Switch Check . . . . . . . . . 10-26
Starting the Engine . . . . . . . . . . . . 9-19
Starting the Vehicle Messages . . . . . . . . . . . . . . . . . . . . 5-33
Steering . . . . . . . . . . . . . . . . . . . . . . . . 9-4 Wheel Adjustment . . . . . . . . . . . . . 5-2
Wheel Controls . . . . . . . . . . . . . . . . 5-2