Page 292 of 428
Black plate (30,1)Chevrolet Malibu Owner Manual (GMNA-Localizing-U.S./Canada/Mexico-
6081487) - 2014 - CRC - 11/19/13
10-30 Vehicle Care
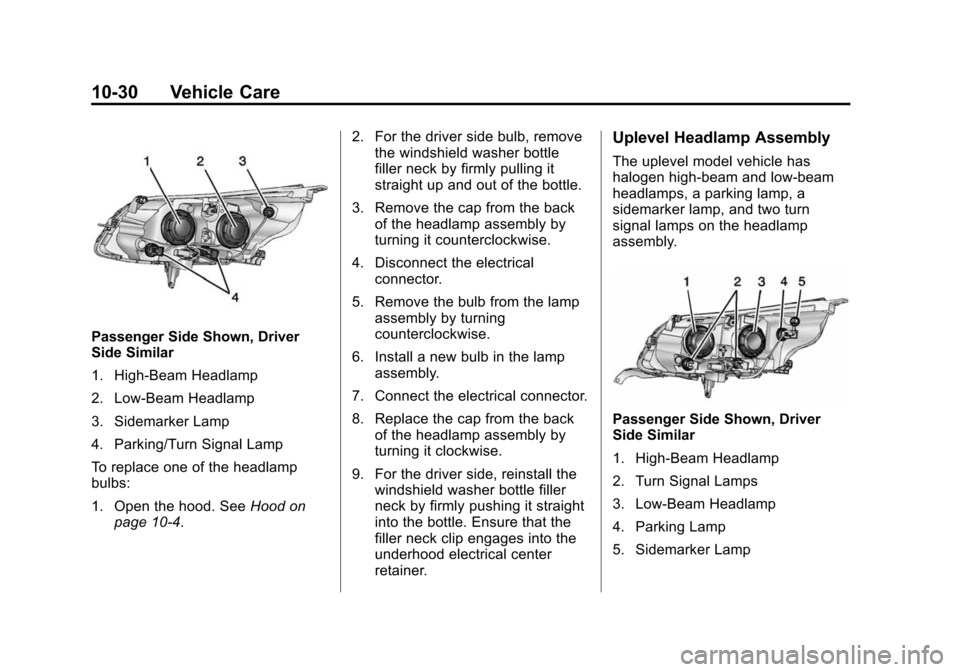
Passenger Side Shown, Driver
Side Similar
1. High-Beam Headlamp
2. Low-Beam Headlamp
3. Sidemarker Lamp
4. Parking/Turn Signal Lamp
To replace one of the headlamp
bulbs:
1. Open the hood. SeeHood on
page 10-4. 2. For the driver side bulb, remove
the windshield washer bottle
filler neck by firmly pulling it
straight up and out of the bottle.
3. Remove the cap from the back of the headlamp assembly by
turning it counterclockwise.
4. Disconnect the electrical connector.
5. Remove the bulb from the lamp assembly by turning
counterclockwise.
6. Install a new bulb in the lamp assembly.
7. Connect the electrical connector.
8. Replace the cap from the back of the headlamp assembly by
turning it clockwise.
9. For the driver side, reinstall the windshield washer bottle filler
neck by firmly pushing it straight
into the bottle. Ensure that the
filler neck clip engages into the
underhood electrical center
retainer.
Uplevel Headlamp Assembly
The uplevel model vehicle has
halogen high-beam and low-beam
headlamps, a parking lamp, a
sidemarker lamp, and two turn
signal lamps on the headlamp
assembly.
Passenger Side Shown, Driver
Side Similar
1. High-Beam Headlamp
2. Turn Signal Lamps
3. Low-Beam Headlamp
4. Parking Lamp
5. Sidemarker Lamp
Page 293 of 428
Black plate (31,1)Chevrolet Malibu Owner Manual (GMNA-Localizing-U.S./Canada/Mexico-
6081487) - 2014 - CRC - 11/19/13
Vehicle Care 10-31
To replace one of these bulbs:
High-Beam Headlamp
1. Open the hood. SeeHood on
page 10-4.
2. For the driver side bulb, remove the windshield washer bottle
filler neck by firmly pulling it
straight up and out of the bottle.
3. Remove the cap from the back of the headlamp assembly by
turning it counterclockwise.
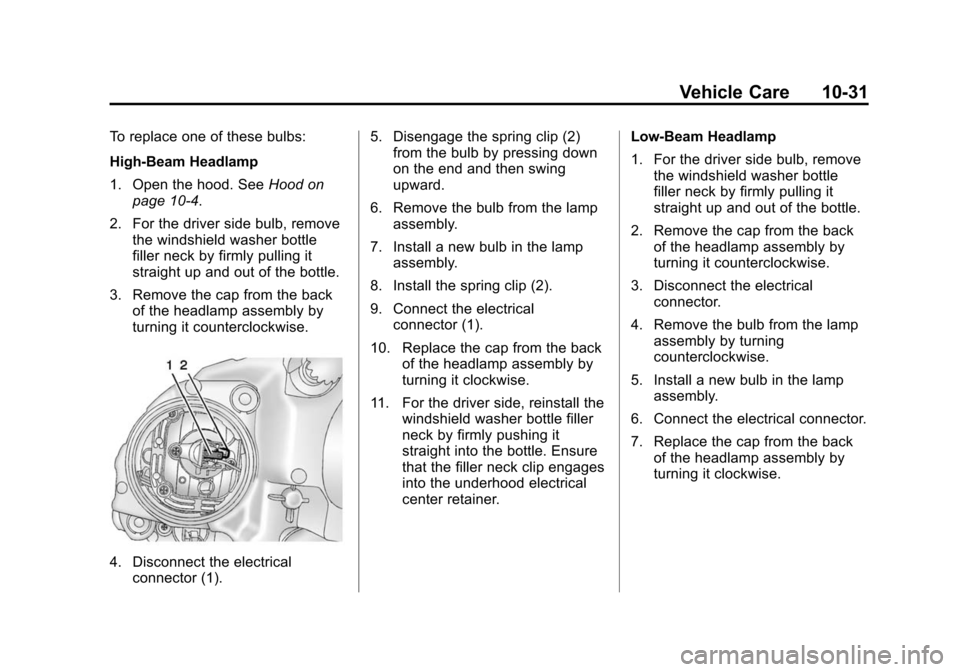
4. Disconnect the electricalconnector (1). 5. Disengage the spring clip (2)
from the bulb by pressing down
on the end and then swing
upward.
6. Remove the bulb from the lamp assembly.
7. Install a new bulb in the lamp assembly.
8. Install the spring clip (2).
9. Connect the electrical connector (1).
10. Replace the cap from the back of the headlamp assembly by
turning it clockwise.
11. For the driver side, reinstall the windshield washer bottle filler
neck by firmly pushing it
straight into the bottle. Ensure
that the filler neck clip engages
into the underhood electrical
center retainer. Low-Beam Headlamp
1. For the driver side bulb, remove
the windshield washer bottle
filler neck by firmly pulling it
straight up and out of the bottle.
2. Remove the cap from the back of the headlamp assembly by
turning it counterclockwise.
3. Disconnect the electrical connector.
4. Remove the bulb from the lamp assembly by turning
counterclockwise.
5. Install a new bulb in the lamp assembly.
6. Connect the electrical connector.
7. Replace the cap from the back of the headlamp assembly by
turning it clockwise.
Page 294 of 428
Black plate (32,1)Chevrolet Malibu Owner Manual (GMNA-Localizing-U.S./Canada/Mexico-
6081487) - 2014 - CRC - 11/19/13
10-32 Vehicle Care
8. For the driver side, reinstall thewindshield washer bottle filler
neck by firmly pushing it straight
into the bottle. Ensure that the
filler neck clip engages into the
underhood electrical center
retainer.
HID Headlamp Assembly
The HID assembly has a high
intensity discharge (HID) high/low
beam, a DRL/parking lamp,
sidemarker lamp, and a turn signal
lamp on the headlamp assembly.
For replacement of the headlamp on
an HID assembly, contact your
dealer. See High Intensity
Discharge (HID) Lighting on
page 10-29.
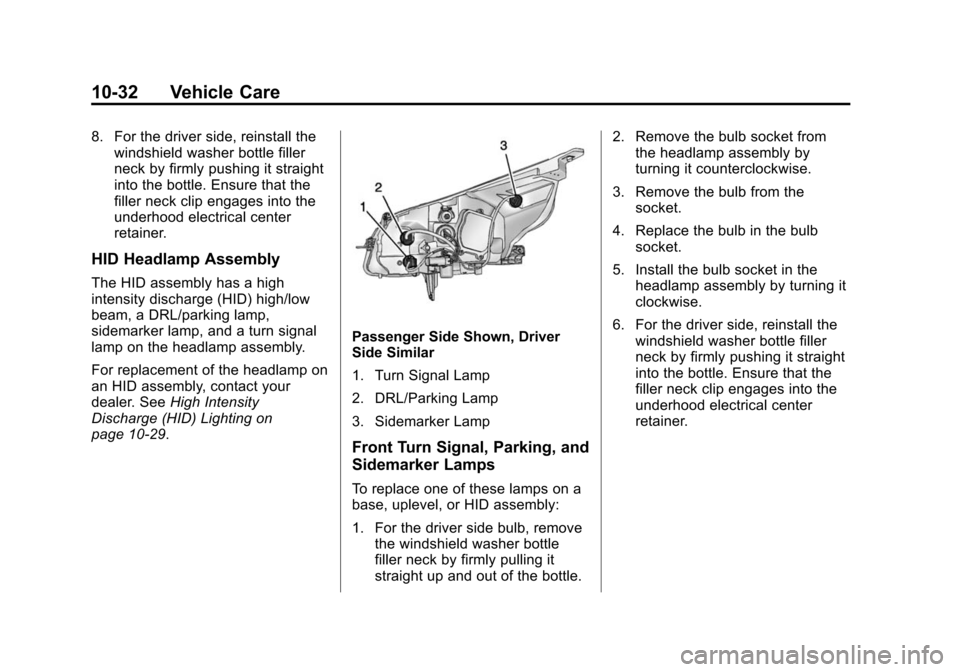
Passenger Side Shown, Driver
Side Similar
1. Turn Signal Lamp
2. DRL/Parking Lamp
3. Sidemarker Lamp
Front Turn Signal, Parking, and
Sidemarker Lamps
To replace one of these lamps on a
base, uplevel, or HID assembly:
1. For the driver side bulb, remove the windshield washer bottle
filler neck by firmly pulling it
straight up and out of the bottle. 2. Remove the bulb socket from
the headlamp assembly by
turning it counterclockwise.
3. Remove the bulb from the socket.
4. Replace the bulb in the bulb socket.
5. Install the bulb socket in the headlamp assembly by turning it
clockwise.
6. For the driver side, reinstall the windshield washer bottle filler
neck by firmly pushing it straight
into the bottle. Ensure that the
filler neck clip engages into the
underhood electrical center
retainer.
Page 299 of 428
Black plate (37,1)Chevrolet Malibu Owner Manual (GMNA-Localizing-U.S./Canada/Mexico-
6081487) - 2014 - CRC - 11/19/13
Vehicle Care 10-37
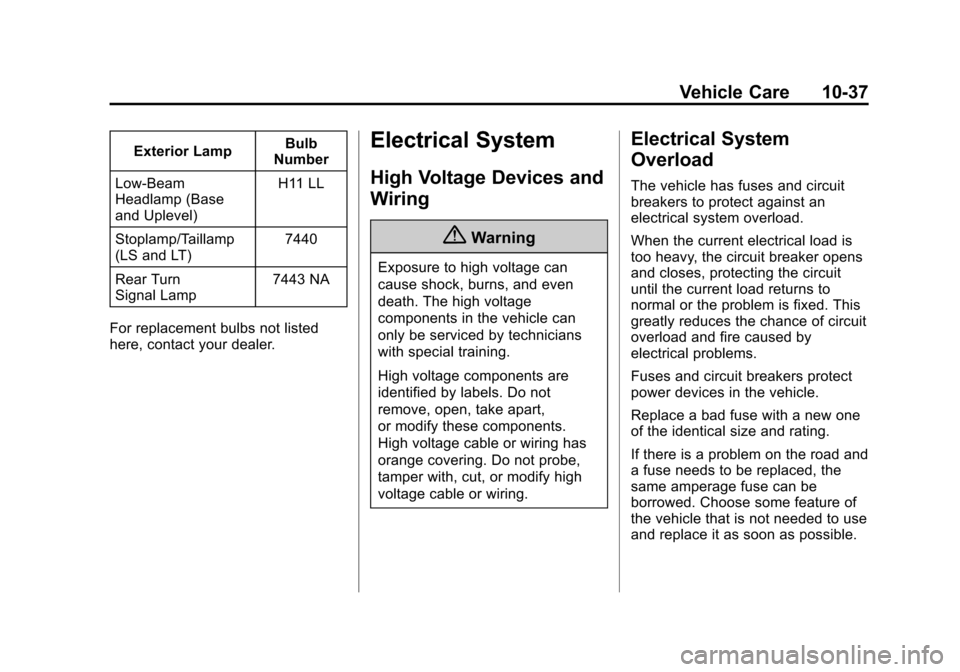
Exterior LampBulb
Number
Low-Beam
Headlamp (Base
and Uplevel) H11 LL
Stoplamp/Taillamp
(LS and LT) 7440
Rear Turn
Signal Lamp 7443 NA
For replacement bulbs not listed
here, contact your dealer.Electrical System
High Voltage Devices and
Wiring
{Warning
Exposure to high voltage can
cause shock, burns, and even
death. The high voltage
components in the vehicle can
only be serviced by technicians
with special training.
High voltage components are
identified by labels. Do not
remove, open, take apart,
or modify these components.
High voltage cable or wiring has
orange covering. Do not probe,
tamper with, cut, or modify high
voltage cable or wiring.
Electrical System
Overload
The vehicle has fuses and circuit
breakers to protect against an
electrical system overload.
When the current electrical load is
too heavy, the circuit breaker opens
and closes, protecting the circuit
until the current load returns to
normal or the problem is fixed. This
greatly reduces the chance of circuit
overload and fire caused by
electrical problems.
Fuses and circuit breakers protect
power devices in the vehicle.
Replace a bad fuse with a new one
of the identical size and rating.
If there is a problem on the road and
a fuse needs to be replaced, the
same amperage fuse can be
borrowed. Choose some feature of
the vehicle that is not needed to use
and replace it as soon as possible.
Page 302 of 428
Black plate (40,1)Chevrolet Malibu Owner Manual (GMNA-Localizing-U.S./Canada/Mexico-
6081487) - 2014 - CRC - 11/19/13
10-40 Vehicle Care
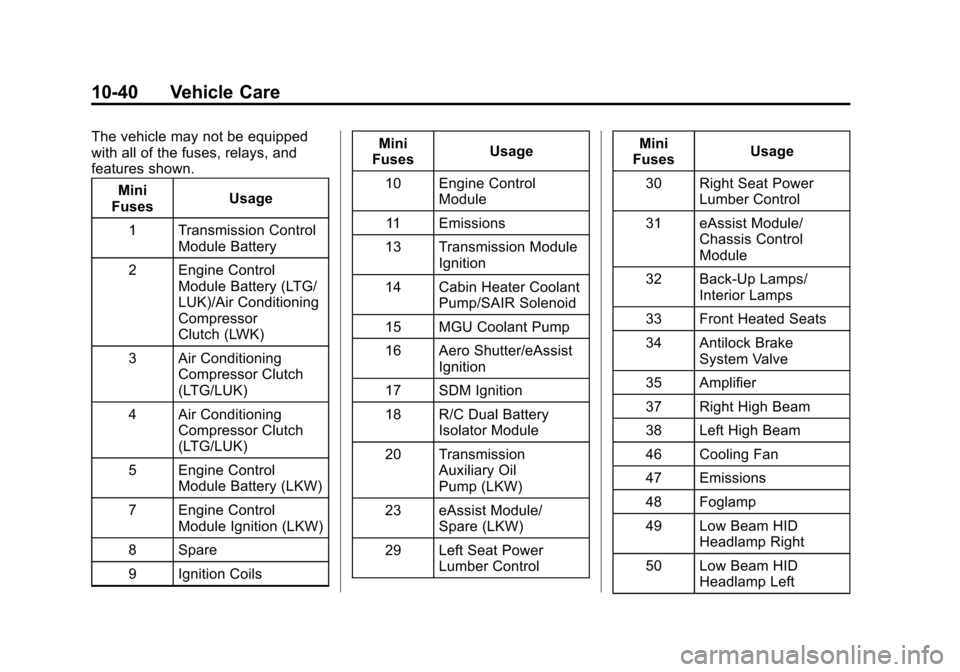
The vehicle may not be equipped
with all of the fuses, relays, and
features shown.Mini
Fuses Usage
1 Transmission Control Module Battery
2 Engine Control Module Battery (LTG/
LUK)/Air Conditioning
Compressor
Clutch (LWK)
3 Air Conditioning Compressor Clutch
(LTG/LUK)
4 Air Conditioning Compressor Clutch
(LTG/LUK)
5 Engine Control Module Battery (LKW)
7 Engine Control Module Ignition (LKW)
8 Spare
9 Ignition Coils Mini
Fuses Usage
10 Engine Control Module
11 Emissions
13 Transmission Module Ignition
14 Cabin Heater Coolant Pump/SAIR Solenoid
15 MGU Coolant Pump
16 Aero Shutter/eAssist Ignition
17 SDM Ignition
18 R/C Dual Battery Isolator Module
20 Transmission Auxiliary Oil
Pump (LKW)
23 eAssist Module/ Spare (LKW)
29 Left Seat Power Lumber Control Mini
Fuses Usage
30 Right Seat Power Lumber Control
31 eAssist Module/ Chassis Control
Module
32 Back-Up Lamps/ Interior Lamps
33 Front Heated Seats
34 Antilock Brake System Valve
35 Amplifier
37 Right High Beam
38 Left High Beam
46 Cooling Fan
47 Emissions
48 Foglamp
49 Low Beam HID Headlamp Right
50 Low Beam HID Headlamp Left
Page 304 of 428
Black plate (42,1)Chevrolet Malibu Owner Manual (GMNA-Localizing-U.S./Canada/Mexico-
6081487) - 2014 - CRC - 11/19/13
10-42 Vehicle Care
Micro
Relays Usage
4 Front Wiper Speed
5 Front Wiper On
6 Cabin Pump eAssist/ SAIR Solenoid
8 Transmission Auxiliary Oil
Pump (LKW)
10 Cooling Fan K3
11 Transmission Oil Pump (LUK)/Starter 2
Solenoid (LKW)
14 Headlamp Low Beam/DRLInstrument Panel Fuse
Block
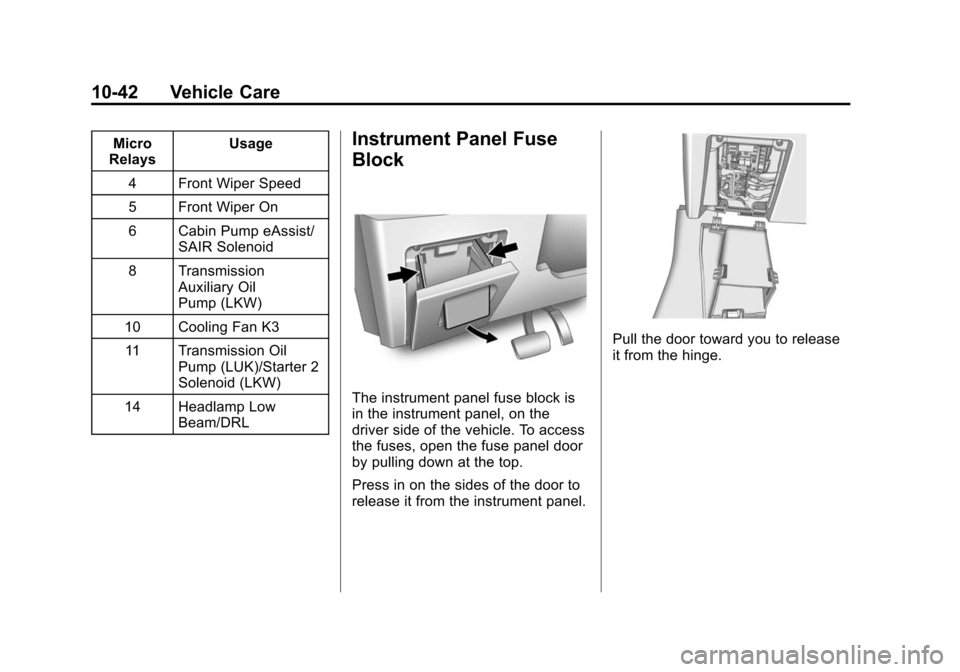
The instrument panel fuse block is
in the instrument panel, on the
driver side of the vehicle. To access
the fuses, open the fuse panel door
by pulling down at the top.
Press in on the sides of the door to
release it from the instrument panel.
Pull the door toward you to release
it from the hinge.
Page 305 of 428
Black plate (43,1)Chevrolet Malibu Owner Manual (GMNA-Localizing-U.S./Canada/Mexico-
6081487) - 2014 - CRC - 11/19/13
Vehicle Care 10-43
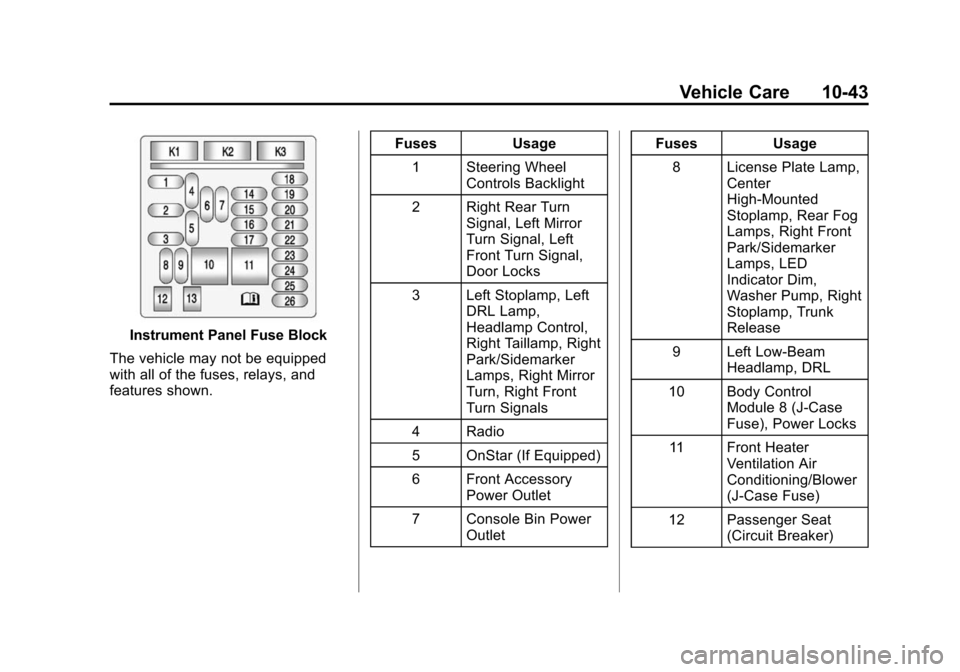
Instrument Panel Fuse Block
The vehicle may not be equipped
with all of the fuses, relays, and
features shown. Fuses Usage
1 Steering Wheel Controls Backlight
2 Right Rear Turn Signal, Left Mirror
Turn Signal, Left
Front Turn Signal,
Door Locks
3 Left Stoplamp, Left DRL Lamp,
Headlamp Control,
Right Taillamp, Right
Park/Sidemarker
Lamps, Right Mirror
Turn, Right Front
Turn Signals
4 Radio
5 OnStar (If Equipped)
6 Front Accessory Power Outlet
7 Console Bin Power Outlet Fuses Usage
8 License Plate Lamp, Center
High-Mounted
Stoplamp, Rear Fog
Lamps, Right Front
Park/Sidemarker
Lamps, LED
Indicator Dim,
Washer Pump, Right
Stoplamp, Trunk
Release
9 Left Low-Beam Headlamp, DRL
10 Body Control Module 8 (J-Case
Fuse), Power Locks
11 Front Heater Ventilation Air
Conditioning/Blower
(J-Case Fuse)
12 Passenger Seat (Circuit Breaker)
Page 306 of 428
Black plate (44,1)Chevrolet Malibu Owner Manual (GMNA-Localizing-U.S./Canada/Mexico-
6081487) - 2014 - CRC - 11/19/13
10-44 Vehicle Care
FusesUsage
13 Driver Seat (Circuit Breaker)
14 Diagnostic Link Connector
15 Airbag, SDM
16 Trunk Release
17 Heater Ventilation Air Conditioning
Controller
18 Audio Main
19 Displays
20 Passenger Occupant Sensor
21 Instrument Cluster
22 Ignition Switch
23 Right Low-Beam Headlamp, DRL Fuses
Usage
24 Ambient Light, Switch Backlighting
(LED), Trunk Lamp,
Shift Lock, Key
Capture
25 110V AC
26 Spare
Relays Usage
K1 Trunk Release
K2 Not Used
K3 Power Outlet RelayWheels and Tires
Tires
Every new GM vehicle has
high-quality tires made by a
leading tire manufacturer. See
the warranty manual for
information regarding the tire
warranty and where to get
service. For additional
information refer to the tire
manufacturer.