2014 CHEVROLET IMPALA fold seats
[x] Cancel search: fold seatsPage 16 of 422
Black plate (10,1)Chevrolet Impala Owner Manual (GMNA-Localizing-U.S./Canada-5772216) -
2014 - 2nd crc - 5/14/13
1-10 In Brief
To return the seatback to the upright
position:
1. Lift the lever fully withoutapplying pressure to the
seatback, and the seatback will
return to the upright position.
2. Push and pull on the seatback to make sure it is locked.
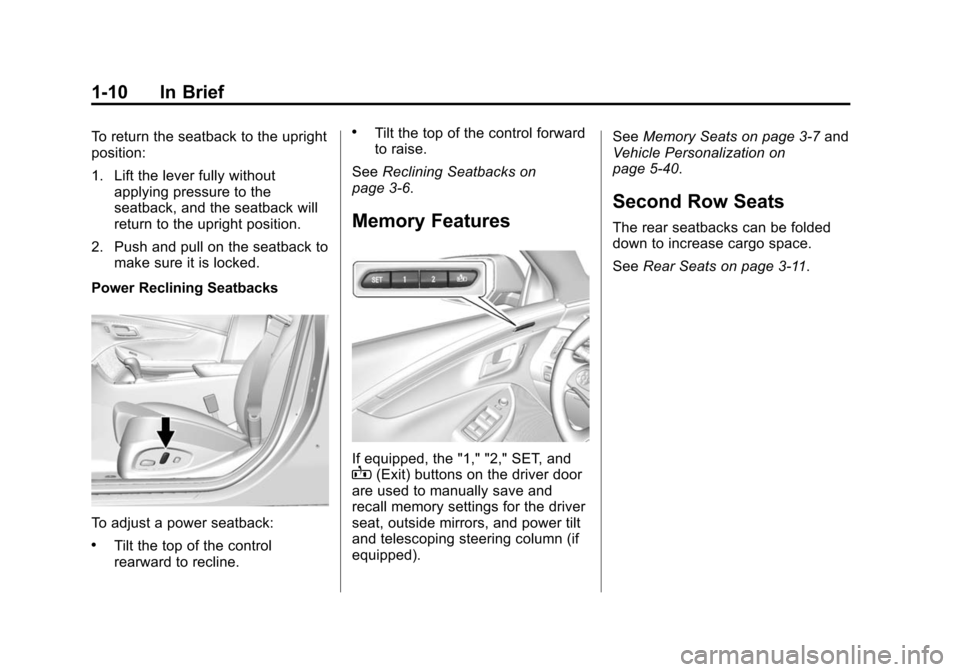
Power Reclining Seatbacks
To adjust a power seatback:
.Tilt the top of the control
rearward to recline.
.Tilt the top of the control forward
to raise.
See Reclining Seatbacks on
page 3-6.
Memory Features
If equipped, the "1," "2," SET, andB(Exit) buttons on the driver door
are used to manually save and
recall memory settings for the driver
seat, outside mirrors, and power tilt
and telescoping steering column (if
equipped). See
Memory Seats on page 3-7 and
Vehicle Personalization on
page 5-40.
Second Row Seats
The rear seatbacks can be folded
down to increase cargo space.
See Rear Seats on page 3-11.
Page 60 of 422
Black plate (2,1)Chevrolet Impala Owner Manual (GMNA-Localizing-U.S./Canada-5772216) -
2014 - 2nd crc - 5/14/13
3-2 Seats and Restraints
Head Restraints
{Warning
With head restraints that are not
installed and adjusted properly,
there is a greater chance that
occupants will suffer a neck/
spinal injury in a crash. Do not
drive until the head restraints for
all occupants are installed and
adjusted properly.
If your vehicle has rear head
restraints that fold down, always
return them to the full upright
position whenever an occupant is
seated in the seat.
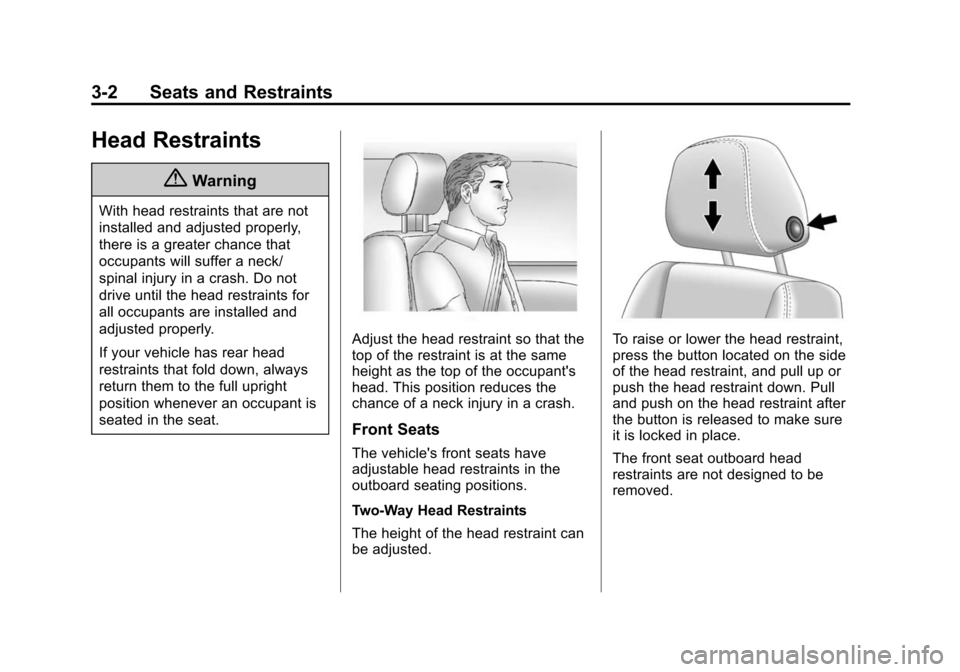
Adjust the head restraint so that the
top of the restraint is at the same
height as the top of the occupant's
head. This position reduces the
chance of a neck injury in a crash.
Front Seats
The vehicle's front seats have
adjustable head restraints in the
outboard seating positions.
Two-Way Head Restraints
The height of the head restraint can
be adjusted.
To raise or lower the head restraint,
press the button located on the side
of the head restraint, and pull up or
push the head restraint down. Pull
and push on the head restraint after
the button is released to make sure
it is locked in place.
The front seat outboard head
restraints are not designed to be
removed.
Page 62 of 422
Black plate (4,1)Chevrolet Impala Owner Manual (GMNA-Localizing-U.S./Canada-5772216) -
2014 - 2nd crc - 5/14/13
3-4 Seats and Restraints
head restraint after the button is
released to make sure that it is
locked in place.
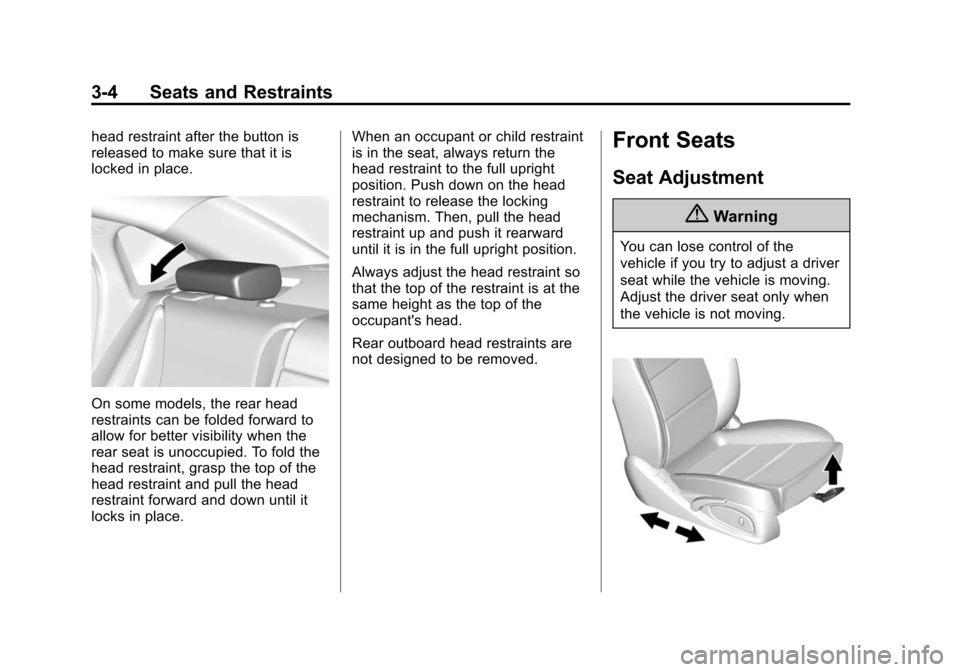
On some models, the rear head
restraints can be folded forward to
allow for better visibility when the
rear seat is unoccupied. To fold the
head restraint, grasp the top of the
head restraint and pull the head
restraint forward and down until it
locks in place.When an occupant or child restraint
is in the seat, always return the
head restraint to the full upright
position. Push down on the head
restraint to release the locking
mechanism. Then, pull the head
restraint up and push it rearward
until it is in the full upright position.
Always adjust the head restraint so
that the top of the restraint is at the
same height as the top of the
occupant's head.
Rear outboard head restraints are
not designed to be removed.
Front Seats
Seat Adjustment
{Warning
You can lose control of the
vehicle if you try to adjust a driver
seat while the vehicle is moving.
Adjust the driver seat only when
the vehicle is not moving.
Page 69 of 422
Black plate (11,1)Chevrolet Impala Owner Manual (GMNA-Localizing-U.S./Canada-5772216) -
2014 - 2nd crc - 5/14/13
Seats and Restraints 3-11
cold outside, the heated seats turn
on, and when it is hot outside the
ventilated seats turn on. The heated
or ventilated seats are canceled
when the ignition is turned on. Press
the button to use the heated or
ventilated seats after the vehicle is
started.
The heated or ventilated seat
indicator lights on the button do not
turn on during a remote start.
The heated seat temperature
performance of an unoccupied seat
may be reduced. This is normal.
The heated or ventilated seats will
not turn on during a remote start
unless they are enabled in the
vehicle personalization menu. See
Remote Vehicle Start on page 2-9
andVehicle Personalization on
page 5-40.Rear Seats
Folding the Seatback
Either side of the seatback can be
folded for more cargo space. Fold a
seatback only when the vehicle is
not moving.
{Caution
Folding a rear seat with the safety
belts still fastened may cause
damage to the seat or the safety
belts. Always unbuckle the safety
belts and return them to their
normal stowed position before
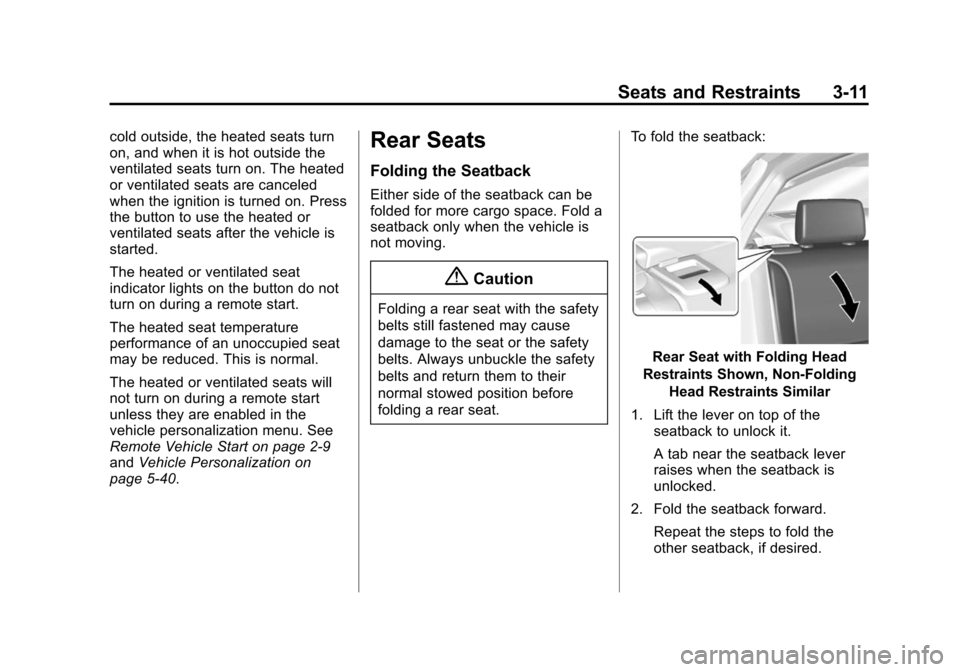
folding a rear seat. To fold the seatback:
Rear Seat with Folding Head
Restraints Shown, Non-Folding Head Restraints Similar
1. Lift the lever on top of the seatback to unlock it.
A tab near the seatback lever
raises when the seatback is
unlocked.
2. Fold the seatback forward. Repeat the steps to fold the
other seatback, if desired.
Page 70 of 422
Black plate (12,1)Chevrolet Impala Owner Manual (GMNA-Localizing-U.S./Canada-5772216) -
2014 - 2nd crc - 5/14/13
3-12 Seats and Restraints
Raising the Seatback
{Warning
If either seatback is not locked, it
could move forward in a sudden
stop or crash. That could cause
injury to the person sitting there.
Always push and pull on the
seatbacks to be sure they are
locked.
{Warning
A safety belt that is improperly
routed, not properly attached,
or twisted will not provide the
protection needed in a crash. The
person wearing the belt could be
seriously injured. After raising the
rear seatback, always check to be
sure that the safety belts are
properly routed and attached, and
are not twisted.To raise a seatback:
1. Lift the seatback up and push it
rearward to lock it in place.
A tab near the seatback lever
retracts when the seatback is
locked in place.
2. Push and pull the top of the seatback to be sure it is locked
into position.
3. Repeat the steps to raise the other seatback, if necessary.
When the seat is not in use, it
should be kept in the upright, locked
position.
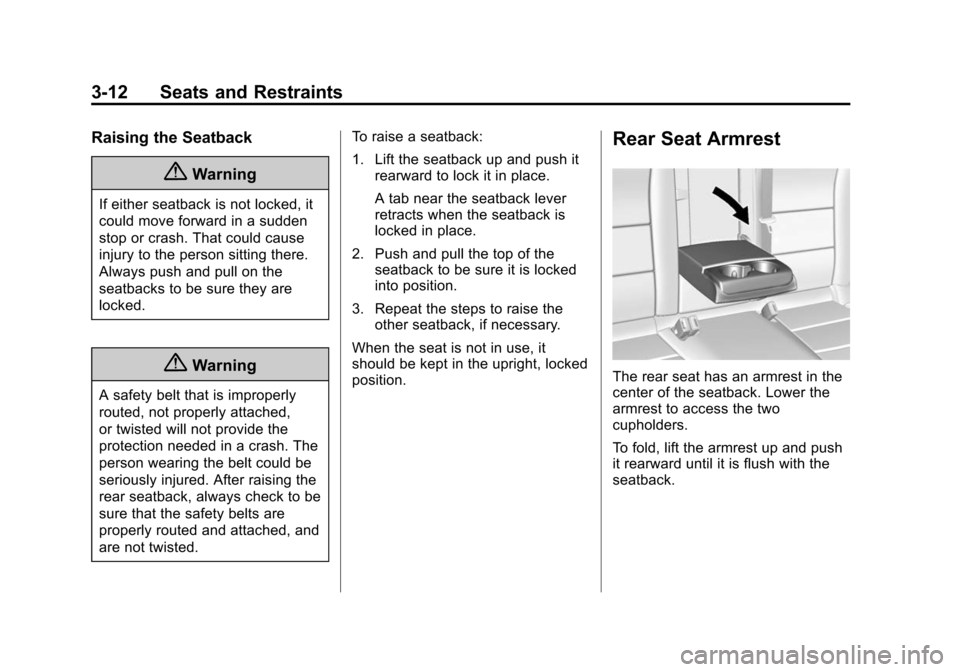
Rear Seat Armrest
The rear seat has an armrest in the
center of the seatback. Lower the
armrest to access the two
cupholders.
To fold, lift the armrest up and push
it rearward until it is flush with the
seatback.
Page 103 of 422
Black plate (45,1)Chevrolet Impala Owner Manual (GMNA-Localizing-U.S./Canada-5772216) -
2014 - 2nd crc - 5/14/13
Seats and Restraints 3-45
Warning (Continued)
of the retractor to set the lock,
if the vehicle has one, after the
child restraint has been installed.
{Caution
Do not let the LATCH
attachments rub against the
vehicle’s safety belts. This may
damage these parts. If necessary,
move buckled safety belts to
avoid rubbing the LATCH
attachments.
Do not fold the empty rear seat
with a safety belt buckled. This
could damage the safety belt or
the seat. Unbuckle and return the
safety belt to its stowed position,
before folding the seat.If you need to secure more than one
child restraint in the rear seat, see
Where to Put the Restraint on
page 3-40.
You cannot secure three child
restraints using the LATCH anchors
in the rear seat at the same time,
but you can install two of them.
If you want to do this, install one
LATCH child restraint in the right
rear seating position, and install the
other one either in the left rear
seating position or in the center
seating position. If you need to
install child restraints in both the
center and left rear seating
positions, the one in the center
seating position will need to be
secured using the vehicle safety
belts instead of the LATCH anchors.
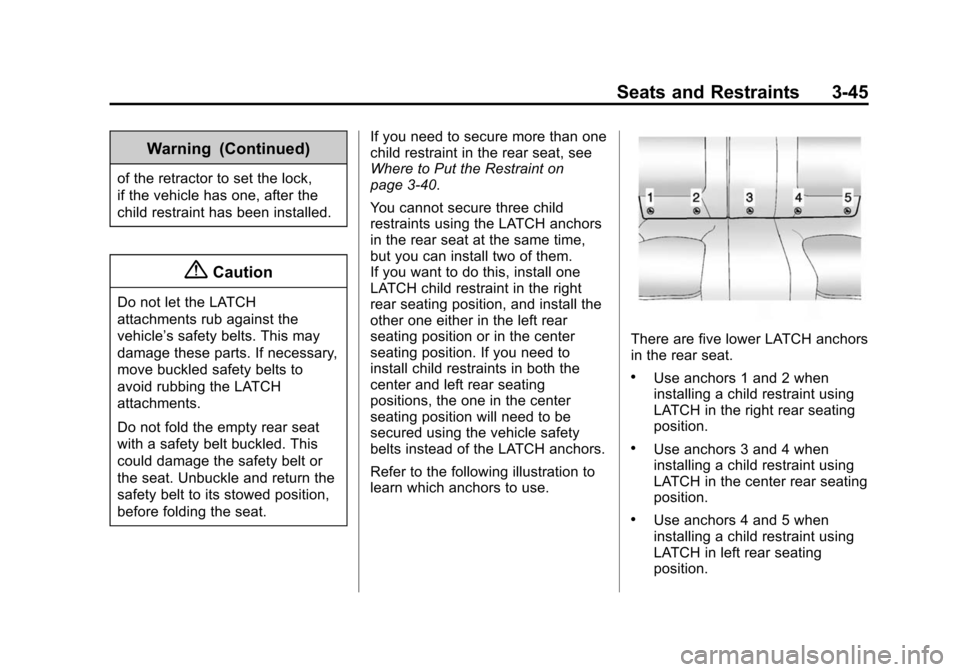
Refer to the following illustration to
learn which anchors to use.
There are five lower LATCH anchors
in the rear seat.
.Use anchors 1 and 2 when
installing a child restraint using
LATCH in the right rear seating
position.
.Use anchors 3 and 4 when
installing a child restraint using
LATCH in the center rear seating
position.
.Use anchors 4 and 5 when
installing a child restraint using
LATCH in left rear seating
position.
Page 222 of 422
Black plate (14,1)Chevrolet Impala Owner Manual (GMNA-Localizing-U.S./Canada-5772216) -
2014 - 2nd crc - 5/14/13
9-14 Driving and Operating
fuel, and cargo. Never exceed
the GVWR for the vehicle, or the
Gross Axle Weight Rating
(GAWR) for either the front or
rear axle.
And, if there is a heavy load, it
should be spread out. See
“Steps for Determining Correct
Load Limit”earlier in this
section.
{Warning
Do not load the vehicle any
heavier than the Gross
Vehicle Weight Rating
(GVWR), or either the
maximum front or rear Gross
Axle Weight Rating (GAWR).
This can cause systems to
break and change the way the
vehicle handles. This could
cause loss of control and a
crash. Overloading can also
shorten the life of the vehicle. If you put things inside the
vehicle
—like suitcases, tools,
packages, or anything
else —they will go as fast as the
vehicle goes. If you have to stop
or turn quickly, or if there is a
crash, they will keep going.
{Warning
Things inside the vehicle can
strike and injure people in a
sudden stop or turn, or in a
crash.
.Put things in the cargo
area of the vehicle. In the
cargo area, put them as
far forward as possible.
Try to spread the weight
evenly.
(Continued)
Warning (Continued)
.Never stack heavier
things, like suitcases,
inside the vehicle so that
some of them are above
the tops of the seats.
.Do not leave an
unsecured child restraint
in the vehicle.
.Secure loose items in the
vehicle.
.Do not leave a seat folded
down unless needed.
Page 412 of 422

Black plate (4,1)Chevrolet Impala Owner Manual (GMNA-Localizing-U.S./Canada-5772216) -
2014 - 2nd crc - 5/14/13
i-4 INDEX
Driving (cont'd)Vehicle Load Limits . . . . . . . . . . . 9-10
Wet Roads . . . . . . . . . . . . . . . . . . . . 9-6
Winter . . . . . . . . . . . . . . . . . . . . . . . . . 9-8
Dual Automatic Climate Control System . . . . . . . . . . . . . . . . 8-3
E
E85 or FlexFuel . . . . . . . . . . . . . . . 9-58
Electric Parking Brake Light . . . 5-21
Electrical Equipment,Add-On . . . . . . . . . . . . . . . . . . . . . . 9-66
Electrical System Engine CompartmentFuse Block . . . . . . . . . . . . . . . . 10-36
Fuses . . . . . . . . . . . . . . . . . . . . . . 10-36
Instrument Panel Fuse
Block . . . . . . . . . . . . . . . . . . . . . . 10-40
Overload . . . . . . . . . . . . . . . . . . . 10-35
Emergency
OnStar
®. . . . . . . . . . . . . . . . . . . . . . 14-2
Energy Information . . . . . . . . . . . . 5-27 Engine
Air Cleaner/Filter . . . . . . . . . . . 10-15
Check and Service Engine
Soon Light . . . . . . . . . . . . . . . . . . 5-17
Compartment Overview . . . . . . . 10-6
Coolant . . . . . . . . . . . . . . . . . . . . . 10-19
Coolant Temperature Gauge . . . . . . . . . . . . . . . . . . . . . . 5-14
Cooling System . . . . . . . . . . . . . 10-18
Cooling System Messages . . . 5-33
Drive Belt Routing . . . . . . . . . . . . 12-4
Exhaust . . . . . . . . . . . . . . . . . . . . . . 9-26
Heater . . . . . . . . . . . . . . . . . . . . . . . . 9-23
Oil Life System . . . . . . . . . . . . . 10-14
Oil Messages . . . . . . . . . . . . . . . . . 5-33
Overheated Protection Operating Mode . . . . . . . . . . . 10-24
Overheating . . . . . . . . . . . . . . . . 10-22
Power Messages . . . . . . . . . . . . . 5-34
Pressure Light . . . . . . . . . . . . . . . . 5-24
Running While Parked . . . . . . . . 9-27
Starting . . . . . . . . . . . . . . . . . . . . . . . 9-19
Entry Lighting . . . . . . . . . . . . . . . . . . . 6-5
Equipment, Towing . . . . . . . . . . . . 9-65
Event Data Recorders . . . . . . . . 13-14
Exit Lighting . . . . . . . . . . . . . . . . . . . . 6-6 Extender, Safety Belt . . . . . . . . . . 3-19
Exterior Lamp Controls . . . . . . . . . 6-1
Exterior Lamps Off Reminder . . . 6-1
F
Features
Memory . . . . . . . . . . . . . . . . . . . . . . . 1-10
Filter, Engine Air Cleaner . . . . . . . . . 10-15
Flash-to-Pass . . . . . . . . . . . . . . . . . . . 6-2
Flashers, Hazard Warning . . . . . . 6-3
Flat Tire . . . . . . . . . . . . . . . . . . . . . . 10-63 Changing . . . . . . . . . . . . . . . . . . . 10-65
FlexFuel E85 . . . . . . . . . . . . . . . . . . . . . . . . . . . 9-58
Floor Mats . . . . . . . . . . . . . . . . . . . . 10-86
Fluid Automatic Transmission . . . . 10-15
Brakes . . . . . . . . . . . . . . . . . . . . . . 10-26
Washer . . . . . . . . . . . . . . . . . . . . . 10-24
Folding Mirrors . . . . . . . . . . . . . . . . 2-20
Forward Collision Alert (FCA) System . . . . . . . . . . . . . . . . 9-48
Front Seats Adjustment . . . . . . . . . . . . . . . . . . . . 3-4
Heated and Ventilated . . . . . . . . 3-10