2014 CHEVROLET EXPRESS PASSANGER turn signal
[x] Cancel search: turn signalPage 163 of 406
Black plate (11,1)Chevrolet Express Owner Manual (GMNA-Localizing-U.S./Canada/Mexico-
6014662) - 2014 - crc - 8/26/13
Infotainment System 7-11
To store a station as a favorite:
1. Tune to the desired radio station.
2. Press the FAV button to displaythe page where the station is to
be stored.
3. Press and hold one of the six softkeys until a beep sounds.
When that softkey is pressed
and released, the station that
was set, returns.
4. Repeat the steps for each softkey radio station to be stored
as a favorite.
The number of favorites pages can
be set up using the MENU button.
To set up the number of favorites
pages:
1. Press the MENU button to display the radio setup menu.
2. Press the softkey below the FAV 1-6 tab.
3. Select the desired number of favorites pages by pressing the
softkey below the displayed
page numbers. 4. Press the FAV button, or let the
menu time out, to return to the
original main radio screen
showing the radio station
frequency tabs and to begin the
process of programming
favorites for the chosen number
of numbered pages.
Radio Reception
Frequency interference and static
can occur during normal radio
reception if items such as cell phone
chargers, vehicle convenience
accessories, and external electronic
devices are plugged into the
accessory power outlet. If there is
interference or static, unplug the
item from the accessory power
outlet.
AM
The range for most AM stations is
greater than for FM, especially at
night. The longer range can cause
station frequencies to interfere with
each other. For better radio
reception, most AM radio stations boost the power levels during the
day, and then reduce these levels
during the night. Static can also
occur when things like storms and
power lines interfere with radio
reception. When this happens, try
reducing the treble on the radio.
FM Stereo
FM stereo gives the best sound, but
FM signals reach only about 16 to
65 km (10 to 40 mi). Tall buildings or
hills can interfere with FM signals,
causing the sound to fade in
and out.
Cellular Phone Usage
Cellular phone usage may cause
interference with the radio. This
interference may occur when
making or receiving phone calls,
charging the phone's battery,
or simply having the phone on. This
interference causes an increased
level of static while listening to the
radio. If static is received while
listening to the radio, unplug the
cellular phone and turn it off.
Page 199 of 406

Black plate (9,1)Chevrolet Express Owner Manual (GMNA-Localizing-U.S./Canada/Mexico-
6014662) - 2014 - crc - 8/26/13
Driving and Operating 9-9
Warning (Continued)
.Adjust the climate control
system to a setting that
circulates the air inside the
vehicle and set the fan speed
to the highest setting. See
“Climate Control Systems”in
the Index.
For more information about
carbon monoxide, see Engine
Exhaust on page 9-22.
To save fuel, run the engine for only
short periods as needed to warm
the vehicle and then shut the engine
off and close the window most of
the way to save heat. Repeat this
until help arrives but only when you
feel really uncomfortable from the
cold. Moving about to keep warm
also helps.
If it takes some time for help to
arrive, now and then when you run
the engine, push the accelerator
pedal slightly so the engine runs
faster than the idle speed. This keeps the battery charged to restart
the vehicle and to signal for help
with the headlamps. Do this as little
as possible to save fuel.
If the Vehicle Is Stuck
Slowly and cautiously spin the
wheels to free the vehicle when
stuck in sand, mud, ice, or snow.
If stuck too severely for the traction
system to free the vehicle, turn the
traction system off and use the
rocking method. See
Traction
Control/Electronic Stability Control
on page 9-33.
{Warning
If the vehicle's tires spin at high
speed, they can explode, and you
or others could be injured. The
vehicle can overheat, causing an
engine compartment fire or other
damage. Spin the wheels as little
as possible and avoid going
above 56 km/h (35 mph).
Rocking the Vehicle to Get
it Out
Turn the steering wheel left and
right to clear the area around the
front wheels. Turn off any traction
system. Shift back and forth
between R (Reverse) and a low
forward gear, spinning the wheels
as little as possible. To prevent
transmission wear, wait until the
wheels stop spinning before shifting
gears. Release the accelerator
pedal while shifting, and press
lightly on the accelerator pedal
when the transmission is in gear.
Slowly spinning the wheels in the
forward and reverse directions
causes a rocking motion that could
free the vehicle. If that does not get
the vehicle out after a few tries, it
might need to be towed out. If the
vehicle does need to be towed out,
see Towing the Vehicle on
page 10-83.
Page 232 of 406

Black plate (42,1)Chevrolet Express Owner Manual (GMNA-Localizing-U.S./Canada/Mexico-
6014662) - 2014 - crc - 8/26/13
9-42 Driving and Operating
.The back of the vehicle is in an
accident. The position and
mounting angle of the camera
can change or the camera can
be affected. Be sure to have the
camera and its position and
mounting angle checked at your
dealer.
The RVC system display in the
rearview mirror may turn off or not
appear as expected due to one of
the following conditions. If this
occurs, the left indicator light on the
mirror will flash.
.A slow flash may indicate a loss
of video signal, or no video
signal present during the reverse
cycle.
.A fast flash may indicate that the
display has been on for the
maximum allowable time during
a reverse cycle, or the display
has reached an Over
Temperature limit. The fast flash conditions are
used to protect the video device
from high temperature
conditions. Once conditions
return to normal, the device will
reset and the indicator will stop
flashing.
During any of these fault conditions,
the display will be blank and the
indicator will flash while the vehicle
is in R (Reverse) or until the
conditions return to normal.
Fuel
For diesel engine vehicles, see
“Fuel for Diesel Engines” in the
Duramax diesel supplement.
For gasoline engine vehicles, use of
the recommended fuel is an
important part of the proper
maintenance of this vehicle. When
driving in the U.S., to help keep the
engine clean and maintain optimum
vehicle performance, we
recommend using TOP TIER
Detergent Gasolines.
See www.toptiergas.com for a list of
TOP TIER Detergent Gasolines.
Page 239 of 406
Black plate (49,1)Chevrolet Express Owner Manual (GMNA-Localizing-U.S./Canada/Mexico-
6014662) - 2014 - crc - 8/26/13
Driving and Operating 9-49
Towing a trailer requires a certain
amount of experience. The
combination you are driving is
longer and not as responsive as the
vehicle itself. Get acquainted with
the handling and braking of the rig
before setting out for the open road.
Before starting, check all trailer hitch
parts and attachments, safety
chains, electrical connectors, lamps,
tires, and mirrors. If the trailer has
electric brakes, start the
combination moving and then apply
the trailer brake controller by hand
to be sure the brakes work.
During the trip, check occasionally
to be sure that the load is secure
and the lamps and any trailer
brakes still work.
Following Distance
Stay at least twice as far behind the
vehicle ahead as you would when
driving the vehicle without a trailer.
This can help to avoid heavy
braking and sudden turns.
Passing
More passing distance is needed
when towing a trailer. The
combination will not accelerate as
quickly and is longer so it is
necessary to go much farther
beyond the passed vehicle before
returning to the lane.
Backing Up
Hold the bottom of the steering
wheel with one hand. To move the
trailer to the left, move that hand to
the left. To move the trailer to the
right, move your hand to the right.
Always back up slowly and,
if possible, have someone
guide you.
Making Turns
{Caution
Making very sharp turns while
trailering could cause the trailer to
come in contact with the vehicle.
The vehicle could be damaged.
Avoid making very sharp turns
while trailering.
When turning with a trailer, make
wider turns than normal. Do this so
the trailer will not strike soft
shoulders, curbs, road signs, trees,
or other objects. Avoid jerky or
sudden maneuvers. Signal well in
advance.
If the trailer turn signal bulbs burn
out, the arrows on the instrument
cluster will still flash for turns. It is
important to check occasionally to
be sure the trailer bulbs are still
working.
Page 248 of 406
Black plate (58,1)Chevrolet Express Owner Manual (GMNA-Localizing-U.S./Canada/Mexico-
6014662) - 2014 - crc - 8/26/13
9-58 Driving and Operating
If the vehicle has a trailer hitch, the
seven-wire harness assembly with
connector is attached to a bracket
on the hitch platform. In both cases,
the seven-wire harness has a
connector and includes a 30-amp
feed wire.
The seven-wire harness connector
contains the following trailer circuits:
.Light Green: Back-up Lamps
(10A fuse)**
.White: Ground
.Dark Blue: Trailer Brake Signal
.Dark Green: Right Rear Stop
and Turn Signal*
.Red/Black Stripe: Battery Feed
(30A Fuse)
.Brown: Trailer Park Lamp
Supply Voltage (15A fuse)**
.Yellow: Left Rear Stop and Turn
Signal *The four-wire harness (without
connector) contains the following
circuits:
.Black: Ground
.Red/White: Battery Feed
.Dark Blue: Trailer Brake Signal
.Light Blue: CHMSL/Stoplamp
Supply Voltage
* If the vehicle is a cutaway with
trailer provisions, a 15 amp fuse will
be shared for both left/stop trailer
turn and right/stop trailer turn
signals. However, the cutaway
lighting connector will have a
10 amp fuse for each signal.
** If the vehicle is a cutaway with
trailer provisions, a 15 amp fuse will
be shared for trailer park lamps and
cutaway rear lighting connector park
lamps. Also, a 10 amp fuse will be
shared for trailer back-up lamps and
cutaway rear lighting connector
back-up lamps.
Tow/Haul Mode
This button is on the instrument
panel, to the right of the steering
wheel.
Pressing this button turns on and off
the Tow/Haul Mode.
This indicator light on the instrument
cluster comes on when the Tow/
Haul Mode is on.
Tow/Haul is a feature that assists
when pulling a heavy trailer or a
large or heavy load. See Tow/Haul
Mode on page 9-30.
Page 251 of 406

Black plate (1,1)Chevrolet Express Owner Manual (GMNA-Localizing-U.S./Canada/Mexico-
6014662) - 2014 - crc - 8/26/13
Vehicle Care 10-1
Vehicle Care
General Information
General Information . . . . . . . . . . 10-2
California Proposition65 Warning . . . . . . . . . . . . . . . . . 10-3
California Perchlorate Materials Requirements . . . . 10-3
Accessories and Modifications . . . . . . . . . . . . . . . 10-3
Vehicle Checks
Doing Your OwnService Work . . . . . . . . . . . . . . . 10-4
Hood . . . . . . . . . . . . . . . . . . . . . . . . 10-4
Engine Compartment Overview . . . . . . . . . . . . . . . . . . . 10-6
Engine Oil . . . . . . . . . . . . . . . . . . . 10-7
Engine Oil Life System . . . . . 10-10
Automatic Transmission Fluid (4-Speed Transmission) . . . 10-11
Automatic Transmission Fluid (6-Speed
Transmission) . . . . . . . . . . . . . 10-13
Engine Air Cleaner/Filter . . . . 10-16
Cooling System . . . . . . . . . . . . 10-17
Engine Coolant . . . . . . . . . . . . . 10-18
Engine Overheating . . . . . . . . 10-22 Engine Fan . . . . . . . . . . . . . . . . . 10-23
Power Steering Fluid . . . . . . . 10-24
Washer Fluid . . . . . . . . . . . . . . . 10-25
Brakes . . . . . . . . . . . . . . . . . . . . . 10-25
Brake Fluid . . . . . . . . . . . . . . . . . 10-26
Battery . . . . . . . . . . . . . . . . . . . . . 10-28
All-Wheel Drive . . . . . . . . . . . . . 10-29
Front Axle . . . . . . . . . . . . . . . . . . 10-29
Rear Axle . . . . . . . . . . . . . . . . . . 10-30
Noise Control System . . . . . . 10-30
Starter Switch Check . . . . . . . 10-31
Automatic Transmission Shift
Lock Control Function
Check . . . . . . . . . . . . . . . . . . . . . 10-32
Ignition Transmission Lock Check . . . . . . . . . . . . . . . . . . . . . 10-32
Park Brake and P (Park) Mechanism Check . . . . . . . . 10-32
Wiper Blade Replacement . . . . . . . . . . . . . . 10-33
Headlamp Aiming
Headlamp Aiming . . . . . . . . . . 10-33
Bulb Replacement
Bulb Replacement . . . . . . . . . . 10-34
Halogen Bulbs . . . . . . . . . . . . . . 10-34
Headlamps . . . . . . . . . . . . . . . . . 10-34 Front Turn Signal,
Sidemarker, and Parking
Lamps . . . . . . . . . . . . . . . . . . . . 10-36
Taillamps . . . . . . . . . . . . . . . . . . . 10-36
Center High-Mounted Stoplamp (CHMSL) . . . . . . . 10-37
License Plate Lamp . . . . . . . . 10-38
Replacement Bulbs . . . . . . . . . 10-38
Electrical System
Electrical System Overload . . . . . . . . . . . . . . . . . . 10-39
Fuses and Circuit Breakers . . . . . . . . . . . . . . . . . . 10-40
Engine Compartment Fuse Block . . . . . . . . . . . . . . . . . . . . . 10-40
Floor Console Fuse
Block . . . . . . . . . . . . . . . . . . . . . 10-43
Wheels and Tires
Tires . . . . . . . . . . . . . . . . . . . . . . . . 10-46
All-Season Tires . . . . . . . . . . . . 10-47
Winter Tires . . . . . . . . . . . . . . . . 10-47
All-Terrain Tires . . . . . . . . . . . . 10-48
Tire Sidewall Labeling . . . . . . 10-48
Tire Designations . . . . . . . . . . . 10-51
Tire Terminology andDefinitions . . . . . . . . . . . . . . . . 10-52
Tire Pressure . . . . . . . . . . . . . . . 10-55
Page 286 of 406
Black plate (36,1)Chevrolet Express Owner Manual (GMNA-Localizing-U.S./Canada/Mexico-
6014662) - 2014 - crc - 8/26/13
10-36 Vehicle Care
Front Turn Signal,
Sidemarker, and Parking
Lamps
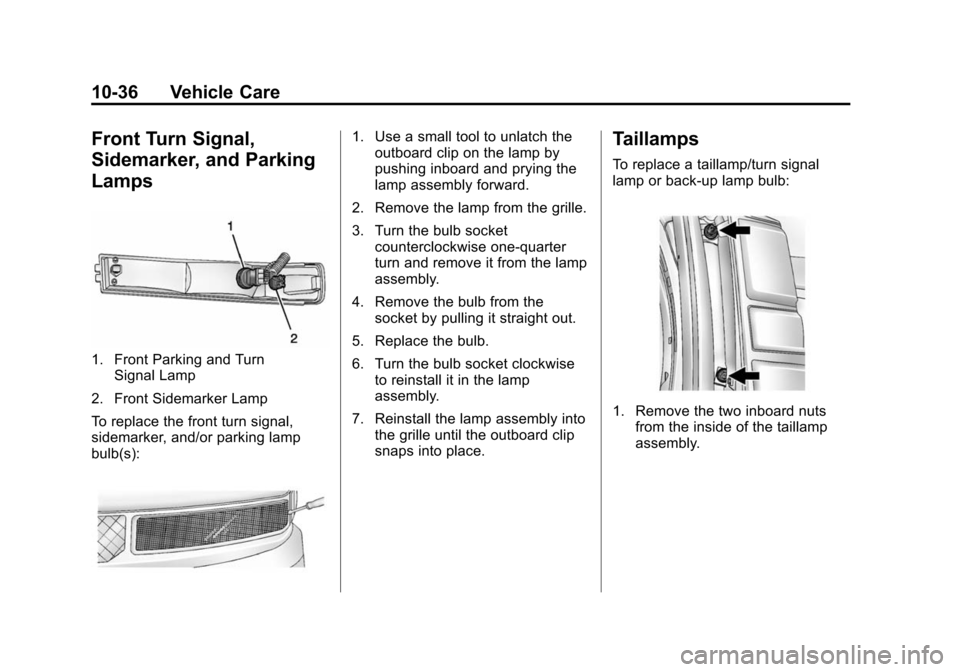
1. Front Parking and TurnSignal Lamp
2. Front Sidemarker Lamp
To replace the front turn signal,
sidemarker, and/or parking lamp
bulb(s):
1. Use a small tool to unlatch the outboard clip on the lamp by
pushing inboard and prying the
lamp assembly forward.
2. Remove the lamp from the grille.
3. Turn the bulb socket counterclockwise one-quarter
turn and remove it from the lamp
assembly.
4. Remove the bulb from the socket by pulling it straight out.
5. Replace the bulb.
6. Turn the bulb socket clockwise to reinstall it in the lamp
assembly.
7. Reinstall the lamp assembly into the grille until the outboard clip
snaps into place.Taillamps
To replace a taillamp/turn signal
lamp or back-up lamp bulb:
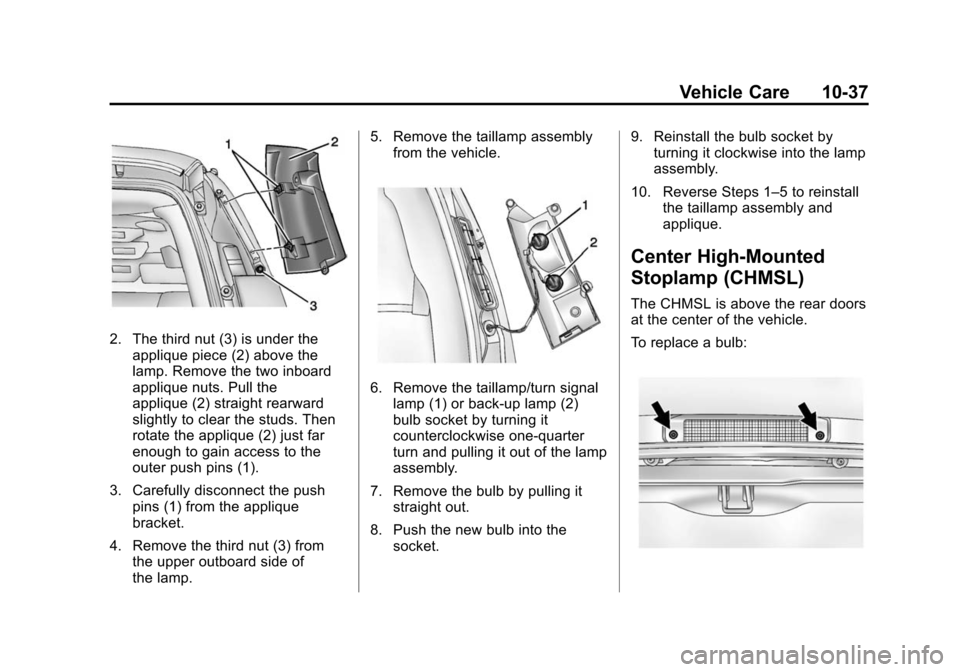
1. Remove the two inboard nuts
from the inside of the taillamp
assembly.
Page 287 of 406
Black plate (37,1)Chevrolet Express Owner Manual (GMNA-Localizing-U.S./Canada/Mexico-
6014662) - 2014 - crc - 8/26/13
Vehicle Care 10-37
2. The third nut (3) is under theapplique piece (2) above the
lamp. Remove the two inboard
applique nuts. Pull the
applique (2) straight rearward
slightly to clear the studs. Then
rotate the applique (2) just far
enough to gain access to the
outer push pins (1).
3. Carefully disconnect the push pins (1) from the applique
bracket.
4. Remove the third nut (3) from the upper outboard side of
the lamp. 5. Remove the taillamp assembly
from the vehicle.
6. Remove the taillamp/turn signallamp (1) or back-up lamp (2)
bulb socket by turning it
counterclockwise one-quarter
turn and pulling it out of the lamp
assembly.
7. Remove the bulb by pulling it straight out.
8. Push the new bulb into the socket. 9. Reinstall the bulb socket by
turning it clockwise into the lamp
assembly.
10. Reverse Steps 1–5 to reinstall the taillamp assembly and
applique.
Center High-Mounted
Stoplamp (CHMSL)
The CHMSL is above the rear doors
at the center of the vehicle.
To replace a bulb: