2014 CHEVROLET EXPRESS PASSANGER clock
[x] Cancel search: clockPage 158 of 406
Black plate (6,1)Chevrolet Express Owner Manual (GMNA-Localizing-U.S./Canada/Mexico-
6014662) - 2014 - crc - 8/26/13
7-6 Infotainment System
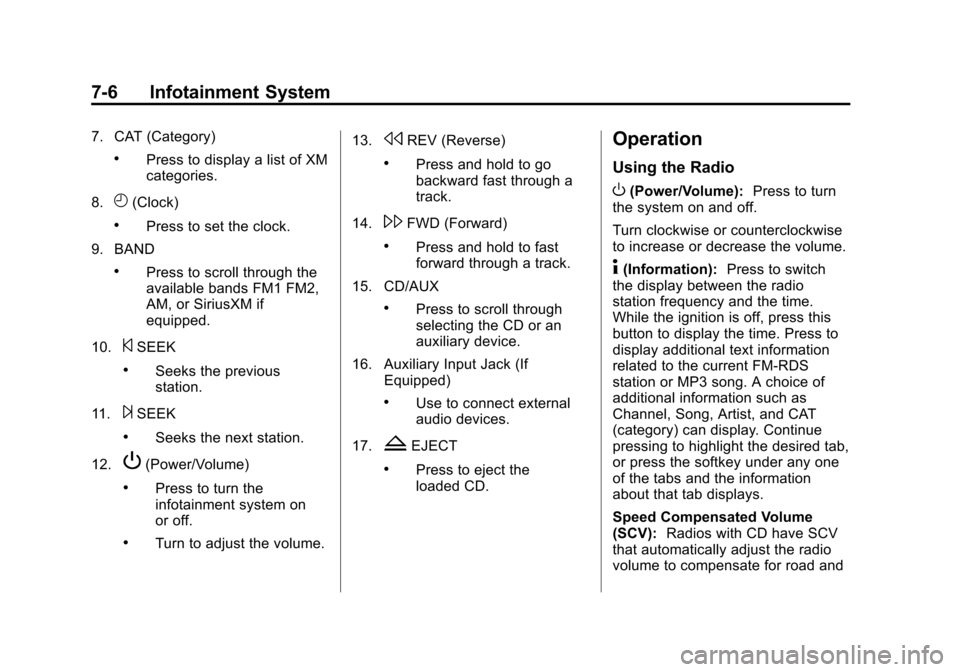
7. CAT (Category)
.Press to display a list of XM
categories.
8.
H(Clock)
.Press to set the clock.
9. BAND
.Press to scroll through the
available bands FM1 FM2,
AM, or SiriusXM if
equipped.
10.
©SEEK
.Seeks the previous
station.
11.
¨SEEK
.Seeks the next station.
12.
P(Power/Volume)
.Press to turn the
infotainment system on
or off.
.Turn to adjust the volume. 13.
sREV (Reverse)
.Press and hold to go
backward fast through a
track.
14.
\FWD (Forward)
.Press and hold to fast
forward through a track.
15. CD/AUX
.Press to scroll through
selecting the CD or an
auxiliary device.
16. Auxiliary Input Jack (If Equipped)
.Use to connect external
audio devices.
17.
ZEJECT
.Press to eject the
loaded CD.
Operation
Using the Radio
O(Power/Volume): Press to turn
the system on and off.
Turn clockwise or counterclockwise
to increase or decrease the volume.
4(Information): Press to switch
the display between the radio
station frequency and the time.
While the ignition is off, press this
button to display the time. Press to
display additional text information
related to the current FM-RDS
station or MP3 song. A choice of
additional information such as
Channel, Song, Artist, and CAT
(category) can display. Continue
pressing to highlight the desired tab,
or press the softkey under any one
of the tabs and the information
about that tab displays.
Speed Compensated Volume
(SCV): Radios with CD have SCV
that automatically adjust the radio
volume to compensate for road and
Page 160 of 406
Black plate (8,1)Chevrolet Express Owner Manual (GMNA-Localizing-U.S./Canada/Mexico-
6014662) - 2014 - crc - 8/26/13
7-8 Infotainment System
Radio
AM-FM Radio
Radio Data System (RDS)
The radio may have an RDS. The
RDS feature is available for use
only on FM stations that broadcast
RDS information. This system relies
upon receiving specific information
from these stations and only works
when the information is available.
While the radio is tuned to an
FM-RDS station, the station name
or call letters display. In rare cases,
a radio station could broadcast
incorrect information that causes the
radio features to work improperly.
If this happens, contact the radio
station.
Finding a Station
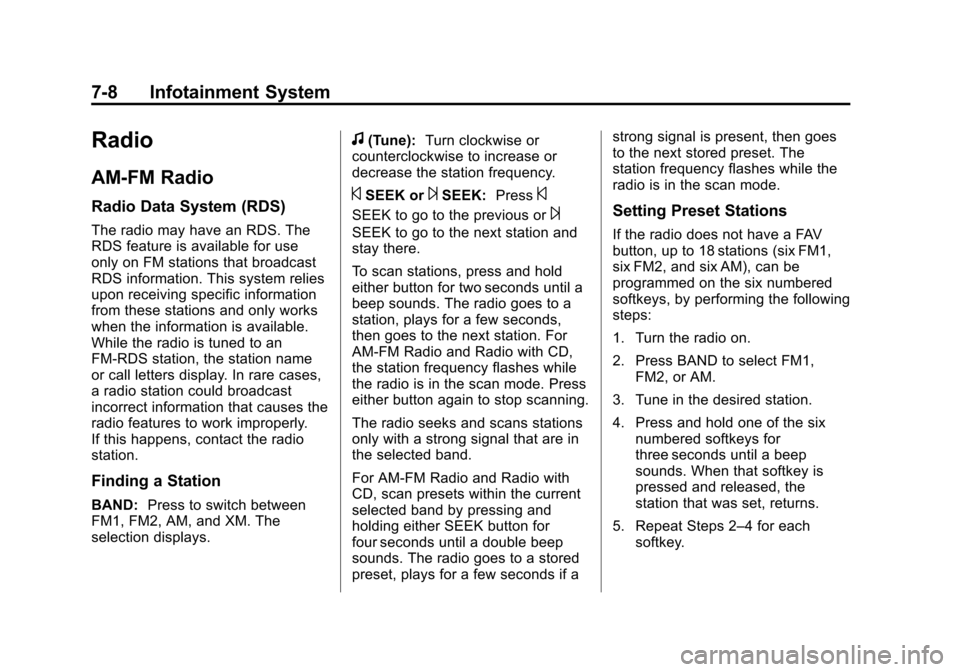
BAND:Press to switch between
FM1, FM2, AM, and XM. The
selection displays.
f(Tune): Turn clockwise or
counterclockwise to increase or
decrease the station frequency.
©SEEK or¨SEEK: Press©
SEEK to go to the previous or¨
SEEK to go to the next station and
stay there.
To scan stations, press and hold
either button for two seconds until a
beep sounds. The radio goes to a
station, plays for a few seconds,
then goes to the next station. For
AM-FM Radio and Radio with CD,
the station frequency flashes while
the radio is in the scan mode. Press
either button again to stop scanning.
The radio seeks and scans stations
only with a strong signal that are in
the selected band.
For AM-FM Radio and Radio with
CD, scan presets within the current
selected band by pressing and
holding either SEEK button for
four seconds until a double beep
sounds. The radio goes to a stored
preset, plays for a few seconds if a strong signal is present, then goes
to the next stored preset. The
station frequency flashes while the
radio is in the scan mode.
Setting Preset Stations
If the radio does not have a FAV
button, up to 18 stations (six FM1,
six FM2, and six AM), can be
programmed on the six numbered
softkeys, by performing the following
steps:
1. Turn the radio on.
2. Press BAND to select FM1,
FM2, or AM.
3. Tune in the desired station.
4. Press and hold one of the six numbered softkeys for
three seconds until a beep
sounds. When that softkey is
pressed and released, the
station that was set, returns.
5. Repeat Steps 2–4 for each softkey.
Page 162 of 406
Black plate (10,1)Chevrolet Express Owner Manual (GMNA-Localizing-U.S./Canada/Mexico-
6014662) - 2014 - crc - 8/26/13
7-10 Infotainment System
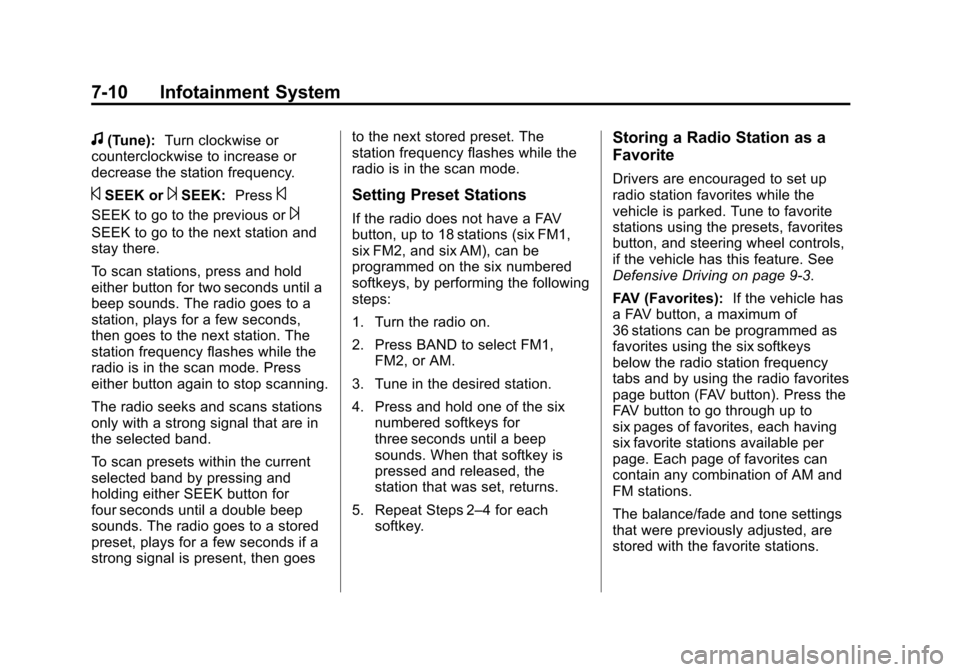
f(Tune):Turn clockwise or
counterclockwise to increase or
decrease the station frequency.
©SEEK or¨SEEK: Press©
SEEK to go to the previous or¨
SEEK to go to the next station and
stay there.
To scan stations, press and hold
either button for two seconds until a
beep sounds. The radio goes to a
station, plays for a few seconds,
then goes to the next station. The
station frequency flashes while the
radio is in the scan mode. Press
either button again to stop scanning.
The radio seeks and scans stations
only with a strong signal that are in
the selected band.
To scan presets within the current
selected band by pressing and
holding either SEEK button for
four seconds until a double beep
sounds. The radio goes to a stored
preset, plays for a few seconds if a
strong signal is present, then goes to the next stored preset. The
station frequency flashes while the
radio is in the scan mode.
Setting Preset Stations
If the radio does not have a FAV
button, up to 18 stations (six FM1,
six FM2, and six AM), can be
programmed on the six numbered
softkeys, by performing the following
steps:
1. Turn the radio on.
2. Press BAND to select FM1,
FM2, or AM.
3. Tune in the desired station.
4. Press and hold one of the six numbered softkeys for
three seconds until a beep
sounds. When that softkey is
pressed and released, the
station that was set, returns.
5. Repeat Steps 2–4 for each softkey.
Storing a Radio Station as a
Favorite
Drivers are encouraged to set up
radio station favorites while the
vehicle is parked. Tune to favorite
stations using the presets, favorites
button, and steering wheel controls,
if the vehicle has this feature. See
Defensive Driving on page 9-3.
FAV (Favorites): If the vehicle has
a FAV button, a maximum of
36 stations can be programmed as
favorites using the six softkeys
below the radio station frequency
tabs and by using the radio favorites
page button (FAV button). Press the
FAV button to go through up to
six pages of favorites, each having
six favorite stations available per
page. Each page of favorites can
contain any combination of AM and
FM stations.
The balance/fade and tone settings
that were previously adjusted, are
stored with the favorite stations.
Page 170 of 406

Black plate (18,1)Chevrolet Express Owner Manual (GMNA-Localizing-U.S./Canada/Mexico-
6014662) - 2014 - crc - 8/26/13
7-18 Infotainment System
Drivers are encouraged to set up
any auxiliary device while the
vehicle is in P (Park). See
Defensive Driving on page 9-3for
more information on driver
distraction.
To use a portable audio player,
connect a 3.5 mm (1/8 in) cable to
the radio's front auxiliary input jack.
When a device is connected, press
the radio CD/AUX button to begin
playing audio from the device over
the vehicle speakers.
For optimal sound quality, increase
the portable audio device's volume
to the loudest level.
It is always best to power the
portable audio device through its
own battery while playing.
O(Power/Volume): Turn clockwise
or counterclockwise to increase or
decrease the volume of the portable
player. Additional volume
adjustments might have to be made
from the portable device if the
volume is not loud or soft enough. BAND:
Press to listen to the radio
when a portable audio device is
playing. The portable audio device
continues playing.
CD/AUX (CD/Auxiliary): Press to
play a CD when a portable audio
device is playing. Press again and
the system begins playing audio
from the connected portable audio
player. If a portable audio player is
not connected, “No Input Device
Found” displays.
Using the USB Port
Radios with a USB port can control
a USB storage device or an iPod®
using the radio buttons and knobs.
See“Playing an MP3” inCD Player
on page 7-12 for information about
how to connect and control a USB
storage device or an iPod. USB Support
If equipped, the USB port is on the
instrument panel and uses the
USB 2.0 standard.
USB-Supported Devices
.USB flash drive
.Portable USB hard drive
.Fifth generation or later iPod
.iPod nano®
.iPod touch®
.iPod classic®
Page 183 of 406
Black plate (1,1)Chevrolet Express Owner Manual (GMNA-Localizing-U.S./Canada/Mexico-
6014662) - 2014 - crc - 8/26/13
Climate Controls 8-1
Climate Controls
Climate Control Systems
Climate Control Systems . . . . . . 8-1
Rear Heating System . . . . . . . . . 8-4
Rear Climate ControlSystem . . . . . . . . . . . . . . . . . . . . . . 8-4
Air Vents
Air Vents . . . . . . . . . . . . . . . . . . . . . . 8-7
Climate Control Systems
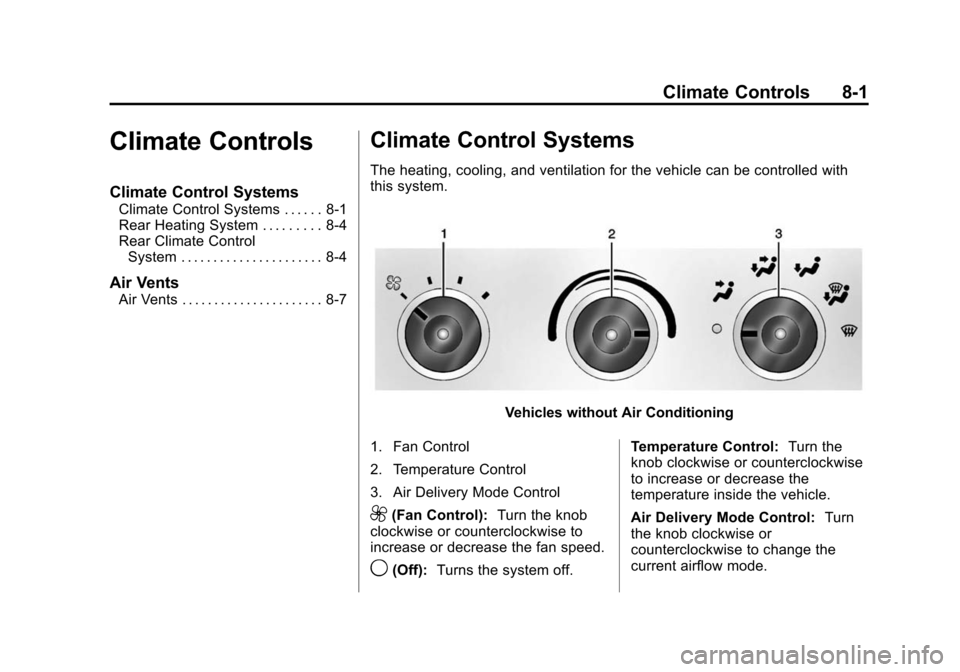
The heating, cooling, and ventilation for the vehicle can be controlled with
this system.
Vehicles without Air Conditioning
1. Fan Control
2. Temperature Control
3. Air Delivery Mode Control
9(Fan Control): Turn the knob
clockwise or counterclockwise to
increase or decrease the fan speed.
9(Off): Turns the system off. Temperature Control:
Turn the
knob clockwise or counterclockwise
to increase or decrease the
temperature inside the vehicle.
Air Delivery Mode Control: Turn
the knob clockwise or
counterclockwise to change the
current airflow mode.
Page 188 of 406
Black plate (6,1)Chevrolet Express Owner Manual (GMNA-Localizing-U.S./Canada/Mexico-
6014662) - 2014 - crc - 8/26/13
8-6 Climate Controls
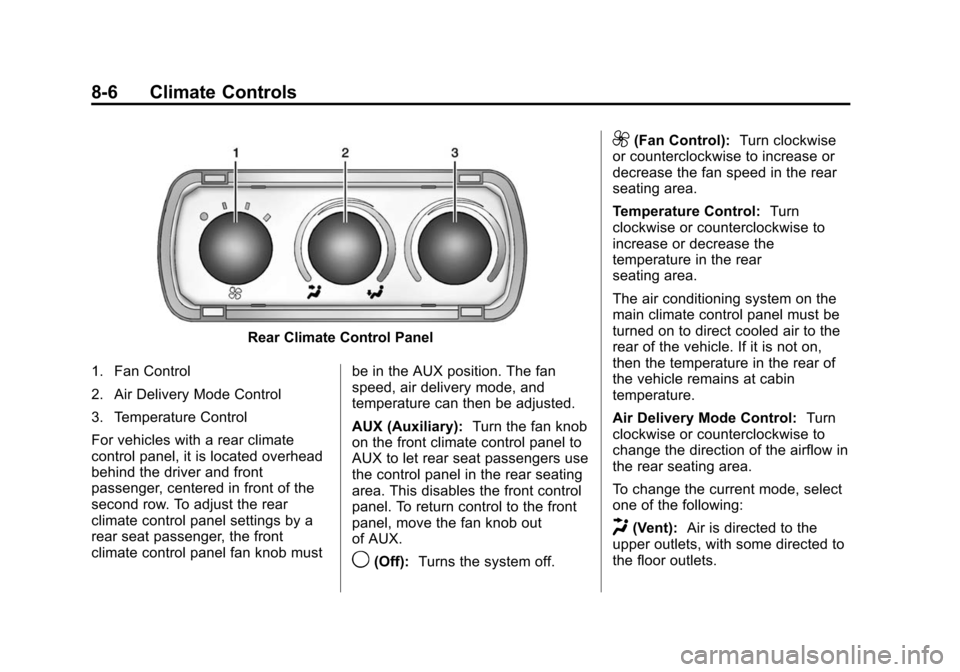
Rear Climate Control Panel
1. Fan Control
2. Air Delivery Mode Control
3. Temperature Control
For vehicles with a rear climate
control panel, it is located overhead
behind the driver and front
passenger, centered in front of the
second row. To adjust the rear
climate control panel settings by a
rear seat passenger, the front
climate control panel fan knob must be in the AUX position. The fan
speed, air delivery mode, and
temperature can then be adjusted.
AUX (Auxiliary):
Turn the fan knob
on the front climate control panel to
AUX to let rear seat passengers use
the control panel in the rear seating
area. This disables the front control
panel. To return control to the front
panel, move the fan knob out
of AUX.
9(Off): Turns the system off.
9(Fan Control): Turn clockwise
or counterclockwise to increase or
decrease the fan speed in the rear
seating area.
Temperature Control: Turn
clockwise or counterclockwise to
increase or decrease the
temperature in the rear
seating area.
The air conditioning system on the
main climate control panel must be
turned on to direct cooled air to the
rear of the vehicle. If it is not on,
then the temperature in the rear of
the vehicle remains at cabin
temperature.
Air Delivery Mode Control: Turn
clockwise or counterclockwise to
change the direction of the airflow in
the rear seating area.
To change the current mode, select
one of the following:
H(Vent): Air is directed to the
upper outlets, with some directed to
the floor outlets.
Page 236 of 406

Black plate (46,1)Chevrolet Express Owner Manual (GMNA-Localizing-U.S./Canada/Mexico-
6014662) - 2014 - crc - 8/26/13
9-46 Driving and Operating
Warning (Continued)
.Do not leave the fuel pump
unattended.
.Do not reenter the vehicle
while pumping fuel.
.Keep children away from the
fuel pump and never let
children pump fuel.
.Fuel can spray out if the fuel
cap is opened too quickly.
This spray can happen if the
tank is nearly full, and is
more likely in hot weather.
Open the fuel cap slowly and
wait for any hiss noise to stop
then unscrew the cap all
the way.
The fuel cap is behind a hinged fuel
door on the driver side of the
vehicle.
If the vehicle has E85 fuel capability,
the fuel cap will be yellow and state
that E85 or gasoline can be used.
SeeE85 or FlexFuel on page 9-44.
To remove the fuel cap, turn it
slowly counterclockwise.
While refueling, hang the tethered
fuel cap from the hook on the
fuel door. Be careful not to spill fuel. Do not
top off or overfill the tank and wait a
few seconds after you have finished
pumping before removing the
nozzle. Clean fuel from painted
surfaces as soon as possible. See
Exterior Care on page 10-86.
When replacing the fuel cap, turn it
clockwise until it clicks. Make sure
the cap is fully installed. The
diagnostic system can determine if
the fuel cap has been left off or
improperly installed. This would
allow fuel to evaporate into the
atmosphere. See
Malfunction
Indicator Lamp on page 5-19.
{Warning
If a fire starts while you are
refueling, do not remove the
nozzle. Shut off the flow of fuel by
shutting off the pump or by
notifying the station attendant.
Leave the area immediately.
Page 270 of 406
Black plate (20,1)Chevrolet Express Owner Manual (GMNA-Localizing-U.S./Canada/Mexico-
6014662) - 2014 - crc - 8/26/13
10-20 Vehicle Care
If the coolant is low, add the coolant
or take the vehicle to a dealer for
service.
How to Add Coolant to the
Recovery Tank for Gasoline
Engines
{Warning
You can be burned if you spill
coolant on hot engine parts.
Coolant contains ethylene glycol
and it will burn if the engine parts
are hot enough. Do not spill
coolant on a hot engine.
{Caution
This vehicle has a specific
coolant fill procedure. Failure to
follow this procedure could cause
the engine to overheat and be
severely damaged.If coolant is needed, add the proper
DEX-COOL coolant mixture at the
coolant recovery tank.
How to Add Coolant to the
Radiator
{Warning
Steam and scalding liquids from a
hot cooling system can blow out
and burn you badly. Never turn
the cap when the cooling system,
including the surge tank pressure
cap, is hot. Wait for the cooling
system and surge tank pressure
cap to cool.
If coolant is needed, add the proper
mixture directly to the radiator, but
be sure the cooling system is cool
before this is done.
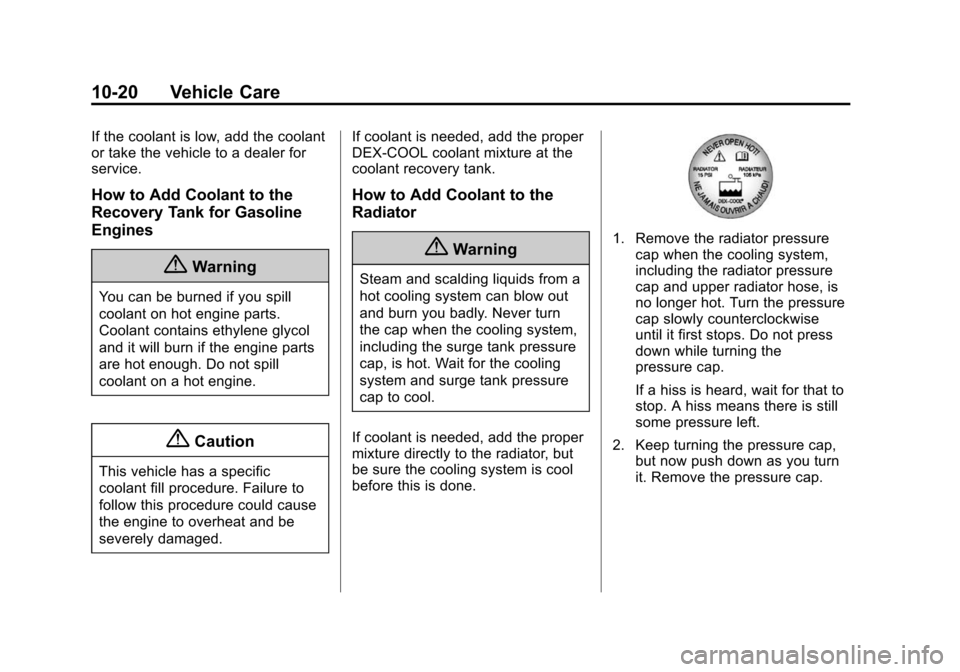
1. Remove the radiator pressure cap when the cooling system,
including the radiator pressure
cap and upper radiator hose, is
no longer hot. Turn the pressure
cap slowly counterclockwise
until it first stops. Do not press
down while turning the
pressure cap.
If a hiss is heard, wait for that to
stop. A hiss means there is still
some pressure left.
2. Keep turning the pressure cap, but now push down as you turn
it. Remove the pressure cap.