2014 CHEVROLET EQUINOX remove wheel
[x] Cancel search: remove wheelPage 198 of 390
Black plate (6,1)Chevrolet Equinox Owner Manual (GMNA-Localizing-U.S./Canada-
6081479) - 2014 - crc2 - 10/23/13
9-6 Driving and Operating
material on the road. Learn to
recognize warning clues—such
as enough water, ice, or packed
snow on the road to make a
mirrored surface —and slow
down when you have any doubt.
.Try to avoid sudden steering,
acceleration, or braking,
including reducing vehicle speed
by shifting to a lower gear. Any
sudden changes could cause
the tires to slide.
Remember: Antilock brakes help
avoid only the braking skid.
Off-Road Driving
All-wheel-drive vehicles can be
used for off-road driving. Vehicles
without all-wheel drive and vehicles
not equipped with All Terrain (AT) or
On-Off Road (OOR) tires must not
be driven off-road except on a level,
solid surface. To contact the tire
manufacturer for more information
about the original equipment tires, see the Limited Warranty and
Owner Assistance Information
manual.
Controlling the vehicle is the key to
successful off-road driving. One of
the best ways to control the vehicle
is to control the speed.
{Warning
When driving off-road, bouncing
and quick changes in direction
can easily throw you out of
position. This could cause you to
lose control and crash. You and
your passengers should always
wear safety belts.
Before Driving Off-Road
.Have all necessary maintenance
and service work completed.
.Fuel the vehicle, fill fluid levels,
and check inflation pressure in
all tires, including the spare,
if equipped.
.Read all the information about
all-wheel-drive vehicles in this
manual.
.Make sure all underbody
shields, if equipped, are properly
attached.
.Know the local laws that apply to
off-road driving.
To gain more ground clearance if
needed, it may be necessary to
remove the front fascia lower
air dam.
{Caution
Operating the vehicle for
extended periods without the front
fascia lower air dam installed can
cause improper air flow to the
engine. Re-attach the front fascia
air dam after off-road driving.
Page 202 of 390
Black plate (10,1)Chevrolet Equinox Owner Manual (GMNA-Localizing-U.S./Canada-
6081479) - 2014 - crc2 - 10/23/13
9-10 Driving and Operating
Driving in Water
{Warning
Driving through rushing water can
be dangerous. Deep water can
sweep your vehicle downstream
and you and your passengers
could drown. If it is only shallow
water, it can still wash away the
ground from under your tires.
Traction could be lost, and the
vehicle could roll over. Do not
drive through rushing water.
{Caution
Do not drive through standing
water if it is deep enough to cover
the wheel hubs, axles, or exhaust
pipe. Deep water can damage the
axle and other vehicle parts.
If the standing water is not too deep,
drive slowly through it. At faster
speeds, water splashes on the ignition system and the vehicle can
stall. Stalling can also occur if you
get the exhaust pipe under water.
While the exhaust pipe is under
water, you will not be able to start
the engine. When going through
water, the brakes get wet, and it
might take longer to stop. See
Driving on Wet Roads on
page 9-10.
After Off-Road Driving
Remove any brush or debris that
has collected on the underbody or
chassis, or under the hood. These
accumulations can be a fire hazard.
After operation in mud or sand,
have the brake linings cleaned and
checked. These substances can
cause glazing and uneven braking.
Check the body structure, steering,
suspension, wheels, tires, and
exhaust system for damage and
check the fuel lines and cooling
system for any leakage.
More frequent maintenance service
is required. Refer to the
Maintenance Schedule on
page 11-2
for more information.
Driving on Wet Roads
Rain and wet roads can reduce
vehicle traction and affect your
ability to stop and accelerate.
Always drive slower in these types
of driving conditions and avoid
driving through large puddles and
deep‐standing or flowing water.
{Warning
Wet brakes can cause crashes.
They might not work as well in a
quick stop and could cause
pulling to one side. You could
lose control of the vehicle.
(Continued)
Page 212 of 390
Black plate (20,1)Chevrolet Equinox Owner Manual (GMNA-Localizing-U.S./Canada-
6081479) - 2014 - crc2 - 10/23/13
9-20 Driving and Operating
This is the only position from which
the key can be removed. If the can
cannot be removed, make sure the
shift lever is in P (Park).
The ignition switch can bind in the
LOCK/OFF position with the wheels
turned off center. If this happens,
move the steering wheel from right
to left while turning the key to ACC/
ACCESSORY. If this does not work,
then the vehicle needs service.
Do not turn the engine off when the
vehicle is moving. This will cause a
loss of power assist in the brake
and steering systems and disable
the airbags.
If the vehicle must be shut off in an
emergency:
1. Brake using a firm and steadypressure. Do not pump the
brakes repeatedly. This may
deplete power assist, requiring
increased brake pedal force.
2. Shift the vehicle to N (Neutral). This can be done while the
vehicle is moving. After shifting to N (Neutral), firmly apply the
brakes and steer the vehicle to a
safe location.
3. Come to a complete stop, shift to P (Park), and turn the ignition
to LOCK/OFF. On vehicles with
an automatic transmission, the
shift lever must be in P (Park) to
turn the ignition switch to the
LOCK/OFF position.
4. Set the parking brake. See Parking Brake on page 9-31.
{Warning
Turning off the vehicle while
moving may cause loss of power
assist in the brake and steering
systems and disable the airbags.
While driving, only shut the
vehicle off in an emergency.
If the vehicle cannot be pulled over,
and must be shut off while driving,
turn the ignition to ACC/
ACCESSORY. 2 (ACC/ACCESSORY):
This
position provides power to some of
the electrical accessories. It unlocks
the steering wheel and ignition. To
move the key from ACC/
ACCESSORY to LOCK/OFF, push
in the key and then turn it to
LOCK/OFF.
3 (ON/RUN): The ignition switch
stays in this position when the
engine is running. This position can
be used to operate the electrical
accessories, including the
ventilation fan and 12-volt power
outlets, as well as to display some
warning and indicator lights. This
position can also be used for
service and diagnostics, and to
verify the proper operation of the
malfunction indicator lamp as may
be required for emission inspection
purposes. The transmission is also
unlocked in this position on
automatic transmission vehicles.
The battery could be drained if the
key is left in the ACC/ACCESSORY
or ON/RUN position with the engine
Page 227 of 390
Black plate (35,1)Chevrolet Equinox Owner Manual (GMNA-Localizing-U.S./Canada-
6081479) - 2014 - crc2 - 10/23/13
Driving and Operating 9-35
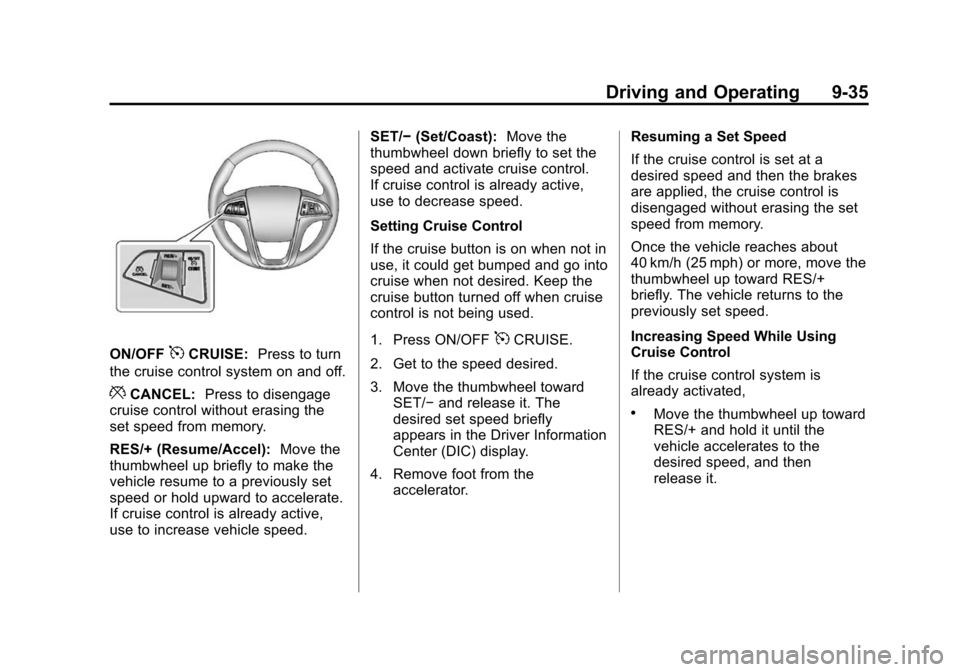
ON/OFF5CRUISE:Press to turn
the cruise control system on and off.
*CANCEL: Press to disengage
cruise control without erasing the
set speed from memory.
RES/+ (Resume/Accel): Move the
thumbwheel up briefly to make the
vehicle resume to a previously set
speed or hold upward to accelerate.
If cruise control is already active,
use to increase vehicle speed. SET/−
(Set/Coast): Move the
thumbwheel down briefly to set the
speed and activate cruise control.
If cruise control is already active,
use to decrease speed.
Setting Cruise Control
If the cruise button is on when not in
use, it could get bumped and go into
cruise when not desired. Keep the
cruise button turned off when cruise
control is not being used.
1. Press ON/OFF
5CRUISE.
2. Get to the speed desired.
3. Move the thumbwheel toward SET/− and release it. The
desired set speed briefly
appears in the Driver Information
Center (DIC) display.
4. Remove foot from the accelerator. Resuming a Set Speed
If the cruise control is set at a
desired speed and then the brakes
are applied, the cruise control is
disengaged without erasing the set
speed from memory.
Once the vehicle reaches about
40 km/h (25 mph) or more, move the
thumbwheel up toward RES/+
briefly. The vehicle returns to the
previously set speed.
Increasing Speed While Using
Cruise Control
If the cruise control system is
already activated,
.Move the thumbwheel up toward
RES/+ and hold it until the
vehicle accelerates to the
desired speed, and then
release it.
Page 272 of 390
Black plate (24,1)Chevrolet Equinox Owner Manual (GMNA-Localizing-U.S./Canada-
6081479) - 2014 - crc2 - 10/23/13
10-24 Vehicle Care
Battery
Refer to the replacement number on
the original battery label when a
new battery is needed.
{Warning
Battery posts, terminals, and
related accessories contain lead
and lead compounds, chemicals
known to the State of California to
cause cancer and reproductive
harm. Wash hands after handling.
Vehicle Storage
{Warning
Batteries have acid that can burn
you and gas that can explode.
You can be badly hurt if you are
not careful. SeeJump Starting on
page 10-67 for tips on working
around a battery without
getting hurt. Infrequent Usage: Remove the
black, negative (−) cable from the
battery to keep the battery from
running down.
Extended Storage: Remove the
black, negative (−) cable from the
battery or use a battery trickle
charger.
All-Wheel Drive
Transfer Case
Under normal driving conditions,
transfer case fluid does not require
changing or checking unless there
is a fluid leak or unusual noise.
If required, have the transfer case
serviced by your dealer.
Starter Switch Check
{Warning
When you are doing this
inspection, the vehicle could
move suddenly. If the vehicle
moves, you or others could be
injured.
1. Before starting this check, be sure there is enough room
around the vehicle.
2. Apply both the parking brake and the regular brake.
Do not use the accelerator
pedal, and be ready to turn off
the engine immediately if it
starts.
3. Try to start the engine in each gear. The vehicle should start
only in P (Park) or N (Neutral).
If the vehicle starts in any other
position, contact your dealer for
service.
Page 276 of 390
Black plate (28,1)Chevrolet Equinox Owner Manual (GMNA-Localizing-U.S./Canada-
6081479) - 2014 - crc2 - 10/23/13
10-28 Vehicle Care
Bulb Replacement
For the proper type of replacement
bulbs, seeReplacement Bulbs on
page 10-31.
For any bulb changing procedure
not listed in this section, contact
your dealer.
Halogen Bulbs
{Warning
Halogen bulbs have pressurized
gas inside and can burst if you
drop or scratch the bulb. You or
others could be injured. Be sure
to read and follow the instructions
on the bulb package.
Headlamps, Front Turn
Signal, Sidemarker, and
Parking Lamps
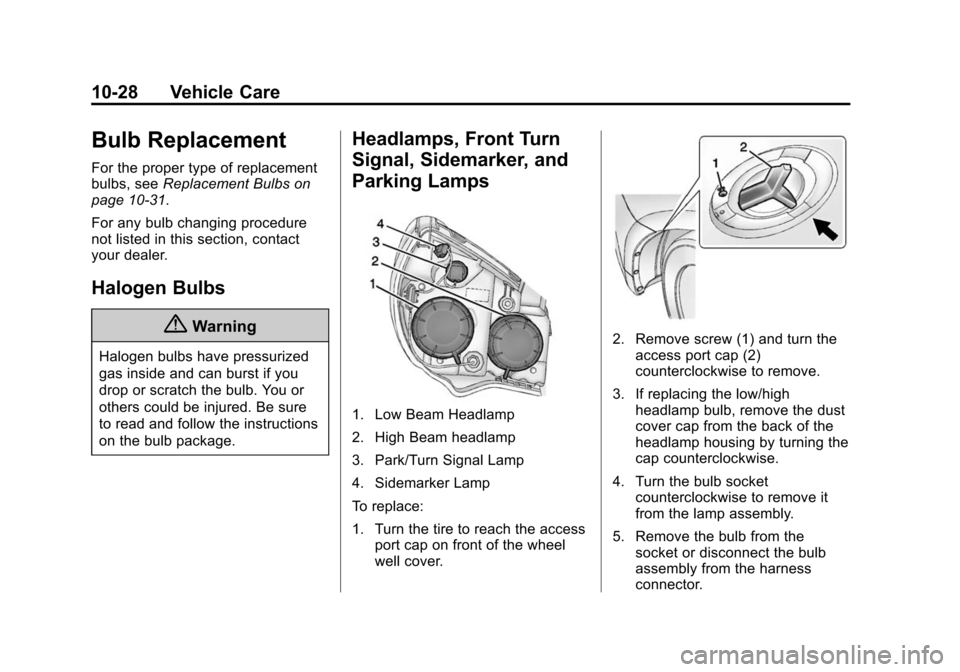
1. Low Beam Headlamp
2. High Beam headlamp
3. Park/Turn Signal Lamp
4. Sidemarker Lamp
To replace:
1. Turn the tire to reach the access
port cap on front of the wheel
well cover.
2. Remove screw (1) and turn theaccess port cap (2)
counterclockwise to remove.
3. If replacing the low/high headlamp bulb, remove the dust
cover cap from the back of the
headlamp housing by turning the
cap counterclockwise.
4. Turn the bulb socket counterclockwise to remove it
from the lamp assembly.
5. Remove the bulb from the socket or disconnect the bulb
assembly from the harness
connector.
Page 277 of 390
Black plate (29,1)Chevrolet Equinox Owner Manual (GMNA-Localizing-U.S./Canada-
6081479) - 2014 - crc2 - 10/23/13
Vehicle Care 10-29
6. Install a new bulb.
7. Reinstall the lamp socket intothe lamp assembly by turning it
clockwise.
8. Replace the dust cover cap on the lamp assembly.
9. Reinstall the wheel well cover access port cap and secure by
installing the screw.
Fog Lamps
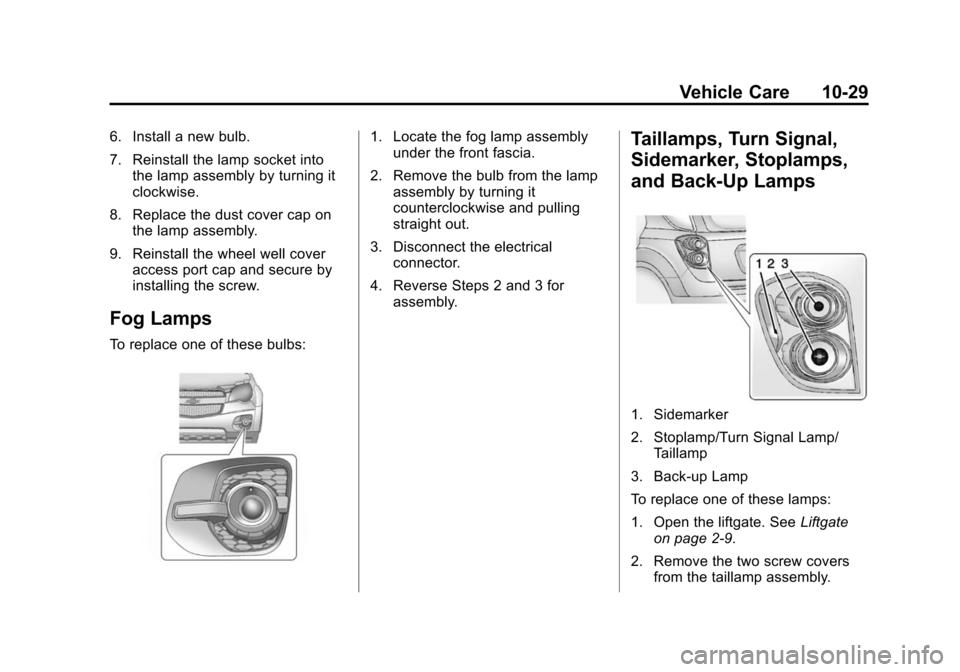
To replace one of these bulbs:
1. Locate the fog lamp assemblyunder the front fascia.
2. Remove the bulb from the lamp assembly by turning it
counterclockwise and pulling
straight out.
3. Disconnect the electrical connector.
4. Reverse Steps 2 and 3 for assembly.Taillamps, Turn Signal,
Sidemarker, Stoplamps,
and Back-Up Lamps
1. Sidemarker
2. Stoplamp/Turn Signal Lamp/Taillamp
3. Back-up Lamp
To replace one of these lamps:
1. Open the liftgate. See Liftgate
on page 2-9.
2. Remove the two screw covers from the taillamp assembly.
Page 300 of 390
Black plate (52,1)Chevrolet Equinox Owner Manual (GMNA-Localizing-U.S./Canada-
6081479) - 2014 - crc2 - 10/23/13
10-52 Vehicle Care
Anytime unusual wear is
noticed, rotate the tires as soon
as possible, check for proper tire
inflation pressure, and check for
damaged tires or wheels. If the
unusual wear continues after the
rotation, check the wheel
alignment. SeeWhen It Is Time
for New Tires on page 10-53
and Wheel Replacement on
page 10-57.
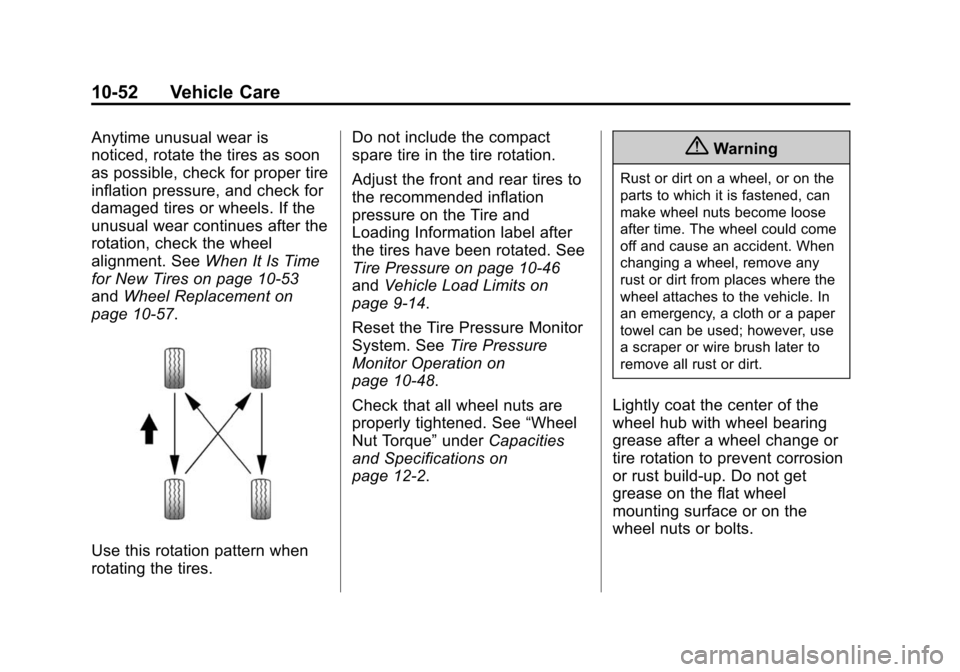
Use this rotation pattern when
rotating the tires. Do not include the compact
spare tire in the tire rotation.
Adjust the front and rear tires to
the recommended inflation
pressure on the Tire and
Loading Information label after
the tires have been rotated. See
Tire Pressure on page 10-46
and
Vehicle Load Limits on
page 9-14.
Reset the Tire Pressure Monitor
System. See Tire Pressure
Monitor Operation on
page 10-48.
Check that all wheel nuts are
properly tightened. See “Wheel
Nut Torque” underCapacities
and Specifications on
page 12-2.
{Warning
Rust or dirt on a wheel, or on the
parts to which it is fastened, can
make wheel nuts become loose
after time. The wheel could come
off and cause an accident. When
changing a wheel, remove any
rust or dirt from places where the
wheel attaches to the vehicle. In
an emergency, a cloth or a paper
towel can be used; however, use
a scraper or wire brush later to
remove all rust or dirt.
Lightly coat the center of the
wheel hub with wheel bearing
grease after a wheel change or
tire rotation to prevent corrosion
or rust build-up. Do not get
grease on the flat wheel
mounting surface or on the
wheel nuts or bolts.