2014 CHEVROLET CRUZE start stop button
[x] Cancel search: start stop buttonPage 26 of 420

Black plate (20,1)Chevrolet Cruze Owner Manual (GMNA-Localizing-U.S./Canada-6007168) -
2014 - 2nd Edition - 7/15/13
1-20 In Brief
.Press and release thegbutton
again to turn on both systems.
See Traction Control/Electronic
Stability Control on page 9-41.
Tire Pressure Monitor
This vehicle may have a Tire
Pressure Monitor System (TPMS).
The low tire pressure warning light
alerts to a significant loss in
pressure of one of the vehicle's
tires. If the warning light comes on,
stop as soon as possible and inflate
the tires to the recommended
pressure shown on the Tire and
Loading Information label. See
Vehicle Load Limits on page 9-9.
The warning light will remain on until
the tire pressure is corrected. The low tire pressure warning light
may come on in cool weather when
the vehicle is first started, and then
turn off as the vehicle is driven. This
may be an early indicator that the
tire pressures are getting low and
the tires need to be inflated to the
proper pressure.
The TPMS does not replace normal
monthly tire maintenance. Maintain
the correct tire pressures.
See
Tire Pressure Monitor System
on page 10-52.
Engine Oil Life System
The engine oil life system calculates
engine oil life based on vehicle use
and displays the CHANGE ENGINE
OIL SOON DIC message when it is
necessary to change the engine oil
and filter.
Remember, the Oil Life display must
be reset after each oil change. It will
not reset itself. Also, be careful not
to reset the Oil Life display
accidentally at any time other than
when the oil has just been changed. It cannot be reset accurately until
the next oil change. To reset the
engine oil life system press the
SET/CLR button while the Oil Life
display is active.
Resetting the Oil Life System
1. Using the DIC MENU button and
thumbwheel, scroll until you
reach REMAINING OIL LIFE on
the DIC (
:% for Canada).
2. Press the SET/CLR button to reset the oil life at 100%. When
prompted, use the thumbwheel
to highlight YES or NO. Press
the SET/CLR button to confirm.
Be careful not to reset the oil life
display accidentally at any time
other than after the oil is changed.
It cannot be reset accurately.
See Engine Oil Life System on
page 10-15.
Page 37 of 420
Black plate (7,1)Chevrolet Cruze Owner Manual (GMNA-Localizing-U.S./Canada-6007168) -
2014 - 2nd Edition - 7/15/13
Keys, Doors, and Windows 2-7
Programming with a Recognized
Transmitter (Keyless Access
Vehicles Only)
A new transmitter can be
programmed to the vehicle when
there is one recognized transmitter.
To program, the vehicle must be off
and all of the transmitters, both
currently recognized and new, must
be with you.
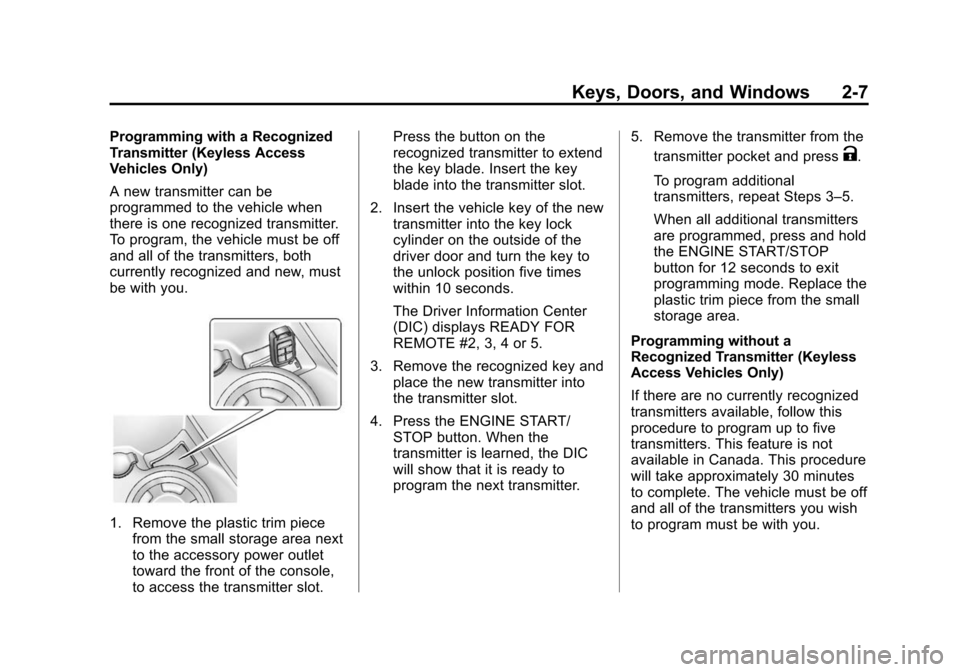
1. Remove the plastic trim piecefrom the small storage area next
to the accessory power outlet
toward the front of the console,
to access the transmitter slot. Press the button on the
recognized transmitter to extend
the key blade. Insert the key
blade into the transmitter slot.
2. Insert the vehicle key of the new transmitter into the key lock
cylinder on the outside of the
driver door and turn the key to
the unlock position five times
within 10 seconds.
The Driver Information Center
(DIC) displays READY FOR
REMOTE #2, 3, 4 or 5.
3. Remove the recognized key and place the new transmitter into
the transmitter slot.
4. Press the ENGINE START/ STOP button. When the
transmitter is learned, the DIC
will show that it is ready to
program the next transmitter. 5. Remove the transmitter from the
transmitter pocket and press
K.
To program additional
transmitters, repeat Steps 3–5.
When all additional transmitters
are programmed, press and hold
the ENGINE START/STOP
button for 12 seconds to exit
programming mode. Replace the
plastic trim piece from the small
storage area.
Programming without a
Recognized Transmitter (Keyless
Access Vehicles Only)
If there are no currently recognized
transmitters available, follow this
procedure to program up to five
transmitters. This feature is not
available in Canada. This procedure
will take approximately 30 minutes
to complete. The vehicle must be off
and all of the transmitters you wish
to program must be with you.
Page 38 of 420
Black plate (8,1)Chevrolet Cruze Owner Manual (GMNA-Localizing-U.S./Canada-6007168) -
2014 - 2nd Edition - 7/15/13
2-8 Keys, Doors, and Windows
1. Insert the vehicle key of thetransmitter into the key lock
cylinder on the outside of the
driver door and turn the key to
the unlock position five times
within 10 seconds.
The Driver Information Center
(DIC) displays REMOTE LEARN
PENDING, PLEASE WAIT.
2. Wait for 10 minutes until the DIC displays PRESS ENGINE
START BUTTON TO LEARN
and then press the ENGINE
START/STOP button.
The DIC displays will again
show REMOTE LEARN
PENDING, PLEASE WAIT.
3. Repeat Step 2 two additional times. After the third time all
previously known transmitters
will no longer work with the
vehicle. Remaining transmitters
can be relearned during the next
steps. The DIC display should now
show READY FOR REMOTE
# 1.
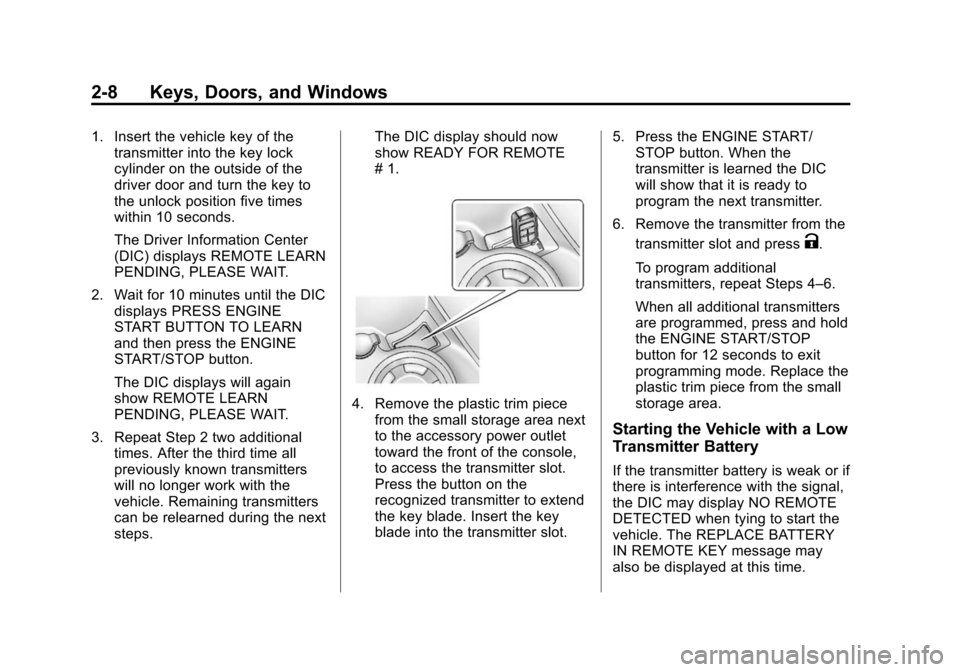
4. Remove the plastic trim piece
from the small storage area next
to the accessory power outlet
toward the front of the console,
to access the transmitter slot.
Press the button on the
recognized transmitter to extend
the key blade. Insert the key
blade into the transmitter slot. 5. Press the ENGINE START/
STOP button. When the
transmitter is learned the DIC
will show that it is ready to
program the next transmitter.
6. Remove the transmitter from the transmitter slot and press
K.
To program additional
transmitters, repeat Steps 4–6.
When all additional transmitters
are programmed, press and hold
the ENGINE START/STOP
button for 12 seconds to exit
programming mode. Replace the
plastic trim piece from the small
storage area.
Starting the Vehicle with a Low
Transmitter Battery
If the transmitter battery is weak or if
there is interference with the signal,
the DIC may display NO REMOTE
DETECTED when tying to start the
vehicle. The REPLACE BATTERY
IN REMOTE KEY message may
also be displayed at this time.
Page 39 of 420

Black plate (9,1)Chevrolet Cruze Owner Manual (GMNA-Localizing-U.S./Canada-6007168) -
2014 - 2nd Edition - 7/15/13
Keys, Doors, and Windows 2-9
To start the vehicle:
1. Remove the plastic trim piecefrom the small storage area next
to the accessory power outlet
toward the front of the console,
to access the transmitter slot.
2. Press the button on the recognized transmitter to extend
the key blade. Insert the key
blade into the transmitter slot. 3. With the vehicle in P (Park) or
N (Neutral), press the brake
pedal and the ENGINE START/
STOP button. See Starting the
Engine on page 9-18 for
additional information about the
vehicle's keyless ignition with
pushbutton start.
Replace the transmitter battery
as soon as possible.
Battery Replacement
Replace the battery if the REPLACE
BATTERY IN REMOTE KEY
message displays in the DIC. See
Key and Lock Messages on
page 5-30.
{Caution
When replacing the battery, do
not touch any of the circuitry on
the transmitter. Static from your
body could damage the
transmitter. The battery is not rechargeable. To
replace the battery:
1. Press the button on the
transmitter to extend the key
blade.
2. Remove the battery cover byprying it with a finger.
3. Remove the battery by pushing on the battery and sliding it
toward the key blade.
Page 130 of 420

Black plate (24,1)Chevrolet Cruze Owner Manual (GMNA-Localizing-U.S./Canada-6007168) -
2014 - 2nd Edition - 7/15/13
5-24 Instruments and Controls
.cL/100 km (mpg). Reset the
average consumption by pressing
SET/CLR when it is displayed.
This screen also displays the
average vehicle speed of the
vehicle in kilometers per hour (km/h)
or miles per hour (mph). This
average is based on the various
vehicle speeds recorded since the
last reset. This display is shown as
ckm/h (mph). Reset the average
speed by pressing SET/CLR when it
is displayed.
Blank Display: Displays no
information.
Digital Speed: Displays how fast
the vehicle is moving in either
kilometers per hour (km/h) or miles
per hour (mph). The speedometer
cannot be reset.
Fuel Used: Displays the
approximate liters (L) or gallons (gal)
of fuel that have been used since
last reset. The fuel used can be
reset by pressing the SET/CLR
button while the Fuel Used display
is showing. Timer:
To start the timer, press
SET/CLR while Timer is displayed.
The display will show the amount of
time that has passed since the timer
was last reset, not including time the
ignition is off. Time will continue to
be counted as long as the ignition is
on, even if another display is being
shown on the DIC. The timer will
record up to 99 hours, 59 minutes,
and 59 seconds (99:59:59) after
which the display will return to zero.
To stop the timer, press SET/CLR
briefly while Timer is displayed. To
reset the timer to zero, press and
hold SET/CLR.
Navigation: Used for the OnStar or
navigation system Turn-by-Turn
guidance. See OnStar Overview on
page 14-1 or the navigation manual,
if the vehicle has navigation, for
more information.
Speed, Fuel Range,
Instantaneous Fuel Economy:
Displays how fast the vehicle is
moving in either kilometers per
hour (km/h) or miles per hour (mph).
The speedometer cannot be reset. The center of the page shows the
approximate distance the vehicle
can be driven without refueling. The
fuel range estimate is based on an
average of the vehicle's fuel
economy over recent driving history
and the amount of fuel remaining in
the fuel tank. This display is shown
as
l
.km (mi). Fuel range cannot
be reset.
Also displays the current fuel
economy in liters per 100 kilometers
(L/100 km) or miles per
gallon (mpg). This number reflects
only the fuel economy that the
vehicle has right now and changes
frequently as driving conditions
change. This display is shown as
.
L/100 km (mpg). This display cannot
be reset.
Page 206 of 420
Black plate (14,1)Chevrolet Cruze Owner Manual (GMNA-Localizing-U.S./Canada-6007168) -
2014 - 2nd Edition - 7/15/13
9-14 Driving and Operating
Starting and
Operating
New Vehicle Break-In
{Caution
The vehicle does not need an
elaborate break-in. But it will
perform better in the long run if
you follow these guidelines:
.Do not drive at any one
constant speed, fast or slow,
for the first 805 km (500 mi).
Do not make full-throttle
starts. Avoid downshifting to
brake or slow the vehicle.
.Avoid making hard stops for
the first 322 km (200 mi) or
so. During this time the new
brake linings are not yet
broken in. Hard stops with
new linings can mean
premature wear and earlier
replacement. Follow this(Continued)
Caution (Continued)
breaking-in guideline every
time you get new brake
linings.
Following break-in, engine speed
and load can be gradually
increased.
Ignition Positions
(Keyless Access)
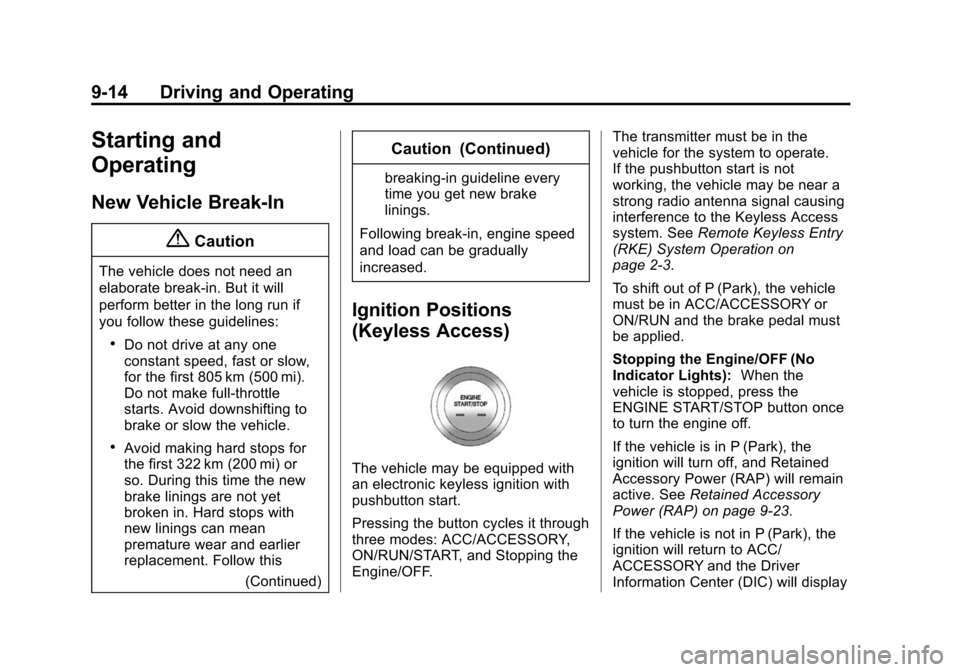
The vehicle may be equipped with
an electronic keyless ignition with
pushbutton start.
Pressing the button cycles it through
three modes: ACC/ACCESSORY,
ON/RUN/START, and Stopping the
Engine/OFF. The transmitter must be in the
vehicle for the system to operate.
If the pushbutton start is not
working, the vehicle may be near a
strong radio antenna signal causing
interference to the Keyless Access
system. See
Remote Keyless Entry
(RKE) System Operation on
page 2-3.
To shift out of P (Park), the vehicle
must be in ACC/ACCESSORY or
ON/RUN and the brake pedal must
be applied.
Stopping the Engine/OFF (No
Indicator Lights): When the
vehicle is stopped, press the
ENGINE START/STOP button once
to turn the engine off.
If the vehicle is in P (Park), the
ignition will turn off, and Retained
Accessory Power (RAP) will remain
active. See Retained Accessory
Power (RAP) on page 9-23.
If the vehicle is not in P (Park), the
ignition will return to ACC/
ACCESSORY and the Driver
Information Center (DIC) will display
Page 207 of 420
Black plate (15,1)Chevrolet Cruze Owner Manual (GMNA-Localizing-U.S./Canada-6007168) -
2014 - 2nd Edition - 7/15/13
Driving and Operating 9-15
the message SHIFT TO PARK in
the Driver Information Center (DIC).
SeeTransmission Messages on
page 5-33. When the vehicle is
shifted into P (Park), the ignition
system will switch to OFF.
Do not turn the engine off when the
vehicle is moving. This will cause a
loss of power assist in the brake
and steering systems and disable
the airbags.
If the vehicle must be shut off in an
emergency:
1. Brake using a firm and steady pressure. Do not pump the
brakes repeatedly. This may
deplete power assist, requiring
increased brake pedal force.
2. Shift the vehicle to N (Neutral). This can be done while the
vehicle is moving. After shifting
to N (Neutral), firmly apply the
brakes and steer the vehicle to a
safe location. 3. Come to a complete stop. Shift
to P (Park) with an automatic
transmission, or Neutral with a
manual transmission. Turn the
ignition to LOCK/OFF.
4. Set the parking brake. See Parking Brake on page 9-40.
{Warning
Turning off the vehicle while
moving may cause loss of power
assist in the brake and steering
systems and disable the airbags.
While driving, only shut the
vehicle off in an emergency.
If the vehicle cannot be pulled over,
and must be shut off while driving,
press and hold the ENGINE START/
STOP button for longer than
two seconds, or press twice in
five seconds.
ACC/ACCESSORY (Amber
Indicator Light): This mode allows
you to use some electrical
accessories when the engine is off. With the ignition off, pressing the
button one time without the brake
pedal applied will place the ignition
system in ACC/ACCESSORY.
The ignition will switch from ACC/
ACCESSORY to OFF after
five minutes to prevent battery
rundown.
ON/RUN/START (Green Indicator
Light):
This mode is for driving and
starting. With the ignition off, and
the brake pedal applied, pressing
the button once will place the
ignition system in ON/RUN/START.
Once engine cranking begins,
release the button. Engine cranking
will continue until the engine starts.
See Starting the Engine on
page 9-18. The ignition will then
remain in ON/RUN.
Service Only Mode
This power mode is available for
service and diagnostics, and to
verify the proper operation of the
malfunction indicator lamp as may
be required for emission inspection
purposes. With the vehicle off, and
Page 208 of 420
Black plate (16,1)Chevrolet Cruze Owner Manual (GMNA-Localizing-U.S./Canada-6007168) -
2014 - 2nd Edition - 7/15/13
9-16 Driving and Operating
the brake pedal not applied,
pressing and holding the button for
more than five seconds will place
the vehicle in Service Only Mode.
The instruments and audio systems
will operate as they do in ON/RUN,
but the vehicle will not be able to be
driven. The engine will not start in
Service Only Mode. Press the
button again to turn the vehicle off.
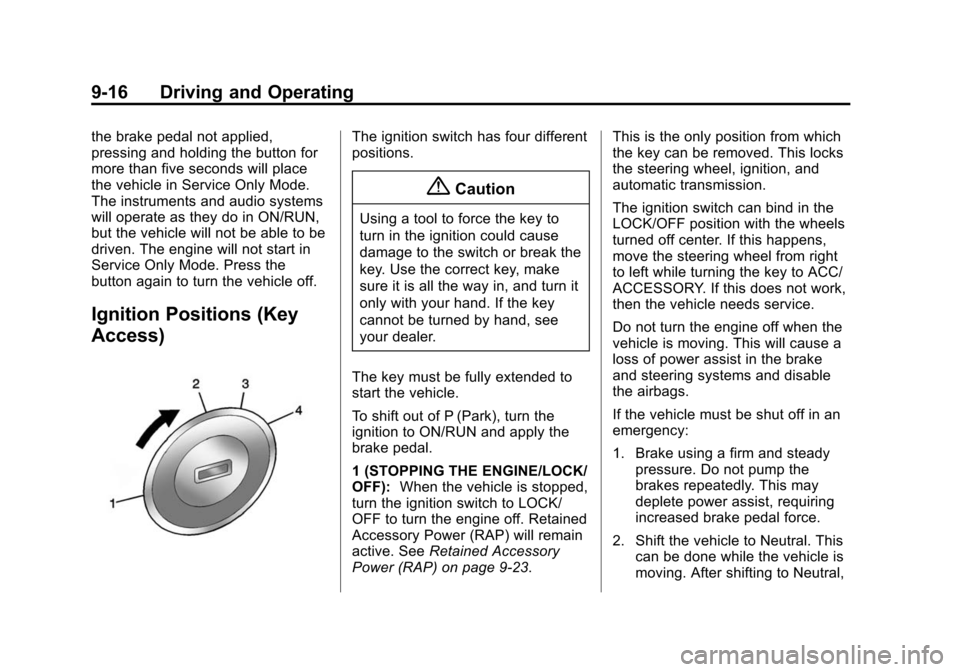
Ignition Positions (Key
Access)
The ignition switch has four different
positions.
{Caution
Using a tool to force the key to
turn in the ignition could cause
damage to the switch or break the
key. Use the correct key, make
sure it is all the way in, and turn it
only with your hand. If the key
cannot be turned by hand, see
your dealer.
The key must be fully extended to
start the vehicle.
To shift out of P (Park), turn the
ignition to ON/RUN and apply the
brake pedal.
1 (STOPPING THE ENGINE/LOCK/
OFF): When the vehicle is stopped,
turn the ignition switch to LOCK/
OFF to turn the engine off. Retained
Accessory Power (RAP) will remain
active. See Retained Accessory
Power (RAP) on page 9-23. This is the only position from which
the key can be removed. This locks
the steering wheel, ignition, and
automatic transmission.
The ignition switch can bind in the
LOCK/OFF position with the wheels
turned off center. If this happens,
move the steering wheel from right
to left while turning the key to ACC/
ACCESSORY. If this does not work,
then the vehicle needs service.
Do not turn the engine off when the
vehicle is moving. This will cause a
loss of power assist in the brake
and steering systems and disable
the airbags.
If the vehicle must be shut off in an
emergency:
1. Brake using a firm and steady
pressure. Do not pump the
brakes repeatedly. This may
deplete power assist, requiring
increased brake pedal force.
2. Shift the vehicle to Neutral. This can be done while the vehicle is
moving. After shifting to Neutral,