2014 CHEVROLET CRUZE navigation
[x] Cancel search: navigationPage 7 of 420
Black plate (1,1)Chevrolet Cruze Owner Manual (GMNA-Localizing-U.S./Canada-6007168) -
2014 - 2nd Edition - 7/15/13
In Brief 1-1
In Brief
Instrument Panel
Instrument Panel Overview . . . . 1-2
Initial Drive Information
Initial Drive Information . . . . . . . . 1-4
Remote Keyless Entry (RKE)System . . . . . . . . . . . . . . . . . . . . . . 1-4
Remote Vehicle Start . . . . . . . . . 1-5
Door Locks . . . . . . . . . . . . . . . . . . . 1-5
Windows . . . . . . . . . . . . . . . . . . . . . . 1-7
Seat Adjustment . . . . . . . . . . . . . . 1-7
Heated Seats . . . . . . . . . . . . . . . . . 1-9
Head Restraint Adjustment . . . . 1-9
Safety Belts . . . . . . . . . . . . . . . . . . 1-10
Passenger Sensing System . . . . . . . . . . . . . . . . . . . . . 1-10
Mirror Adjustment . . . . . . . . . . . . 1-10
Steering Wheel Adjustment . . . . . . . . . . . . . . . . . 1-11
Interior Lighting . . . . . . . . . . . . . . 1-12
Exterior Lighting . . . . . . . . . . . . . 1-12
Windshield Wiper/Washer . . . . 1-13
Climate Controls . . . . . . . . . . . . . 1-13
Transmission . . . . . . . . . . . . . . . . 1-15
Vehicle Features
Radio(s) . . . . . . . . . . . . . . . . . . . . . 1-15
Satellite Radio . . . . . . . . . . . . . . . 1-16
Portable Audio Devices . . . . . . 1-16
Bluetooth
®. . . . . . . . . . . . . . . . . . . 1-17
Steering Wheel Controls . . . . . 1-17
Cruise Control . . . . . . . . . . . . . . . 1-18
Navigation System . . . . . . . . . . . 1-18
Driver Information
Center (DIC) . . . . . . . . . . . . . . . 1-18
Ultrasonic Parking Assist . . . . 1-19
Power Outlets . . . . . . . . . . . . . . . 1-19
Performance and Maintenance
Traction Control/Electronic Stability Control . . . . . . . . . . . . 1-19
Tire Pressure Monitor . . . . . . . . 1-20
Engine Oil Life System . . . . . . 1-20
Driving for Better Fuel Economy . . . . . . . . . . . . . . . . . . . 1-21
Diesel Particulate Filter . . . . . . 1-21
Diesel Exhaust Fluid . . . . . . . . . 1-22
Roadside Assistance Program . . . . . . . . . . . . . . . . . . . . 1-23
OnStar
®. . . . . . . . . . . . . . . . . . . . . 1-23
Page 22 of 420
Black plate (16,1)Chevrolet Cruze Owner Manual (GMNA-Localizing-U.S./Canada-6007168) -
2014 - 2nd Edition - 7/15/13
1-16 In Brief
Storing a Favorite Station
Stations from all bands can be
stored in the favorite lists in any
order. Up to six stations can be
stored in each favorite page and the
number of available favorite pages
can be set.
To store the station to a position in
the list, press the corresponding
numeric button 1 to 6 until a beep is
heard.
For more information, see“Storing a
Station as a Favorite” inAM-FM
Radio on page 7-7.
Setting the Clock
Adjusting the Time or Date
To set the time and date for the
radio with navigation:
1. Press CLOCK.
2. Select Set Time or Set Date.
3. Turn the MENU/SEL knob to adjust the highlighted number.
4. Press the MENU/SEL knob to select the next number. 5. To save the settings, press
BACK on the radio faceplate.
Setting the 12/24 Hour Format
To set the 12/24 hour format for the
radio with navigation:
1. Press CLOCK.
2. Highlight 12/24 Hour Format.
3. Press the MENU/SEL knob to select the 12 hour or 24 hour
display format.
4. To save the settings, press BACK on the radio faceplate.
For detailed instructions on setting
the clock for the vehicle's specific
audio system. See Clock on
page 5-4.
Satellite Radio
If equipped, vehicles with a
SiriusXM®satellite radio tuner and a
valid SiriusXM satellite radio
subscription can receive SiriusXM
programming.
SiriusXM Satellite Radio
Service
SiriusXM is a satellite radio service
based in the 48 contiguous United
States and 10 Canadian provinces.
SiriusXM satellite radio has a wide
variety of programming and
commercial-free music, coast to
coast, and in digital-quality sound.
A fee is required to receive the
SiriusXM service.
Refer to:
.www.siriusxm.com or call
1-866-635-2349 (U.S.).
.www.xmradio.ca or call
1-877-209-0079 (Canada).
See Satellite Radio on page 7-9.
Portable Audio Devices
Some vehicles have a 3.5 mm
(1/8 in) auxiliary input and a USB
port in the center console. External
devices such as iPods
®, laptop
computers, MP3 players, CD
Page 23 of 420
Black plate (17,1)Chevrolet Cruze Owner Manual (GMNA-Localizing-U.S./Canada-6007168) -
2014 - 2nd Edition - 7/15/13
In Brief 1-17
changers, and USB drives may be
connected, depending on the audio
system.
SeeAuxiliary Devices on page 7-16.
Bluetooth®
The Bluetooth®system allows users
with a Bluetooth-enabled mobile
phone to make and receive
hands-free calls using the vehicle
audio system and controls.
The Bluetooth-enabled mobile
phone must be paired with the
in-vehicle Bluetooth system before it
can be used in the vehicle. Not all
phones will support all functions.
See Bluetooth (Overview) on
page 7-18 orBluetooth
(Infotainment Controls) on
page 7-20 orBluetooth (Voice
Recognition) on page 7-23.
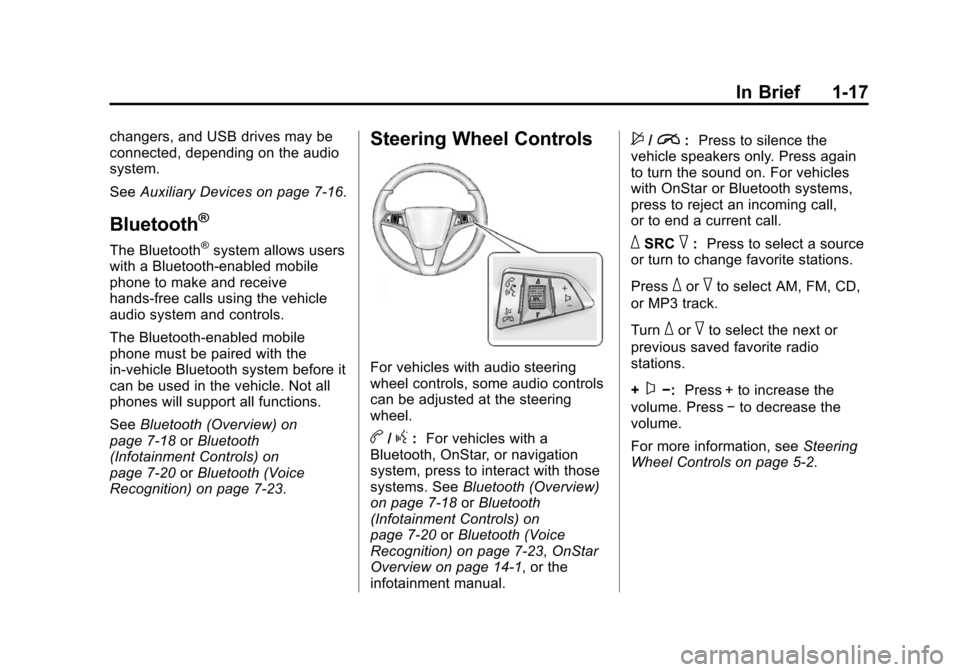
Steering Wheel Controls
For vehicles with audio steering
wheel controls, some audio controls
can be adjusted at the steering
wheel.
b/g: For vehicles with a
Bluetooth, OnStar, or navigation
system, press to interact with those
systems. See Bluetooth (Overview)
on page 7-18 orBluetooth
(Infotainment Controls) on
page 7-20 orBluetooth (Voice
Recognition) on page 7-23, OnStar
Overview on page 14-1, or the
infotainment manual.
$/i: Press to silence the
vehicle speakers only. Press again
to turn the sound on. For vehicles
with OnStar or Bluetooth systems,
press to reject an incoming call,
or to end a current call.
_SRC^: Press to select a source
or turn to change favorite stations.
Press
_or^to select AM, FM, CD,
or MP3 track.
Turn
_or^to select the next or
previous saved favorite radio
stations.
+
x−: Press + to increase the
volume. Press −to decrease the
volume.
For more information, see Steering
Wheel Controls on page 5-2.
Page 24 of 420
Black plate (18,1)Chevrolet Cruze Owner Manual (GMNA-Localizing-U.S./Canada-6007168) -
2014 - 2nd Edition - 7/15/13
1-18 In Brief
Cruise Control
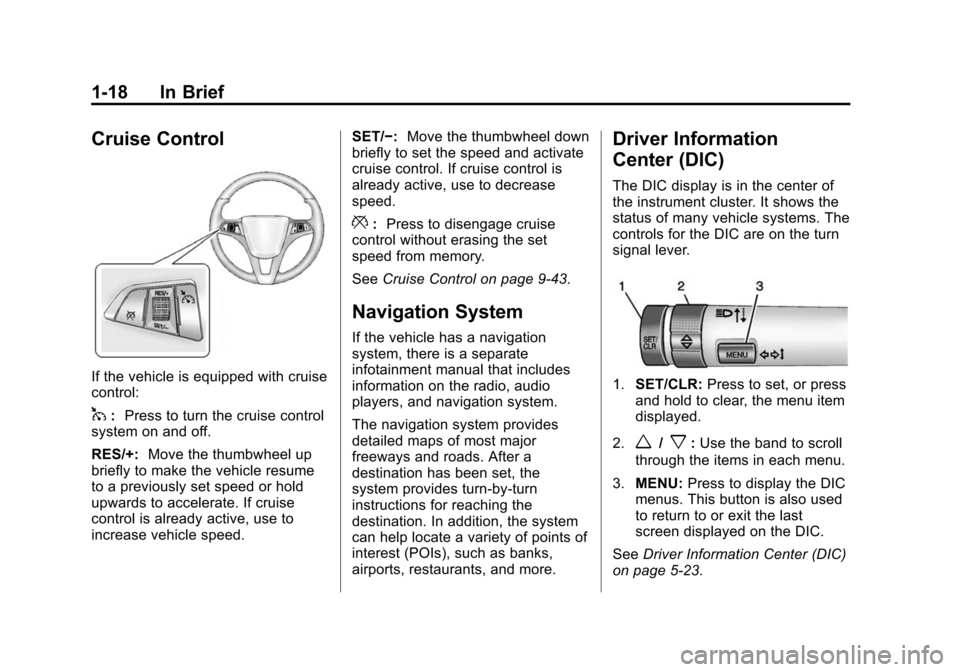
If the vehicle is equipped with cruise
control:
1:Press to turn the cruise control
system on and off.
RES/+: Move the thumbwheel up
briefly to make the vehicle resume
to a previously set speed or hold
upwards to accelerate. If cruise
control is already active, use to
increase vehicle speed. SET/−:
Move the thumbwheel down
briefly to set the speed and activate
cruise control. If cruise control is
already active, use to decrease
speed.
*: Press to disengage cruise
control without erasing the set
speed from memory.
See Cruise Control on page 9-43.
Navigation System
If the vehicle has a navigation
system, there is a separate
infotainment manual that includes
information on the radio, audio
players, and navigation system.
The navigation system provides
detailed maps of most major
freeways and roads. After a
destination has been set, the
system provides turn-by-turn
instructions for reaching the
destination. In addition, the system
can help locate a variety of points of
interest (POIs), such as banks,
airports, restaurants, and more.
Driver Information
Center (DIC)
The DIC display is in the center of
the instrument cluster. It shows the
status of many vehicle systems. The
controls for the DIC are on the turn
signal lever.
1.SET/CLR: Press to set, or press
and hold to clear, the menu item
displayed.
2.
w/x: Use the band to scroll
through the items in each menu.
3. MENU: Press to display the DIC
menus. This button is also used
to return to or exit the last
screen displayed on the DIC.
See Driver Information Center (DIC)
on page 5-23.
Page 29 of 420
Black plate (23,1)Chevrolet Cruze Owner Manual (GMNA-Localizing-U.S./Canada-6007168) -
2014 - 2nd Edition - 7/15/13
In Brief 1-23
As the DEF tank becomes low on
fluid, warnings begin with
approximately 1600 km
(1,000 miles) of remaining range.
These warnings will increase in
intensity as the tank becomes
empty. Once the tank is empty, the
vehicle speed will be limited. If there
is an issue with the quality of the
fluid or the exhaust fluid system,
warnings will be displayed in the
Driver Information Center (DIC).
SeeDiesel Exhaust Fluid on
page 9-27.
Roadside Assistance
Program
U.S.: 1-800-243-8872
TTY Users (U.S. Only):
1-888-889-2438
Canada: 1-800-268-6800
As the owner of a new Chevrolet,
you are automatically enrolled in the
Roadside Assistance program.
See Roadside Assistance Program
on page 13-5.
OnStar®
If equipped, this vehicle has a
comprehensive, in-vehicle system
that can connect to a live Advisor
for Emergency, Security, Navigation,
Connection, and Diagnostic
Services. See OnStar Overview on
page 14-1.
Page 108 of 420
Black plate (2,1)Chevrolet Cruze Owner Manual (GMNA-Localizing-U.S./Canada-6007168) -
2014 - 2nd Edition - 7/15/13
5-2 Instruments and Controls
Ride Control SystemMessages . . . . . . . . . . . . . . . . . . 5-32
Airbag System Messages . . . . 5-32
Security Messages . . . . . . . . . . 5-32
Service Vehicle Messages . . . 5-32
Starting the Vehicle Messages . . . . . . . . . . . . . . . . . . 5-33
Tire Messages . . . . . . . . . . . . . . . 5-33
Transmission Messages . . . . . 5-33
Vehicle Reminder Messages . . . . . . . . . . . . . . . . . . 5-34
Vehicle Speed Messages . . . . 5-34
Vehicle Personalization
Vehicle Personalization . . . . . . 5-35
Controls
Steering Wheel
Adjustment
To adjust the steering wheel:
1. Pull the lever down.
2. Move the steering wheel up
or down.
3. Pull or push the steering wheel closer or away from you.
4. Push the lever up to lock the steering wheel in place. Do not adjust the steering wheel
while driving.
Steering Wheel Controls
For vehicles with audio steering
wheel controls, some audio controls
can be adjusted at the steering
wheel.
b/g(Push to Talk):
For vehicles
with a Bluetooth, OnStar,
or navigation system, press to
interact with those systems. See
Bluetooth (Overview) on page 7-18
or Bluetooth (Infotainment Controls)
Page 110 of 420
Black plate (4,1)Chevrolet Cruze Owner Manual (GMNA-Localizing-U.S./Canada-6007168) -
2014 - 2nd Edition - 7/15/13
5-4 Instruments and Controls
been activated. SeeWasher Fluid
on page 10-25 for information on
filling the windshield washer fluid
reservoir.
{Warning
In freezing weather, do not use
the washer until the windshield is
warmed. Otherwise the washer
fluid can form ice on the
windshield, blocking your vision.
Clear snow and ice from the wiper
blades and windshield before using
them. If frozen to the windshield,
carefully loosen or thaw them.
Damaged blades should be
replaced. See Wiper Blade
Replacement on page 10-30.
Heavy snow or ice can overload the
wiper motor.
Wipe Parking
If the ignition is turned to LOCK/
OFF while the wipers are on LO, HI,
or INT, they will immediately stop. If the windshield wiper lever is then
moved to off before the driver door
is opened or within 10 minutes, the
wipers will restart and move to the
base of the windshield.
If the ignition is turned to LOCK/
OFF while the wipers are performing
wipes due to windshield washing,
the wipers continue to run until they
reach the base of the windshield.
Compass
The vehicle may have a compass
display in the Driver Information
Center (DIC). The compass receives
its heading and other information
from the Global Positioning
System (GPS) antenna, StabiliTrak,
and vehicle speed information.
Avoid covering the GPS antenna,
located on the roof, for long periods
of time with objects that may
interfere with the antenna's ability to
receive a satellite signal. The
compass system is designed to
operate for a certain number of
miles or degrees of turn beforeneeding a signal from the GPS
satellites. When the compass
display shows CAL, drive the
vehicle for a short distance in an
open area where it can receive a
GPS signal. The compass system
will automatically determine when
the GPS signal is restored and
provide a heading again. See
Compass Messages on page 5-27
for more information on the
messages that may be displayed for
the compass.
Clock
The infotainment system controls
are used to access the time and
date settings through the menu
system. See
Operation on page 7-4
for information about how to use the
menu system. For vehicles with a
connective radio or navigation
system, see the infotainment
manual.
Page 111 of 420
Black plate (5,1)Chevrolet Cruze Owner Manual (GMNA-Localizing-U.S./Canada-6007168) -
2014 - 2nd Edition - 7/15/13
Instruments and Controls 5-5
Setting the Time and Date
To set the time and date for the
radio with CD:
1. Press CLOCK.
2. Select Set Time or Set Date.
3. Turn the MENU/SEL knob toadjust the highlighted number.
4. Press the MENU/SEL knob to select the next number.
5. To save the settings, press the MENU/SEL knob.
To set the time and date for the
radio without navigation:
1. Press CLOCK.
2. Select Set Time or Set Date.
3. Turn the MENU/SEL knob to adjust the highlighted number.
4. Press the MENU/SEL knob to select the next number.
5. To save the settings, press OK screen button. To set the time and date for the
radio with navigation:
1. Press CLOCK.
2. Select Set Time or Set Date.
3. Turn the MENU/SEL knob to
adjust the highlighted number.
4. Press the MENU/SEL knob to select the next number.
5. To save the settings, press BACK on the radio faceplate.
If auto timing is set, the time
displayed on the clock may not
update immediately when driving
into a new time zone.
Setting the 12/24 Hour Format
To set the 12/24 hour format for the
radio with CD:
1. Press CLOCK.
2. Highlight 12/24 Hour Format.
3. Press the MENU/SEL knob to select the 12 hour or 24 hour
display format. 4. To save the settings, press the
MENU/SEL knob.
To set the 12/24 hour format for the
radio without navigation:
1. Press CLOCK.
2. Highlight 12/24 Hour Format.
3. Press the MENU/SEL knob to select the 12 hour or 24 hour
display format.
4. To save the settings, press OK screen button.
To set the 12/24 hour format for the
radio with navigation:
1. Press CLOCK.
2. Highlight 12/24 Hour Format.
3. Press the MENU/SEL knob to select the 12 hour or 24 hour
display format.
4. To save the settings, press the BACK on the radio faceplate.