2014 CHEVROLET CRUZE manual transmission
[x] Cancel search: manual transmissionPage 310 of 420
Black plate (48,1)Chevrolet Cruze Owner Manual (GMNA-Localizing-U.S./Canada-6007168) -
2014 - 2nd Edition - 7/15/13
10-48 Vehicle Care
Tire Designations
Tire Size
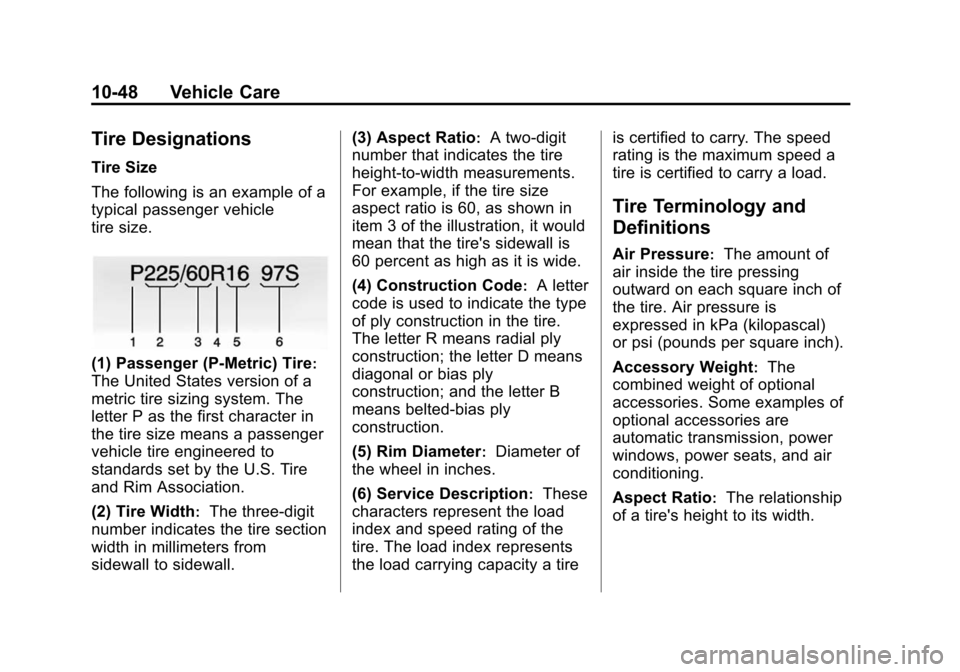
The following is an example of a
typical passenger vehicle
tire size.
(1) Passenger (P-Metric) Tire:
The United States version of a
metric tire sizing system. The
letter P as the first character in
the tire size means a passenger
vehicle tire engineered to
standards set by the U.S. Tire
and Rim Association.
(2) Tire Width
:The three-digit
number indicates the tire section
width in millimeters from
sidewall to sidewall. (3) Aspect Ratio
:A two-digit
number that indicates the tire
height-to-width measurements.
For example, if the tire size
aspect ratio is 60, as shown in
item 3 of the illustration, it would
mean that the tire's sidewall is
60 percent as high as it is wide.
(4) Construction Code
:A letter
code is used to indicate the type
of ply construction in the tire.
The letter R means radial ply
construction; the letter D means
diagonal or bias ply
construction; and the letter B
means belted-bias ply
construction.
(5) Rim Diameter
:Diameter of
the wheel in inches.
(6) Service Description
:These
characters represent the load
index and speed rating of the
tire. The load index represents
the load carrying capacity a tire is certified to carry. The speed
rating is the maximum speed a
tire is certified to carry a load.
Tire Terminology and
Definitions
Air Pressure:The amount of
air inside the tire pressing
outward on each square inch of
the tire. Air pressure is
expressed in kPa (kilopascal)
or psi (pounds per square inch).
Accessory Weight
:The
combined weight of optional
accessories. Some examples of
optional accessories are
automatic transmission, power
windows, power seats, and air
conditioning.
Aspect Ratio
:The relationship
of a tire's height to its width.
Page 327 of 420
Black plate (65,1)Chevrolet Cruze Owner Manual (GMNA-Localizing-U.S./Canada-6007168) -
2014 - 2nd Edition - 7/15/13
Vehicle Care 10-65
Warning (Continued)
changing a flat tire. If it is used for
anything else, you or others could
be badly injured or killed if the
vehicle slips off the jack. If a jack
is provided with the vehicle, only
use it for changing a flat tire.
If a tire goes flat, avoid further tire
and wheel damage by driving slowly
to a level place, well off the road,
if possible. Turn on the hazard
warning flashers. See Hazard
Warning Flashers on page 6-3.
{Warning
Changing a tire can be
dangerous. The vehicle can slip
off the jack and roll over or fall
causing injury or death. Find a
(Continued)
Warning (Continued)
level place to change the tire. To
help prevent the vehicle from
moving:
1. Set the parking brake firmly.
2. Put an automatic transmission in P (Park) or a
manual transmission in
1 (First) or R (Reverse).
3. Turn off the engine and do not restart while the vehicle
is raised.
4. Do not allow passengers to remain in the vehicle.
5. Place wheel blocks on both sides of the tire at the
opposite corner of the tire
being changed.
This vehicle may come with a jack,
spare tire, and wheel block(s) or a
tire sealant and compressor kit. To
use the jacking equipment to
change a spare tire safely, follow the instructions below. Then see
Tire Changing on page 10-73. To
use the tire sealant and compressor
kit, see
Tire Sealant and
Compressor Kit on page 10-66.
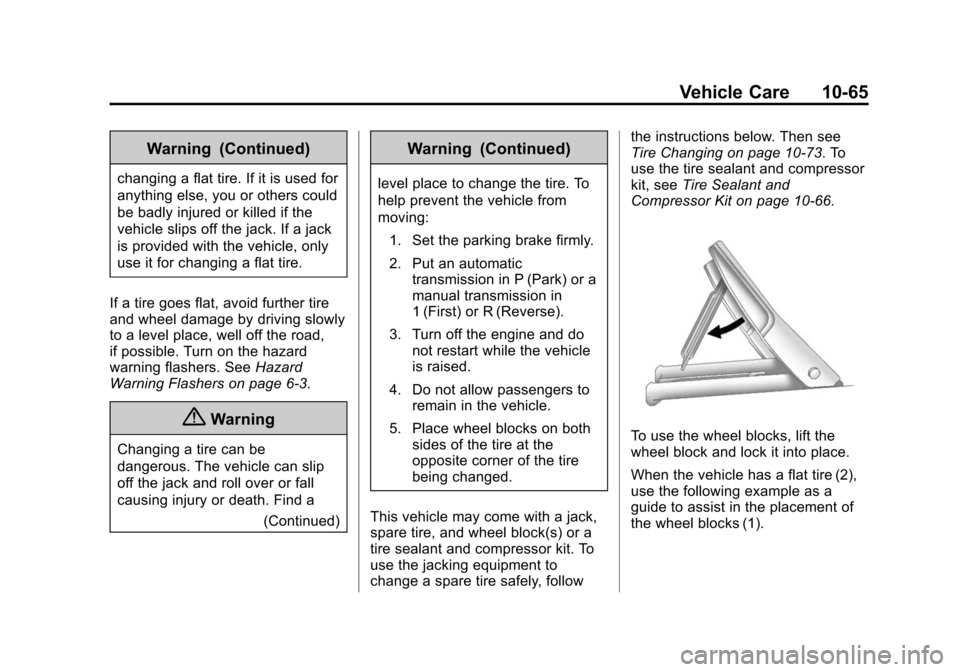
To use the wheel blocks, lift the
wheel block and lock it into place.
When the vehicle has a flat tire (2),
use the following example as a
guide to assist in the placement of
the wheel blocks (1).
Page 345 of 420
Black plate (83,1)Chevrolet Cruze Owner Manual (GMNA-Localizing-U.S./Canada-6007168) -
2014 - 2nd Edition - 7/15/13
Vehicle Care 10-83
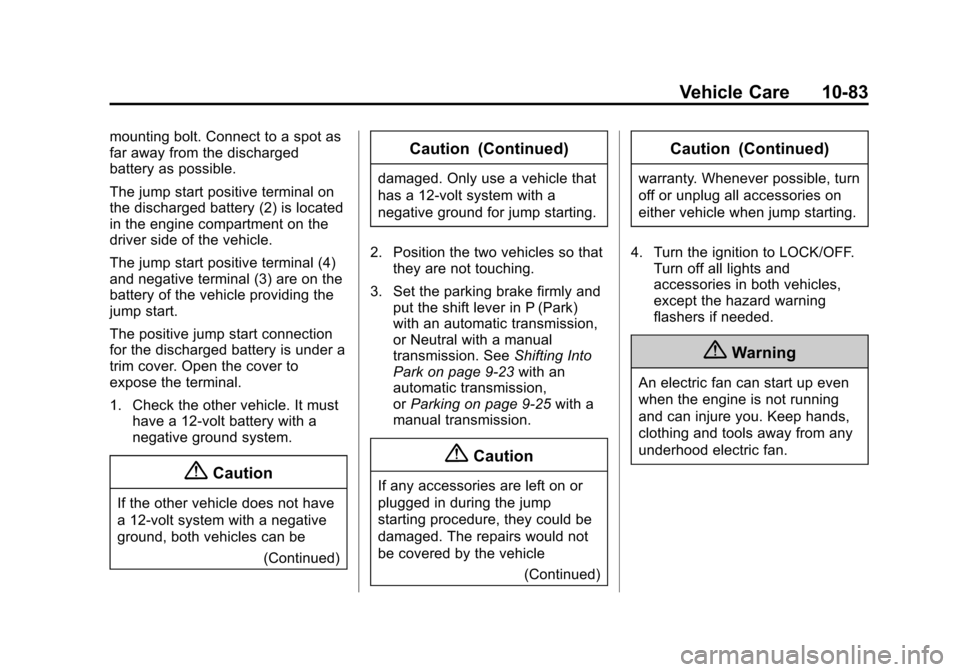
mounting bolt. Connect to a spot as
far away from the discharged
battery as possible.
The jump start positive terminal on
the discharged battery (2) is located
in the engine compartment on the
driver side of the vehicle.
The jump start positive terminal (4)
and negative terminal (3) are on the
battery of the vehicle providing the
jump start.
The positive jump start connection
for the discharged battery is under a
trim cover. Open the cover to
expose the terminal.
1. Check the other vehicle. It musthave a 12-volt battery with a
negative ground system.
{Caution
If the other vehicle does not have
a 12-volt system with a negative
ground, both vehicles can be
(Continued)
Caution (Continued)
damaged. Only use a vehicle that
has a 12-volt system with a
negative ground for jump starting.
2. Position the two vehicles so that they are not touching.
3. Set the parking brake firmly and put the shift lever in P (Park)
with an automatic transmission,
or Neutral with a manual
transmission. See Shifting Into
Park on page 9-23 with an
automatic transmission,
or Parking on page 9-25 with a
manual transmission.
{Caution
If any accessories are left on or
plugged in during the jump
starting procedure, they could be
damaged. The repairs would not
be covered by the vehicle
(Continued)
Caution (Continued)
warranty. Whenever possible, turn
off or unplug all accessories on
either vehicle when jump starting.
4. Turn the ignition to LOCK/OFF. Turn off all lights and
accessories in both vehicles,
except the hazard warning
flashers if needed.
{Warning
An electric fan can start up even
when the engine is not running
and can injure you. Keep hands,
clothing and tools away from any
underhood electric fan.
Page 348 of 420
Black plate (86,1)Chevrolet Cruze Owner Manual (GMNA-Localizing-U.S./Canada-6007168) -
2014 - 2nd Edition - 7/15/13
10-86 Vehicle Care
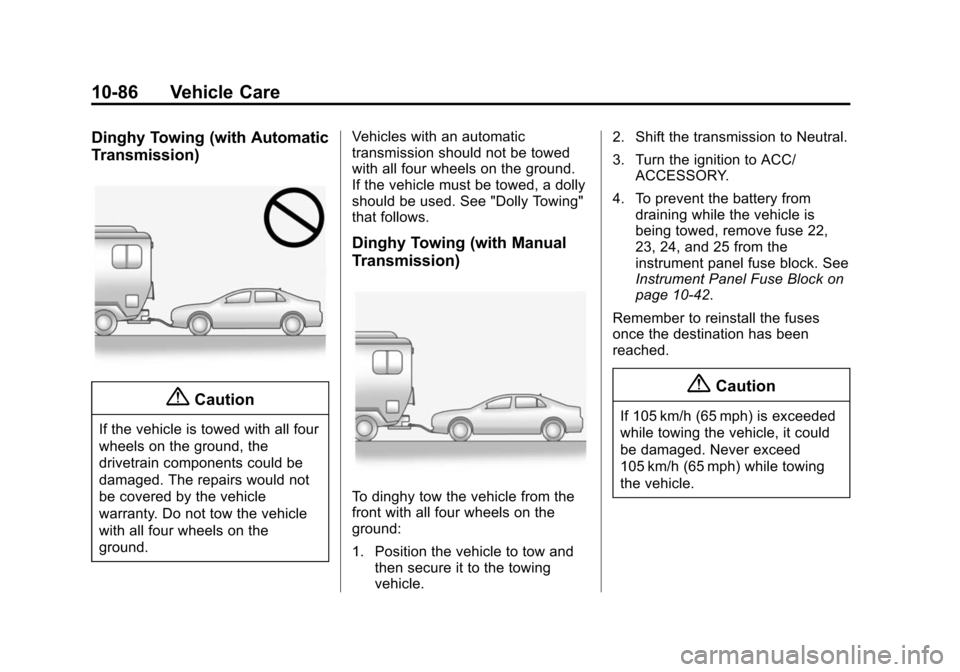
Dinghy Towing (with Automatic
Transmission)
{Caution
If the vehicle is towed with all four
wheels on the ground, the
drivetrain components could be
damaged. The repairs would not
be covered by the vehicle
warranty. Do not tow the vehicle
with all four wheels on the
ground.Vehicles with an automatic
transmission should not be towed
with all four wheels on the ground.
If the vehicle must be towed, a dolly
should be used. See "Dolly Towing"
that follows.
Dinghy Towing (with Manual
Transmission)
To dinghy tow the vehicle from the
front with all four wheels on the
ground:
1. Position the vehicle to tow and
then secure it to the towing
vehicle. 2. Shift the transmission to Neutral.
3. Turn the ignition to ACC/
ACCESSORY.
4. To prevent the battery from draining while the vehicle is
being towed, remove fuse 22,
23, 24, and 25 from the
instrument panel fuse block. See
Instrument Panel Fuse Block on
page 10-42.
Remember to reinstall the fuses
once the destination has been
reached.
{Caution
If 105 km/h (65 mph) is exceeded
while towing the vehicle, it could
be damaged. Never exceed
105 km/h (65 mph) while towing
the vehicle.
Page 349 of 420
Black plate (87,1)Chevrolet Cruze Owner Manual (GMNA-Localizing-U.S./Canada-6007168) -
2014 - 2nd Edition - 7/15/13
Vehicle Care 10-87
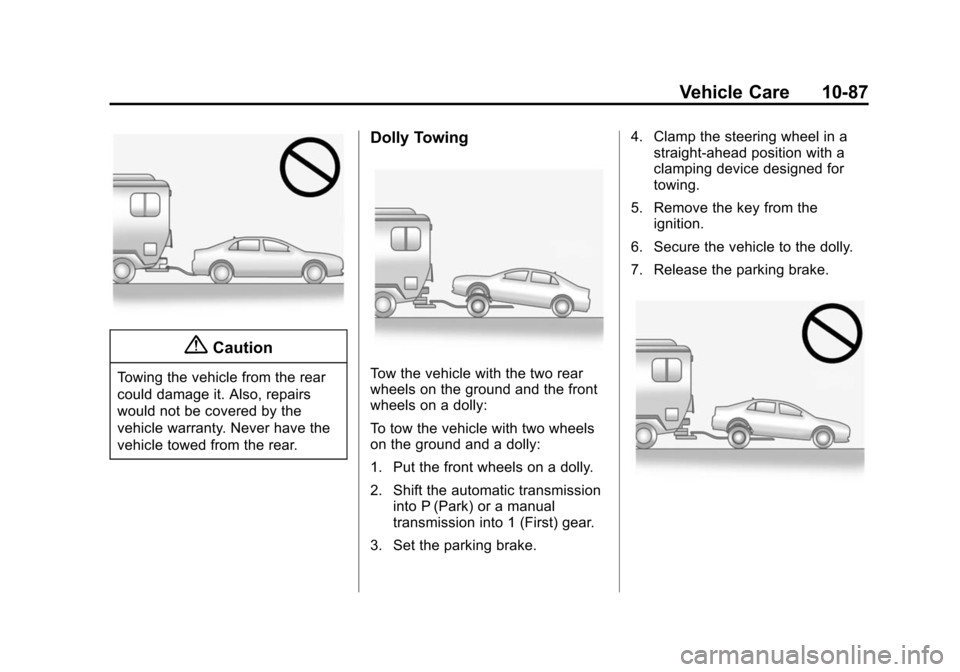
{Caution
Towing the vehicle from the rear
could damage it. Also, repairs
would not be covered by the
vehicle warranty. Never have the
vehicle towed from the rear.
Dolly Towing
Tow the vehicle with the two rear
wheels on the ground and the front
wheels on a dolly:
To tow the vehicle with two wheels
on the ground and a dolly:
1. Put the front wheels on a dolly.
2. Shift the automatic transmissioninto P (Park) or a manual
transmission into 1 (First) gear.
3. Set the parking brake. 4. Clamp the steering wheel in a
straight-ahead position with a
clamping device designed for
towing.
5. Remove the key from the ignition.
6. Secure the vehicle to the dolly.
7. Release the parking brake.
Page 364 of 420

Black plate (4,1)Chevrolet Cruze Owner Manual (GMNA-Localizing-U.S./Canada-6007168) -
2014 - 2nd Edition - 7/15/13
11-4 Service and Maintenance
.Lubricate body components. See
Exterior Care on page 10-88.
.Check starter switch. SeeStarter
Switch Check on page 10-29.
.Check automatic transmission
shift lock control function. See
Automatic Transmission Shift
Lock Control Function Check on
page 10-29.
.Check ignition transmission lock.
See Ignition Transmission Lock
Check on page 10-30.
.Check parking brake and
automatic transmission park
mechanism. See Park Brake and
P (Park) Mechanism Check on
page 10-30.
.Check accelerator pedal for
damage, high effort, or binding.
Replace if needed.
.Visually inspect gas strut for
signs of wear, cracks, or other
damage. Check the hold open
ability of the strut. See your
dealer if service is required.
.Check tire sealant expiration
date, if equipped. See Tire
Sealant and Compressor Kit on
page 10-66.
.Inspect sunroof track and seal,
if equipped. See Sunroof on
page 2-23.
Page 365 of 420
Black plate (5,1)Chevrolet Cruze Owner Manual (GMNA-Localizing-U.S./Canada-6007168) -
2014 - 2nd Edition - 7/15/13
Service and Maintenance 11-5
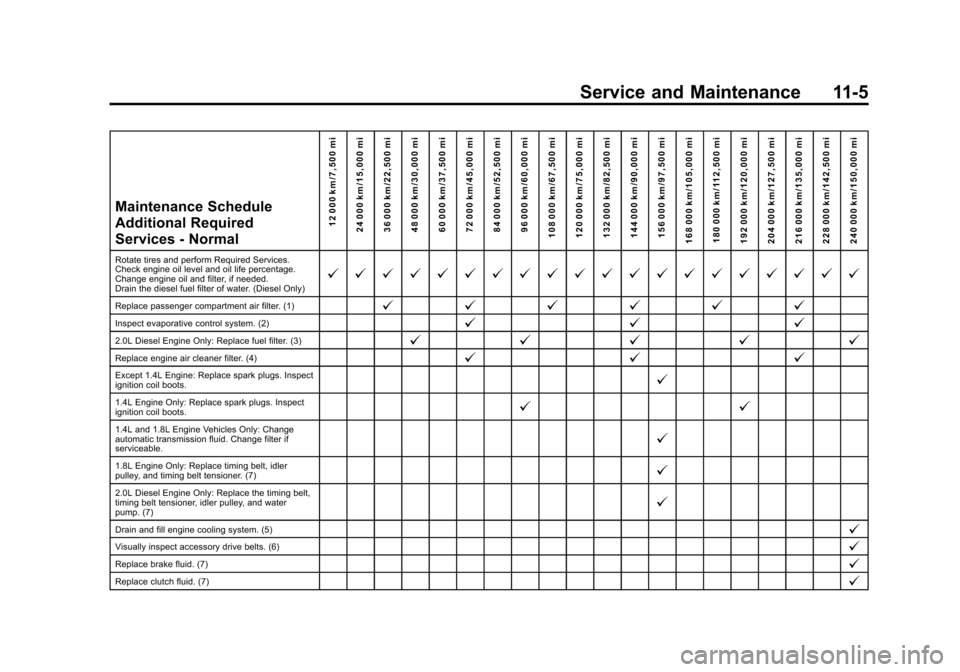
Maintenance Schedule
Additional Required
Services - Normal12 000 km/7,500 mi
24 000 km/15,000 mi
36 000 km/22,500 mi
48 000 km/30,000 mi
60 000 km/37,500 mi
72 000 km/45,000 mi
84 000 km/52,500 mi
96 000 km/60,000 mi
108 000 km/67,500 mi
120 000 km/75,000 mi
132 000 km/82,500 mi
144 000 km/90,000 mi
156 000 km/97,500 mi
168 000 km/105,000 mi 180 000 km/112,500 mi
192 000 km/120,000 mi
204 000 km/127,500 mi
216 000 km/135,000 mi
228 000 km/142,500 mi
240 000 km/150,000 mi
Rotate tires and perform Required Services.
Check engine oil level and oil life percentage.
Change engine oil and filter, if needed.
Drain the diesel fuel filter of water. (Diesel Only)@ @ @ @ @ @ @ @ @ @ @ @ @ @ @ @ @ @ @ @
Replace passenger compartment air filter. (1)@ @@@@@
Inspect evaporative control system. (2)@ @@
2.0L Diesel Engine Only: Replace fuel filter. (3)@@@@@
Replace engine air cleaner filter. (4)@ @@
Except 1.4L Engine: Replace spark plugs. Inspect
ignition coil boots.@
1.4L Engine Only: Replace spark plugs. Inspect
ignition coil boots.@ @
1.4L and 1.8L Engine Vehicles Only: Change
automatic transmission fluid. Change filter if
serviceable.@
1.8L Engine Only: Replace timing belt, idler
pulley, and timing belt tensioner. (7)@
2.0L Diesel Engine Only: Replace the timing belt,
timing belt tensioner, idler pulley, and water
pump. (7)@
Drain and fill engine cooling system. (5)@
Visually inspect accessory drive belts. (6)@
Replace brake fluid. (7)@
Replace clutch fluid. (7)@
Page 367 of 420
Black plate (7,1)Chevrolet Cruze Owner Manual (GMNA-Localizing-U.S./Canada-6007168) -
2014 - 2nd Edition - 7/15/13
Service and Maintenance 11-7
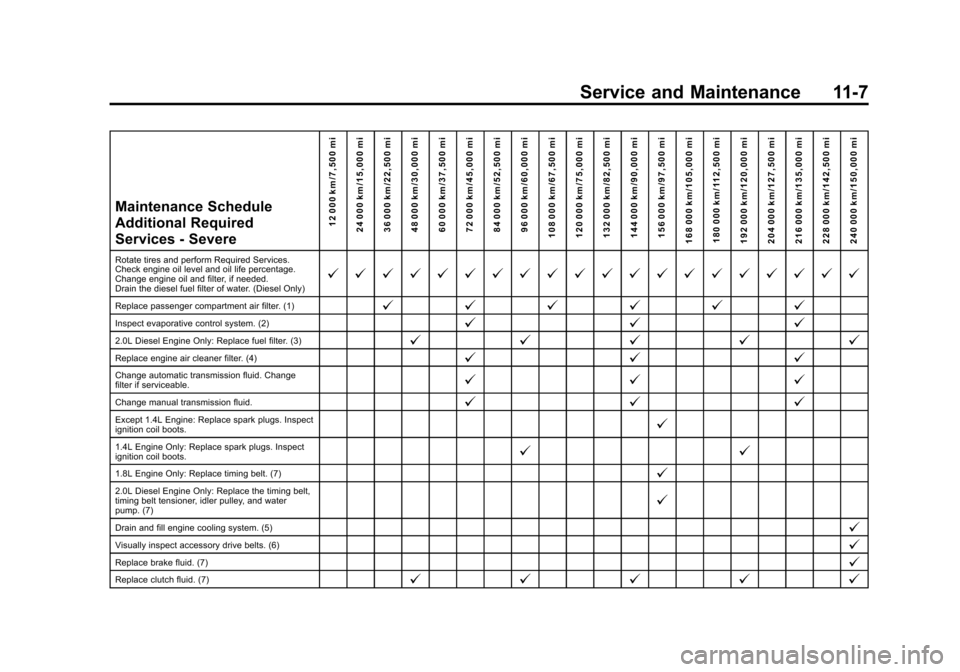
Maintenance Schedule
Additional Required
Services - Severe12 000 km/7,500 mi
24 000 km/15,000 mi
36 000 km/22,500 mi
48 000 km/30,000 mi
60 000 km/37,500 mi
72 000 km/45,000 mi
84 000 km/52,500 mi
96 000 km/60,000 mi
108 000 km/67,500 mi
120 000 km/75,000 mi
132 000 km/82,500 mi
144 000 km/90,000 mi
156 000 km/97,500 mi
168 000 km/105,000 mi 180 000 km/112,500 mi
192 000 km/120,000 mi
204 000 km/127,500 mi
216 000 km/135,000 mi
228 000 km/142,500 mi
240 000 km/150,000 mi
Rotate tires and perform Required Services.
Check engine oil level and oil life percentage.
Change engine oil and filter, if needed.
Drain the diesel fuel filter of water. (Diesel Only)@ @ @ @ @ @ @ @ @ @ @ @ @ @ @ @ @ @ @ @
Replace passenger compartment air filter. (1)@ @@@@@
Inspect evaporative control system. (2)@ @@
2.0L Diesel Engine Only: Replace fuel filter. (3)@@@@@
Replace engine air cleaner filter. (4)@ @@
Change automatic transmission fluid. Change
filter if serviceable.@@@
Change manual transmission fluid.@@@
Except 1.4L Engine: Replace spark plugs. Inspect
ignition coil boots.@
1.4L Engine Only: Replace spark plugs. Inspect
ignition coil boots.@ @
1.8L Engine Only: Replace timing belt. (7)@
2.0L Diesel Engine Only: Replace the timing belt,
timing belt tensioner, idler pulley, and water
pump. (7)@
Drain and fill engine cooling system. (5)@
Visually inspect accessory drive belts. (6)@
Replace brake fluid. (7)@
Replace clutch fluid. (7)@@@@@