Page 286 of 420

Black plate (24,1)Chevrolet Cruze Owner Manual (GMNA-Localizing-U.S./Canada-6007168) -
2014 - 2nd Edition - 7/15/13
10-24 Vehicle Care
Warning (Continued)
from the engine if you see or hear
steam coming from it. Just turn it
off and get everyone away from
the vehicle until it cools down.
Wait until there is no sign of
steam or coolant before you open
the hood.
If you keep driving when the
engine is overheated, the liquids
in it can catch fire. You or others
could be badly burned. Stop the
engine if it overheats, and get out
of the vehicle until the engine
is cool.
If No Steam Is Coming from
the Engine Compartment
If an engine overheat warning is
displayed but no steam can be seen
or heard, the problem may not be
too serious. Sometimes the engine
can get a little too hot when the
vehicle:
.Climbs a long hill on a hot day.
.Stops after high-speed driving.
.Idles for long periods in traffic.
.Tows a trailer.
If the overheat warning is displayed
with no sign of steam:
1. Turn the air conditioning off.
2. Turn the heater on to the highest temperature and to the highest
fan speed. Open the windows as
necessary.
3. When it is safe to do so, pull off the road, shift to P (Park) or
N (Neutral) and let the
engine idle. If the temperature overheat gauge is
no longer in the overheat zone or an
overheat warning no longer
displays, the vehicle can be driven.
Continue to drive the vehicle slowly
for about 10 minutes. Keep a safe
vehicle distance from the vehicle in
front. If the warning does not come
back on, continue to drive normally
and have the cooling system
checked for fill and function.
If the warning continues, pull over,
stop, and park the vehicle
right away.
If there is no sign of steam, idle the
engine for three minutes while
parked. If the warning is still
displayed, turn off the engine until it
cools down. Also, for gasoline
engines only, see
“Overheated
Engine Protection Operating Mode”
following.
Page 294 of 420
Black plate (32,1)Chevrolet Cruze Owner Manual (GMNA-Localizing-U.S./Canada-6007168) -
2014 - 2nd Edition - 7/15/13
10-32 Vehicle Care
Headlamp Aiming
Headlamp aim has been preset and
should need no further adjustment.
If the vehicle is damaged in a crash,
the headlamp aim may be affected.
If adjustment to the headlamps is
necessary, see your dealer.
Bulb Replacement
For the proper type of replacement
bulbs, seeReplacement Bulbs on
page 10-37.
For any bulb‐changing procedure
not listed in this section, contact
your dealer.
Halogen Bulbs
{Warning
Halogen bulbs have pressurized
gas inside and can burst if you
drop or scratch the bulb. You or
others could be injured. Be sure
to read and follow the instructions
on the bulb package.
Headlamps, Front Turn
Signal and Parking
Lamps
1. Parking/Turn Signal Lamp
2. High-Beam Headlamp/
Low-Beam Headlamp and DRL
High-Beam Headlamp/
Low-Beam Headlamp and DRL
1. Open the hood. See Hood on
page 10-4.
Page 295 of 420

Black plate (33,1)Chevrolet Cruze Owner Manual (GMNA-Localizing-U.S./Canada-6007168) -
2014 - 2nd Edition - 7/15/13
Vehicle Care 10-33
2. For the driver side bulb, removethe windshield washer bottle
filler neck by firmly pulling it
straight up and out of the bottle.
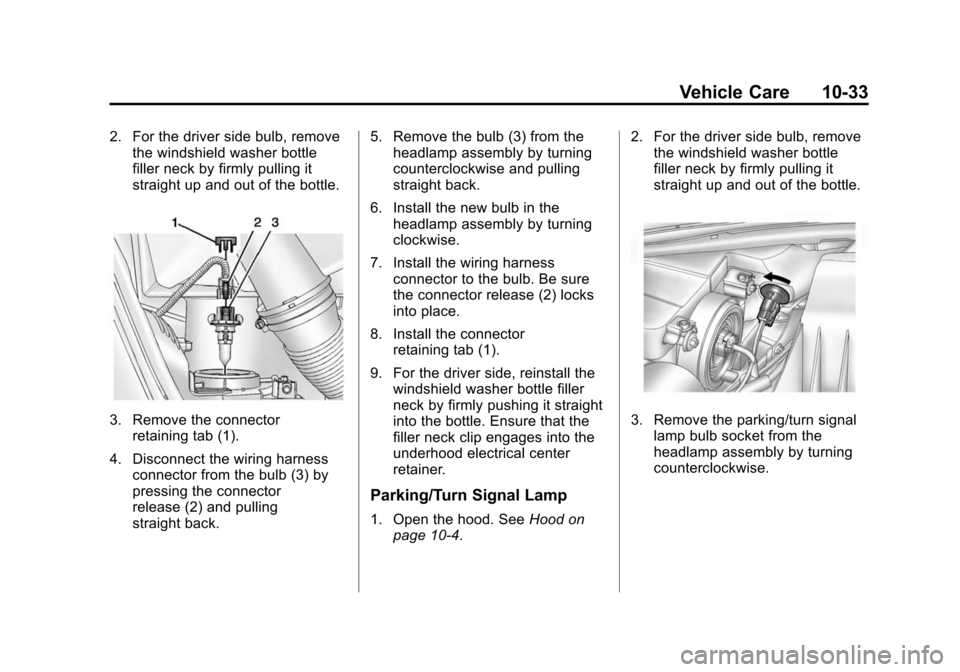
3. Remove the connector
retaining tab (1).
4. Disconnect the wiring harness connector from the bulb (3) by
pressing the connector
release (2) and pulling
straight back. 5. Remove the bulb (3) from the
headlamp assembly by turning
counterclockwise and pulling
straight back.
6. Install the new bulb in the headlamp assembly by turning
clockwise.
7. Install the wiring harness connector to the bulb. Be sure
the connector release (2) locks
into place.
8. Install the connector retaining tab (1).
9. For the driver side, reinstall the windshield washer bottle filler
neck by firmly pushing it straight
into the bottle. Ensure that the
filler neck clip engages into the
underhood electrical center
retainer.
Parking/Turn Signal Lamp
1. Open the hood. See Hood on
page 10-4. 2. For the driver side bulb, remove
the windshield washer bottle
filler neck by firmly pulling it
straight up and out of the bottle.
3. Remove the parking/turn signal
lamp bulb socket from the
headlamp assembly by turning
counterclockwise.
Page 296 of 420
Black plate (34,1)Chevrolet Cruze Owner Manual (GMNA-Localizing-U.S./Canada-6007168) -
2014 - 2nd Edition - 7/15/13
10-34 Vehicle Care
4. Remove the bulb from the bulbsocket.
5. Install the new bulb in the bulb socket.
6. Install the bulb socket into the headlamp assembly by turning
clockwise.
7. For the driver side, reinstall the windshield washer bottle filler
neck by firmly pushing it straight
into the bottle. Ensure that the
filler neck clip engages into the
underhood electrical center
retainer.
Taillamps, Turn Signal,
Sidemarker, Stoplamps,
and Back-Up Lamps
Trunk Deck Inboard Taillamps
1. Open the trunk.
2. Remove the trunk deck trimcover (1).
3. Remove the bulb socket (2) by turning counterclockwise and
pulling straight out.
Page 345 of 420

Black plate (83,1)Chevrolet Cruze Owner Manual (GMNA-Localizing-U.S./Canada-6007168) -
2014 - 2nd Edition - 7/15/13
Vehicle Care 10-83
mounting bolt. Connect to a spot as
far away from the discharged
battery as possible.
The jump start positive terminal on
the discharged battery (2) is located
in the engine compartment on the
driver side of the vehicle.
The jump start positive terminal (4)
and negative terminal (3) are on the
battery of the vehicle providing the
jump start.
The positive jump start connection
for the discharged battery is under a
trim cover. Open the cover to
expose the terminal.
1. Check the other vehicle. It musthave a 12-volt battery with a
negative ground system.
{Caution
If the other vehicle does not have
a 12-volt system with a negative
ground, both vehicles can be
(Continued)
Caution (Continued)
damaged. Only use a vehicle that
has a 12-volt system with a
negative ground for jump starting.
2. Position the two vehicles so that they are not touching.
3. Set the parking brake firmly and put the shift lever in P (Park)
with an automatic transmission,
or Neutral with a manual
transmission. See Shifting Into
Park on page 9-23 with an
automatic transmission,
or Parking on page 9-25 with a
manual transmission.
{Caution
If any accessories are left on or
plugged in during the jump
starting procedure, they could be
damaged. The repairs would not
be covered by the vehicle
(Continued)
Caution (Continued)
warranty. Whenever possible, turn
off or unplug all accessories on
either vehicle when jump starting.
4. Turn the ignition to LOCK/OFF. Turn off all lights and
accessories in both vehicles,
except the hazard warning
flashers if needed.
{Warning
An electric fan can start up even
when the engine is not running
and can injure you. Keep hands,
clothing and tools away from any
underhood electric fan.