2014 CHEVROLET CAMARO brake rotor
[x] Cancel search: brake rotorPage 206 of 432

Black plate (8,1)Chevrolet Camaro Owner Manual (GMNA-Localizing-U.S./Canada/Mexico-
6042601) - 2014 - CRC - 1/21/14
9-8 Driving and Operating
increase. After the procedure is
complete, the brake pads may
appear white at the rotor contact.
Run this procedure in a safe
manner and in compliance with all
local and state ordinances/laws
regarding motor vehicle operation.
Run this procedure only on dry
pavement.
Racing/Track Brake Burnishing
Procedure
{Caution
Brake pedal fade will occur during
this track burnish procedure and
can cause brake pedal travel and
force to increase. This could
extend stopping distance until the
brakes are fully burnished.
1. Apply the brakes 25 times starting at 100 km/h (60 mph) to
50 km/h (30 mph) while
decelerating at 0.4 g. This is a
medium brake application. Drive
for at least 1 km (0.6 mi) between applying the brakes.
This first step may be skipped if
there are more than 320 km
(200 mi) on the brake pads.
2. Repeatedly apply the brakes from 100 km/h (60 mph) to
25 km/h (15 mph) while
decelerating at 0.8 g. This is a
hard brake application, without
activating the Antilock Brake
System (ABS). Drive for at least
1 km (0.6 mi) between stops.
Repeat until the brake pedal
travel starts to increase.
Depending on conditions, this
should take no longer than
25 brake applications.
3. Cool down: Drive at 100 km/h (60 mph) for approximately
15 km (10 mi) without using the
brakes.
4. Apply the brakes 25 times from 100 km/h (60 mph) to 50 km/h
(30 mph) while decelerating at
0.4 g. This is a medium brake application. Drive for at least
1 km (0.6 mi) between
applications.
Z/28 Brake Burnishing
{Caution
These procedures are specific to
the Z/28 with ceramic brake
rotors. These procedures should
not be run on other Camaro
models as damage may result.
{Caution
The new vehicle break-in period
should be completed before
performing the brake burnish
procedure or damage may occur
to the powertrain/engine. See
New Vehicle Break-In on
page 9-19.
Page 207 of 432

Black plate (9,1)Chevrolet Camaro Owner Manual (GMNA-Localizing-U.S./Canada/Mexico-
6042601) - 2014 - CRC - 1/21/14
Driving and Operating 9-9
When performed as instructed,
these procedures will not damage
the brakes. During the burnishing
procedure, the brake pads will
smoke and produce an odor. The
braking force and pedal travel may
increase. After the procedure is
complete, the brake pads may
appear white at the rotor contact.
Street High Performance Brake
Burnishing Procedure
Perform this procedure on dry
pavement only and in a safe
manner and in compliance with all
local and state ordinances/laws
regarding motor vehicle operation.
1. From a stop, accelerate asrapidly as possible without
activating traction control to a
speed of 100 km/h (60 mph).
2. Use enough pedal force to completely stop the vehicle in
four to five seconds. If ABS
activates, braking is too hard. 3. Repeat Steps 1 and 2 five times.
This should take about
10 minutes.
4. After completing the five stops, cool the brakes by driving for
8 km (5 mi) at 100 km/h
(60 mph).
As with all high performance brake
systems, some amount of brake
squeal is normal.
Racing/Track Brake Burnishing
Procedure
To prepare the Z/28 brake system
for track events and racing, the
street high performance brake
burnish as described previously
should be completed.
In addition to completing the street
high performance brake burnishing
procedure, the following procedure
needs to be completed to make the
Z/28 brake system ready for track
events and racing.
This procedure should only be run
on a track and only on dry
pavement.{Caution
Brake pedal fade will occur during
this track burnish procedure and
can cause brake pedal travel and
force to increase. This could
extend stopping distance until the
brakes are fully burnished.
1. Drive a normal first lap, not too aggressively.
2. Laps 2 and 3 should be gradually driven faster and more
aggressively, while allowing for
reduced brake output and
increased stopping distance due
to brake fade.
3. Drive Lap 4 near full speed, while allowing for reduced brake
output and increased stopping
distance due to brake fade.
4. Laps 5 and 6 should be cool down laps.
5. Lap 7 should be normal driving or an easy out lap.
Page 299 of 432

Black plate (39,1)Chevrolet Camaro Owner Manual (GMNA-Localizing-U.S./Canada/Mexico-
6042601) - 2014 - CRC - 1/21/14
Vehicle Care 10-39
Some driving conditions or climates
can cause a brake squeal when the
brakes are first applied or lightly
applied. This does not mean
something is wrong with the brakes.
Properly torqued wheel nuts are
necessary to help prevent brake
pulsation. When tires are rotated,
inspect brake pads for wear and
evenly tighten wheel nuts in the
proper sequence to torque
specifications. SeeCapacities and
Specifications on page 12-2.
Brake pads should be replaced as
complete sets.
Brake Pedal Travel
See your dealer if the brake pedal
does not return to normal height,
or if there is a rapid increase in
pedal travel. This could be a sign
that brake service might be
required.
Brake Adjustment
Every time the brakes are applied,
with or without the vehicle moving,
the brakes adjust for wear.
Replacing Brake System Parts
The braking system on a vehicle is
complex. Its many parts have to be
of top quality and work well together
if the vehicle is to have really good
braking. The vehicle was designed
and tested with top-quality brake
parts. When parts of the braking
system are replaced, be sure to get
new, approved replacement parts.
If this is not done, the brakes may
not work properly. For example,
installing disc brake pads that are
wrong for the vehicle, can change
the balance between the front and
rear brakes —for the worse. The
braking performance expected can
change in many other ways if the
wrong replacement brake parts are
installed.
Z/28 Brake Pad and
Rotor Wear
The Z/28 has electronic brake pad
wear sensors. When the pads are
worn, a message displays in the
Driver Information Center. See
Brake System Messages on
page 5-33.
Visual Inspection
Periodic visual inspection of the
brake pads is required to determine
when to replace the brake pads.
.Brake pads can be visually
inspected through the wheel by
inspecting the outer brake pads
at each wheel.
.Brake pads should be replaced
when the pad lining is worn to
2 mm of pad thickness. New
pads are 10 mm thick.
.In addition, brake pad inspection
is required any time the tires are
removed.
Page 300 of 432

Black plate (40,1)Chevrolet Camaro Owner Manual (GMNA-Localizing-U.S./Canada/Mexico-
6042601) - 2014 - CRC - 1/21/14
10-40 Vehicle Care
The Z/28 has ceramic brake rotors.
Rotors should be visually inspected
when the brake pads are replaced.
The rotor can be reused if it is within
specification. Rotor inspection and
measuring methods can be found in
the service manual. SeeService
Publications Ordering Information
on page 13-11.
Brake Fluid
The brake/clutch master cylinder
reservoir is filled with DOT 3 brake
fluid as indicated on the reservoir
cap. See Engine Compartment
Overview on page 10-6 for the
location of the reservoir. There are only two reasons why the
fluid level in the reservoir might
go down:
.The fluid level goes down
because of normal brake lining
wear. When new linings are
installed, the fluid level goes
back up.
.A fluid leak in the brake/clutch
hydraulic system can also cause
a low fluid level. Have the brake/
clutch hydraulic system fixed,
since a leak means that sooner
or later the brakes and/or clutch
will not work well.
Do not top off the brake/clutch fluid.
Adding fluid does not correct a leak.
If fluid is added when the linings are
worn, there will be too much fluid
when new brake linings are
installed. Add or remove brake fluid,
as necessary, only when work is
done on the brake/clutch hydraulic
system.
{Warning
If too much brake fluid is added, it
can spill on the engine and burn,
if the engine is hot enough. You
or others could be burned, and
the vehicle could be damaged.
Add brake fluid only when work is
done on the brake/clutch
hydraulic system.
When the brake/clutch fluid falls to a
low level, the brake warning light
comes on. See Brake System
Warning Light on page 5-19.
What to Add
Use only new DOT 3 brake fluid
from a sealed container. See
Recommended Fluids and
Lubricants on page 11-12.
Always clean the brake/clutch fluid
reservoir cap and the area around
the cap before removing it. This
helps keep dirt from entering the
reservoir.
Page 355 of 432

Black plate (95,1)Chevrolet Camaro Owner Manual (GMNA-Localizing-U.S./Canada/Mexico-
6042601) - 2014 - CRC - 1/21/14
Vehicle Care 10-95
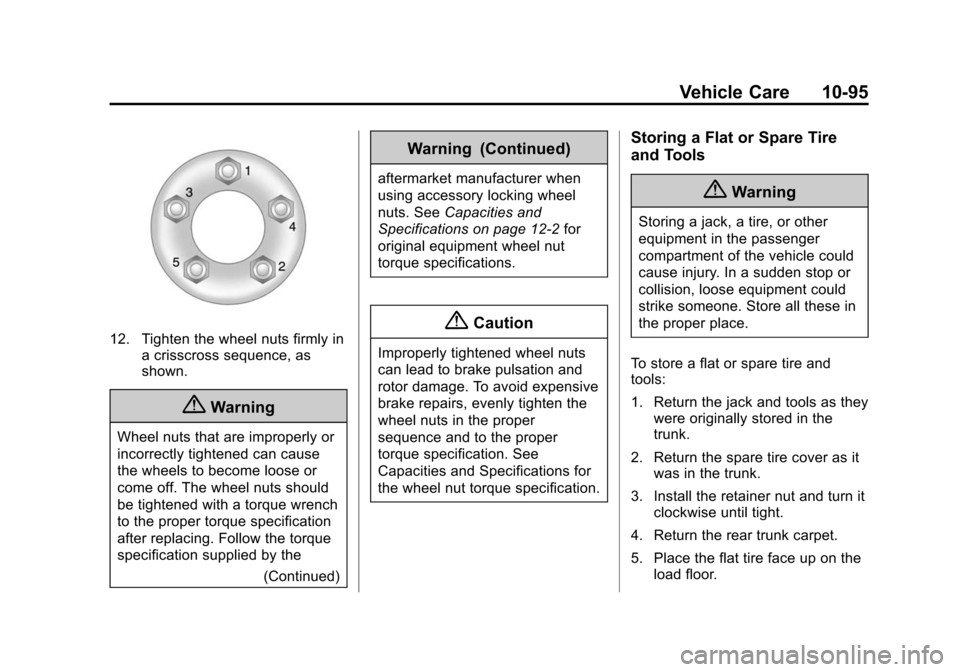
12. Tighten the wheel nuts firmly ina crisscross sequence, as
shown.
{Warning
Wheel nuts that are improperly or
incorrectly tightened can cause
the wheels to become loose or
come off. The wheel nuts should
be tightened with a torque wrench
to the proper torque specification
after replacing. Follow the torque
specification supplied by the
(Continued)
Warning (Continued)
aftermarket manufacturer when
using accessory locking wheel
nuts. SeeCapacities and
Specifications on page 12-2 for
original equipment wheel nut
torque specifications.
{Caution
Improperly tightened wheel nuts
can lead to brake pulsation and
rotor damage. To avoid expensive
brake repairs, evenly tighten the
wheel nuts in the proper
sequence and to the proper
torque specification. See
Capacities and Specifications for
the wheel nut torque specification.
Storing a Flat or Spare Tire
and Tools
{Warning
Storing a jack, a tire, or other
equipment in the passenger
compartment of the vehicle could
cause injury. In a sudden stop or
collision, loose equipment could
strike someone. Store all these in
the proper place.
To store a flat or spare tire and
tools:
1. Return the jack and tools as they were originally stored in the
trunk.
2. Return the spare tire cover as it was in the trunk.
3. Install the retainer nut and turn it clockwise until tight.
4. Return the rear trunk carpet.
5. Place the flat tire face up on the load floor.