2014 CHEVROLET CAMARO tow
[x] Cancel search: towPage 276 of 432

Black plate (16,1)Chevrolet Camaro Owner Manual (GMNA-Localizing-U.S./Canada/Mexico-
6042601) - 2014 - CRC - 1/21/14
10-16 Vehicle Care
{Warning
The engine oil dipstick handle
may be hot; it could burn you.
Use a towel or glove to touch the
dipstick handle.
2. Pull out the dipstick and clean it with a paper towel or cloth, then
push it back in all the way.
Remove it again, keeping the tip
down, and check the level.
When to Add Engine Oil
(Except Z/28)
If the oil is below the cross-hatched
area at the tip of the dipstick, add
1 L (1 qt) of the recommended oil
and then recheck the level. See
“Selecting the Right Engine Oil” inthis section for an explanation of
what kind of oil to use. For engine
oil crankcase capacity, see
Capacities and Specifications on
page 12-2.
{Caution
Do not add too much oil. Oil
levels above or below the
acceptable operating range
shown on the dipstick are harmful
to the engine. If you find that you
have an oil level above the
operating range, i.e., the engine
has so much oil that the oil level
gets above the cross-hatched
area that shows the proper
operating range, the engine could
be damaged. You should drain
out the excess oil or limit driving
of the vehicle and seek a service
professional to remove the
excess amount of oil.
See
Engine Compartment Overview
on page 10-6 for the location of the
engine oil fill cap.
Add enough oil to put the level
somewhere in the proper operating
range. Push the dipstick all the way
back in when through.Checking Engine Oil (Z/28)
1. Engine Oil Dipstick
2. Engine Oil Fill Cap
Page 277 of 432

Black plate (17,1)Chevrolet Camaro Owner Manual (GMNA-Localizing-U.S./Canada/Mexico-
6042601) - 2014 - CRC - 1/21/14
Vehicle Care 10-17
It is a good idea to check the engine
oil level at each fuel fill. In order to
get an accurate reading, the vehicle
must be on level ground.
The engine oil dipstick handle is a
loop. The dipstick is on the dry
sump engine oil tank. SeeEngine
Compartment Overview on
page 10-6 for the location of the dry
sump engine oil tank.
These vehicles have a dry sump
engine lubrication system. This high
performance system operates
differently than a standard engine
lubrication system and requires a
special procedure when checking
the engine oil level. Follow this
procedure closely.
The engine oil level must be
checked when the engine is warm.
Cold oil level in the dry sump tank
may not indicate the actual amount
of oil in the system. With this
system, engine oil is contained in an
external tank, separate from the
engine. Under normal operating
conditions, the oil pan under the engine does not store any oil. If the
vehicle has been parked for an
extended period without the engine
being started, some oil will seep
back into the oil pan, reducing the
amount of oil held in the dry sump
tank and there could be no engine
oil at all showing on the dipstick.
This is normal since the dipstick is
designed to read the engine oil level
only after the engine has run long
enough to reach normal operating
temperature. Do not add engine oil
based on cold engine dipstick
readings. The engine oil level on the
dipstick will also be inaccurate if
checked while the engine is running.
1. To obtain an accurate engine oil
level reading, warm up the
engine to at least 80°C (175°F).
Cold oil will not give a correct oil
level reading.
2. Once the engine is warm, turn off the engine. Checking the oil
while the engine is running will
result in an incorrect oil level
reading. 3. Check the oil level between five
and 10 minutes after the engine
is shut down.
{Warning
The engine oil dipstick handle
may be hot; it could burn you.
Use a towel or glove to touch the
dipstick handle.
4. Remove the dipstick from the external engine oil tank and
clean it with a lint-free paper
towel or a cloth. Re-insert the
dipstick into the external oil tank,
pushing it all the way in until it
stops.
5. Remove the dipstick from the oil tank and read the level on the
cross-hatched area.
Page 296 of 432

Black plate (36,1)Chevrolet Camaro Owner Manual (GMNA-Localizing-U.S./Canada/Mexico-
6042601) - 2014 - CRC - 1/21/14
10-36 Vehicle Care
{Caution
Running the engine without
coolant may cause damage or a
fire. Vehicle damage would not be
covered by the vehicle warranty.
If Steam Is Coming from the
Engine Compartment
{Warning
Steam from an overheated engine
can burn you badly, even if you
just open the hood. Stay away
from the engine if you see or hear
steam coming from it. Just turn it
off and get everyone away from
the vehicle until it cools down.
Wait until there is no sign of
steam or coolant before you open
the hood.(Continued)
Warning (Continued)
If you keep driving when the
engine is overheated, the liquids
in it can catch fire. You or others
could be badly burned. Stop the
engine if it overheats, and get out
of the vehicle until the engine
is cool.
If No Steam Is Coming from
the Engine Compartment
If an engine overheat warning is
displayed but no steam can be seen
or heard, the problem may not be
too serious. Sometimes the engine
can get a little too hot when the
vehicle:
.Climbs a long hill on a hot day.
.Stops after high-speed driving.
.Idles for long periods in traffic.
.Tows a trailer. If the overheat warning is displayed
with no sign of steam:
1. Turn the air conditioning off.
2. Turn the heater on to the highest
temperature and to the highest
fan speed. Open the windows as
necessary.
3. When it is safe to do so, pull off the road, shift to P (Park) or
N (Neutral) and let the
engine idle.
If the temperature overheat gauge is
no longer in the overheat zone or an
overheat warning no longer
displays, the vehicle can be driven.
Continue to drive the vehicle slowly
for about 10 minutes. Keep a safe
vehicle distance from the vehicle in
front. If the warning does not come
back on, continue to drive normally
and have the cooling system
checked for proper fill and function.
If the warning continues, pull over,
stop, and park the vehicle
right away.
Page 297 of 432

Black plate (37,1)Chevrolet Camaro Owner Manual (GMNA-Localizing-U.S./Canada/Mexico-
6042601) - 2014 - CRC - 1/21/14
Vehicle Care 10-37
If there is no sign of steam, idle the
engine for three minutes while
parked. If the warning is still
displayed, turn off the engine until it
cools down.
Power Steering Fluid
(L99, LS3, ZL1 and Z/28)
The vehicle has electric power
steering and does not use power
steering fluid.
Power Steering
Fluid (LFX)
The power steering fluid reservoir is
under the engine cover on the driver
side toward the front of the engine
compartment. SeeEngine
Compartment Overview on
page 10-6.
When to Check Power Steering
Fluid
It is not necessary to regularly
check power steering fluid unless
you suspect there is a leak in the
system or an unusual noise is
heard. A fluid loss in this system
could indicate a problem. Have the
system inspected and repaired.
How to Check Power Steering
Fluid
Check the level after the vehicle has
been driven for at least 20 minutes
so the fluid is warm.
To check the power steering fluid:
1. Turn the ignition key to LOCK/ OFF and let the engine
compartment cool down.
2. Remove the engine cover. See Engine Cover on page 10-13.
3. Wipe the cap and the top of the reservoir clean.
4. Turn the cap counterclockwise and pull it straight up. 5. Wipe the dipstick with a
clean rag.
6. Replace the cap and completely tighten it.
7. Remove the cap again and look at the fluid level on the dipstick.
When the engine is hot, the level
should be at the hot MAX level.
When the engine is cold, the
fluid level should be between
MIN and MAX on the dipstick.
What to Use
To determine what kind of fluid to
use, see Recommended Fluids and
Lubricants on page 11-12. Always
use the proper fluid.
Page 304 of 432

Black plate (44,1)Chevrolet Camaro Owner Manual (GMNA-Localizing-U.S./Canada/Mexico-
6042601) - 2014 - CRC - 1/21/14
10-44 Vehicle Care
2. Lift up on the latch in the middleof the wiper blade where the
wiper arm attaches.
3. With the latch open, pull the wiper blade down toward the
windshield far enough to release
it from the J-hooked end of the
wiper arm. 4. Remove the wiper blade.
Allowing the wiper blade arm to
touch the windshield when no
wiper blade is installed could
damage the windshield. Any
damage that occurs would not
be covered by the vehicle
warranty. Do not allow the wiper
blade arm to touch the
windshield.
5. Reverse Steps 1–3 for wiper blade replacement.
Windshield Replacement
If the Head-Up display (HUD)
system and the windshield need to
be replaced, get one that is
designed for HUD or the HUD
image may look out of focus.
Headlamp Aiming
Headlamp aim has been preset and
should need no further adjustment.
If the vehicle is damaged in a crash,
the headlamp aim may be affected.
If adjustment to the headlamps is
necessary, see your dealer.
Page 334 of 432

Black plate (74,1)Chevrolet Camaro Owner Manual (GMNA-Localizing-U.S./Canada/Mexico-
6042601) - 2014 - CRC - 1/21/14
10-74 Vehicle Care
Adjust the front and rear tires to
the recommended inflation
pressure on the Tire and
Loading Information label after
the tires have been rotated. See
Tire Pressure on page 10-65
andVehicle Load Limits on
page 9-14.
Reset the Tire Pressure Monitor
System. See Tire Pressure
Monitor Operation on
page 10-68.
Check that all wheel nuts are
properly tightened. See “Wheel
Nut Torque” underCapacities
and Specifications on
page 12-2.{Warning
Rust or dirt on a wheel, or on the
parts to which it is fastened, can
make wheel nuts become loose
after time. The wheel could come
off and cause an accident. When
changing a wheel, remove any
rust or dirt from places where the
wheel attaches to the vehicle. In
an emergency, a cloth or a paper
towel can be used; however, use
a scraper or wire brush later to
remove all rust or dirt.
Lightly coat the center of the
wheel hub with wheel bearing
grease after a wheel change or
tire rotation to prevent corrosion
or rust build-up. Do not get
grease on the flat wheel
mounting surface or on the
wheel nuts or bolts.
When It Is Time for New
Tires
Factors such as maintenance,
temperatures, driving speeds,
vehicle loading, and road conditions
affect the wear rate of the tires.
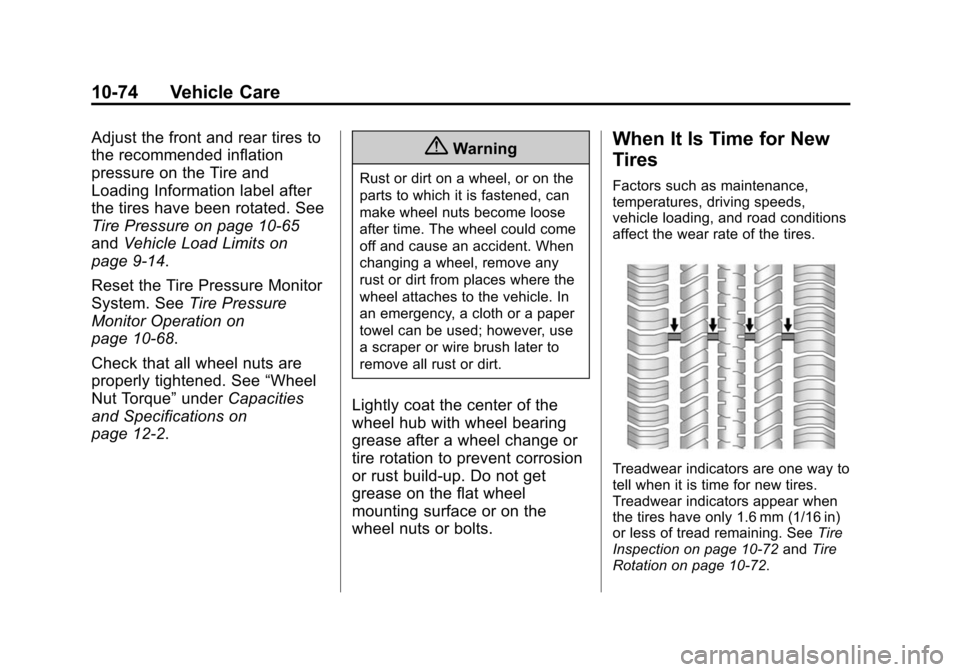
Treadwear indicators are one way to
tell when it is time for new tires.
Treadwear indicators appear when
the tires have only 1.6 mm (1/16 in)
or less of tread remaining. See Tire
Inspection on page 10-72 andTire
Rotation on page 10-72.
Page 340 of 432

Black plate (80,1)Chevrolet Camaro Owner Manual (GMNA-Localizing-U.S./Canada/Mexico-
6042601) - 2014 - CRC - 1/21/14
10-80 Vehicle Care
Used Replacement Wheels
{Warning
Replacing a wheel with a used
one is dangerous. How it has
been used or how far it has been
driven may be unknown. It could
fail suddenly and cause a crash.
When replacing wheels, use a
new GM original equipment
wheel.
Tire Chains
{Warning
Do not use tire chains. There is
not enough clearance. Tire chains
used on a vehicle without the
proper amount of clearance can
cause damage to the brakes,
suspension, or other vehicle
parts. The area damaged by the
tire chains could cause loss of(Continued)
Warning (Continued)
control and a crash. Use another
type of traction device only if its
manufacturer recommends it for
the vehicle's tire size combination
and road conditions. Follow that
manufacturer's instructions. To
avoid vehicle damage, drive
slowly and readjust or remove the
traction device if it contacts the
vehicle. Do not spin the wheels.
If traction devices are used, install
them on the rear tires.
If a Tire Goes Flat
It is unusual for a tire to blow out
while driving, especially if the tires
are maintained properly. See Tires
on page 10-56. If air goes out of a
tire, it is much more likely to leak
out slowly. But if there is ever a
blowout, here are a few tips about
what to expect and what to do:
If a front tire fails, the flat tire
creates a drag that pulls the vehicle
toward that side. Take your foot off
the accelerator pedal and grip the
steering wheel firmly. Steer to
maintain lane position, and then
gently brake to a stop, well off the
road, if possible.
A rear blowout, particularly on a
curve, acts much like a skid and
may require the same correction as
used in a skid. Stop pressing the
accelerator pedal and steer to
straighten the vehicle. It may be
very bumpy and noisy. Gently brake
to a stop, well off the road,
if possible.
Page 354 of 432

Black plate (94,1)Chevrolet Camaro Owner Manual (GMNA-Localizing-U.S./Canada/Mexico-
6042601) - 2014 - CRC - 1/21/14
10-94 Vehicle Care
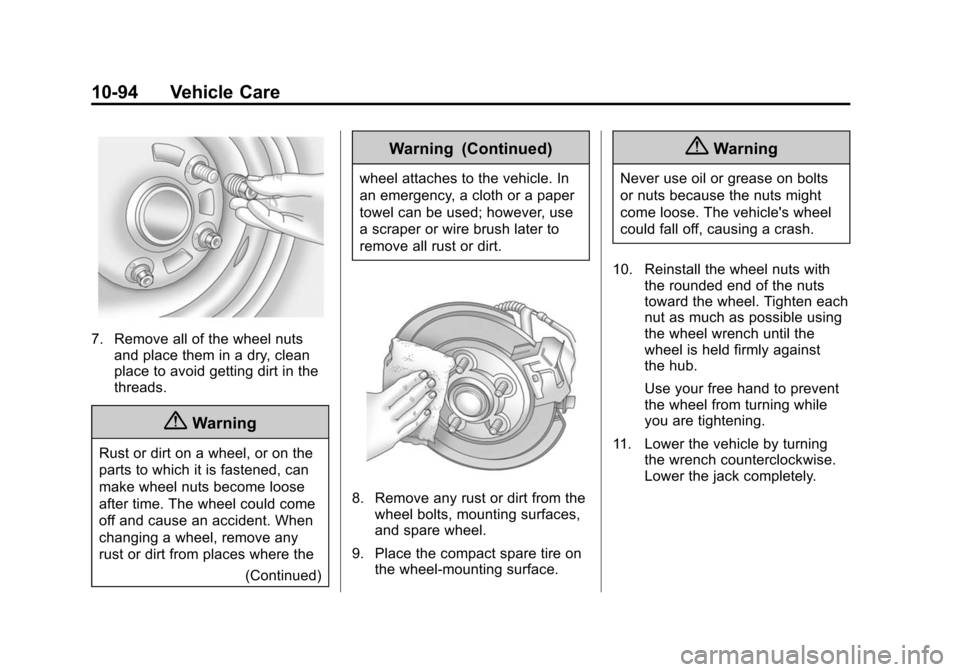
7. Remove all of the wheel nutsand place them in a dry, clean
place to avoid getting dirt in the
threads.
{Warning
Rust or dirt on a wheel, or on the
parts to which it is fastened, can
make wheel nuts become loose
after time. The wheel could come
off and cause an accident. When
changing a wheel, remove any
rust or dirt from places where the
(Continued)
Warning (Continued)
wheel attaches to the vehicle. In
an emergency, a cloth or a paper
towel can be used; however, use
a scraper or wire brush later to
remove all rust or dirt.
8. Remove any rust or dirt from thewheel bolts, mounting surfaces,
and spare wheel.
9. Place the compact spare tire on the wheel-mounting surface.
{Warning
Never use oil or grease on bolts
or nuts because the nuts might
come loose. The vehicle's wheel
could fall off, causing a crash.
10. Reinstall the wheel nuts with the rounded end of the nuts
toward the wheel. Tighten each
nut as much as possible using
the wheel wrench until the
wheel is held firmly against
the hub.
Use your free hand to prevent
the wheel from turning while
you are tightening.
11. Lower the vehicle by turning the wrench counterclockwise.
Lower the jack completely.