2014 CHEVROLET CAMARO change wheel
[x] Cancel search: change wheelPage 256 of 432
Black plate (58,1)Chevrolet Camaro Owner Manual (GMNA-Localizing-U.S./Canada/Mexico-
6042601) - 2014 - CRC - 1/21/14
9-58 Driving and Operating
Towing a trailer requires a certain
amount of experience. The
combination you are driving is
longer and not as responsive as the
vehicle itself. Get acquainted with
the handling and braking of the rig
before setting out for the open road.
Before starting, check all trailer hitch
parts and attachments, safety
chains, electrical connectors, lamps,
tires and mirrors. If the trailer has
electric brakes, start the
combination moving and then apply
the trailer brake controller by hand
to be sure the brakes work.
During the trip, check occasionally
to be sure that the load is secure
and the lamps and any trailer
brakes still work.
Towing with a Stability Control
System
When towing, the sound of the
stability control system might be
heard. The system is reacting to the
vehicle movement caused by thetrailer, which mainly occurs during
cornering. This is normal when
towing heavier trailers.
Following Distance
Stay at least twice as far behind the
vehicle ahead as you would when
driving the vehicle without a trailer.
This can help to avoid situations
that require heavy braking and
sudden turns.
Passing
More passing distance is needed
when towing a trailer. Because the
rig is longer, it is necessary to go
farther beyond the passed vehicle
before returning to the lane.
Backing Up
Hold the bottom of the steering
wheel with one hand. To move the
trailer to the left, move your hand to
the left. To move the trailer to the
right, move your hand to the right.
Always back up slowly and,
if possible, have someone
guide you.
Making Turns
{Caution
Making very sharp turns while
trailering could cause the trailer to
come in contact with the vehicle.
The vehicle could be damaged.
Avoid making very sharp turns
while trailering.
When turning with a trailer, make
wider turns than normal so the
trailer will not strike soft shoulders,
curbs, road signs, trees or other
objects. Use the turn signal well in
advance and avoid jerky or sudden
maneuvers.
Turn Signals When Towing a
Trailer
The turn signal indicators on the
instrument cluster flash whenever
signaling a turn or lane change.
Properly hooked up, the trailer
Page 299 of 432

Black plate (39,1)Chevrolet Camaro Owner Manual (GMNA-Localizing-U.S./Canada/Mexico-
6042601) - 2014 - CRC - 1/21/14
Vehicle Care 10-39
Some driving conditions or climates
can cause a brake squeal when the
brakes are first applied or lightly
applied. This does not mean
something is wrong with the brakes.
Properly torqued wheel nuts are
necessary to help prevent brake
pulsation. When tires are rotated,
inspect brake pads for wear and
evenly tighten wheel nuts in the
proper sequence to torque
specifications. SeeCapacities and
Specifications on page 12-2.
Brake pads should be replaced as
complete sets.
Brake Pedal Travel
See your dealer if the brake pedal
does not return to normal height,
or if there is a rapid increase in
pedal travel. This could be a sign
that brake service might be
required.
Brake Adjustment
Every time the brakes are applied,
with or without the vehicle moving,
the brakes adjust for wear.
Replacing Brake System Parts
The braking system on a vehicle is
complex. Its many parts have to be
of top quality and work well together
if the vehicle is to have really good
braking. The vehicle was designed
and tested with top-quality brake
parts. When parts of the braking
system are replaced, be sure to get
new, approved replacement parts.
If this is not done, the brakes may
not work properly. For example,
installing disc brake pads that are
wrong for the vehicle, can change
the balance between the front and
rear brakes —for the worse. The
braking performance expected can
change in many other ways if the
wrong replacement brake parts are
installed.
Z/28 Brake Pad and
Rotor Wear
The Z/28 has electronic brake pad
wear sensors. When the pads are
worn, a message displays in the
Driver Information Center. See
Brake System Messages on
page 5-33.
Visual Inspection
Periodic visual inspection of the
brake pads is required to determine
when to replace the brake pads.
.Brake pads can be visually
inspected through the wheel by
inspecting the outer brake pads
at each wheel.
.Brake pads should be replaced
when the pad lining is worn to
2 mm of pad thickness. New
pads are 10 mm thick.
.In addition, brake pad inspection
is required any time the tires are
removed.
Page 317 of 432
Black plate (57,1)Chevrolet Camaro Owner Manual (GMNA-Localizing-U.S./Canada/Mexico-
6042601) - 2014 - CRC - 1/21/14
Vehicle Care 10-57
All-Season Tires
This vehicle may come with
all-season tires. These tires are
designed to provide good overall
performance on most road surfaces
and weather conditions. Original
equipment tires designed to GM's
specific tire performance criteria
have a TPC specification code
molded onto the sidewall. Original
equipment all-season tires can be
identified by the last two characters
of this TPC code, which will
be“MS.”
Consider installing winter tires on
the vehicle if frequent driving on
snow or ice-covered roads is
expected. All-season tires provide
adequate performance for most
winter driving conditions, but they
may not offer the same level of
traction or performance as winter
tires on snow or ice-covered roads.
See Winter Tires on page 10-57.
Winter Tires
This vehicle was not originally
equipped with winter tires. Winter
tires are designed for increased
traction on snow and ice-covered
roads. Consider installing winter
tires on the vehicle if frequent
driving on ice or snow covered
roads is expected. See your dealer
for details regarding winter tire
availability and proper tire selection.
Also, see Buying New Tires on
page 10-75.
With winter tires, there may be
decreased dry road traction,
increased road noise, and shorter
tread life. After changing to winter
tires, be alert for changes in vehicle
handling and braking.
If using winter tires:
.Use tires of the same brand and
tread type on all four wheel
positions.
.Use only radial ply tires of the
same size, load range, and
speed rating as the original
equipment tires.
Winter tires with the same speed
rating as the original equipment tires
may not be available for H, V, W, Y,
and ZR speed rated tires. If winter
tires with a lower speed rating are
chosen, never exceed the tire's
maximum speed capability.
Low-Profile Tires
If the vehicle has 305/30ZR19
size tires, they are classified as
low-profile tires.
{Caution
Low-profile tires are more
susceptible to damage from road
hazards or curb impact than
standard profile tires. Tire and/or
wheel assembly damage can
occur when coming into contact (Continued)
Page 334 of 432
Black plate (74,1)Chevrolet Camaro Owner Manual (GMNA-Localizing-U.S./Canada/Mexico-
6042601) - 2014 - CRC - 1/21/14
10-74 Vehicle Care
Adjust the front and rear tires to
the recommended inflation
pressure on the Tire and
Loading Information label after
the tires have been rotated. See
Tire Pressure on page 10-65
andVehicle Load Limits on
page 9-14.
Reset the Tire Pressure Monitor
System. See Tire Pressure
Monitor Operation on
page 10-68.
Check that all wheel nuts are
properly tightened. See “Wheel
Nut Torque” underCapacities
and Specifications on
page 12-2.{Warning
Rust or dirt on a wheel, or on the
parts to which it is fastened, can
make wheel nuts become loose
after time. The wheel could come
off and cause an accident. When
changing a wheel, remove any
rust or dirt from places where the
wheel attaches to the vehicle. In
an emergency, a cloth or a paper
towel can be used; however, use
a scraper or wire brush later to
remove all rust or dirt.
Lightly coat the center of the
wheel hub with wheel bearing
grease after a wheel change or
tire rotation to prevent corrosion
or rust build-up. Do not get
grease on the flat wheel
mounting surface or on the
wheel nuts or bolts.
When It Is Time for New
Tires
Factors such as maintenance,
temperatures, driving speeds,
vehicle loading, and road conditions
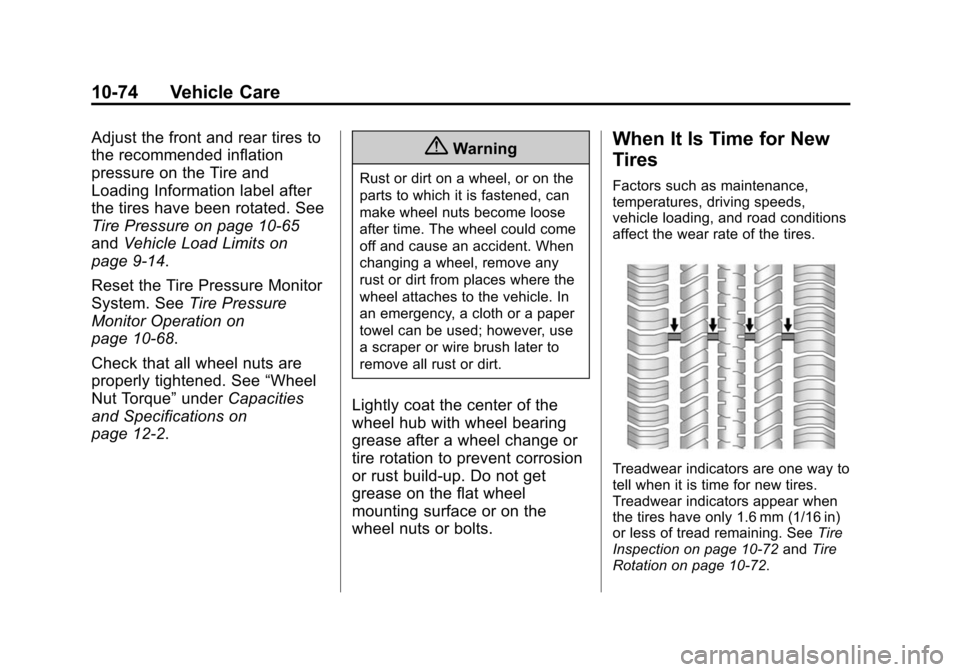
affect the wear rate of the tires.
Treadwear indicators are one way to
tell when it is time for new tires.
Treadwear indicators appear when
the tires have only 1.6 mm (1/16 in)
or less of tread remaining. See Tire
Inspection on page 10-72 andTire
Rotation on page 10-72.
Page 341 of 432
Black plate (81,1)Chevrolet Camaro Owner Manual (GMNA-Localizing-U.S./Canada/Mexico-
6042601) - 2014 - CRC - 1/21/14
Vehicle Care 10-81
{Warning
Driving on a flat tire will cause
permanent damage to the tire.
Re-inflating a tire after it has been
driven on while severely
underinflated or flat may cause a
blowout and a serious crash.
Never attempt to re-inflate a tire
that has been driven on while
severely underinflated or flat.
Have your dealer or an authorized
tire service center repair or
replace the flat tire as soon as
possible.
{Warning
Lifting a vehicle and getting under
it to do maintenance or repairs is
dangerous without the
appropriate safety equipment and
training. If a jack is provided with
the vehicle, it is designed only for
changing a flat tire. If it is used for
anything else, you or others could
be badly injured or killed if the
vehicle slips off the jack. If a jack
is provided with the vehicle, only
use it for changing a flat tire.
If a tire goes flat, avoid further tire
and wheel damage by driving slowly
to a level place, well off the road,
if possible. Turn on the hazard
warning flashers. See Hazard
Warning Flashers on page 6-4.
{Warning
Changing a tire can be
dangerous. The vehicle can slip
off the jack and roll over or fall
causing injury or death. Find a
level place to change the tire. To
help prevent the vehicle from
moving:
1. Set the parking brake firmly.
2. Put an automatic transmission in P (Park) or a
manual transmission in
1 (First) or R (Reverse).
3. Turn off the engine and do not restart while the vehicle
is raised.
4. Do not allow passengers to remain in the vehicle.
5. Place wheel blocks on both sides of the tire at the
opposite corner of the tire
being changed.
Page 342 of 432
Black plate (82,1)Chevrolet Camaro Owner Manual (GMNA-Localizing-U.S./Canada/Mexico-
6042601) - 2014 - CRC - 1/21/14
10-82 Vehicle Care
This vehicle may come with a jack
and spare tire or a tire sealant and
compressor kit. To use the jacking
equipment to change a spare tire
safely, follow the instructions below.
Then seeTire Changing on
page 10-90. To use the tire sealant
and compressor kit, see Tire
Sealant and Compressor Kit on
page 10-82.
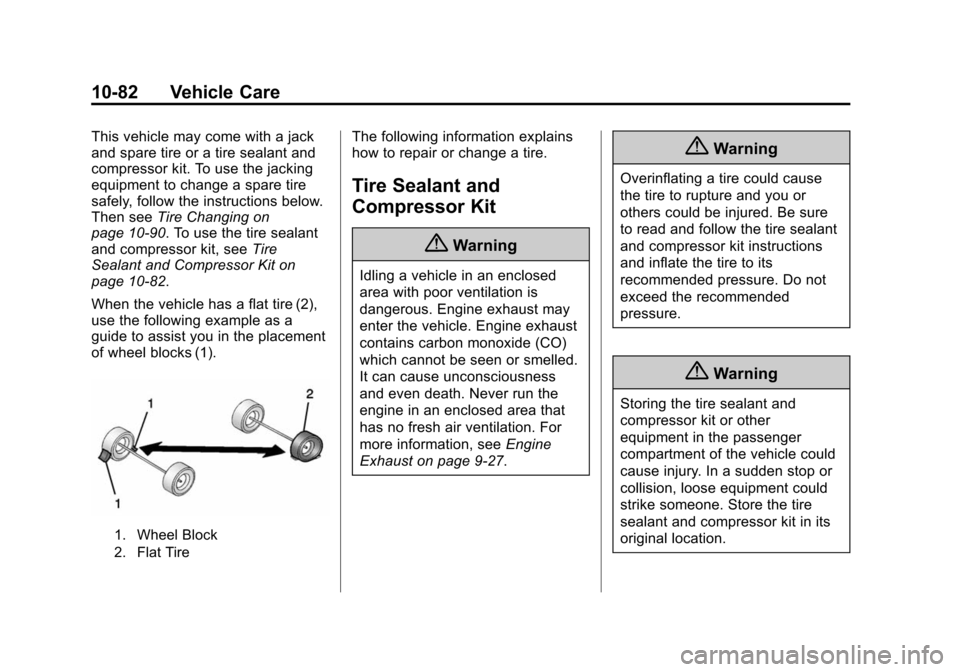
When the vehicle has a flat tire (2),
use the following example as a
guide to assist you in the placement
of wheel blocks (1).
1. Wheel Block
2. Flat Tire
The following information explains
how to repair or change a tire.
Tire Sealant and
Compressor Kit
{Warning
Idling a vehicle in an enclosed
area with poor ventilation is
dangerous. Engine exhaust may
enter the vehicle. Engine exhaust
contains carbon monoxide (CO)
which cannot be seen or smelled.
It can cause unconsciousness
and even death. Never run the
engine in an enclosed area that
has no fresh air ventilation. For
more information, see Engine
Exhaust on page 9-27.
{Warning
Overinflating a tire could cause
the tire to rupture and you or
others could be injured. Be sure
to read and follow the tire sealant
and compressor kit instructions
and inflate the tire to its
recommended pressure. Do not
exceed the recommended
pressure.
{Warning
Storing the tire sealant and
compressor kit or other
equipment in the passenger
compartment of the vehicle could
cause injury. In a sudden stop or
collision, loose equipment could
strike someone. Store the tire
sealant and compressor kit in its
original location.
Page 430 of 432

Black plate (10,1)Chevrolet Camaro Owner Manual (GMNA-Localizing-U.S./Canada/Mexico-
6042601) - 2014 - CRC - 1/21/14
i-10 INDEX
SeatsAdjustment, Front . . . . . . . . . . . . . . 3-3
Head Restraints . . . . . . . . . . . . . . . 3-2
Heated Front . . . . . . . . . . . . . . . . . . 3-6
Power Adjustment, Front . . . . . . 3-4
Rear . . . . . . . . . . . . . . . . . . . . . . . . . . . 3-7
Reclining Seatbacks . . . . . . . . . . . 3-4
Securing Child Restraints . . . . . . . . . . . . . . 3-42, 3-44
Security Messages . . . . . . . . . . . . . . . . . . . . 5-40
OnStar
®. . . . . . . . . . . . . . . . . . . . . . 14-3
Vehicle . . . . . . . . . . . . . . . . . . . . . . . 2-11
Vehicle Alarm . . . . . . . . . . . . . . . . . 2-11
Selective Ride Control . . . . . . . . . 9-44
Service Accessories andModifications . . . . . . . . . . . . . . . . 10-3
Doing Your Own Work . . . . . . . . 10-4
Engine Soon Light . . . . . . . . . . . . 5-16
Maintenance Records . . . . . . .11-15
Maintenance, General Information . . . . . . . . . . . . . . . . . . 11-1
Parts Identification Label . . . . . 12-1 Service (cont'd)
Publications Ordering
Information . . . . . . . . . . . . . . . . .13-11
Scheduling Appointments . . . . . 13-7
Vehicle Messages . . . . . . . . . . . . 5-40
Servicing the Airbag . . . . . . . . . . . 3-26
Shift Lock Control Function Check, Automatic
Transmission . . . . . . . . . . . . . . . . 10-42
Shifting Into Park . . . . . . . . . . . . . . . . . . . . . . 9-24
Out of Park . . . . . . . . . . . . . . . . . . . 9-25
Signals, Turn and Lane-Change . . . . . . . . . . . . . . . . . 6-4
Spare Tire Compact . . . . . . . . . . . . . . . . . . . . 10-96
Specifications and Capacities . . . . . . . . . . . . . . . . . . . . 12-2
Speedometer . . . . . . . . . . . . . . . . . . . 5-9
StabiliTrak OFF Light . . . . . . . . . . . . . . . . . . . . . 5-21
Start Assist, Hills . . . . . . . . . . . . . . 9-38
Start Vehicle, Remote . . . . . . . . . . 2-5 Starter Switch Check . . . . . . . . . 10-42
Starting the Engine . . . . . . . . . . . . 9-21
Steering . . . . . . . . . . . . . . . . . . . . . . . . 9-4
Fluid, Power . . . . . . . . . . . . . . . . 10-37
Wheel Adjustment . . . . . . . . . . . . . 5-2
Wheel Controls . . . . . . . . . . . . . . . . 5-2
Storage
Rear . . . . . . . . . . . . . . . . . . . . . . . . . . . 4-1
Storage Areas Center Console . . . . . . . . . . . . . . . . 4-2
Convenience Net . . . . . . . . . . . . . . 4-5
Glove Box . . . . . . . . . . . . . . . . . . . . . 4-1
Storage Compartments . . . . . . . . . 4-1
Storing the Tire Sealant and Compressor Kit . . . . . . . . . 10-89
Stuck Vehicle . . . . . . . . . . . . . . . . . . 9-14
Sun Visors . . . . . . . . . . . . . . . . . . . . . 2-17
Sunroof . . . . . . . . . . . . . . . . . . . . . . . . 2-18
Symbols . . . . . . . . . . . . . . . . . . . . . . . . . . iv
System Infotainment . . . . . . . . . . . . 7-1, 13-14
Page 431 of 432

Black plate (11,1)Chevrolet Camaro Owner Manual (GMNA-Localizing-U.S./Canada/Mexico-
6042601) - 2014 - CRC - 1/21/14
INDEX i-11
T
Tachometer . . . . . . . . . . . . . . . . . . . . . 5-9
Taillamp Indicator Light . . . . . . . . 5-23
TaillampsTurn Signal andStoplamps . . . . . . . . . . . . . . . . 10-47
Text Telephone (TTY) Users . . . 13-4
Theater Dimming . . . . . . . . . . . . . . . 6-6
Theft-Deterrent Systems . . . . . . . 2-13
Immobilizer . . . . . . . . . . . . . . . . . . . 2-13
Time . . . . . . . . . . . . . . . . . . . . . . . . . . . . 5-4
Tires
Buying New Tires . . . . . . . . . . . 10-75
Chains . . . . . . . . . . . . . . . . . . . . . . 10-80
Changing . . . . . . . . . . . . . . . . . . . 10-90
Compact Spare . . . . . . . . . . . . . 10-96
Competition Oriented . . . . . . . 10-58
Designations . . . . . . . . . . . . . . . 10-62
Different Size . . . . . . . . . . . . . . . 10-77
If a Tire Goes Flat . . . . . . . . . . 10-80
Inflation Monitor System . . . . 10-68
Inspection . . . . . . . . . . . . . . . . . . 10-72
Low Profile . . . . . . . . . . . . . . . . . 10-57
Messages . . . . . . . . . . . . . . . . . . . . 5-40
Pressure . . . . . . . . . . . . . . . . . . . . 10-67
Pressure Light . . . . . . . . . . . . . . . . 5-22 Tires (cont'd)
Pressure Monitor System . . . 10-67
Rotation . . . . . . . . . . . . . . . . . . . . 10-72
Sealant and
Compressor Kit . . . . . . . . . . . 10-82
Sealant and Compressor Kit, Storing . . . . . . . . . . . . . . . . 10-89
Sidewall Labeling . . . . . . . . . . . 10-59
Terminology and Definitions . . . . . . . . . . . . . . . . . 10-62
Uniform Tire Quality Grading . . . . . . . . . . . . . . . . . . . 10-77
Wheel Alignment and Tire Balance . . . . . . . . . . . . . . . . . . . 10-79
Wheel Replacement . . . . . . . . 10-79
When It Is Time for New Tires . . . . . . . . . . . . . . . . . . . . . . 10-74
Winter . . . . . . . . . . . . . . . . . . . . . . 10-57
Tonneau Cover . . . . . . . . . . . . . . . . . 4-3
Towing Driving Characteristics . . . . . . . . 9-57
Equipment . . . . . . . . . . . . . . . . . . . . 9-61
General Information . . . . . . . . . . 9-57
Recreational Vehicle . . . . . . . 10-100
Trailer . . . . . . . . . . . . . . . . . . . . . . . . 9-60
Vehicle . . . . . . . . . . . . . . . . . . . . 10-100 Track Events and
Competitive Driving . . . . . . . . . . . 9-6
Traction . . . . . . . . . . . . . . . . . . . . . . . . 5-21 Control OFF/StabiliTrakOFF Light . . . . . . . . . . . . . . . . . . . 5-21
Control System (TCS)/ StabiliTrak
®Light . . . . . . . . . . . . 5-21
Limited-Slip Rear Axle . . . . . . . . 9-44
Off Light . . . . . . . . . . . . . . . . . . . . . . 5-20
Selective Ride Control . . . . . . . . 9-44
Traction Control/Electronic
Stability Control . . . . . . . . . . . . . . 9-39
Trailer Towing . . . . . . . . . . . . . . . . . . . . . . . . 9-60
Transmission Automatic . . . . . . . . . . . . . . . . . . . . . 9-28
Fluid, Automatic . . . . . . . . . . . . 10-21
Fluid, Manual . . . . . . . . . . . . . . . 10-21
Messages . . . . . . . . . . . . . . . . . . . . 5-41
Temperature Gauge . . . . . . . . . . 5-12
Transportation Program,
Courtesy . . . . . . . . . . . . . . . . . . . . . 13-7
Trip Odometer . . . . . . . . . . . . . . . . . . 5-9
Trunk . . . . . . . . . . . . . . . . . . . . . . . . . . . 2-9
Turn and Lane-Change Signals . . . . . . . . . . . . . . . . . . . . . . . . 6-4