2014 CHEVROLET CAMARO air filter
[x] Cancel search: air filterPage 282 of 432

Black plate (22,1)Chevrolet Camaro Owner Manual (GMNA-Localizing-U.S./Canada/Mexico-
6042601) - 2014 - CRC - 1/21/14
10-22 Vehicle Care
Do not remove the cap to check the
fluid level or to top‐off the fluid level.
Remove the cap only when
necessary to add the proper fluid
until the level reaches the MIN line.
Engine Air Cleaner/Filter
(Except ZL1 and Z/28)
SeeEngine Compartment Overview
on page 10-6 for the location of the
engine air cleaner/filter.
When to Inspect the Engine Air
Cleaner/Filter
Inspect the air cleaner/filter at the
scheduled maintenance intervals
and replace it at the appropriate
interval. See Maintenance Schedule
on page 11-3 for more information.
If driving in dusty/dirty conditions,
inspect the filter at each engine oil
change.
How to Inspect the Engine Air
Cleaner/Filter
To inspect the air cleaner/filter,
remove the filter from the vehicle
and lightly shake the filter to release
loose dust and dirt. If the filter
remains covered with dirt, a new
filter is required.
To inspect or replace the engine air
cleaner/filter:
1. Open the hood. See Hood on
page 10-5.
2. Locate the air filter housing on the front of the driver side of the
engine compartment. See
Engine Compartment Overview
on page 10-6.
3.6L V6 Engine Air Cleaner/Filter
Housing Shown (6.2L V8 Engines Similar)
Page 283 of 432

Black plate (23,1)Chevrolet Camaro Owner Manual (GMNA-Localizing-U.S./Canada/Mexico-
6042601) - 2014 - CRC - 1/21/14
Vehicle Care 10-23
3. Loosen the clamp at the duct ofthe air cleaner/filter housing.
4. Unlatch the retaining clips on the air cleaner/filter housing.
5. Lift the cover at the retaining clip location high enough to clear the
retaining clips and pull the cover
outward to remove it from the air
cleaner/filter housing hinges.
6. Pull straight up on the cover; while holding the cover, remove
the air filter.
7. Inspect or replace the air filter. See Maintenance Replacement
Parts on page 11-14.
8. Reverse Steps 1–6 to reinstall the cover.
{Warning
Operating the engine with the air
cleaner/filter off can cause you or
others to be burned. The air
cleaner not only cleans the air; it
(Continued)
Warning (Continued)
helps to stop flames if the engine
backfires. Use caution when
working on the engine and do not
drive with the air cleaner/filter off.
{Caution
If the air cleaner/filter is off, dirt
can easily get into the engine,
which could damage it. Always
have the air cleaner/filter in place
when you are driving.
Engine Air Cleaner/Filter
(ZL1 Only)
SeeEngine Compartment Overview
on page 10-6 for the location of the
engine air cleaner/filter.
{Caution
If water is sprayed and enters the
engine air cleaner/filter intake and
housing, the engine could be
damaged. The repairs would not
be covered by the vehicle
warranty.
When to Inspect the Engine Air
Cleaner/Filter
Inspect the air cleaner/filter at the
scheduled maintenance intervals
and replace it at the appropriate
interval. See Maintenance Schedule
on page 11-3 for more information.
If driving in dusty/dirty conditions,
inspect the filter at each engine oil
change.
Page 284 of 432

Black plate (24,1)Chevrolet Camaro Owner Manual (GMNA-Localizing-U.S./Canada/Mexico-
6042601) - 2014 - CRC - 1/21/14
10-24 Vehicle Care
How to Inspect the Engine Air
Cleaner/Filter
To inspect the air cleaner/filter,
remove the filter from the vehicle
and lightly shake the filter to release
loose dust and dirt. If the filter
remains covered with dirt, a new
filter is required.
To inspect or replace the engine air
cleaner/filter:
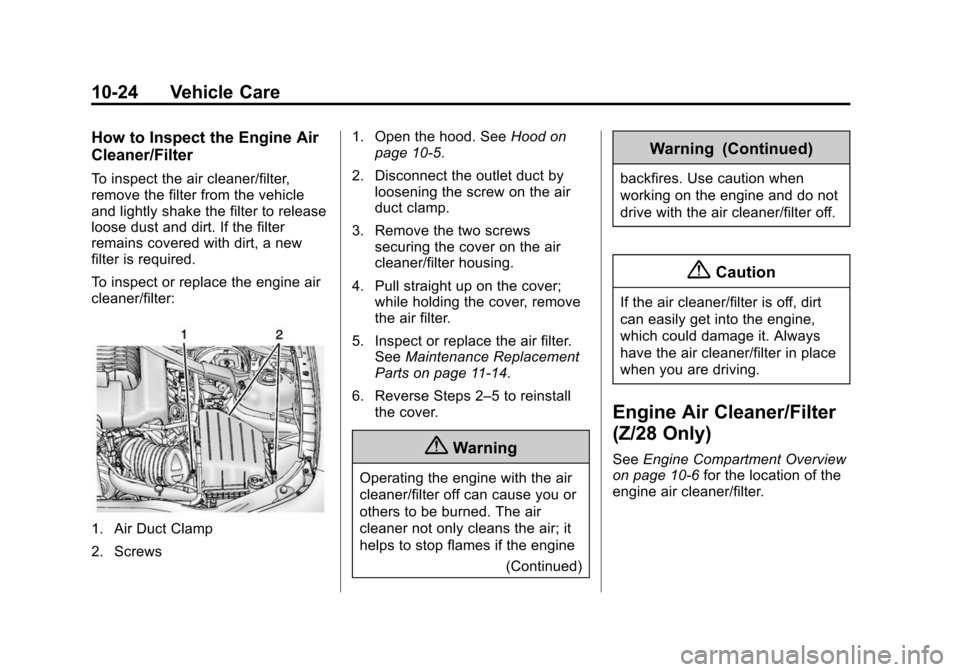
1. Air Duct Clamp
2. Screws1. Open the hood. See
Hood on
page 10-5.
2. Disconnect the outlet duct by loosening the screw on the air
duct clamp.
3. Remove the two screws securing the cover on the air
cleaner/filter housing.
4. Pull straight up on the cover; while holding the cover, remove
the air filter.
5. Inspect or replace the air filter. See Maintenance Replacement
Parts on page 11-14.
6. Reverse Steps 2–5 to reinstall the cover.
{Warning
Operating the engine with the air
cleaner/filter off can cause you or
others to be burned. The air
cleaner not only cleans the air; it
helps to stop flames if the engine
(Continued)
Warning (Continued)
backfires. Use caution when
working on the engine and do not
drive with the air cleaner/filter off.
{Caution
If the air cleaner/filter is off, dirt
can easily get into the engine,
which could damage it. Always
have the air cleaner/filter in place
when you are driving.
Engine Air Cleaner/Filter
(Z/28 Only)
SeeEngine Compartment Overview
on page 10-6 for the location of the
engine air cleaner/filter.
Page 285 of 432

Black plate (25,1)Chevrolet Camaro Owner Manual (GMNA-Localizing-U.S./Canada/Mexico-
6042601) - 2014 - CRC - 1/21/14
Vehicle Care 10-25
{Caution
If water is sprayed and enters the
engine air cleaner/filter intake and
housing, the engine could be
damaged. The repairs would not
be covered by the vehicle
warranty.
When to Inspect the Engine Air
Cleaner/Filter
Inspect the air cleaner/filter at the
scheduled maintenance intervals
and replace it at the appropriate
interval. SeeMaintenance Schedule
on page 11-3 for more information.
If driving in dusty/dirty conditions,
inspect the filter at each engine oil
change.
How to Inspect the Engine Air
Cleaner/Filter
To inspect the air cleaner/filter,
remove the filter from the vehicle
and lightly shake the filter to release loose dust and dirt. If the filter
remains covered with dirt, a new
filter is required.
To inspect or replace the engine air
cleaner/filter:
1. Air Cleaner/Filter Clamp
2. Air Cleaner/Filter Alignment Tabs
1. Open the hood. See
Hood on
page 10-5.
2. Loosen the screw on the air cleaner/filter clamp (1). 3. Remove the filter by moving it
outward while tipping it upward
from the mass air flow sensor
air tube.
4. Inspect or replace the air filter. See Maintenance Replacement
Parts on page 11-14.
5. Using the same air filter/cleaner clamp (1), install the air cleaner/
filter. Make sure that the air
cleaner/filter alignment tabs (2)
are set properly, and tighten the
screw on the clamp.
{Warning
Operating the engine with the air
cleaner/filter off can cause you or
others to be burned. The air
cleaner not only cleans the air; it
helps to stop flames if the engine
backfires. Use caution when
working on the engine and do not
drive with the air cleaner/filter off.
Page 286 of 432

Black plate (26,1)Chevrolet Camaro Owner Manual (GMNA-Localizing-U.S./Canada/Mexico-
6042601) - 2014 - CRC - 1/21/14
10-26 Vehicle Care
{Caution
If the air cleaner/filter is off, dirt
can easily get into the engine,
which could damage it. Always
have the air cleaner/filter in place
when you are driving.
Cooling System (Except
ZL1 and Z/28 Engines)
3.6L V6 Engine
1. Engine Coolant Recovery Bottle 2. Electric Cooling Fans (Out
of View)
3. Radiator Cap (Under Engine Cover)
6.2L V8 Engines (L99 Shown, LS3
Similar)
1. Engine Coolant Recovery Bottle
2. Electric Cooling Fans (Out of View)
3. Radiator Cap (Out of View)
{Warning
An electric engine cooling fan
under the hood can start up even
when the engine is not running
and can cause injury. Keep
hands, clothing, and tools away
from any underhood electric fan.
If the coolant inside the engine
coolant recovery bottle is boiling, do
not do anything else until it cools
down. The vehicle should be parked
on a level surface.
The coolant level should be
between the MIN and MAX lines.
If it is not, the vehicle may have a
leak at the radiator hoses, heater
hoses, radiator, water pump,
or somewhere else in the cooling
system.
Page 305 of 432

Black plate (45,1)Chevrolet Camaro Owner Manual (GMNA-Localizing-U.S./Canada/Mexico-
6042601) - 2014 - CRC - 1/21/14
Vehicle Care 10-45
Bulb Replacement
For the proper type of replacement
bulbs, seeReplacement Bulbs on
page 10-48.
For any bulb‐changing procedure
not listed in this section, contact
your dealer.
Halogen Bulbs
{Warning
Halogen bulbs have pressurized
gas inside and can burst if you
drop or scratch the bulb. You or
others could be injured. Be sure
to read and follow the instructions
on the bulb package.
High Intensity Discharge
(HID) Lighting
{Warning
The high intensity discharge
lighting system operates at a very
high voltage. If you try to service
any of the system components,
you could be seriously injured.
Have your dealer or a qualified
technician service them.
After an HID headlamp bulb has
been replaced, the beam might be a
slightly different shade than it was
originally. This is normal.
Headlamps, Front Turn
Signal and Parking
Lamps (Uplevel Vehicle)
The uplevel model vehicle has an
HID headlamp and a turn signal
lamp on the headlamp assembly.
The parking lamp is also the function of the HID headlamp. See
High Intensity Discharge (HID)
Lighting on page 10-45.
To replace the turn signal bulb:
1. Open the hood. See
Hood on
page 10-5.
2. Press in on the tabs on the sides of the duct, and then push the
duct rearward into the air
cleaner/filter housing.
Page 306 of 432

Black plate (46,1)Chevrolet Camaro Owner Manual (GMNA-Localizing-U.S./Canada/Mexico-
6042601) - 2014 - CRC - 1/21/14
10-46 Vehicle Care
3. Disconnect the wiring harnessand turn the bulb socket
counterclockwise to remove it
from the headlamp assembly.
4. Pull the bulb straight out from the socket.
5. Push the new bulb into the socket and reinstall the socket
into the headlamp assembly by
turning it clockwise.
6. Reconnect the electrical connector. 7. Pull the duct back out of the air
cleaner/filter housing until the
tabs snap the duct back into
position.
Headlamps, Front Turn
Signal and Parking
Lamps (Base Vehicle)
The base model vehicle has a
halogen headlamp and a turn
signal/parking lamp on the
headlamp assembly.
To replace one of these bulbs:
1. Open the hood. See Hood on
page 10-5.
2. Press in on the tabs on the sides
of the duct, and then push the
duct rearward into the air
cleaner/filter housing.
3. Disconnect the wiring harness and turn the bulb socket
counterclockwise to remove it
from the headlamp assembly.
4. Pull the bulb straight out from the socket.
5. Push the new bulb into the socket and reinstall the socket
into the headlamp assembly by
turning it clockwise.
Page 307 of 432

Black plate (47,1)Chevrolet Camaro Owner Manual (GMNA-Localizing-U.S./Canada/Mexico-
6042601) - 2014 - CRC - 1/21/14
Vehicle Care 10-47
6. Reconnect the electricalconnector.
7. Pull the duct back out of the air cleaner/filter housing until the
tabs snap the duct back into
position.
Taillamps, Turn Signal,
and Stoplamps
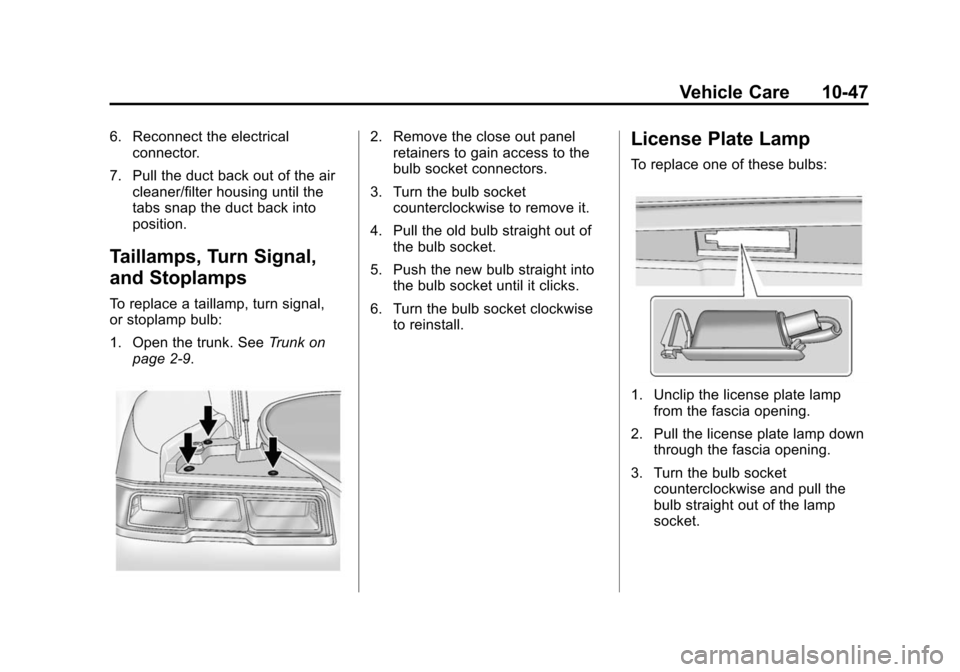
To replace a taillamp, turn signal,
or stoplamp bulb:
1. Open the trunk. See Trunk on
page 2-9.
2. Remove the close out panel retainers to gain access to the
bulb socket connectors.
3. Turn the bulb socket counterclockwise to remove it.
4. Pull the old bulb straight out of the bulb socket.
5. Push the new bulb straight into the bulb socket until it clicks.
6. Turn the bulb socket clockwise to reinstall.License Plate Lamp
To replace one of these bulbs:
1. Unclip the license plate lampfrom the fascia opening.
2. Pull the license plate lamp down through the fascia opening.
3. Turn the bulb socket counterclockwise and pull the
bulb straight out of the lamp
socket.