2014 CADILLAC ELR power steering
[x] Cancel search: power steeringPage 2 of 20

2
Cruise Control/Voice Recognition/Forward Collision Alert/Heated Steering Wheel Buttons
Electric Parking Brake Switch
Instrument Cluster/Driver Information Center
Regen on Demand™ Paddles (behind steering wheel)
Audio Steering Wheel Controls/ 5-way Control
Power Rake/ Telescope Steering Wheel Control
POWER Button
Traction Control and StabiliTrak Button/ Drive Mode Control
Turn Signal Lever/ Pedestrian Safety Signal Lever/Exterior Lamps Control
Memory Seat Buttons
Door Latch Button
Review this guide for an overview of some important features in your Cadillac ELR. Some optional equipment (denoted by ♦) described in this guide may not be included in your vehicle. More detailed information can be found in your Owner Manual.
Instrument Panel Controls
Charging Status Indicator
Heated Seat Buttons
Climate Controls
Windshield Wipers Lever
Hazard Warning Flashers/Lane Departure Warning Buttons
CUE Touch Screen
Glove Box/ Parking Assist Buttons
Audio System Controls
Power Mirror and Window Controls
Page 5 of 20

POWER Button
5
The ELR features an electronic pushbutton start. The POWER button is located to the right of the steering wheel, near the top of the instrument panel.
The Remote Keyless Entry transmitter must be in the vehicle to start the ELR.
Starting the Vehicle/ON
With the vehicle in Park or Neutral, press the brake pedal and then press the POWER button. A power ON audio cue will sound.
The vehicle will not shift out of Park and will display a Charge Cord Connected message if the vehicle is still plugged in.
When ON, the instrument cluster will display an active battery and fuel gauge. The engine will start only if needed.
The READY READY light will display on the instrument cluster when the vehicle is ready to be driven.
Stopping the Vehicle/OFF
Shift to Park and then press the POWER button. A power OFF audio cue will sound.
Note: The air conditioning compressor, pumps and fan may run at any time, even when the vehicle is OFF, to cool or warm the high voltage propulsion battery.
Pressing and holding the POWER button for more than five seconds without pressing the brake pedal will place the vehicle in Service Only \
Mode. The instruments and audio systems will operate as they do with the vehicle ON, but the vehicle will not be able to be driven. Press the
POWER button again to turn off the vehicle.
Conditions for the Engine Starting
When vehicle power is ON, the engine may start indepen-dent of the vehicle being plugged in or completely charged. Conditions that may cause the engine to start include:
• High voltage propulsion battery charge is low
• High voltage propulsion battery temperature is hot or cold
• Cold ambient temperatures
• Hood is open
• Engine and Fuel Maintenance Modes (occur only if the engine has had very limited operation over a long period)
See Driving and Operating in your Owner Manual.
Remote Keyless Entry
Page 7 of 20

7
Instrument Cluster Display
The instrument cluster
features an LCD screen that can be configured in four different themes.
Classic – Displays basic information on speed, range and other operations.
Classic Enhanced – Displays basic information plus driving efficiency and power usage information.
Modern – Displays basic information on speed, range and other operations along with an efficiency ring that glows green to yellow based on driving efficiency.
Modern Enhanced – Displays basic information and the efficiency ring plus additional power usage information.
Cluster Display Zones
Press the left or right side of the 5-way control on the right side of the steering wheel to move between the different display zones.
Press the 5-way control up or down to scroll through the display menus.
Press SEL to select a highlighted item.
Cluster Configurations
1. Use the 5-way control to select the Configurations page in the left display zone on the cluster.
2. Press SEL (Select) to display the Configurations menu.
3. Scroll to highlight one of the cluster configurations; press SEL.
4. Press to exit the menu.
Cluster Tutorial
To view tutorials about the features of the instru-ment cluster, with the vehicle in Park, use the 5-way control to select Tutorials from the Settings menu.
See Instruments and Controls in your Owner Manual.Configurable Cluster
Classic Enhanced theme shown
Modern Enhanced theme shown
Page 8 of 20

8
Efficiency
Driving Style
Your driving style plays a large role in the efficiency of the vehicle. Avoid rapid acceleration or deceleration to help maximize energy efficiency and range. Electric range is maximized at 50 mph and below; higher speeds use more energy and significantly reduce electric range.
Driver-Selected Operating Modes
Press the MODE button on the center console to scroll through a menu of operating modes when more performance is needed. After three seconds, the highlighted mode will become active.
Tour (Default) – Use in normal driving conditions for efficient operation; is active each time the vehicle is started.
Sport – Increases throttle response and adjusts
steering and suspension settings for a sportier driving experience.
Mountain – Use when planning to drive in mountainous terrain (long grades of 5% or higher); reserves battery power to maintain higher speeds on steep grades.
Hold – Use to preserve electric range for later use. Range-extending operation will engage.
Efficiency Gauge
Use the 5-way control to select an instrument
cluster theme that
displays the green ring or leaf indicator.
While driving, try to keep the ring green or the leaf in the center of the gauge. The ring will turn yellow or the leaf will move up or down during inefficient acceleration or aggressive braking, depending on the cluster theme.
Regen on Demand™
Regen on Demand temporarily regenerates energy from the vehicle’s momentum and stores it in the high voltage propulsion battery for later use.
To activate Regen on Demand, pull and hold either paddle on the back of the steering wheel without pressing the brake pedal or accelerator pedal.
While pulling either paddle, the vehicle will begin to decelerate using regenerative braking. Regen on Demand is deactivated once the paddles are released, or the brake pedal or accelerator pedal is pressed.
See Driving and Operating in your Owner Manual.
Drive Modes
Page 12 of 20

12
Climate Controls
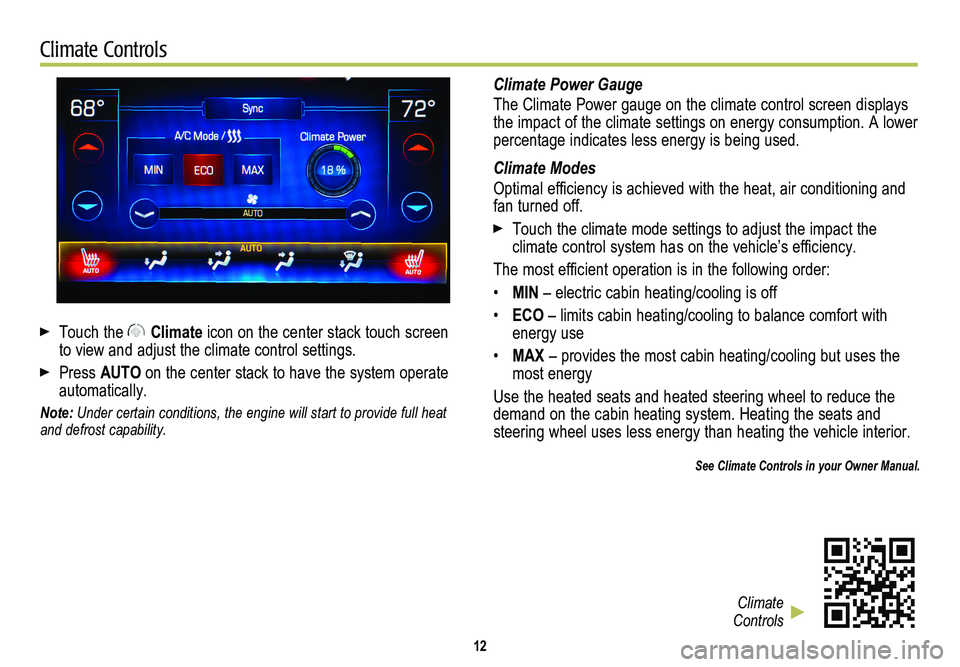
Touch the Climate icon on the center stack touch screen to view and adjust the climate control settings.
Press AUTO on the center stack to have the system operate automatically.
Note: Under certain conditions, the engine will start to provide full heat and defrost capability.
Climate Power Gauge
The Climate Power gauge on the climate control screen displays the impact of the climate settings on energy consumption. A lower percentage indicates less energy is being used.
Climate Modes
Optimal efficiency is achieved with the heat, air conditioning and fan turned off.
Touch the climate mode settings to adjust the impact the
climate control system has on the vehicle’s efficiency.
The most efficient operation is in the following order:
• MIN – electric cabin heating/cooling is off
• ECO – limits cabin heating/cooling to balance comfort with energy use
• MAX – provides the most cabin heating/cooling but uses the most energy
Use the heated seats and heated steering wheel to reduce the demand on the cabin heating system. Heating the seats and steering wheel uses less energy than heating the vehicle interior.
See Climate Controls in your Owner Manual.
Climate Controls
Page 13 of 20

Some vehicle features can be customized using the controls on the infotainment system. The Vehicle Settings menu may include Climate and Air Quality; Collision/Detection Systems; Comfort and Convenience; Energy; Lighting; Power Door Locks; and Remote Lock, Unlock, Start.
1. Touch Settings on the Home page.
2. Touch Vehicle from the Settings menu.
3. Touch the desired menu item.
4. Touch the desired feature and setting.
5. Touch < Back to exit each menu.
See Instruments and Controls in your Owner Manual.
13
Vehicle PersonalizationSeat and Steering Wheel Adjustment
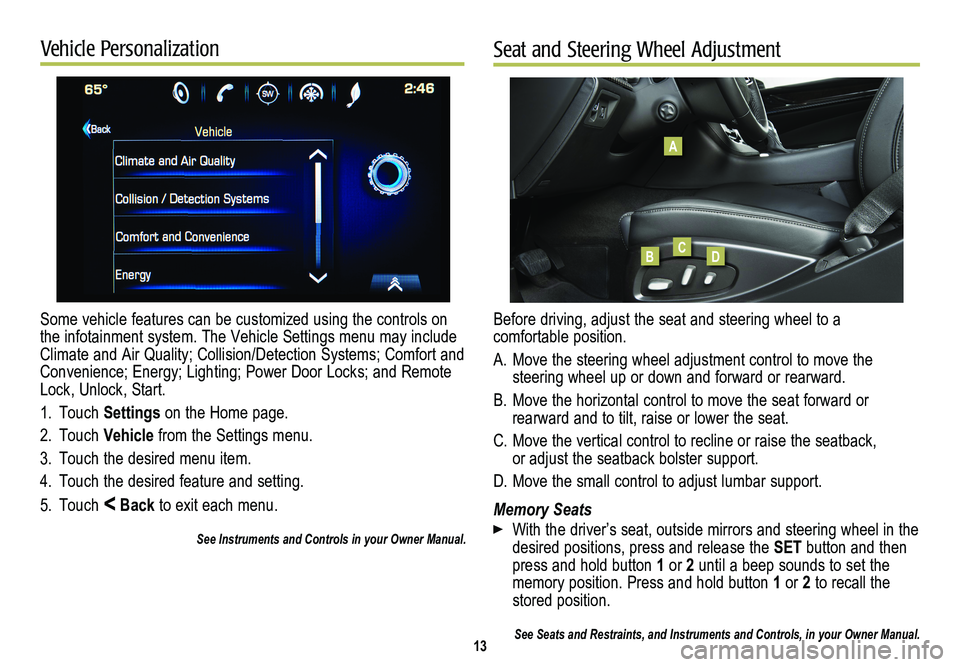
Before driving, adjust the seat and steering wheel to a comfortable position.
A. Move the steering wheel adjustment control to move the
steering wheel up or down and forward or rearward.
B. Move the horizontal control to move the seat forward or
rearward and to tilt, raise or lower the seat.
C. Move the vertical control to recline or raise the seatback, or adjust the seatback bolster support.
D. Move the small control to adjust lumbar support.
Memory Seats
With the driver’s seat, outside mirrors and steering wheel in the desired positions, press and release the SET button and then press and hold button 1 or 2 until a beep sounds to set the memory position. Press and hold button 1 or 2 to recall the stored position.
See Seats and Restraints, and Instruments and Controls, in your Owner Ma\
nual.
A
BCD