2014 BMW X6 XDRIVE 50I engine
[x] Cancel search: enginePage 287 of 323
Once the BMW Response Center has re‐
ceived your Emergency Request, the BMW
Response Center contacts you and takes
further steps to help you.
Even if you are unable to respond, the
BMW Response Center can take further
steps to help you under certain circum‐
stances.
For this purpose, data that are used to de‐
termine the necessary rescue measures,
such as the current position of the vehicle
if it can be established, are transmitted to
the BMW Response Center.▷If the LED is flashing but the BMW Re‐
sponse Center cannot be heard on the
hands-free system, the hands-free system
may be malfunctioning. However, the
BMW Response Center may still be able to
hear you.
Initiating an Emergency Request
automatically
Under certain conditions, an Emergency Re‐
quest is automatically initiated immediately af‐
ter a severe accident. Automatic Collision Noti‐
fication is not affected by pressing the SOS
button.
Roadside Assistance
Service availability Roadside Assistance can be reached around
the clock in many countries. You can obtain as‐
sistance there in the event of a vehicle break‐
down.
Roadside Assistance The Roadside Assistance, refer to page 252,
phone number can be viewed on the iDrive or a
connection to Roadside Assistance can be es‐
tablished directly.
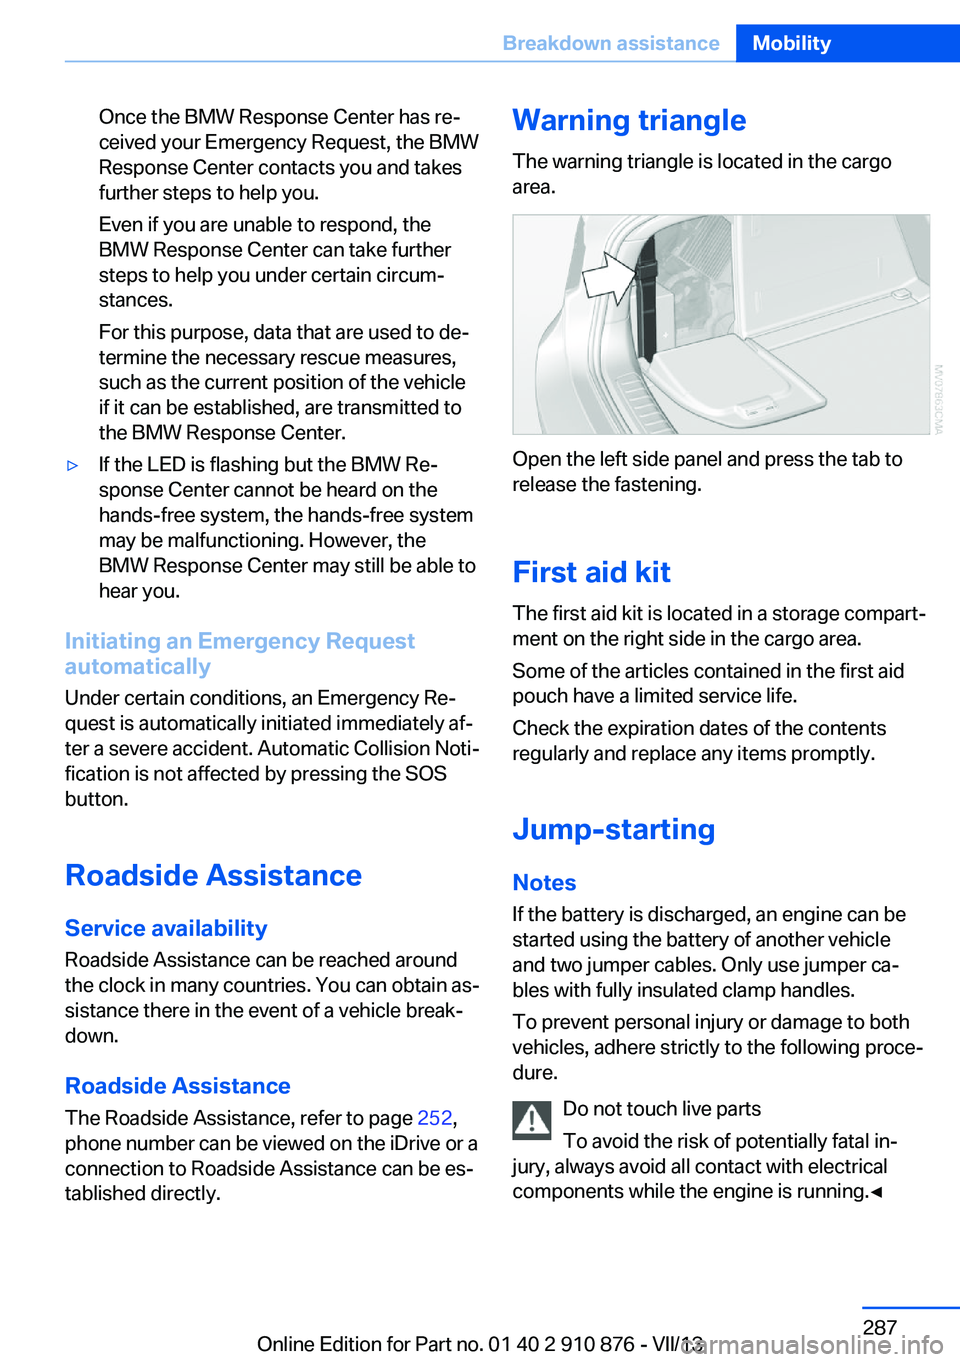
Warning triangle
The warning triangle is located in the cargo
area.
Open the left side panel and press the tab to
release the fastening.
First aid kit
The first aid kit is located in a storage compart‐
ment on the right side in the cargo area.
Some of the articles contained in the first aid
pouch have a limited service life.
Check the expiration dates of the contents
regularly and replace any items promptly.
Jump-starting Notes
If the battery is discharged, an engine can be
started using the battery of another vehicle
and two jumper cables. Only use jumper ca‐
bles with fully insulated clamp handles.
To prevent personal injury or damage to both
vehicles, adhere strictly to the following proce‐
dure.
Do not touch live parts
To avoid the risk of potentially fatal in‐
jury, always avoid all contact with electrical
components while the engine is running.◀
Seite 287Breakdown assistanceMobility287
Online Edition for Part no. 01 40 2 910 876 - VII/13
Page 288 of 323
Preparation1.Check whether the battery of the other ve‐
hicle has a voltage of 12 volts and approxi‐
mately the same capacitance in Ah. This
information can be found on the battery.2.Switch off the engine of the assisting vehi‐
cle.3.Switch off any electronic systems/power
consumers in both vehicles.
Bodywork contact between vehicles
There must not be any contact between
the bodies of the two vehicles, otherwise there
is a danger of shorting.◀
Starting aid terminals Connecting order
Connect the jumper cables in the correct
order; otherwise, there is the danger of injury
from sparking.◀
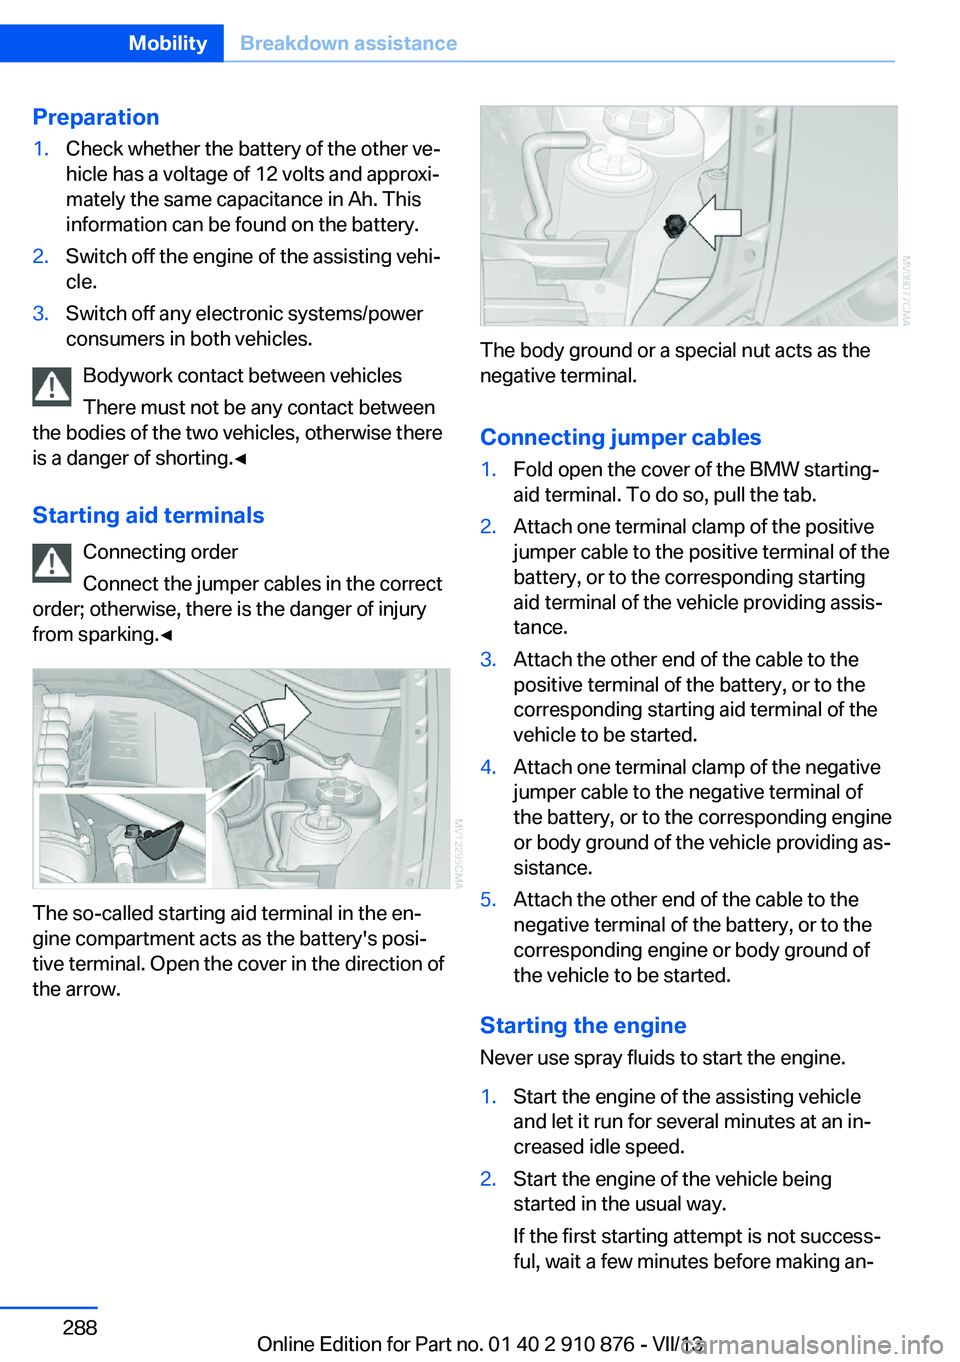
The so-called starting aid terminal in the en‐
gine compartment acts as the battery's posi‐
tive terminal. Open the cover in the direction of
the arrow.
The body ground or a special nut acts as the
negative terminal.
Connecting jumper cables
1.Fold open the cover of the BMW starting-
aid terminal. To do so, pull the tab.2.Attach one terminal clamp of the positive
jumper cable to the positive terminal of the
battery, or to the corresponding starting
aid terminal of the vehicle providing assis‐
tance.3.Attach the other end of the cable to the
positive terminal of the battery, or to the
corresponding starting aid terminal of the
vehicle to be started.4.Attach one terminal clamp of the negative
jumper cable to the negative terminal of
the battery, or to the corresponding engine
or body ground of the vehicle providing as‐
sistance.5.Attach the other end of the cable to the
negative terminal of the battery, or to the
corresponding engine or body ground of
the vehicle to be started.
Starting the engine
Never use spray fluids to start the engine.
1.Start the engine of the assisting vehicle
and let it run for several minutes at an in‐
creased idle speed.2.Start the engine of the vehicle being
started in the usual way.
If the first starting attempt is not success‐
ful, wait a few minutes before making an‐Seite 288MobilityBreakdown assistance288
Online Edition for Part no. 01 40 2 910 876 - VII/13
Page 289 of 323
other attempt in order to allow the dis‐
charged battery to recharge.3.Let both engines run for several minutes.4.Disconnect the jumper cables in the re‐
verse order.
Check the battery and recharge if necessary.
Tow-starting and towing Observe applicable laws and regulations
Observe applicable laws and regulations
for tow-starting and towing.◀
No additional passengers
Do not transport any passengers other
than the driver in a vehicle that is being
towed.◀
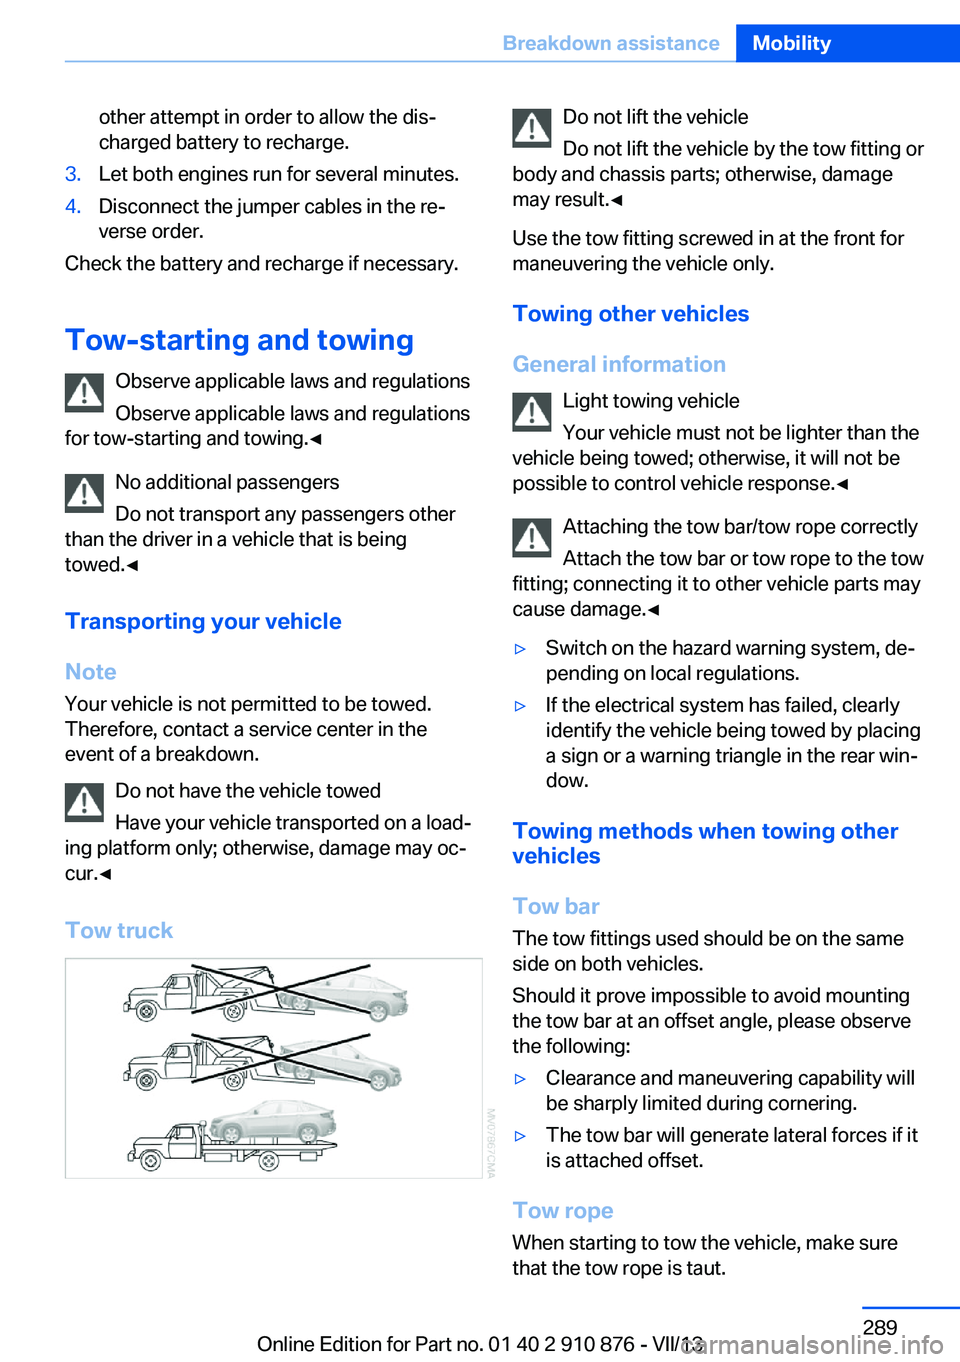
Transporting your vehicle
Note Your vehicle is not permitted to be towed.
Therefore, contact a service center in the
event of a breakdown.
Do not have the vehicle towed
Have your vehicle transported on a load‐
ing platform only; otherwise, damage may oc‐
cur.◀
Tow truck
Do not lift the vehicle
Do not lift the vehicle by the tow fitting or
body and chassis parts; otherwise, damage
may result.◀
Use the tow fitting screwed in at the front for
maneuvering the vehicle only.
Towing other vehicles
General information Light towing vehicle
Your vehicle must not be lighter than the
vehicle being towed; otherwise, it will not be
possible to control vehicle response.◀
Attaching the tow bar/tow rope correctly
Attach the tow bar or tow rope to the tow
fitting; connecting it to other vehicle parts may
cause damage.◀▷Switch on the hazard warning system, de‐
pending on local regulations.▷If the electrical system has failed, clearly
identify the vehicle being towed by placing
a sign or a warning triangle in the rear win‐
dow.
Towing methods when towing other
vehicles
Tow bar The tow fittings used should be on the same
side on both vehicles.
Should it prove impossible to avoid mounting
the tow bar at an offset angle, please observe
the following:
▷Clearance and maneuvering capability will
be sharply limited during cornering.▷The tow bar will generate lateral forces if it
is attached offset.
Tow rope
When starting to tow the vehicle, make sure
that the tow rope is taut.
Seite 289Breakdown assistanceMobility289
Online Edition for Part no. 01 40 2 910 876 - VII/13
Page 290 of 323
To avoid jerking and the associated stresses
on the vehicle components when towing, al‐
ways use nylon ropes or nylon straps.
Attaching the tow rope correctly
Only secure the tow rope on the tow fit‐
ting; otherwise, damage can occur when it is
secured on other parts of the vehicle.◀
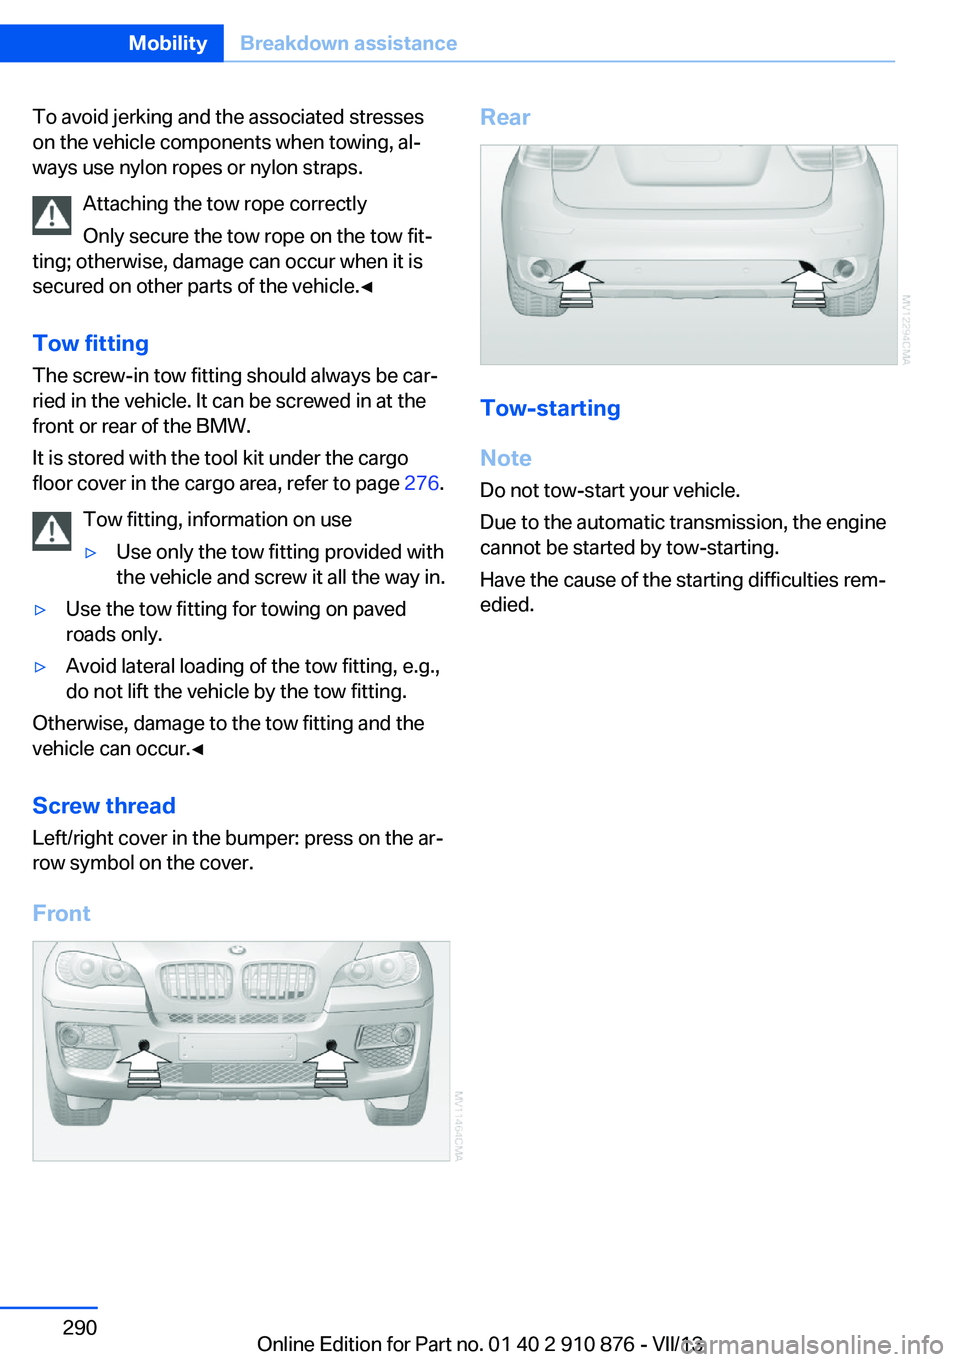
Tow fitting
The screw-in tow fitting should always be car‐
ried in the vehicle. It can be screwed in at the
front or rear of the BMW.
It is stored with the tool kit under the cargo
floor cover in the cargo area, refer to page 276.
Tow fitting, information on use▷Use only the tow fitting provided with
the vehicle and screw it all the way in.▷Use the tow fitting for towing on paved
roads only.▷Avoid lateral loading of the tow fitting, e.g.,
do not lift the vehicle by the tow fitting.
Otherwise, damage to the tow fitting and the
vehicle can occur.◀
Screw thread Left/right cover in the bumper: press on the ar‐
row symbol on the cover.
Front
Rear
Tow-starting
Note Do not tow-start your vehicle.
Due to the automatic transmission, the engine
cannot be started by tow-starting.
Have the cause of the starting difficulties rem‐
edied.
Seite 290MobilityBreakdown assistance290
Online Edition for Part no. 01 40 2 910 876 - VII/13
Page 291 of 323
CareVehicle equipmentThis chapter describes all series equipment as
well as country-specific and special equipment
offered for this model series.Therefore, it also
describes equipment that may not be found in
your vehicle, for instance due to the selected
special equipment or the country version. This
also applies to safety-related functions and
systems.
Car washes
Notes Steam jets or high-pressure washers
When using steam jets or high-pressure
washers, hold them a sufficient distance away
and use a maximum temperature of
140 ℉/60 ℃.
Holding them too close or using excessively
high pressures or temperatures can cause
damage or preliminary damage that may then lead to long-term damage.
Follow the operating instructions for the high-
pressure washer.◀
Cleaning sensors/cameras with high-
pressure washers
When using high-pressure washers, do not
spray the exterior sensors and cameras, for
Park Distance Control or the backup camera,
for instance, for extended periods of time and
only from a distance of at least 12 in/30 cm.◀
Regularly remove foreign bodies, such as
leaves, from the area below the windshield
when the hood is open.
Wash your vehicle frequently, particularly in
winter.
Intense soiling and road salt can damage the
vehicle.Washing in automatic car washes
Give preference to cloth car washes or those
that use soft brushes in order to avoid paint
damage.
Notes
Note the following:▷Make sure that the wheels and tires are not
damaged by the transport mechanisms.▷Fold in the exterior mirrors; otherwise, they
may be damaged, depending on the width
of the vehicle.▷Deactivate rain sensor, refer to page 66, to
prevent unintentional wiper action.▷Remove additional attachments, for in‐
stance a spoiler or telephone antenna, if
there is a risk that these may be damaged.
Guide rails in car washes
Avoid car washes with guide rails higher
than 4 in/10 cm; otherwise, the vehicle body
could be damaged.◀
Before driving into a car wash The vehicle is able to roll if the following steps
are taken.
1.Insert the remote control into the ignition
lock, even with Comfort Access.2.Engage transmission position N.3.Release the parking brake.4.Deactivating Automatic Hold, refer to
page 62.5.Switch the engine off.6.Leave the remote control in the ignition
lock so that the vehicle can roll.
Transmission position P will be engaged:
▷Automatically after approx. 30 minutes.Seite 291CareMobility291
Online Edition for Part no. 01 40 2 910 876 - VII/13
Page 308 of 323
Everything from A to Z
IndexA ABS, Antilock Brake Sys‐ tem 96
ACC Active Cruise Con‐ trol 102
Accident, refer to Emergency Request, initiating 286
Acoustic signal, refer to Check Control 76
Activated-charcoal filter 126
Active Cruise Control ACC 102
Active cruise control, indica‐ tor lamp 106
Active Cruise Control, radar sensor 106
Active Cruise Control, select‐ ing the distance 104
Active Cruise Control, warn‐ ing lamps 106
Active seat 47
Active seat ventilation 46
Active steering 101
Adaptive brake lights, refer to Brake force display 95
Adaptive Drive 100
Adaptive fixing system 140
Adaptive Light Control 82
Additional telephone 226
Additives, coolant 273
Additives, engine oil 272
After washing vehicle 292
Airbags 86
Airbags, indicator/warning light 88
Air circulation, refer to Recir‐ culated air mode 124
Air distribution, auto‐ matic 122, 127
Air distribution, manual 124 Air drying, refer to Cooling
function 124
Air flow rate 123
Air flow rate, blower, refer to Air volume 127
Airing, refer to Ventila‐ tion 125
Air pressure, refer to Tire in‐ flation pressure 262
Air vents 121
Air vents, refer to Ventila‐ tion 125
Alarm system 39
Alarm system– Avoiding unintentional
alarms 40– Ending an alarm 40– Interior motion sensor 40– Tilt alarm sensor 40
All around the headliner 17
All-season tires, refer to Win‐ ter tires 268
All-wheel drive, refer to
xDrive 98
Alternating-code hand-held transmitter 130
AM/FM station 182
Announcement, navigation, refer to Spoken instruc‐
tions 171
Antifreeze, coolant 273
Antifreeze, washer fluid 66
Antilock Brake System, ABS 96
Anti-slip control, refer to Dy‐ namic Stability Control
DSC 96
Anti-theft protection 32
Appointments 244
Approved axle loads, refer to Weights 298
Approved engine oils 272
Approved gross vehicle weight, refer to
Weights 298
Armrest, refer to Center arm‐ rest 138
Arrival time, refer to Com‐ puter 73
Ashtray 133
Ashtray, front 133
Ashtray, rear 133
Assistance, Roadside Assis‐ tance 287
Assistance with driving off, refer to Drive-off assis‐
tant 100
Assistance with starting en‐ gine, refer to Jump-start‐
ing 287
Audio CD with rear DVD sys‐ tem 216
Audio device, external 138
Audio playback 191
Audio playback, Blue‐ tooth 205
Automatic, air distribu‐ tion 122, 127
Automatic air distribu‐ tion 127
Automatic, air flow rate 122
Automatic car wash 291
Automatic climate con‐ trol 121
Automatic climate control, automatic air distribu‐
tion 122, 127
Automatic climate control, in rear 126
Automatic climate control in rear, activating on Control
Display 126 Seite 308ReferenceEverything from A to Z308
Online Edition for Part no. 01 40 2 910 876 - VII/13
Page 309 of 323
Automatic climate control inrear, air supply 127
Automatic climate control in rear, deactivating on Control
Display 126
Automatic climate control in rear, switching off 127
Automatic climate control, switching off 125, 127
Automatic climate control, ventilation in rear 126
Automatic climate control, with 2-zone control 122
Automatic climate control, with 4-zone control 126
Automatic, cruise control 109
Automatic Cruise Con‐ trol 102
Automatic Curb Monitor 52
Automatic headlamp con‐ trol 81, 82
Automatic Hold 62
Automatic Hold, activating 62
Automatic Hold, deactivat‐ ing 62
Automatic Hold, parking 63
Automatic recirculated air control 124
Automatic Soft Closing, doors 35
Automatic tailgate opera‐ tion 36
Automatic transmission with Steptronic 67
Automatic transmission with
Steptronic– Kickdown 67
AUTO program with auto‐
matic climate con‐
trol 122 , 127
AUX-IN port 138, 202
Average fuel consumption 73
Average fuel consumption, setting the units 79
Average speed 72
Average speed, refer to Com‐ puter 72
Axle loads, refer to
Weights 298
B
Backrest curvature, refer to Lumbar support 45
Backrest width 45
Back seats, adjusting the head restraints 50
Backup camera 113
Backup camera, obstacle marking 115
Backup camera, pathway lines 114
Backup camera, turning lines 114
Balance 180
Band-aids, refer to First aid kit 287
Bass 180
Battery– Remote control 30
Battery change, remote con‐
trol for rear DVD sys‐
tem 212
Battery disposal 284
Battery, refer to Vehicle bat‐ tery 283
Battery replacement, remote control for vehicle 39
Before entering the car wash 291
Belts, refer to Safety belts 47
Belt tensioners, refer to Safety belts 47
Beverage holder, refer to Cu‐ pholder 139
Black and white map dis‐ play 174
Blower, refer to Air flow rate 123
Bluetooth audio 205
Bluetooth connection, acti‐ vating/deactivating 227
BMW Apps 255
BMW EfficientDynamics, re‐
fer to Saving fuel 153
BMW Homepage 6
BMW Internet page 6
BMW maintenance sys‐ tem 274
BMW Online 252
Bottle holder, refer to Cu‐ pholder 139
Brake assistant 96
Brake discs, breaking in 146
Brake fluid, refer to Service requirements 74
Brake force display 95
Brake force distribution, elec‐ tronic 96
Brake lamps, brake force dis‐ play 95
Brake lights, adaptive 95
Brake pads, breaking in 146
Brakes, BMW maintenance system 274
Brakes, parking brake 61
Brakes, service require‐ ments 74
Brake system, BMW mainte‐ nance system 274
Braking, notes 147
Breakdown assistance 287
Breakdown, transporting the vehicle 289
Breaking in 146
Brightness, on the Control Display 79
Bulb replacement, refer to Lamp and bulb replace‐
ment 276
Button for starting the engine, refer to Start/Stop but‐
ton 59
C
Calendar 244
Calibration, driver's seat 49 Seite 309Everything from A to ZReference309
Online Edition for Part no. 01 40 2 910 876 - VII/13
Page 310 of 323
California Proposition 65Warning 7
Camera, care 294
Camera, refer to Backup cam‐ era 113
Camera, side view 118
Camera, Top View 117
Can holder, refer to Cu‐ pholder 139
Car battery, refer to Vehicle battery 283
Car care products 292
Care 291
Care, displays 294
Care, vehicle 292
Cargo 150
Cargo area– Comfort Access 38
Cargo area, capacities 298
Cargo area, enlarging 135
Cargo area lamp, refer to Inte‐ rior lamps 85
Cargo area lid, refer to Tail‐
gate 36
Cargo area, opening/closing, refer to Tailgate 36
Cargo area, refer to Cargo area 135
Cargo cover 135
Cargo, securing with ski bag, refer to Securing cargo 142
Cargo straps, securing cargo 151
Car key, refer to Integrated key/remote control 30
Carpet, care 293
Car phone, installation loca‐ tion, refer to Center arm‐
rest 138
Car phone, refer to Tele‐ phone 226
Car vacuum cleaner, connect‐ ing, refer to Connecting
electrical devices 133
Car wash 291
Catalytic converter, refer to Hot exhaust system 146
CBC, refer to Cornering Brake
Control 96
CBS Condition Based Serv‐ ice 274
CD/DVD 190
CD/DVD changer 194
CD/DVD in rear 211
CD/DVD notes 196
CD, refer to Playing audio tracks, rear DVD sys‐
tem 216
CDs, storing 197
Cell phone 226
Cell phone, installation loca‐ tion, refer to Center arm‐
rest 138
Center armrest, front 138
Center armrest, rear 138
Center brake lamp 280
Center console, refer to Around the center con‐
sole 16
Central locking– Comfort Access 37– From the inside 35– Setting the unlocking char‐
acteristics 32
Central locking system
– From the outside 32– Principle 32
Central screen, refer to Con‐
trol Display 19
Changes, technical, refer to Safety 6
Changing wheels/tires 267
Chassis number, refer to En‐ gine compartment 270
Check Control 76
Children, transporting 54
Child restraint fixing system LATCH 55
Child restraint fixing sys‐ tems 54
Child restraint fixing systems, mounting 54
Child safety locks 57
Child seat, mounting 54
Child seats, refer to Trans‐
porting children safely 54
Chrome parts, care 293
Cigarette lighter, connecting electrical devices 133
Cigarette lighter, refer to Lighter 133
Cigarette lighter socket 133
Circulation of air, refer to Re‐ circulated air mode 124
Cleaning, displays 294
Cleaning your BMW, refer to Care 291
Clock 70
Clock, 12h/24h mode 78
Closing– From the inside 35– From the outside 32
Clothes hooks 138
Cockpit 12
Cold start, refer to Starting the engine 60
Combination instrument, refer to Instrument cluster 14
Combination switch, refer to Turn signal/high beams/
headlamp flasher 64
Combination switch, refer to Washer/wiper system 65
Comfort Access
– Battery replacement 39
Comfort area, refer to Around
the center console 16
Compact wheel, inflation pressure 262
Compartment for remote control, refer to Ignition
lock 59
Compartments, refer to Stor‐ age compart‐
ments 137, 138
Compass, digital 131
Computer 72
Computer, displaying infor‐ mation 72
Computer, displays on the Control Display 73
Seite 310ReferenceEverything from A to Z310
Online Edition for Part no. 01 40 2 910 876 - VII/13