2014 BMW X6 XDRIVE 50I navigation system
[x] Cancel search: navigation systemPage 177 of 323
What to do if...Vehicle equipmentThis chapter describes all series equipment as
well as country-specific and special equipment
offered for this model series.Therefore, it also
describes equipment that may not be found in
your vehicle, for instance due to the selected
special equipment or the country version. This
also applies to safety-related functions and
systems.
What to do if...▷The current transmission position cannot
be displayed?
The vehicle is located in an unrecognized
region, is in a poor reception area, or the
system is currently determining the posi‐
tion. Reception is usually best when you
have an unobstructed view of the sky.▷The destination without street information
is not used for route guidance?
When city has been input, no downtown
can be determined. Input any street in the
selected city and start destination guid‐
ance.▷The destination is not used for route guid‐
ance?
The destination data are not contained in
the navigation data. Select a destination
that is as close as possible to the original.▷Letters for destination input cannot be se‐
lected?
The stored data do not contain the data of
the destination. Select a goal that is as
close as possible to the original.▷Is the map displayed in shades of gray?
"Traffic conditions/gray map" active:The Control Display changes to a black
and white display. This enables a better
view of the traffic bulletins.▷Spoken instructions are no longer output
during route guidance in front of intersec‐
tions?
The area has not yet been fully recorded,
or you have left the recommended route
and the system requires a few seconds to
calculate a new route suggestion.Seite 177What to do if...Navigation177
Online Edition for Part no. 01 40 2 910 876 - VII/13
Page 211 of 323
1.Turn the display screen, arrow 1
The display screen switches off.2.Fold down the display screen, arrow 2.
The display screen is folded out in the reverse
order.
CD/DVD player
Controls
1Press: switch the DVD system on/off
Turn: volume for headphones with jack
plug, left2Eject CD/DVD3 Beginning of track
Stop
Playback, pause, freeze frame
Next track
4CD/DVD slot5Connectors for external device: cinch
sockets6Press: switch the DVD system on/offTurn: volume for headphones with jack
plug, right
Connecting headphones
You can connect headphones with a jack plug
or operate them using the infrared interface.
To enable optimal use of the infrared interface,
use infrared headphones that comply with the
IEC 61603-2 standard.
Compatible infrared headphones and informa‐
tion about supported headphones are available
at your service center.
When using infrared headphones, it is impor‐
tant not to interrupt the infrared connection
between the headphones and the infrared in‐
terface. This means that no obstacle should
come between the two and that the cover of
the infrared interface should not be covered or
scratched. Unfavorable lighting conditions
such as glare from outside can interfere with
reception.
Remote control
1Menu navigation2Volume for headphones with jack plug3Changing track or chapter during CD-,
DVD- or AUX playback, fast forward/rewind4Headphones right/left5Open start menu for DVD systemSeite 211DVD system in rearEntertainment211
Online Edition for Part no. 01 40 2 910 876 - VII/13
Page 212 of 323
Menu navigation
You can use the thumbwheel and buttons 1 to
navigate through the menus.▷Turn the thumbwheel: select a menu item.▷Press the arrow buttons: change between
fields.▷ Press the button: activate the menu
item.
Changing batteries
1.Press the detent and remove the cover.2.Change the batteries. The type and instal‐
lation position are marked on the bottom of
the battery compartment.3.Close the cover.
Take the used battery to a recycling
center or to your service center.
Setting the language of the
DVD system
1.Select a CD/DVD track.2. Press the button.3.Select "Tone".4. Press the button.5.Switch to the top window.6.Select "Language".7. Press the button.8.Select the desired language.9. Press the button.Sound output via speakers
In addition to the headphones, you can also
play the sound via the vehicle speakers.1."CD/Multimedia"2."External devices"3."AUX rear"4."Volume"5.Turn the controller until the desired volume
is set and press the controller.
Switching DVD system on/off
Press the button on the CD-/DVD player or un‐
der the desired screen.
The DVD system switches on automatically
when a CD or DVD is inserted.
Playing CD/DVD
Use the following menu items to access data
from a CD/DVD:
▷Video data via "DVD"▷Audio data via "CD"▷Images "Photo"Seite 212EntertainmentDVD system in rear212
Online Edition for Part no. 01 40 2 910 876 - VII/13
Page 213 of 323
Playing videos from CDs/
DVDs
Country codes of DVDs
Your DVD player only plays DVDs with the
coding of your home region, e.g., Europe=2.
The country codes supported by your DVD are
contained in the information on your DVD.
An overview of the coding zones:CodeRegion1USA, Canada2Japan, Europe, Middle East, South Af‐
rica3Southeast Asia4Australia, Central and South America,
New Zealand5Northwest Asia, North Africa6China
DVDs with the code 0 can be played on all de‐
vices.
Starting playback
1.Push the CD/DVD into the drive with the la‐
beled side facing upward. The CD/DVD is
automatically pulled in.▷Playback begins automatically after a
few seconds.▷Otherwise: select "DVD".2.If the DVD control or the DVD-specific
menu is displayed when a DVD is inserted,
use the remote control buttons for menu
navigation to select the desired option.
Or:
Press the button on the CD/DVD
player.
You can control the playback with the buttons
on the CD/DVD player or the DVD control.
Video CDs (VCDs) and Super Video CDs
(SVCDs) can only be played if they do not have
a DVD-specific menu.
Eject CD/DVD
Press the button on the CD/DVD player.
The DVD emerges slightly from the drive.
DVD control With the DVD control, you can select the title
and chapter, open the DVD-specific menu, and
operate functions such as Language, Fast for‐
ward and Reverse or Freeze frame.
A DVD can briefly deactivate functions of the
DVD control, under certain circumstances
while the entire DVD is being played. It is not
possible to operate the DVD control under
these circumstances. In this case, try to make
the selection using the DVD-specific menu.
1. Press the button on the remote con‐
trol during playback.2.Press the buttons on the remote con‐
trol or turn the thumbwheel to select the
desired function.3. Press the button.SymbolFunction Exit DVD control"SET"Settings for playing DVDs. Start playback. Stop playback.Seite 213DVD system in rearEntertainment213
Online Edition for Part no. 01 40 2 910 876 - VII/13
Page 219 of 323
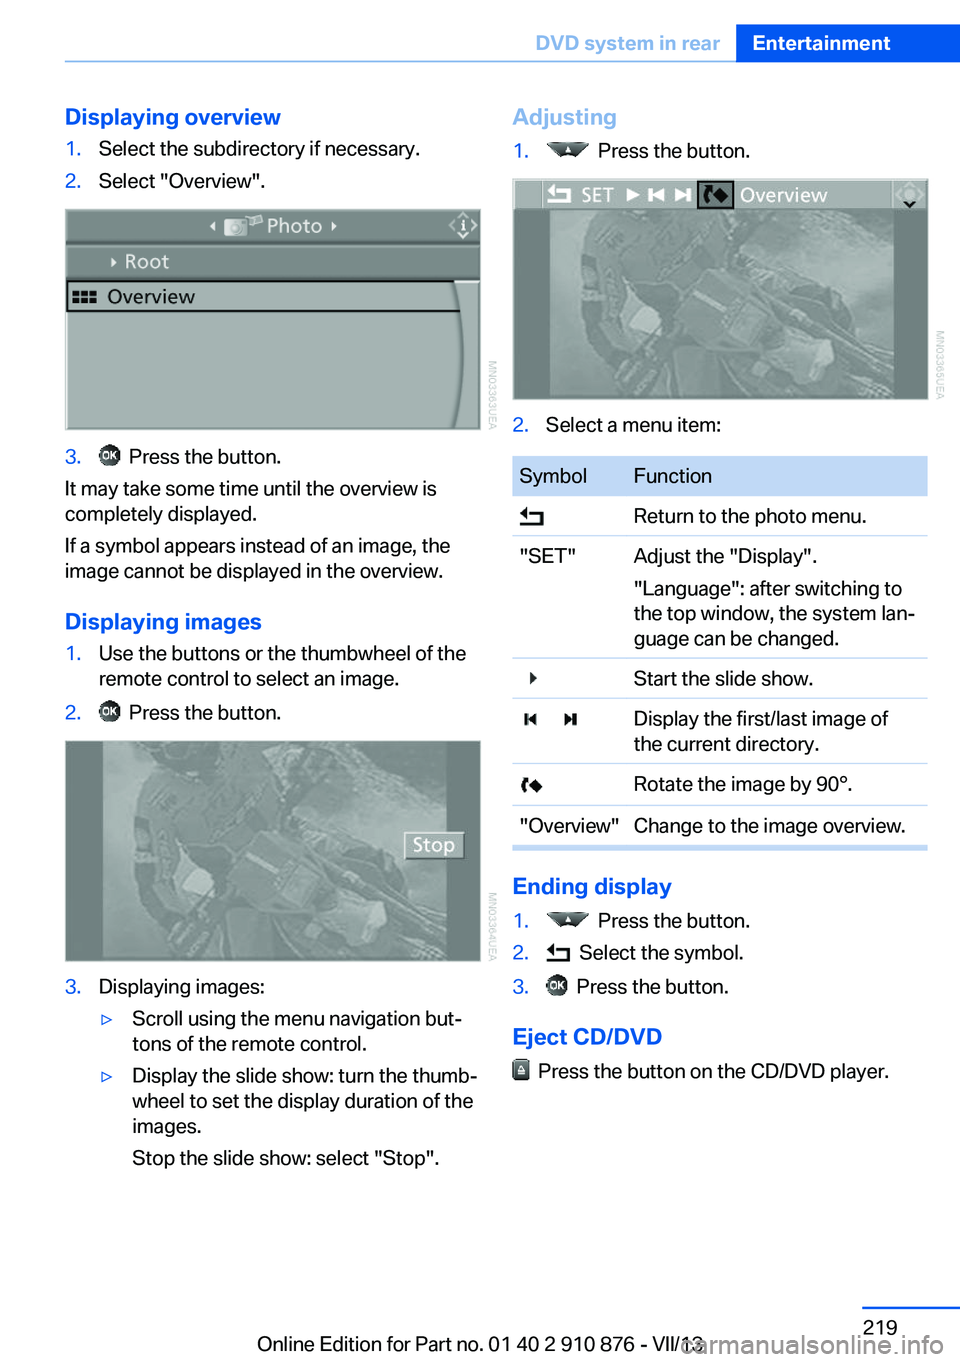
Displaying overview1.Select the subdirectory if necessary.2.Select "Overview".3. Press the button.
It may take some time until the overview is
completely displayed.
If a symbol appears instead of an image, the
image cannot be displayed in the overview.
Displaying images
1.Use the buttons or the thumbwheel of the
remote control to select an image.2. Press the button.3.Displaying images:▷Scroll using the menu navigation but‐
tons of the remote control.▷Display the slide show: turn the thumb‐
wheel to set the display duration of the
images.
Stop the slide show: select "Stop".Adjusting1. Press the button.2.Select a menu item:SymbolFunction Return to the photo menu."SET"Adjust the "Display".
"Language": after switching to
the top window, the system lan‐
guage can be changed. Start the slide show. Display the first/last image of
the current directory. Rotate the image by 90°."Overview"Change to the image overview.
Ending display
1. Press the button.2. Select the symbol.3. Press the button.
Eject CD/DVD
Press the button on the CD/DVD player.
Seite 219DVD system in rearEntertainment219
Online Edition for Part no. 01 40 2 910 876 - VII/13
Page 241 of 323
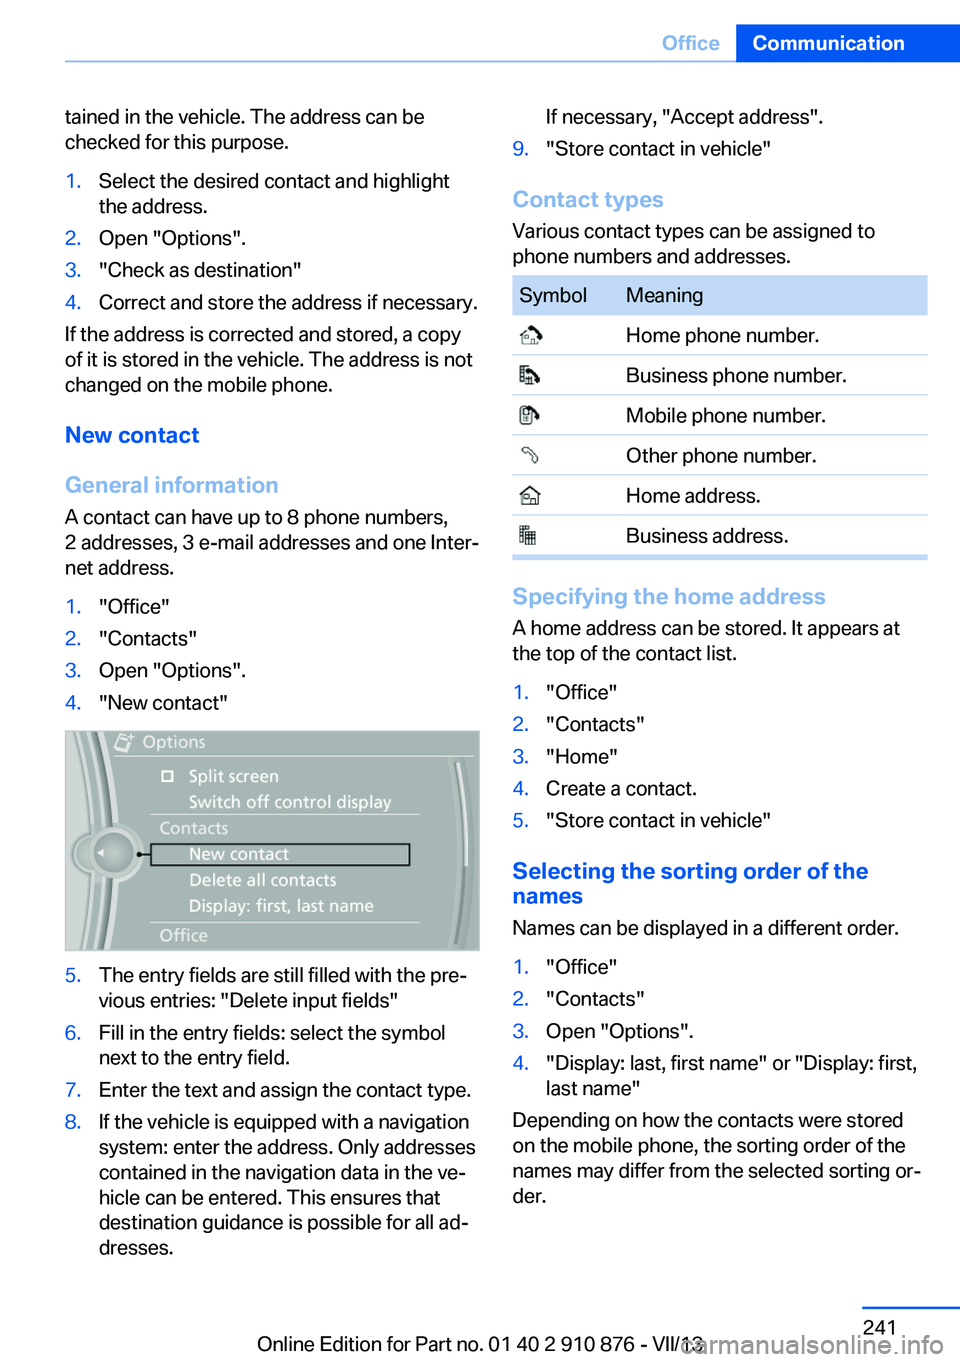
tained in the vehicle. The address can be
checked for this purpose.1.Select the desired contact and highlight
the address.2.Open "Options".3."Check as destination"4.Correct and store the address if necessary.
If the address is corrected and stored, a copy
of it is stored in the vehicle. The address is not
changed on the mobile phone.
New contact
General information
A contact can have up to 8 phone numbers,
2 addresses, 3 e-mail addresses and one Inter‐
net address.
1."Office"2."Contacts"3.Open "Options".4."New contact"5.The entry fields are still filled with the pre‐
vious entries: "Delete input fields"6.Fill in the entry fields: select the symbol
next to the entry field.7.Enter the text and assign the contact type.8.If the vehicle is equipped with a navigation
system: enter the address. Only addresses
contained in the navigation data in the ve‐
hicle can be entered. This ensures that
destination guidance is possible for all ad‐
dresses.If necessary, "Accept address".9."Store contact in vehicle"
Contact types
Various contact types can be assigned to
phone numbers and addresses.
SymbolMeaning Home phone number. Business phone number. Mobile phone number. Other phone number. Home address. Business address.
Specifying the home address
A home address can be stored. It appears at
the top of the contact list.
1."Office"2."Contacts"3."Home"4.Create a contact.5."Store contact in vehicle"
Selecting the sorting order of the
names
Names can be displayed in a different order.
1."Office"2."Contacts"3.Open "Options".4."Display: last, first name" or "Display: first,
last name"
Depending on how the contacts were stored
on the mobile phone, the sorting order of the
names may differ from the selected sorting or‐
der.
Seite 241OfficeCommunication241
Online Edition for Part no. 01 40 2 910 876 - VII/13
Page 248 of 323
ContactsVehicle equipmentThis chapter describes all series equipment as
well as country-specific and special equipment
offered for this model series.Therefore, it also
describes equipment that may not be found in
your vehicle, for instance due to the selected
special equipment or the country version. This
also applies to safety-related functions and
systems.
Note
Equipment version without the mobile phone
preparation package.
General information
Contacts can be created and edited. The con‐
tacts from the mobile phone are displayed as
well if this function is supported by the mobile
phone. The addresses can be adopted as des‐
tinations for navigation and the phone num‐
bers can be dialed.
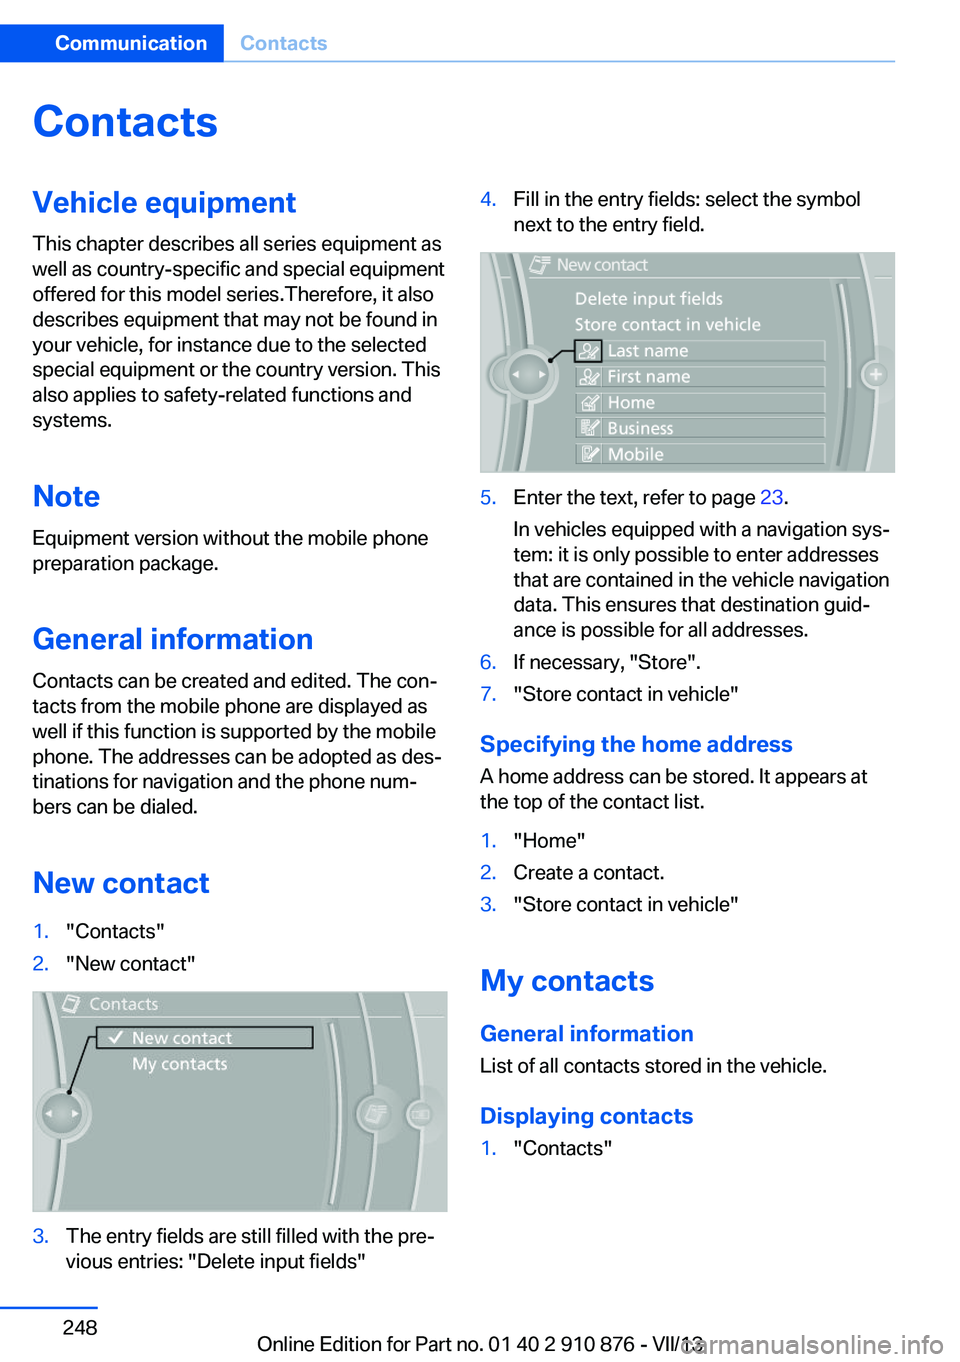
New contact1."Contacts"2."New contact"3.The entry fields are still filled with the pre‐
vious entries: "Delete input fields"4.Fill in the entry fields: select the symbol
next to the entry field.5.Enter the text, refer to page 23.
In vehicles equipped with a navigation sys‐
tem: it is only possible to enter addresses
that are contained in the vehicle navigation
data. This ensures that destination guid‐
ance is possible for all addresses.6.If necessary, "Store".7."Store contact in vehicle"
Specifying the home address
A home address can be stored. It appears at
the top of the contact list.
1."Home"2.Create a contact.3."Store contact in vehicle"
My contacts
General information List of all contacts stored in the vehicle.
Displaying contacts
1."Contacts"Seite 248CommunicationContacts248
Online Edition for Part no. 01 40 2 910 876 - VII/13
Page 283 of 323
Driving with compact wheelDo not exceed a speed of
50 mph/80 km/h.
Drive conservatively and do not exceed a
speed of 50 mph/80 km/h. Otherwise, changes
in the driving characteristics could result, for
example reduced track stability on braking, ex‐ tended braking distance, and altered self-
steering characteristics in the limit range. In
conjunction with winter tires, these character‐
istics are more pronounced.◀
Only mount one compact wheel
Only one compact wheel may be
mounted. Restore the wheels and tires to their
original size as quickly as possible. Failure to
do so is a safety risk.◀
Vehicle battery Maintenance
The battery is maintenance-free, i.e., the elec‐
trolyte will last for the life of the battery.
Your service center will be glad to advise you
on questions regarding the battery.
Battery replacement Use approved vehicle batteries
Only use vehicle batteries that have been
approved for your vehicle by the manufacturer;
otherwise, the vehicle could be damaged and
systems or functions may not be fully availa‐
ble.◀
After a battery replacement, have the battery
registered on the vehicle by your service cen‐
ter to ensure that all comfort functions are fully
available.Charging the battery
Note Do not connect the charger to the socket
Do not connect the battery charger to
the socket installed in the vehicle at the factory
as this could damage the battery.◀
General information Ensure that the battery is sufficiently charged
to achieve the full battery life.
It may be necessary to charge the battery in
the following cases:▷When the vehicle is frequently used to
drive short distances.▷When the vehicle has not been driven for
more than one month.
Starting aid terminals
Only charge using the starting aid terminals,
refer to page 288, in the engine compartment
while the engine is switched off.
Power failure
After a temporary power loss, some equipment
needs to be reinitialized.
Individual settings need to be reprogrammed:
▷Seat and mirror memory: store the posi‐
tions again, refer to page 50.▷Time: update, refer to page 78.▷Date: update, refer to page 78.▷Radio station: save again, refer to
page 182.▷Navigation system: wait for the navigation
system to be operational.▷Glass sunroof: it may only be possible to
tilt the roof. Have the system initialized by
the service center.▷Digital compass: recalibrate, refer to
page 131.Seite 283Replacing componentsMobility283
Online Edition for Part no. 01 40 2 910 876 - VII/13