2014 BMW X6 XDRIVE 50I belt
[x] Cancel search: beltPage 88 of 323
If it is not possible to activate the airbags, have
the person sit in the rear.
To make sure that occupation of the seat
cushion can be detected correctly:▷Do not attach seat covers, seat cushion
padding, ball mats or other items to the
passenger seat unless they are specifically
recommended by BMW.▷Do not place objects under the seat that
could press against the seat from below.
Indicator lamp for the front passenger
airbags
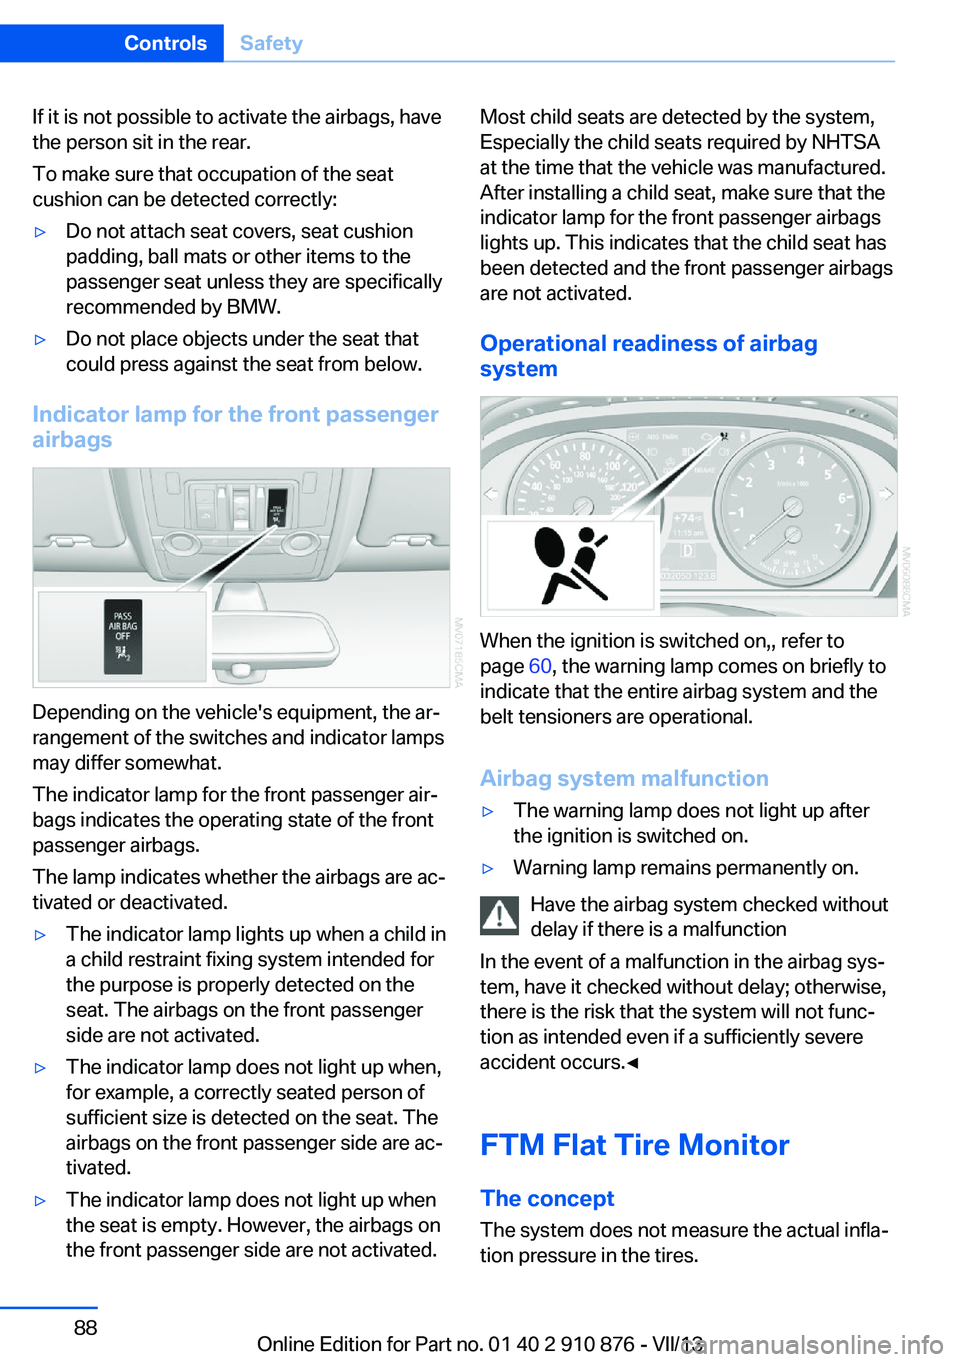
Depending on the vehicle's equipment, the ar‐
rangement of the switches and indicator lamps
may differ somewhat.
The indicator lamp for the front passenger air‐
bags indicates the operating state of the front
passenger airbags.
The lamp indicates whether the airbags are ac‐
tivated or deactivated.
▷The indicator lamp lights up when a child in
a child restraint fixing system intended for
the purpose is properly detected on the
seat. The airbags on the front passenger
side are not activated.▷The indicator lamp does not light up when,
for example, a correctly seated person of
sufficient size is detected on the seat. The
airbags on the front passenger side are ac‐
tivated.▷The indicator lamp does not light up when
the seat is empty. However, the airbags on
the front passenger side are not activated.Most child seats are detected by the system,
Especially the child seats required by NHTSA
at the time that the vehicle was manufactured.
After installing a child seat, make sure that the
indicator lamp for the front passenger airbags
lights up. This indicates that the child seat has
been detected and the front passenger airbags
are not activated.
Operational readiness of airbag
system
When the ignition is switched on,, refer to
page 60, the warning lamp comes on briefly to
indicate that the entire airbag system and the
belt tensioners are operational.
Airbag system malfunction
▷The warning lamp does not light up after
the ignition is switched on.▷Warning lamp remains permanently on.
Have the airbag system checked without
delay if there is a malfunction
In the event of a malfunction in the airbag sys‐
tem, have it checked without delay; otherwise,
there is the risk that the system will not func‐
tion as intended even if a sufficiently severe
accident occurs.◀
FTM Flat Tire Monitor The conceptThe system does not measure the actual infla‐
tion pressure in the tires.
Seite 88ControlsSafety88
Online Edition for Part no. 01 40 2 910 876 - VII/13
Page 105 of 323
Interrupting the system
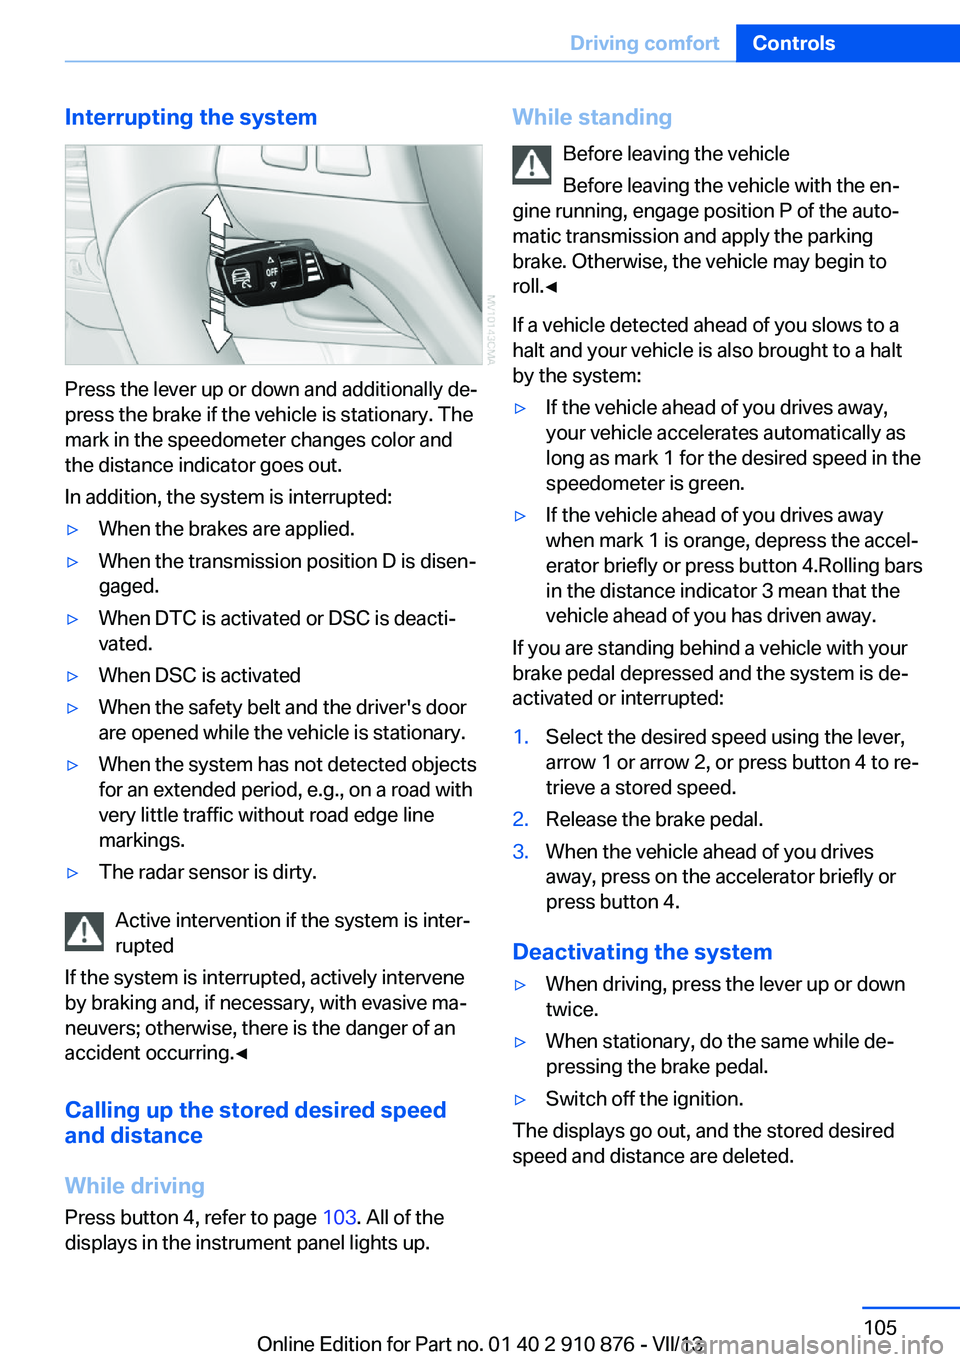
Press the lever up or down and additionally de‐
press the brake if the vehicle is stationary. The
mark in the speedometer changes color and
the distance indicator goes out.
In addition, the system is interrupted:
▷When the brakes are applied.▷When the transmission position D is disen‐
gaged.▷When DTC is activated or DSC is deacti‐
vated.▷When DSC is activated▷When the safety belt and the driver's door
are opened while the vehicle is stationary.▷When the system has not detected objects
for an extended period, e.g., on a road with
very little traffic without road edge line
markings.▷The radar sensor is dirty.
Active intervention if the system is inter‐
rupted
If the system is interrupted, actively intervene
by braking and, if necessary, with evasive ma‐
neuvers; otherwise, there is the danger of an
accident occurring.◀
Calling up the stored desired speed
and distance
While driving
Press button 4, refer to page 103. All of the
displays in the instrument panel lights up.
While standing
Before leaving the vehicle
Before leaving the vehicle with the en‐
gine running, engage position P of the auto‐
matic transmission and apply the parking
brake. Otherwise, the vehicle may begin to
roll.◀
If a vehicle detected ahead of you slows to a
halt and your vehicle is also brought to a halt
by the system:▷If the vehicle ahead of you drives away,
your vehicle accelerates automatically as
long as mark 1 for the desired speed in the
speedometer is green.▷If the vehicle ahead of you drives away
when mark 1 is orange, depress the accel‐
erator briefly or press button 4.Rolling bars
in the distance indicator 3 mean that the
vehicle ahead of you has driven away.
If you are standing behind a vehicle with your
brake pedal depressed and the system is de‐
activated or interrupted:
1.Select the desired speed using the lever,
arrow 1 or arrow 2, or press button 4 to re‐
trieve a stored speed.2.Release the brake pedal.3.When the vehicle ahead of you drives
away, press on the accelerator briefly or
press button 4.
Deactivating the system
▷When driving, press the lever up or down
twice.▷When stationary, do the same while de‐
pressing the brake pedal.▷Switch off the ignition.
The displays go out, and the stored desired
speed and distance are deleted.
Seite 105Driving comfortControls105
Online Edition for Part no. 01 40 2 910 876 - VII/13
Page 136 of 323
Locking the backrest
Before letting passengers ride in the rear,
engage the seat backrests, locking them in
place. Otherwise, there is the danger of an ac‐
cident due to unexpected seat movement.◀
Ensure that the lock is securely engagedWhen folding back the backrest, be sure
that it locks in place securely. The red warning
field in the control display disappears. If it is
not properly engaged, transported cargo could
enter the passenger compartment during brak‐
ing or evasive maneuvers and endanger the
vehicle occupants.◀
Observe the instructions concerning the
safety belt
Observe the instructions concerning the safety
belt, refer to page 47. Otherwise, personal pro‐
tection may be compromised.◀Seite 136ControlsInterior equipment136
Online Edition for Part no. 01 40 2 910 876 - VII/13
Page 151 of 323
Load
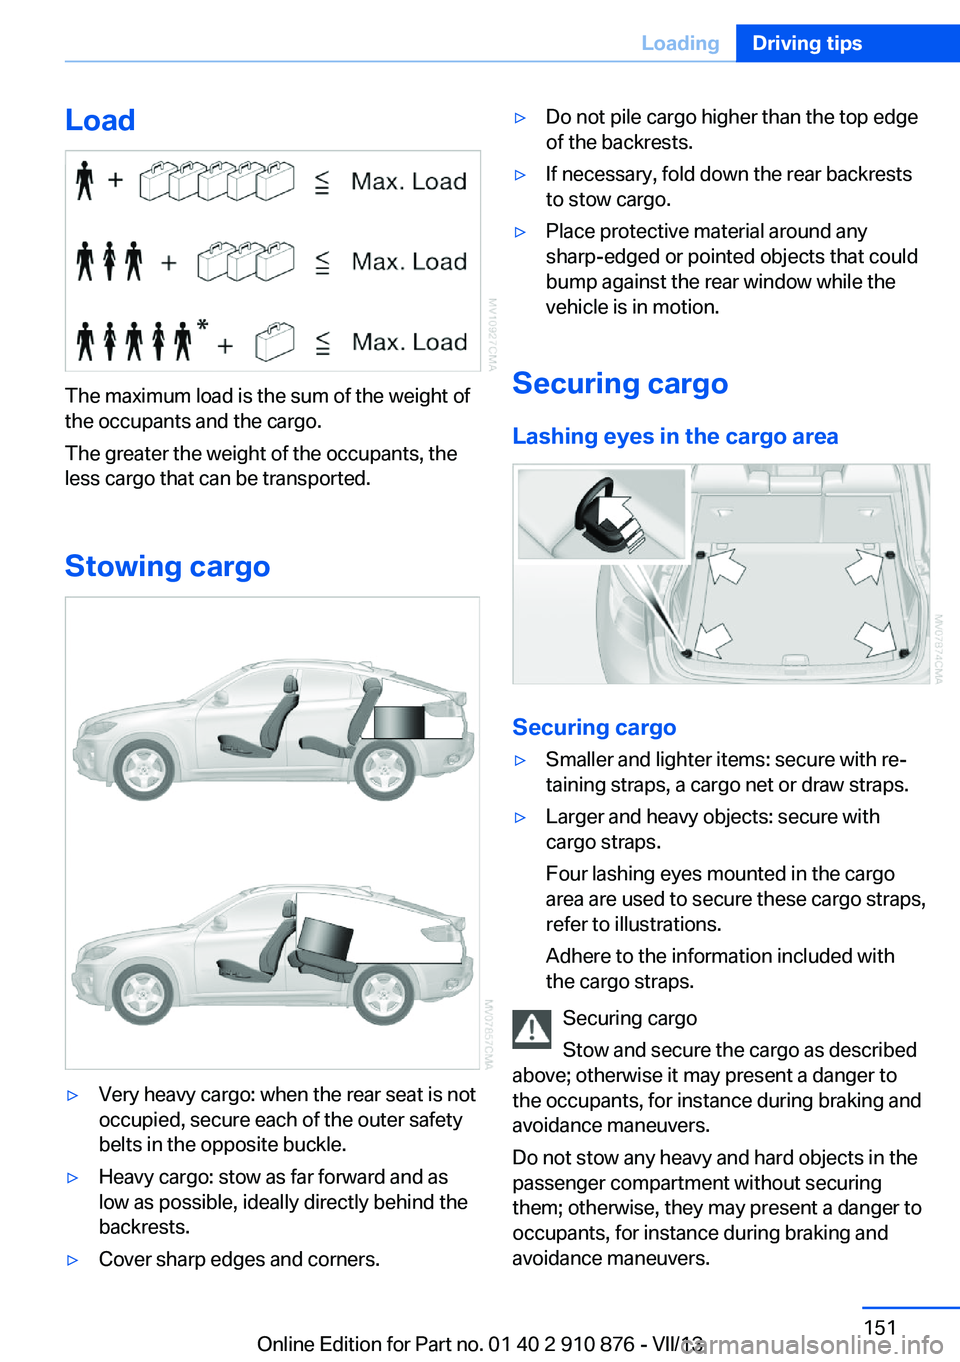
The maximum load is the sum of the weight of
the occupants and the cargo.
The greater the weight of the occupants, the
less cargo that can be transported.
Stowing cargo
▷Very heavy cargo: when the rear seat is not
occupied, secure each of the outer safety
belts in the opposite buckle.▷Heavy cargo: stow as far forward and as
low as possible, ideally directly behind the
backrests.▷Cover sharp edges and corners.▷Do not pile cargo higher than the top edge
of the backrests.▷If necessary, fold down the rear backrests
to stow cargo.▷Place protective material around any
sharp-edged or pointed objects that could
bump against the rear window while the
vehicle is in motion.
Securing cargo
Lashing eyes in the cargo area
Securing cargo
▷Smaller and lighter items: secure with re‐
taining straps, a cargo net or draw straps.▷Larger and heavy objects: secure with
cargo straps.
Four lashing eyes mounted in the cargo
area are used to secure these cargo straps,
refer to illustrations.
Adhere to the information included with
the cargo straps.
Securing cargo
Stow and secure the cargo as described
above; otherwise it may present a danger to
the occupants, for instance during braking and
avoidance maneuvers.
Do not stow any heavy and hard objects in the
passenger compartment without securing
them; otherwise, they may present a danger to
occupants, for instance during braking and
avoidance maneuvers.
Seite 151LoadingDriving tips151
Online Edition for Part no. 01 40 2 910 876 - VII/13
Page 181 of 323
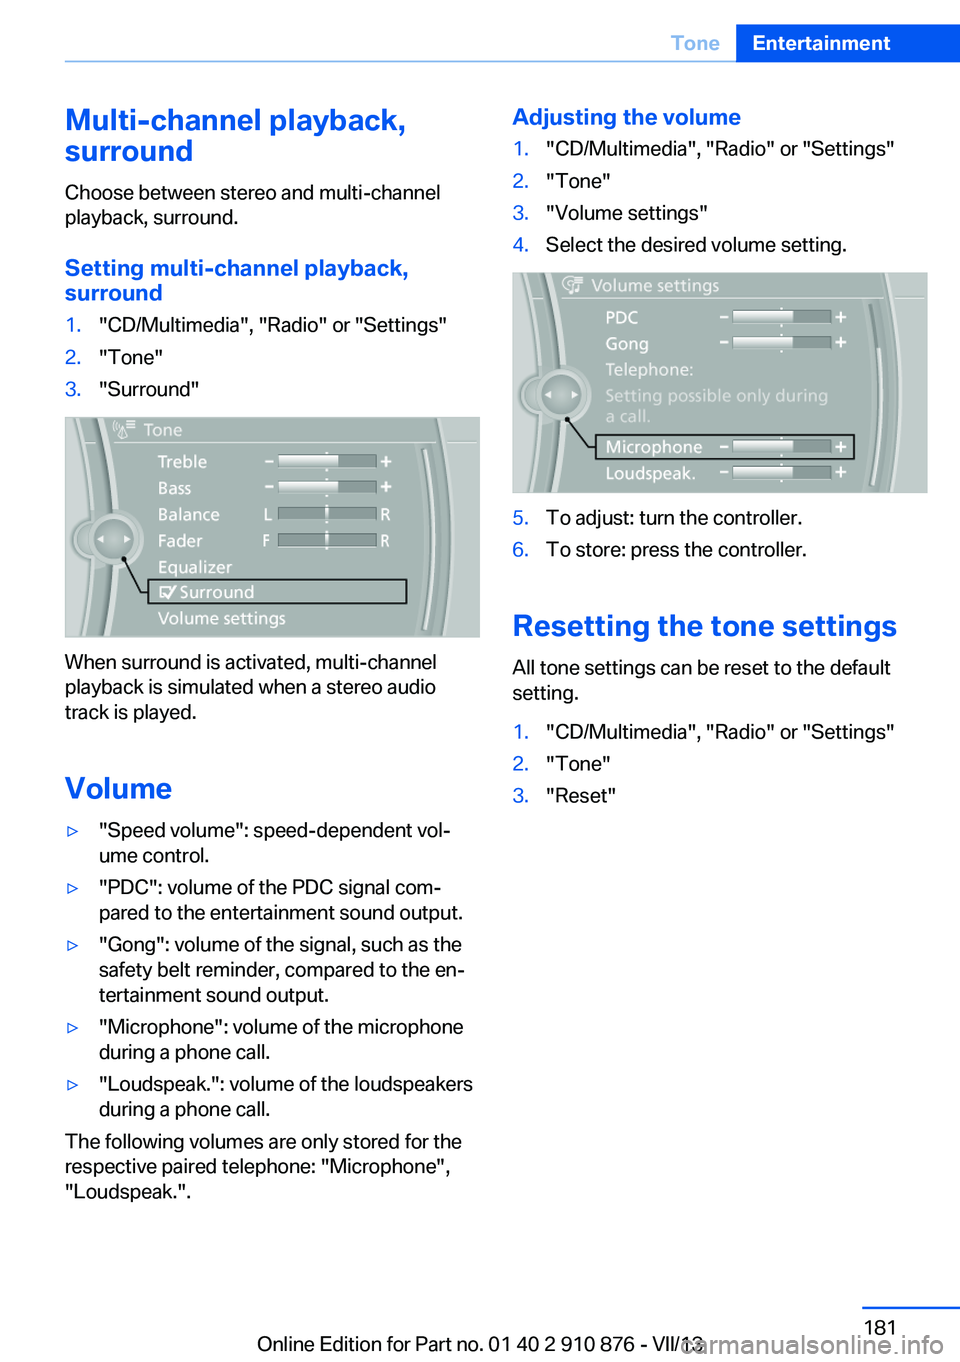
Multi-channel playback,
surround
Choose between stereo and multi-channel
playback, surround.
Setting multi-channel playback,
surround1."CD/Multimedia", "Radio" or "Settings"2."Tone"3."Surround"
When surround is activated, multi-channel
playback is simulated when a stereo audio
track is played.
Volume
▷"Speed volume": speed-dependent vol‐
ume control.▷"PDC": volume of the PDC signal com‐
pared to the entertainment sound output.▷"Gong": volume of the signal, such as the
safety belt reminder, compared to the en‐
tertainment sound output.▷"Microphone": volume of the microphone
during a phone call.▷"Loudspeak.": volume of the loudspeakers
during a phone call.
The following volumes are only stored for the
respective paired telephone: "Microphone",
"Loudspeak.".
Adjusting the volume1."CD/Multimedia", "Radio" or "Settings"2."Tone"3."Volume settings"4.Select the desired volume setting.5.To adjust: turn the controller.6.To store: press the controller.
Resetting the tone settings
All tone settings can be reset to the default
setting.
1."CD/Multimedia", "Radio" or "Settings"2."Tone"3."Reset"Seite 181ToneEntertainment181
Online Edition for Part no. 01 40 2 910 876 - VII/13
Page 293 of 323
Damage from Velcro® fasteners
Open Velcro® fasteners on pants or
other articles of clothing can damage the seat
covers. Ensure that any Velcro® fasteners are
closed.◀
Caring for special components
Light-alloy wheels When cleaning the wheels on the vehicle, only
use a neutral wheel rim cleaner with a pH value
of 5 to 9. Do not use abrasive cleaners or a
steam jet hotter than 140 ℉/60 ℃; otherwise,
damage may result. Adhere to the manufac‐
turer instructions.
Aggressive, acidic, or alkaline cleaners may
destroy the protective coating of neighboring
components such as the brake disc.
Chrome surfaces
Carefully clean components such as the radia‐
tor grille or door handles with an ample supply
of water, possibly with shampoo added, partic‐
ularly when they have been exposed to road
salt.
Aluminum running boards
A rust film on the aluminum running boards
can be removed with a special cleaning agent.
Rubber components
Aside from water, treat only with rubber
cleansers.
When cleaning rubber seals, do not use any
silicon-containing car care products in order to
avoid damage or reduced noise damping.
Fine wood parts Clean fine wood facing and fine wood compo‐
nents only with a moist rag. Then dry with a
soft cloth.
Plastic components These include:▷Imitation leather surfaces.▷Headliner.▷Lamp lenses.▷Instrument cluster cover.▷Matte black spray-coated components.▷Painted parts in the interior.
Clean with a microfiber cloth.
Moisten the cloth lightly with water if neces‐
sary.
Do not soak the headliner.
Do not use cleansers that contain alcohol
or solvents
Do not use cleansers that contain alcohol or
solvents, such as lacquer thinners, heavy-duty
grease removers, fuel, or such; this could lead
to surface damage.◀
Safety belts
Dirty belt straps impede the reeling action and
thus have a negative impact on safety.
No chemical cleaning
Do not clean chemically; this can destroy
the webbing.◀
Use only a mild soapy solution, with the safety
belts clipped into their buckles.
Do not allow the reels to retract the safety
belts until they are dry.
Carpets and floor mats No objects in the area around the pedals
Keep floor mats, carpets, and any other
objects out of the area of motion of the pedals;
otherwise, the function of the pedals could be
impeded while driving
Do not place additional floor mats over existing
mats or other objects.
Only use floor mats that have been approved
for the vehicle and can be properly fixed in
place.
Seite 293CareMobility293
Online Edition for Part no. 01 40 2 910 876 - VII/13
Page 309 of 323
Automatic climate control inrear, air supply 127
Automatic climate control in rear, deactivating on Control
Display 126
Automatic climate control in rear, switching off 127
Automatic climate control, switching off 125, 127
Automatic climate control, ventilation in rear 126
Automatic climate control, with 2-zone control 122
Automatic climate control, with 4-zone control 126
Automatic, cruise control 109
Automatic Cruise Con‐ trol 102
Automatic Curb Monitor 52
Automatic headlamp con‐ trol 81, 82
Automatic Hold 62
Automatic Hold, activating 62
Automatic Hold, deactivat‐ ing 62
Automatic Hold, parking 63
Automatic recirculated air control 124
Automatic Soft Closing, doors 35
Automatic tailgate opera‐ tion 36
Automatic transmission with Steptronic 67
Automatic transmission with
Steptronic– Kickdown 67
AUTO program with auto‐
matic climate con‐
trol 122 , 127
AUX-IN port 138, 202
Average fuel consumption 73
Average fuel consumption, setting the units 79
Average speed 72
Average speed, refer to Com‐ puter 72
Axle loads, refer to
Weights 298
B
Backrest curvature, refer to Lumbar support 45
Backrest width 45
Back seats, adjusting the head restraints 50
Backup camera 113
Backup camera, obstacle marking 115
Backup camera, pathway lines 114
Backup camera, turning lines 114
Balance 180
Band-aids, refer to First aid kit 287
Bass 180
Battery– Remote control 30
Battery change, remote con‐
trol for rear DVD sys‐
tem 212
Battery disposal 284
Battery, refer to Vehicle bat‐ tery 283
Battery replacement, remote control for vehicle 39
Before entering the car wash 291
Belts, refer to Safety belts 47
Belt tensioners, refer to Safety belts 47
Beverage holder, refer to Cu‐ pholder 139
Black and white map dis‐ play 174
Blower, refer to Air flow rate 123
Bluetooth audio 205
Bluetooth connection, acti‐ vating/deactivating 227
BMW Apps 255
BMW EfficientDynamics, re‐
fer to Saving fuel 153
BMW Homepage 6
BMW Internet page 6
BMW maintenance sys‐ tem 274
BMW Online 252
Bottle holder, refer to Cu‐ pholder 139
Brake assistant 96
Brake discs, breaking in 146
Brake fluid, refer to Service requirements 74
Brake force display 95
Brake force distribution, elec‐ tronic 96
Brake lamps, brake force dis‐ play 95
Brake lights, adaptive 95
Brake pads, breaking in 146
Brakes, BMW maintenance system 274
Brakes, parking brake 61
Brakes, service require‐ ments 74
Brake system, BMW mainte‐ nance system 274
Braking, notes 147
Breakdown assistance 287
Breakdown, transporting the vehicle 289
Breaking in 146
Brightness, on the Control Display 79
Bulb replacement, refer to Lamp and bulb replace‐
ment 276
Button for starting the engine, refer to Start/Stop but‐
ton 59
C
Calendar 244
Calibration, driver's seat 49 Seite 309Everything from A to ZReference309
Online Edition for Part no. 01 40 2 910 876 - VII/13
Page 312 of 323

DVD system in rear 210
DVD, video 192
Dynamic destination guid‐ ance 176
Dynamic Performance Con‐ trol 98
Dynamic Stability Control DSC 96
Dynamic Traction Control DTC 97
E
Easy entry/exit 53
EfficientDynamics, refer to Saving fuel 153
Electrical malfunction– Door lock 34– Driver's door 34– Fuel filler flap 258
Electrical malfunction, park‐
ing brake 63
Electric seat adjustment 45
Electric steering wheel ad‐
justment 53
Electronic brake-force distri‐ bution 96
Electronic engine oil level check 271
Electronic Stability Program ESP, refer to Dynamic Sta‐
bility Control DSC 96
Emergency operation
– Door lock, refer to Manual
operation 34
Emergency operation, fuel
filler flap, unlocking man‐
ually 258
Emergency Request 286
Emergency service, refer to Roadside Assistance 287
Energy-conscious driving, re‐ fer to Current fuel consump‐
tion 71
Energy, saving, refer to Sav‐ ing fuel 153
Engine, breaking in 146
Engine compartment 270
Engine coolant, refer to Cool‐ ant 273
Engine oil, adding 272
Engine oil, additives, refer to Approved engine oils 272
Engine oil, alternative oil types 273
Engine oil, BMW maintenance system 274
Engine oil change intervals, refer to Service require‐
ments 74
Engine oil, checking the level 271
Engine oil, filling ca‐ pacity 299
Engine oil temperature 71
Engine oil types, alterna‐ tive 272
Engine oil types, ap‐ proved 272
Engine, overheating, refer to Coolant temperature 71
Engine start, assistance 287
Engine, starting 60
Engine, starting– Comfort Access 37
Engine, starting, Start/Stop
button 59
Engine, stopping, Start/Stop button 59
Engine, switching off 60
Environmentally friendly driv‐ ing, refer to Current fuel
consumption 71
Equalizer 180
Equipment, interior 129
ESP Electronic Stability Pro‐ gram, refer to Dynamic Sta‐
bility Control DSC 96
Exchanging wheels/tires 267
Exhaust system 146
Exterior mirrors 51
Exterior mirrors, adjusting 51
Exterior mirrors, automatic dimming 52
Exterior mirrors, automatic
heating 52
Exterior mirrors, folding in and out 52
External audio device 138
External devices 202
External temperature dis‐ play 70
External temperature display, changing the units of meas‐
ure, changing the units of
measure on the Control Dis‐
play 79
External temperature warn‐ ing 70
Externel temperature dis‐ play 70
Eyes for securing cargo 151
F
Fader 180
Failure messages, refer to Check Control 76
False alarm– Avoiding unintentional
alarms 40– Ending an alarm 40
Fastening safety belts, refer
to Safety belts 47
Fault messages, refer to Check Control 76
Filling capacities 299
Filter, refer to Microfilter/acti‐ vated-charcoal filter 126
Fine wood, care 293
First aid kit 287
Fitting for towing 290
Fixing system, adaptive 140
Flashing when locking/ unlocking 33
Flat Tire Monitor FTM 88
Flat Tire Monitor FTM, snow chains 269
Flat tire, run-flat tires 268
Flat tire, Tire Pressure Moni‐ tor TPM 90
Seite 312ReferenceEverything from A to Z312
Online Edition for Part no. 01 40 2 910 876 - VII/13