2014 BMW X6 inflation pressure
[x] Cancel search: inflation pressurePage 194 of 259

LoadingVehicle features and options
This chapter describes all standard, country-
specific and optional features offered with the
series. It also describes features that are not
necessarily available in your car, e. g., due to
the selected options or country versions. This
also applies to safety-related functions and
systems.
Hints Overloading the vehicle
To avoid exceeding the approved ca‐
pacity of the tires, never overload the vehicle.
Overloading can lead to overheating and in‐
creases the rate at which damage develops in‐
side the tires. This could result in a sudden
loss of tire inflation pressure.◀
No fluids in the cargo area
Make sure that fluids do not leak into the
cargo area; otherwise, the vehicle may be dam‐
aged.◀
Heavy and hard objects
Do not stow any heavy and hard objects
in the car's interior without securing them; oth‐
erwise, they may present a danger to occu‐
pants, e.g., during braking and evasive maneu‐
vers.◀
Determining the load limit1.Locate the following statement on your ve‐
hicle’s placard:▷The combined weight of occupants
and cargo should never exceed XXX kg
or YYY lbs. Otherwise, damage to thevehicle and unstable driving situations
may result.2.Determine the combined weight of the
driver and passengers that will be riding in
your vehicle.3.Subtract the combined weight of the driver
and passengers from XXX kilograms or
YYY pounds.4.The resulting figure equals the available
amount of cargo and luggage load ca‐
pacity.
For example, if the YYY amount equals
1,000 lbs and there will be four 150 lbs
passengers in your vehicle, the amount of
available cargo and luggage load capacity
is 400 lbs: 1,000 lbs minus 600 lbs =
400 lbs.5.Determine the combined weight of lug‐
gage and cargo being loaded on the vehi‐
cle. That weight may not safely exceed the
available cargo and luggage load capacity
calculated in Step 4.Seite 190Driving tipsLoading190
Online Edition for Part no. 01 40 2 954 468 - X/14
Page 197 of 259

Saving fuelVehicle features and optionsThis chapter describes all standard, country-
specific and optional features offered with the
series. It also describes features that are not
necessarily available in your car, e. g., due to
the selected options or country versions. This
also applies to safety-related functions and
systems.
General information
Your vehicle contains advanced technology for
the reduction of fuel consumption and emis‐
sions.
Fuel consumption depends on a number of dif‐
ferent factors.
Carrying out certain measures, such as a mod‐
erate driving style and regular maintenance,
can influence fuel consumption and the envi‐
ronmental impact.
Remove unnecessary cargoAdditional weight increases fuel consumption.
Remove attached parts
following use
Remove auxiliary mirrors, roof or rear luggage
racks which are no longer required following
use.
Attached parts on the vehicle impair the aero‐
dynamics and increase the fuel consumption.Close the windows and glass
sunroof
Driving with the glass sunroof and windows
open results in increased air resistance and
thereby reduces the range.
Tires
General information Tires can affect fuel consumption in various
ways, e.g., tire size may influence fuel con‐
sumption.
Check the tire inflation pressure
regularly
Check and, if needed, correct the tire inflation
pressure at least twice a month and before
starting on a long trip.
Low tire inflation pressure increases rolling re‐
sistance and thus raises fuel consumption and
tire wear.
Drive away immediately
Do not wait for the engine to warm-up while
the vehicle remains stationary. Start driving
right away, but at moderate engine speeds.
This is the quickest way of warming the cold
engine up to operating temperature.
Look well ahead when
driving
Avoid unnecessary acceleration and braking.
By maintaining a suitable distance to the vehi‐
cle driving ahead of you.
Driving smoothly and proactively reduces fuel
consumption.Seite 193Saving fuelDriving tips193
Online Edition for Part no. 01 40 2 954 468 - X/14
Page 208 of 259

Wheels and tiresVehicle features and options
This chapter describes all standard, country-
specific and optional features offered with the
series. It also describes features that are not
necessarily available in your car, e. g., due to
the selected options or country versions. This
also applies to safety-related functions and
systems.
Tire inflation pressure
Safety information
The tire characteristics and tire inflation pres‐
sure influence the following:▷The service life of the tires.▷Road safety.▷Driving comfort.
Checking the tire inflation pressure
Check the tire inflation pressure regularly
Regularly check the tire inflation pres‐
sure, and correct it as needed: at least twice a
month and before a long trip. If you fail to ob‐
serve this precaution, you may be driving on
tires with incorrect tire pressures, a condition
that may not only compromise your vehicle's
driving stability, but also lead to tire damage
and the risk of an accident.◀
Also check the tire inflation pressure of the
emergency wheel in the cargo area regularly,
and correct it as needed.
Tires have a natural, consistent loss of tire in‐
flation pressure.
Tires heat up while driving, and the tire infla‐
tion pressure increases along with the tire's
temperature. The tire inflation pressure speci‐
fications relate to cold tires or tires with the
ambient temperature.
Only check the tire inflation pressure when the
tires are cold. This means after driving no more
than 1.25 miles/2 km or when the vehicle has
been parked for at least 2 hours.
The displays of inflation devices may under-
read by up to 1.45 psi/0.1 bar.
For Flat Tire Monitor: after correcting the tire
inflation pressure, reinitialize the Flat Tire
Monitor.
For Tire Pressure Monitor: after correcting the
tire inflation pressure, reset the Tire Pressure
Monitor.
Tire inflation pressure specifications
The tire inflation pressure table, refer to
page 205, contains all tire inflation pressure
specifications for the specified tire sizes at the
ambient temperature. Tire inflation pressure
specifications apply to approved tire sizes and
recommended tire brands. This information
can be obtained from your service center.
To identify the correct tire inflation pressure,
please note the following:▷Tire sizes of your vehicle.▷Maximum permitted driving speed.
Tire inflation pressures up to
100 mph/160 km/h
For speeds of up to 100 mph/160 km/h and for
optimum driving comfort, note the pressure
values in the tire inflation pressure table, refer
to page 205, and adjust as necessary.
Seite 204MobilityWheels and tires204
Online Edition for Part no. 01 40 2 954 468 - X/14
Page 209 of 259

These pressure values can also be found on
the tire inflation pressure label on the driver's
door pillar.
Maximum permissible speed
Do not exceed 100 mph/160 km/h; other‐
wise, tire damage and accidents may result.◀
Tire inflation pressure values up to
100 mph/160 km/h
X6 sDrive35i, X6 xDrive35i
Tire sizePressure specifications
in bar/PSISpecifications in
bar/PSI with cold
tires255/50 R 19 107 H
M+S XL A/S RSC
255/50 R 19 107 H
M+S XL RSC2.2 / 322.6 / 38Front: 255/50 R 19
107 W XL RSC
Rear: 285/45 R 19
111 W XL RSC2.2 / 32
--
2.4 / 35Front: 275/40 R 20
106 W XL RSC
Rear: 315/35 R 20
110 W XL RSC2.2 / 32
--
2.4 / 35Tire sizePressure specifications
in bar/PSIFront: 275/40 R 20
106 V M+S XL RSC
Rear: 315/35 R 20
110 V M+S XL RSC2.2 / 32
--
2.4 / 35Front: 285/35 R 21
105 Y XL RSC
Rear: 325/30 R 21
108 Y XL RSC2.4 / 35
--
2.6 / 38Emergency wheel:
T 155/90 D 18 113
M
T 155/80 R 19 114
MSpeed up to a max. of
50 mph / 80 km/h
4.2 / 60
X6 xDrive50i
Tire sizePressure specifications
in bar/PSISpecifications in
bar/PSI with cold
tires255/50 R 19 107 H
M+S XL A/S RSC
255/50 R 19 107 H
M+S XL RSC2.3 / 332.8 / 41Front: 255/50 R 19
107 W XL RSC
Rear: 285/45 R 19
111 W XL RSC2.3 / 33
--
2.6 / 38Front: 275/40 R 20
106 W XL RSC
Rear: 315/35 R 20
110 W XL RSC2.3 / 33
--
2.6 / 38Seite 205Wheels and tiresMobility205
Online Edition for Part no. 01 40 2 954 468 - X/14
Page 210 of 259

Tire sizePressure specifications
in bar/PSIFront: 275/40 R 20
106 V M+S XL RSC
Rear: 315/35 R 20
110 V M+S XL RSC2.3 / 33
--
2.6 / 38Front: 285/35 R 21
105 Y XL RSC
Rear: 325/30 R 21
108 Y XL RSC2.5 / 36
--
2.8 / 41Emergency wheel:
T 155/90 D 18 113
M
T 155/80 R 19 114
MSpeed up to a max. of
50 mph / 80 km/h
4.2 / 60
Tire inflation pressures at max.
speeds above 100 mph/160 km/h
Speeds above 100 mph/160 km/h
In order to drive at maximum speeds in
excess of 100 mph/160 km/h, please observe,
and, if necessary, adjust tire pressures for
speeds exceeding 100 mph/160 km/h from the
relevant table on the following pages. Other‐
wise tire damage and accidents could occur.◀
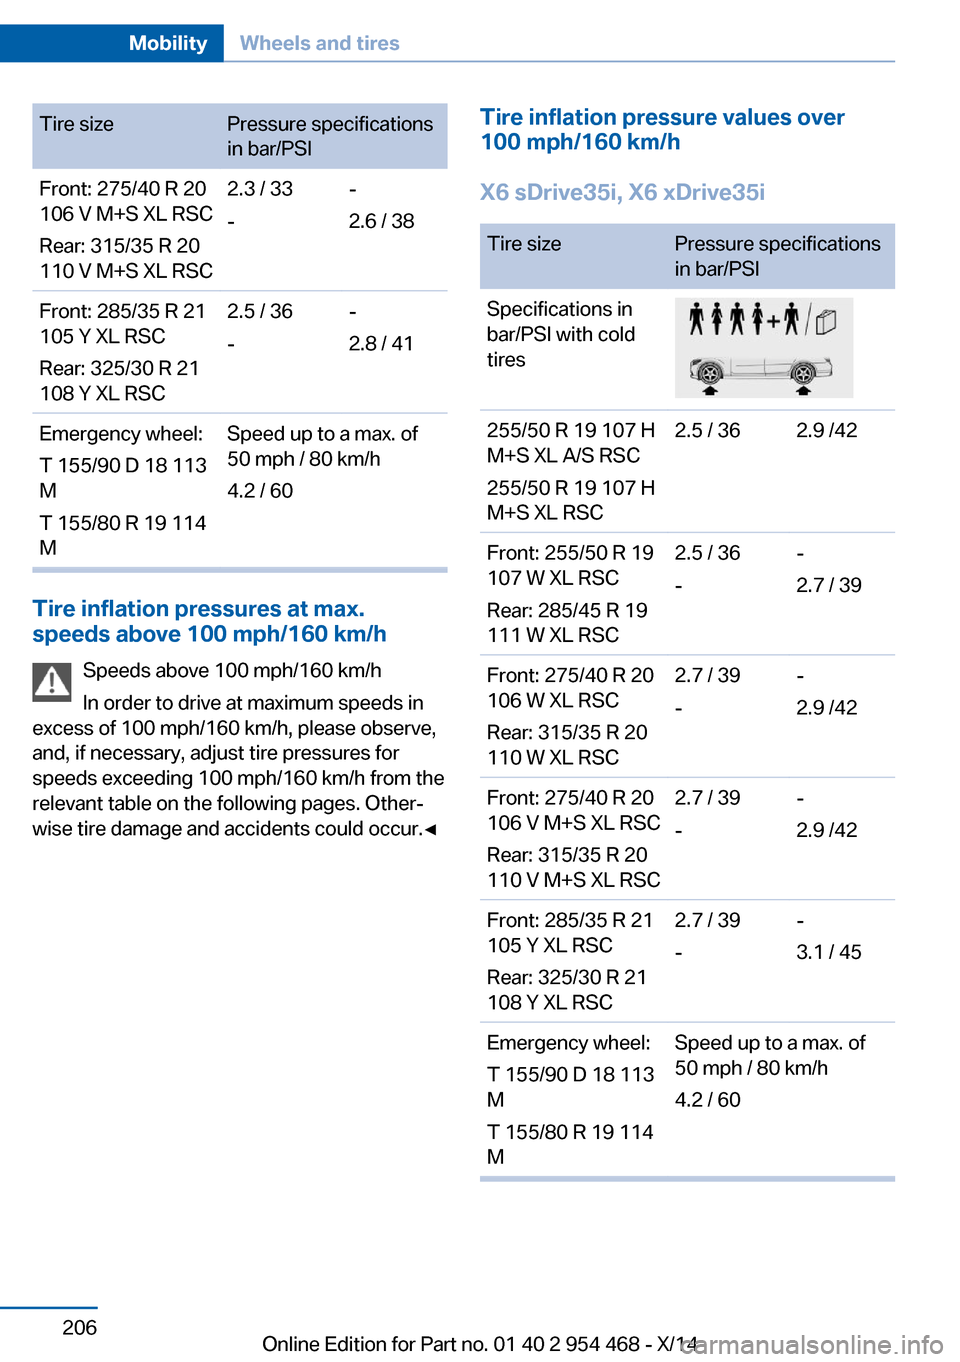
Tire inflation pressure values over
100 mph/160 km/h
X6 sDrive35i, X6 xDrive35iTire sizePressure specifications
in bar/PSISpecifications in
bar/PSI with cold
tires255/50 R 19 107 H
M+S XL A/S RSC
255/50 R 19 107 H
M+S XL RSC2.5 / 362.9 /42Front: 255/50 R 19
107 W XL RSC
Rear: 285/45 R 19
111 W XL RSC2.5 / 36
--
2.7 / 39Front: 275/40 R 20
106 W XL RSC
Rear: 315/35 R 20
110 W XL RSC2.7 / 39
--
2.9 /42Front: 275/40 R 20
106 V M+S XL RSC
Rear: 315/35 R 20
110 V M+S XL RSC2.7 / 39
--
2.9 /42Front: 285/35 R 21
105 Y XL RSC
Rear: 325/30 R 21
108 Y XL RSC2.7 / 39
--
3.1 / 45Emergency wheel:
T 155/90 D 18 113
M
T 155/80 R 19 114
MSpeed up to a max. of
50 mph / 80 km/h
4.2 / 60Seite 206MobilityWheels and tires206
Online Edition for Part no. 01 40 2 954 468 - X/14
Page 215 of 259

StorageStore wheels and tires in a cool, dry place with
as little exposure to light as possible.
Always protect tires against all contact with oil,
grease and fuels.
Do not exceed the maximum tire inflation pres‐
sure indicated on the side wall of the tire.
Run-flat tires Label
RSC label on the tire sidewall.
The wheels consist of tires that are self-sup‐
porting, to a limited degree, and possibly spe‐
cial rims.
The support of the sidewall allows the tire to
remain drivable to a restricted degree in the
event of a tire inflation pressure loss.
Follow the instructions for continued driving
with a flat tire.
Changing run-flat tires
For your own safety, only use run-flat tires. No
spare tire is available in the case of a flat tire.
Your service center will be glad to advise you.
Snow chains
Fine-link snow chains
Only certain types of fine-link snow chains
have been tested by the manufacturer of the
vehicle, classified as road-safe and approved.
Information about the approved snow chains
are available from the service center.
Use
Use only in pairs on the rear wheels, equipped
with the tires of the following size:▷255/50 R 19.
Follow the snow chain manufacturer's instruc‐
tions.
Make sure that the snow chains are always
sufficiently tight. Retighten as needed accord‐
ing to the chain manufacturer's instructions.
Do not initialize the Flat Tire Monitor after
mounting snow chains, as doing so may result
in incorrect readings.
Do not initialize the Tire Pressure Monitor after
mounting snow chains, as doing so may result
in incorrect readings.
When driving with snow chains, briefly activate
Dynamic Traction Control if needed.
Maximum speed with snow chains Do not exceed a speed of 30 mph/50 km/hwhen using snow chains.
Seite 211Wheels and tiresMobility211
Online Edition for Part no. 01 40 2 954 468 - X/14
Page 230 of 259

Prepare wheel change1.Follow the Safety instructions, refer to
page 225.2.Loosen the wheel lug bolts a half turn.
Jacking up the vehicle
1.Place the vehicle jack at the jacking point
closest to the wheel such that the vehicle
jack foot is vertically beneath the vehicle
jacking point with the entire surface on the
ground.2.Insert the vehicle jack head in the rectan‐
gular recess of the jacking point for crank‐
ing it up.3.Crank it up until the wheel in question lifts
off of the ground.
Wheel mounting
1.Unscrew the wheel lug bolts and remove
the wheel.2.Put the new wheel or emergency wheel on
and screw in at least two bolts.
If original BMW light alloy wheels are not
mounted, any accompanying lug bolts also
have to be used.3.Screw in the remaining the lug bolts and
tighten all bolts well in a crosswise pattern.4.Lower the vehicle and remove the vehicle
jack.
After the wheel change
1.Tighten the lug bolts crosswise. The tight‐
ening torque is 101 lb ft/140 Nm.Check for secure seating of the lug
bolts
For safety reasons, have the secure seat‐
ing of the lug bolts checked with a cali‐
brated torque wrench; otherwise, a safety
hazard results from incorrectly tightened
lug bolts.◀2.Stow the defective wheel in the cargo area.
The defective wheel cannot be stored un‐
der the cargo floor panel because of its
size.3.Check tire inflation pressure at the next op‐
portunity and correct as needed.4.Reinitialize the Flat Tire Monitor.
Reset the Tire Pressure Monitor.5.Replace the damaged tires as soon as pos‐
sible.
Driving with emergency wheel
Watch the speed when driving with the
emergency wheel
Drive conservatively and do not exceed a
speed of 50 mph/80 km/h; otherwise, changed
driving characteristics such as reduced lane
stability while braking, extended braking dis‐
tance and changed self-steering properties in
the limit area.◀
Mount one emergency wheel only
Only a single emergency wheel may be
mounted. Reinstall wheels and tires of the
original size as quickly as possible; otherwise,
there is a safety risk.◀
Vehicle battery Maintenance
The battery is maintenance-free.
The added amount of acid is sufficient for the service life of the battery.
Seite 226MobilityReplacing components226
Online Edition for Part no. 01 40 2 954 468 - X/14
Page 252 of 259

Headlights, care 235
Headlight washer system 74
Head restraints 51
Head restraints, front 56
Head-up Display 97
Head-up Display, care 237
Heavy cargo, stowing 191
High-beam Assistant 101
High beams 74
High beams/low beams, refer to High-beam Assistant 101
Hill Descent Control HDC 135
Hills 188
Hill start assistant, refer to Drive-off assistant 132
Hints 6
Holder for beverages 181
Hood 212
Horn 14
Hot exhaust system 186
HUD Head-up Display 97
Hydroplaning 187
I Ice warning, see External temperature warning 89
Icy roads, see External tem‐ perature warning 89
Identification marks, tires 207
Identification number, see ve‐ hicle identification num‐
ber 9
iDrive 18
Ignition key, refer to Remote control 34
Ignition off 67
Ignition on 67
Indication of a flat tire 108 , 111
Indicator and alarm lamps, see Check Control 85
Indicator lamp, see Check Control 85
Individual air distribution 163 Individual settings, refer to
Personal Profile 35
Inflation pressure, tires 204
Inflation pressure warning FTM, tires 111
Info display, refer to Com‐ puter 94
Initialize, Tire Pressure Moni‐ tor TPM 108
Initializing, Flat Tire Monitor FTM 111
Instrument cluster 81
Instrument cluster, electronic displays 81
Instrument display, multifunc‐ tional 82
Instrument lighting 102
Integrated key 34
Integrated Owner's Manual in the vehicle 29
Intelligent Emergency Re‐ quest 229
Intelligent Safety 112
Intensity, AUTO pro‐ gram 163
Interior equipment 169
Interior lights 102
Interior lights via remote con‐ trol 37
Interior motion sensor 46
Interior rearview mirror, auto‐ matic dimming feature 60
Interval display, service re‐ quirements 91
J Jacking points for the vehicle jack 225
Joystick, Steptronic transmis‐ sion 77
Jump-starting 231
K
Key/remote control 34 Keyless Go, refer to Comfort
Access 42
Key Memory, refer to Per‐ sonal Profile 35
Kickdown, Steptronic trans‐ mission 77
Knee airbag 104
L Lamp replacement 222
Lamp replacement, front 223
Lamp replacement, rear 224
Lane departure warning 126
Lane margin, warning 126
Language on Control Dis‐ play 97
Lashing eyes, securing cargo 191
LATCH child restraint sys‐ tem 64
Launch Control 80
Leather, care 236
LED front fog lights, bulb re‐ placement 224
LED headlights, bulb replace‐ ment 223
LEDs, light-emitting di‐ odes 222
Letters and numbers, enter‐ ing 25
Light alloy wheels, care 236
Light control 100
Light-emitting diodes, LEDs 222
Lighting 99
Lighting via remote con‐ trol 37
Light reel 99
Lights 99
Lights and bulbs 222
Load 191
Loading 190
Lock, door 39
Locking/unlocking via door lock 39 Seite 248ReferenceEverything from A to Z248
Online Edition for Part no. 01 40 2 954 468 - X/14