2014 BMW X5 XDRIVE35D navigation
[x] Cancel search: navigationPage 6 of 265

NotesUsing this Owner's Manual
Orientation
The fastest way to find information on a partic‐
ular topic is by using the index.
An initial overview of the vehicle is provided in
the first chapter.
Updates made after the editorial
deadline
Any updates made after the editorial deadline
for the Owner's Manuals are located in the ap‐
pendix of the printed quick reference for the
vehicle.
User's manual for Navigation,
Entertainment, Communication
The topics of Navigation, Entertainment, Com‐
munication and the short commands of the
voice activation system are described in a sep‐
arate user's manual, which is also included
with the onboard literature.
Additional sources of information
The service center will be happy to answer any
other questions you may have.
Information on BMW, e.g., on technology, is
available on the Internet: bmwusa.com.
Symbols in the Owner's
Manual
Indicates precautions that must be followed
precisely in order to avoid the possibility of
personal injury and serious damage to the ve‐
hicle.
◄ Marks the end of a specific item of informa‐
tion.
"..." Identifies Control Display texts used to se‐
lect individual functions.
›...‹ Verbal instructions to use with the voice ac‐
tivation system.
››...‹‹ Identifies the answers generated by the
voice activation system.
Refers to measures that can be taken to
help protect the environment.
Symbols on vehicle components
Indicates that you should consult the rele‐
vant section of this Owner's Manual for infor‐
mation on a particular part or assembly.
Vehicle equipment
This Owner's Manual describes all models and
all standard, country-specific and optional
equipment that is offered in the model series.
Therefore, in this Owner's Manual, equipment
is also described and illustrated that is not
available in your vehicle, e.g., because of the selected optional equipment or the country-
specific variants.
This also applies for safety-related functions
and systems.
For any options and equipment not described
in this Owner's Handbook, refer to the Supple‐
mentary Owner's Handbooks.
On right-hand drive vehicles, some controls
are arranged differently than shown in the illus‐
trations.
Status of the Owner's
Manual
Basic information
The manufacturer of your vehicle pursues a
policy of constant development that is con‐
ceived to ensure that our vehicles continue to
embody the highest quality and safety stan‐
Seite 6Notes6
Online Edition for Part no. 01 40 2 926 740 - X/13
Page 15 of 265

Instrument lighting 102Night Vision, switch on/switch off
heat image 1217Steering column stalk, leftTurn signal 74High beams, head‐
lamp flasher 74High-beam Assistant 101Roadside parking lamps 100Computer 938Steering wheel buttons, leftStore speed 148, 138Resume speed 150, 141Cruise control on/off, interrupt‐
ing 138Cruise control on/off, interrupt‐
ing 149Congestion Assistant ON/OFF,
Pause 145Congestion Assistant: setting
cruise control distance 138Cruise control, reduce dis‐
tance 138Cruise control, increase dis‐
tance 138Cruise control rocker switch 149, 1409Shift paddles 8010Instrument cluster 8211Steering wheel buttons, rightEntertainment sourceVolumeVoice activation 26Telephone, see user's manual for
Navigation, Entertainment and
CommunicationThumbwheel for selection lists 9312Steering column stalk, rightWindshield wipers 75Rain sensor 75Clean the windshields and head‐
lamps 75Rear window wiper in Canadian
models 77Rear window wiper 77Cleaning rear window 7713Start/stop the engine and switch
the ignition on/off 6814Auto Start/Stop function 6915Horn16Steering wheel heating 6217Adjust steering wheel 61Seite 15CockpitAt a glance15
Online Edition for Part no. 01 40 2 926 740 - X/13
Page 16 of 265

18Unlock hood 222
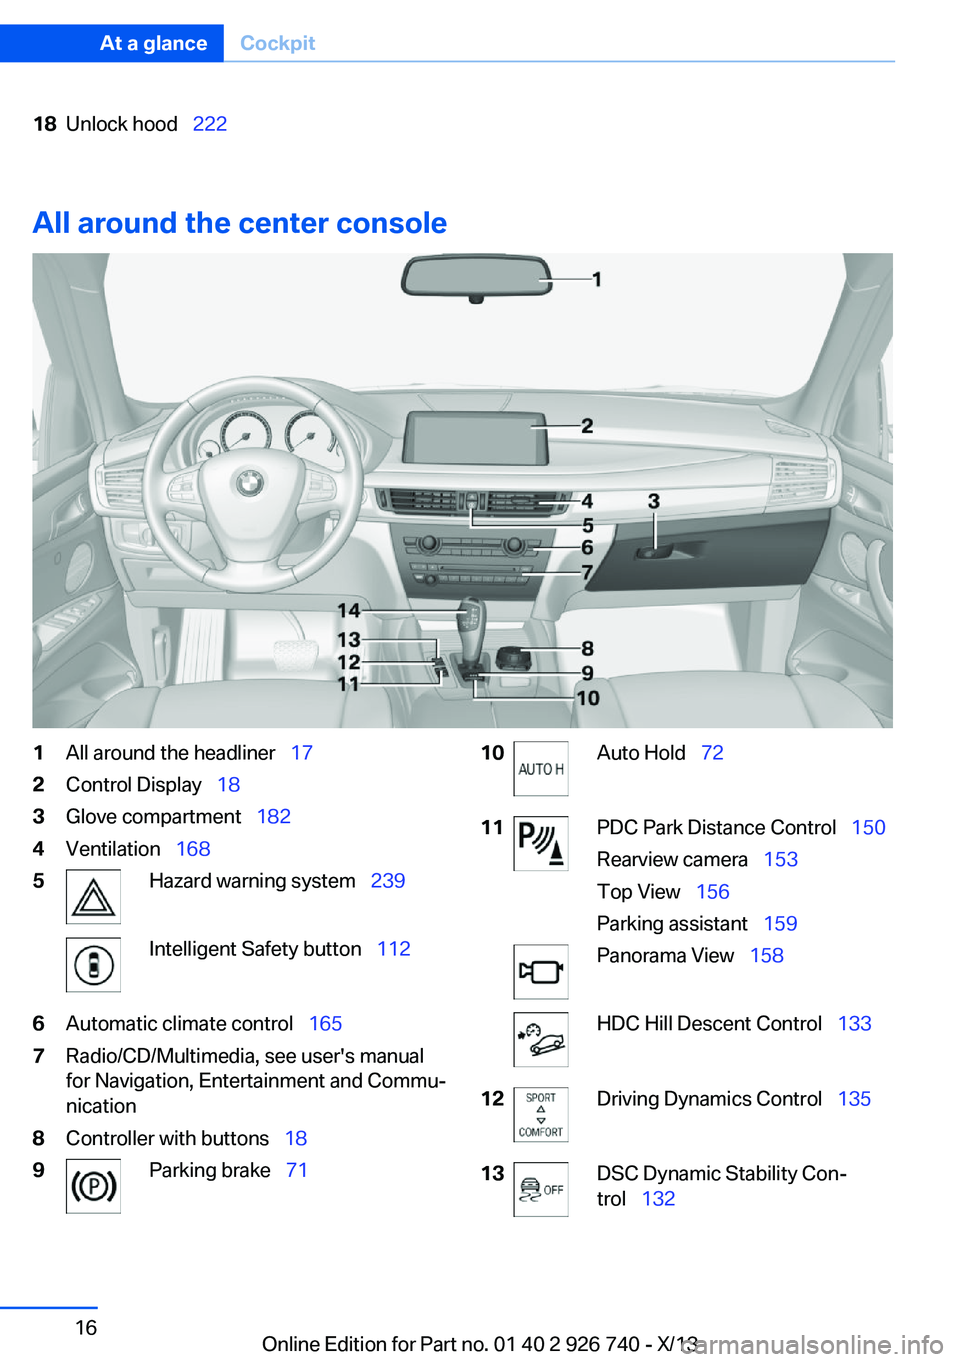
All around the center console
1All around the headliner 172Control Display 183Glove compartment 1824Ventilation 1685Hazard warning system 239Intelligent Safety button 1126Automatic climate control 1657Radio/CD/Multimedia, see user's manual
for Navigation, Entertainment and Commu‐
nication8Controller with buttons 189Parking brake 7110Auto Hold 7211PDC Park Distance Control 150
Rearview camera 153
Top View 156
Parking assistant 159Panorama View 158HDC Hill Descent Control 13312Driving Dynamics Control 13513DSC Dynamic Stability Con‐
trol 132Seite 16At a glanceCockpit16
Online Edition for Part no. 01 40 2 926 740 - X/13
Page 18 of 265

iDriveVehicle equipment
All standard, country-specific and optional
equipment that is offered in the model series is
described in this chapter. Therefore, equip‐
ment is also described that is not available in a
vehicle, e. g., because of the selected optional
equipment or country variant. This also applies
for safety-related functions and systems.
The concept The iDrive combines the functions of a multi‐
tude of switches. Thus, these functions can be
operated from a central location.
Using the iDrive during a trip
To avoid becoming distracted and pos‐
ing an unnecessary hazard to your vehicle's
occupants and to other road users, never at‐
tempt to use the controls or enter information
unless traffic and road conditions allow this.◀
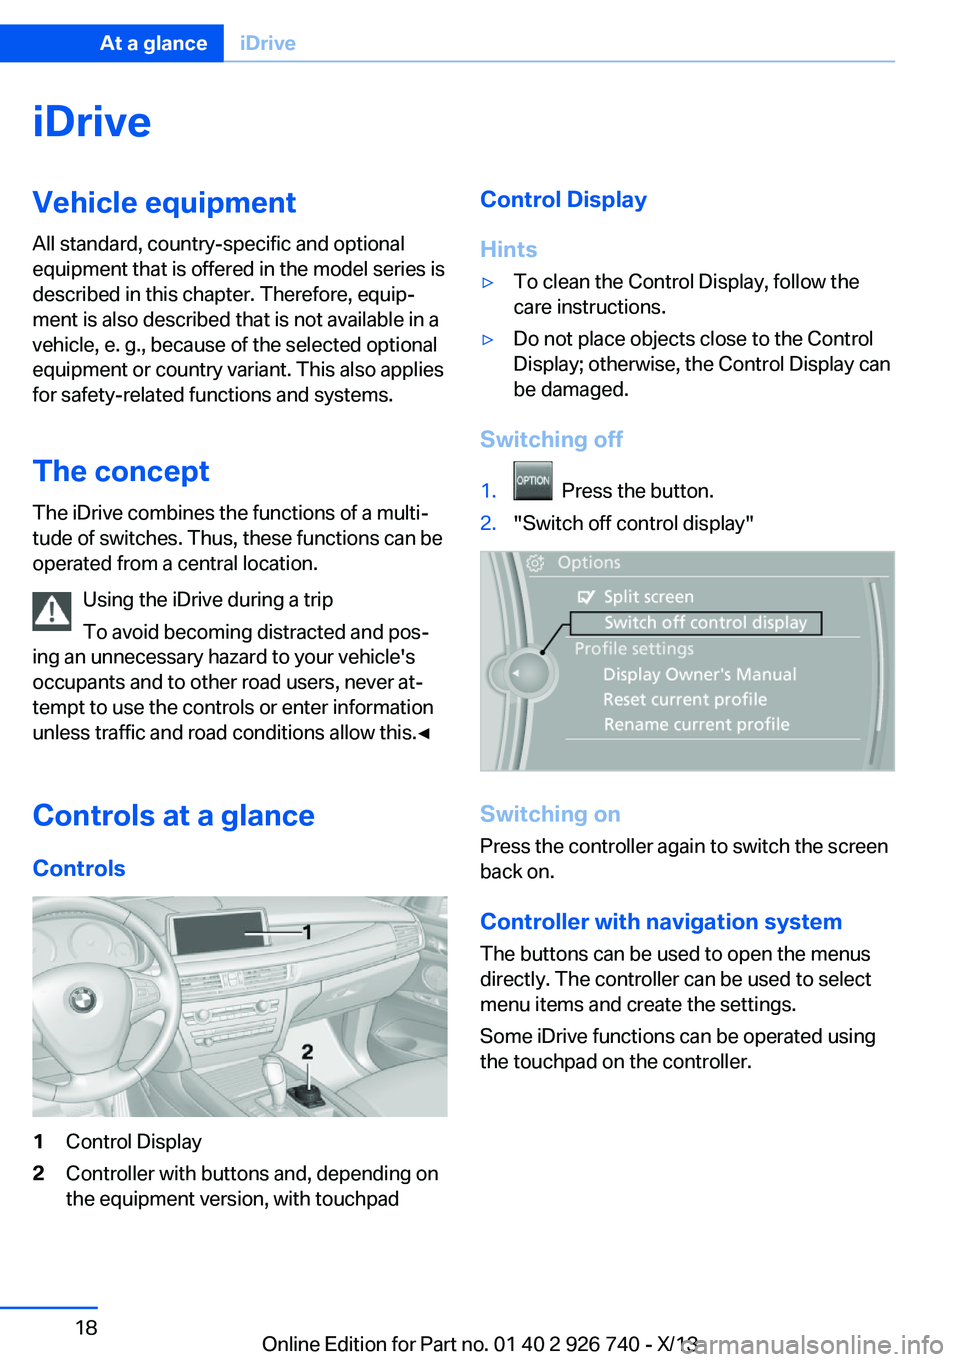
Controls at a glance Controls1Control Display2Controller with buttons and, depending on
the equipment version, with touchpadControl Display
Hints▷To clean the Control Display, follow the
care instructions.▷Do not place objects close to the Control
Display; otherwise, the Control Display can
be damaged.
Switching off
1. Press the button.2."Switch off control display"
Switching on
Press the controller again to switch the screen
back on.
Controller with navigation system
The buttons can be used to open the menus
directly. The controller can be used to select
menu items and create the settings.
Some iDrive functions can be operated using
the touchpad on the controller.
Seite 18At a glanceiDrive18
Online Edition for Part no. 01 40 2 926 740 - X/13
Page 19 of 265

1.Turn.2.Press.3.Move in four directions.
Buttons on controller
Press the but‐
tonFunctionMENUOpen the main menu.RADIOOpens the Radio menu.MEDIAOpens the CD/Multimedia
menu.NAVOpens the Navigation menu.Press the but‐
tonFunctionTELOpens the Telephone menu.BACKDisplays the previous panel.OPTIONOpens the Options menu.
Controller without navigation system
The buttons can be used to open the menus
directly. The controller can be used to select
menu items and create the settings.
1.Turn.2.Press.3.Move in two directions.Seite 19iDriveAt a glance19
Online Edition for Part no. 01 40 2 926 740 - X/13
Page 22 of 265

▷For the input of upper/lower case letters
and numbers, it may be necessary to
switch via the controller to the correspond‐
ing Input mode, refer to page 25, e.g.
when the spelling of upper and lower case
letters is identical.▷Enter characters as they are displayed on
the Control Display.▷Always enter accompanying signs, such as
accents or periods so that the letter can be
clearly recognized. The possibility of input
depends on the set language. Where nec‐
essary, enter special characters via the
controller.▷To delete a character, slide to the left on
the touchpad.▷To enter a blank space, slide to the right in
the center of the touchpad.▷To enter a hyphen, slide to the right in the
upper area of the touchpad.▷To enter an underscore, slide to the right in
the lower area of the touchpad.
Using interactive map and Internet
The interactive map in the navigation system
and Internet sites can be moved via the touch‐
pad.
FunctionControlsMove interactive map
or Internet sites.Slide in the corre‐
sponding direction.Enlarge/shrink interac‐
tive map or Internet
sites.Drag inwards or
outwards on the
touchpad with the
fingers.Display the menu or
open a link in the Inter‐
net.Tap once.Changing settings
Settings on the control display, such as the
volume, can be made via the touchpad. To do
this slide to the left or right accordingly.
Example: setting the clock Setting the clock1. Press the button. The main menu is
displayed.2.Turn the controller until "Settings" is high‐
lighted, and then press the controller.3.If necessary, move the controller to the left
to display "Time/Date".4.Turn the controller until "Time/Date" is
highlighted, and then press the controller.Seite 22At a glanceiDrive22
Online Edition for Part no. 01 40 2 926 740 - X/13
Page 24 of 265

Split screen
General information Additional information can be displayed on the
right side of the split screen, e.g., information
from the onboard computer.
In the divided screen view, the so-called split
screen, this information remains visible even when you change to another menu.
Switching the split screen on and off1. Press the button.2."Split screen"
Selecting the display
1. Press the button.2."Split screen"3.Move the controller until the split screen is
selected.4.Press the controller or select "Split screen
content".5.Select the desired menu item.
Programmable memory
buttons
General information
The iDrive functions can be stored on the pro‐
grammable memory buttons and called up di‐
rectly, e.g., radio stations, navigation destina‐
tions, phone numbers and entry points into the
menu.
The settings are stored for the remote control
currently in use.
Saving a function1.Highlight the function via the iDrive.2. Press the desired button for more
than 2 seconds.
Running a function
Press the button.
The function will run immediately. This
means, for example, that the number is dialed
when a phone number is selected.
Displaying the button assignment Use a finger to touch the buttons. Do not wear
gloves or use objects.
The key assignment is displayed at the top
edge of the screen.
▷To display short information: touch the
button.▷To display detailed information: touch the
button for an extended period.
Deleting the button assignments
1.Press buttons 1 and 8 simultaneously for
approx. five seconds.2."OK"Seite 24At a glanceiDrive24
Online Edition for Part no. 01 40 2 926 740 - X/13
Page 25 of 265

Entering letters and numbersGeneral information1.Turn the controller: select letters or num‐
bers.2.Select additional letters or numbers if
needed.3."OK": confirm the entry.SymbolFunction Press the controller: delete the let‐
ter or number. Press the controller for an extended
period: delete all letters or numbers.
Switching between cases, letters and
numbers
Depending on the menu, you can switch be‐
tween entering upper and lower case, letters
and numbers:
SymbolFunction Enter the letters. Enter the numbers. or Move the controller up.
Without navigation system
Select the symbol.
Entry comparison Entry of names and addresses: the selection is
narrowed down every time a letter is entered
and letters may be added automatically.
The entries are continuously compared to the
data stored in the vehicle.
▷Only those letters are offered during the
entry for which data is available.▷Destination search: town/city names can
be entered using the spelling of language
available on the Control Display.Seite 25iDriveAt a glance25
Online Edition for Part no. 01 40 2 926 740 - X/13