2014 BMW X5 XDRIVE35D tow
[x] Cancel search: towPage 218 of 265

M+S
Winter and all-season tires with better cold
weather performance than summer tires.
Tire tread Summer tires
Do not drive with a tire tread depth of less than
0.12 in/3 mm.
There is an increased danger of hydroplaning if
the tread depth is less than 0.12 in/3 mm.
Winter tires
Do not drive with a tire tread depth of less than
0.16 in/4 mm.
Below a tread depth of 0.16 in/4 mm, tires are
less suitable for winter operation.
Minimum tread depth
Wear indicators are distributed around the
tire's circumference and have the legally re‐
quired minimum height of 0.063 in/1.6 mm.
They are marked on the side of the tire with
TWI, Tread Wear Indicator.
Tire damage
General information
Inspect your tires often for damage, foreign
objects lodged in the tread, and tread wear.
Notes
Driving over rough or damaged road surfaces,
as well as debris, curbs and other obstacles
can cause serious damage to wheels, tires and
suspension parts. This is more likely to occur
with low-profile tires, which provide less cush‐
ioning between the wheel and the road. Be
careful to avoid road hazards and reduce your
speed, especially if your vehicle is equipped
with low-profile tires.
Indications of tire damage or other vehicle de‐
fects:▷Unusual vibrations during driving.▷Unusual handling such as a strong ten‐
dency to pull to the left or right.
Damage can, e. g., be caused by driving over
curbs, road damage, or similar things.
In case of tire damage
If there are indications of tire damage, re‐
duce your speed immediately and have the
wheels and tires checked right away; other‐
wise, there is the increased risk of an accident.
Drive carefully to the nearest service center.
Have the vehicle towed or transported there.
Otherwise, tire damage can become life threat‐
ening for vehicle occupants and also other
road users.◀
Repair of tire damage
For safety reasons, the manufacturer of
your vehicle recommends that you do not have
damaged tires repaired; they should be re‐
placed. Otherwise, damage can occur as a re‐
sult.◀
Changing wheels and tires
Mounting Information on mounting tires
Have mounting and balancing performed
only by a service center.
Seite 218MobilityWheels and tires218
Online Edition for Part no. 01 40 2 926 740 - X/13
Page 228 of 265

3.If the coolant is low, slowly add coolant up
to the specified level; do not overfill.4.Turn the cap until there is an audible click.
The arrows on the coolant reservoir and
the cap must point towards one another.5.Have the cause of the coolant loss elimi‐
nated as soon as possible.
Disposal
Comply with the relevant environmen‐
tal protection regulations when dispos‐
ing of coolant and coolant additives.
Seite 228MobilityCoolant228
Online Edition for Part no. 01 40 2 926 740 - X/13
Page 237 of 265

Check for secure seating of the lug
bolts
For safety reasons, have the secure seat‐
ing of the lug bolts checked with a cali‐
brated torque wrench; otherwise, a safety
hazard results from incorrectly tightened
lug bolts.◀2.Stow the defective wheel in the cargo area.
The defective wheel cannot be stored un‐
der the cargo floor cover because of its
size.3.Check tire inflation pressure at the next op‐
portunity and correct as needed.4.Reinitialize the Flat Tire Monitor, refer to
page 111.
Reinitialize the Tire Pressure Monitor, refer
to page 108.5.Replace the damaged tires as soon as pos‐
sible.
Driving with the compact wheel
Watch the speed when driving with the
compact wheel
Drive conservatively and do not exceed a
speed of 50 mph/80 km/h; otherwise, changed
driving characteristics such as reduced lane
stability while braking, extended braking dis‐
tance and changed self-steering properties in
the limit area.◀
Mounting only one compact wheel
Only a single compact wheel may be
mounted. Reinstall wheels and tires of the
original size as quickly as possible; otherwise,
there is a safety risk.◀
Vehicle battery Maintenance
The battery is maintenance-free. The added
amount of acid is sufficient for the service life
of the battery.
Your service center will be glad to advise you
on questions regarding the battery.
Battery replacement Use approved vehicle batteries only
Only use vehicle batteries that have been
approved for your vehicle by the manufacturer;
otherwise, the vehicle could be damaged and
systems or functions may not be fully availa‐
ble.◀
After a battery replacement, have the battery
registered on the vehicle by your service cen‐
ter to ensure that all comfort functions are fully
available and that any Check Control mes‐
sages of these comfort functions are no longer
displayed.
Charging the battery
Note Do not plug chargers into the socket
Do not connect battery chargers to the
factory-installed sockets in the vehicle as this
may damage the battery.◀
General information
Make sure that the battery is always suffi‐
ciently charged to guarantee that the battery
remains usable for its full service life.
The battery may need to be charged in the fol‐
lowing cases:▷When making frequent short-distance
drives.▷If the vehicle is not used for prolonged pe‐
riods, longer than a month.
Starting aid terminals
In the vehicle, only charge the battery via the
starting aid terminals, refer to page 241, in the
engine compartment with the engine off.
Seite 237Replacing componentsMobility237
Online Edition for Part no. 01 40 2 926 740 - X/13
Page 242 of 265

corresponding engine or body ground of
the vehicle to be started.
Starting the engine
Never use spray fluids to start the engine.
1.Start the engine of the assisting vehicle
and let it run for several minutes at an in‐
creased idle speed.
If the vehicle being started has a diesel en‐
gine: let the engine of the assisting vehicle
run for approx. 10 minutes.2.Start the engine of the vehicle being
started in the usual way.
If the first starting attempt is not success‐
ful, wait a few minutes before making an‐
other attempt in order to allow the dis‐
charged battery to recharge.3.Let both engines run for several minutes.4.Disconnect the jumper cables in the re‐
verse order.
Check the battery and recharge if necessary.
Tow-starting and towing Note Tow-starting and towing
When tow-starting and towing the vehi‐
cle, switch off the Intelligent Safety systems;
otherwise, improper behavior of the braking
function of individual systems could result in
an accident.◀
Switch off Intelligent Safety systems, refer to
page 112.
Transporting your vehicle
Note
Your vehicle is not permitted to be towed.
Therefore, contact a service center in the
event of a breakdown.
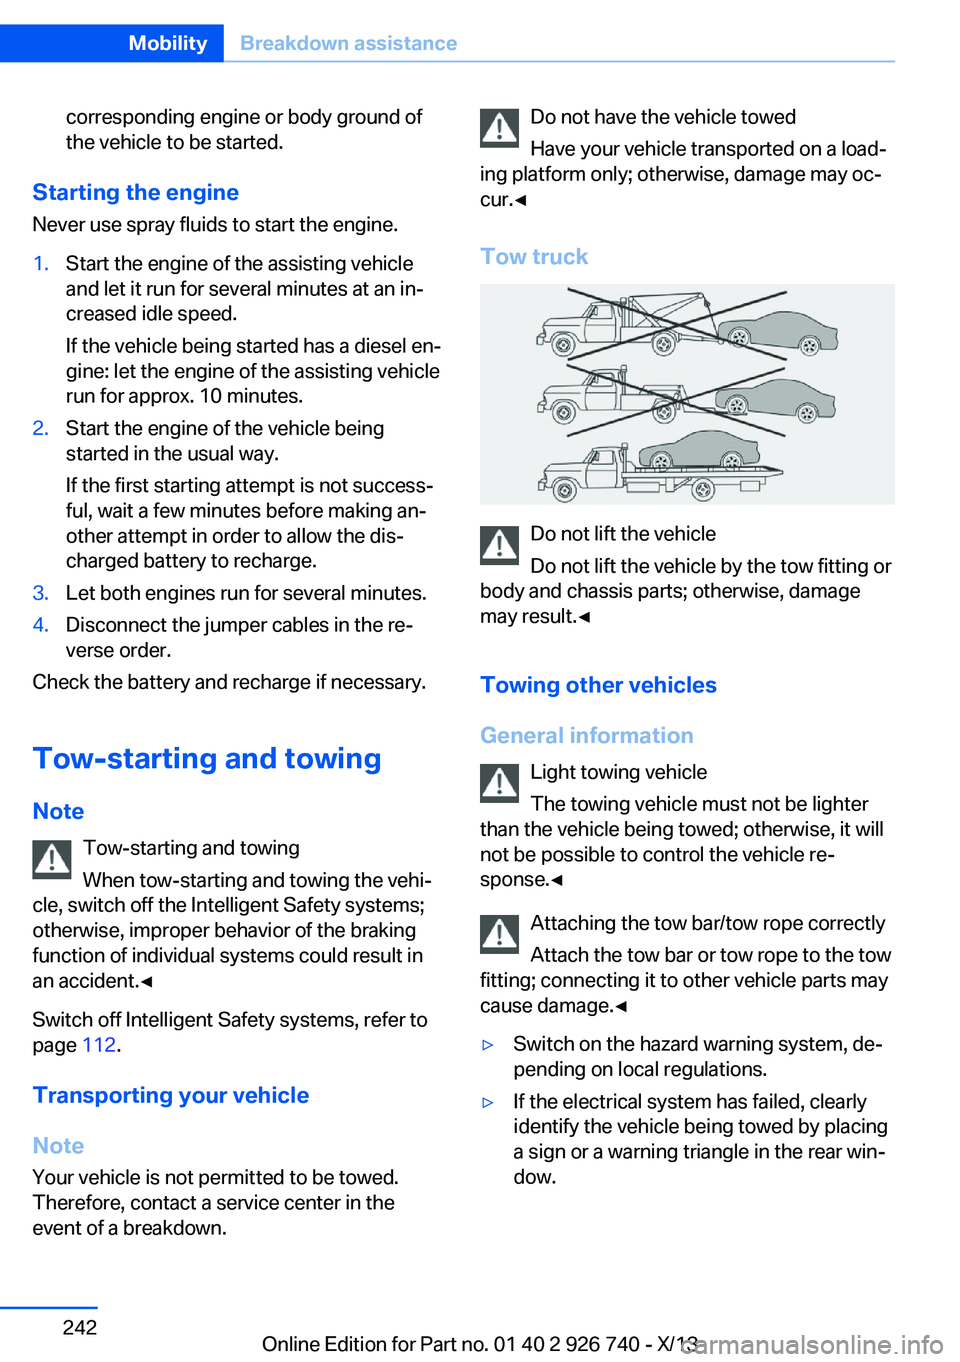
Do not have the vehicle towed
Have your vehicle transported on a load‐
ing platform only; otherwise, damage may oc‐
cur.◀
Tow truck
Do not lift the vehicle
Do not lift the vehicle by the tow fitting or
body and chassis parts; otherwise, damage
may result.◀
Towing other vehicles
General information Light towing vehicle
The towing vehicle must not be lighter
than the vehicle being towed; otherwise, it will
not be possible to control the vehicle re‐
sponse.◀
Attaching the tow bar/tow rope correctly
Attach the tow bar or tow rope to the tow
fitting; connecting it to other vehicle parts may
cause damage.◀
▷Switch on the hazard warning system, de‐
pending on local regulations.▷If the electrical system has failed, clearly
identify the vehicle being towed by placing
a sign or a warning triangle in the rear win‐
dow.Seite 242MobilityBreakdown assistance242
Online Edition for Part no. 01 40 2 926 740 - X/13
Page 243 of 265

Towing methods when towing other
vehicles
Tow bar The tow fittings used should be on the same
side on both vehicles.
Should it prove impossible to avoid mounting
the tow bar at an offset angle, please observe
the following:▷Maneuvering capability is limited during
cornering.▷The tow bar will generate lateral forces if it
is secured with an offset.
Tow rope
When starting to tow the vehicle, make sure
that the tow rope is taut.
To avoid jerking and the associated stresses
on the vehicle components when towing, al‐
ways use nylon ropes or nylon straps.
Attaching the tow rope correctly
Only secure the tow rope on the tow fit‐
ting; otherwise, damage can occur when it is
secured on other parts of the vehicle.◀
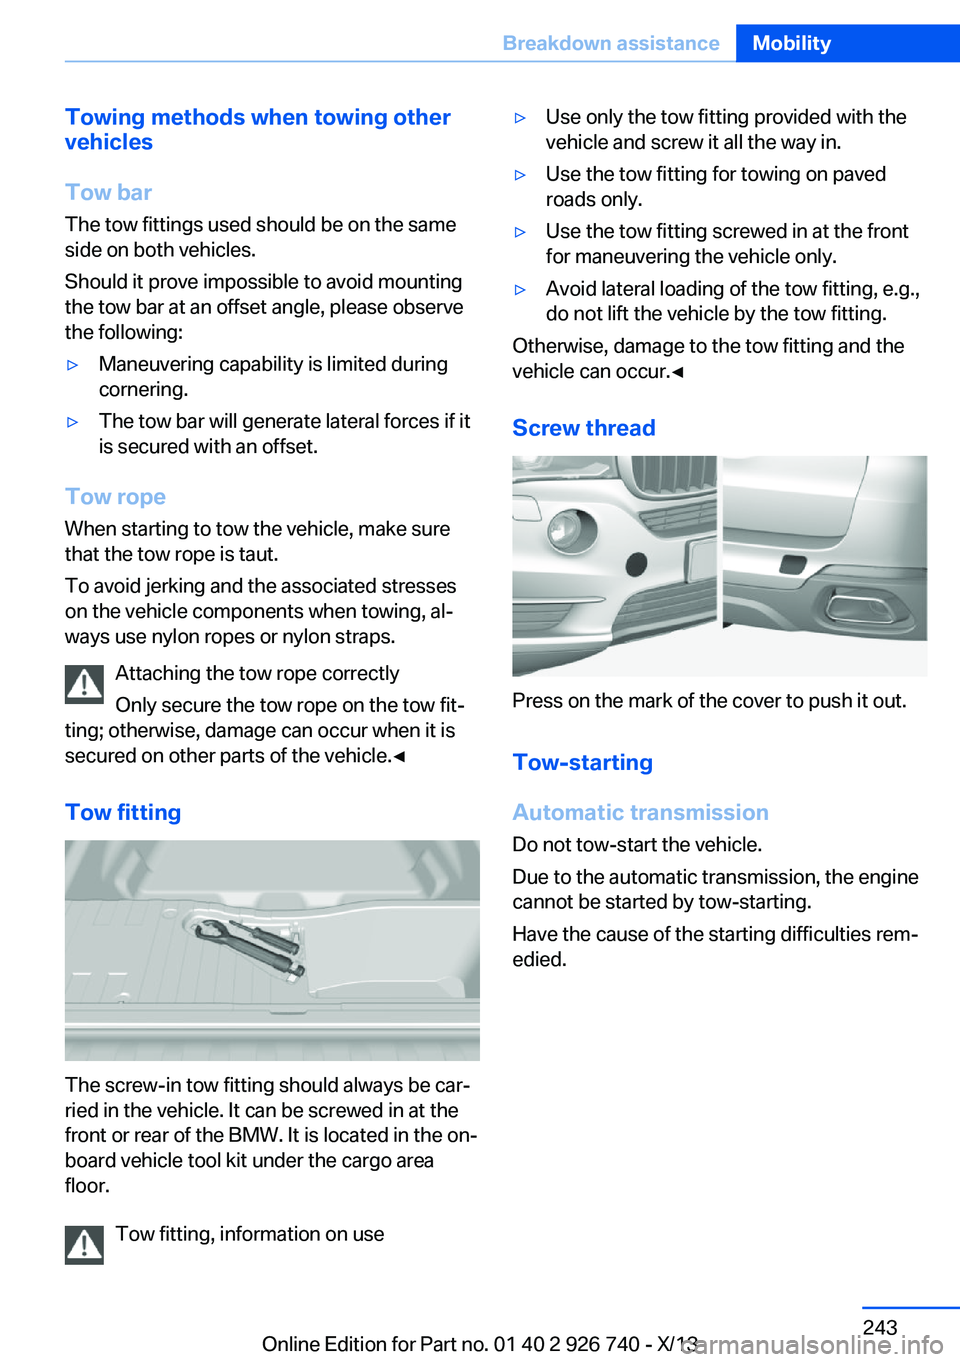
Tow fitting
The screw-in tow fitting should always be car‐
ried in the vehicle. It can be screwed in at the
front or rear of the BMW. It is located in the on‐
board vehicle tool kit under the cargo area
floor.
Tow fitting, information on use
▷Use only the tow fitting provided with the
vehicle and screw it all the way in.▷Use the tow fitting for towing on paved
roads only.▷Use the tow fitting screwed in at the front
for maneuvering the vehicle only.▷Avoid lateral loading of the tow fitting, e.g.,
do not lift the vehicle by the tow fitting.
Otherwise, damage to the tow fitting and the
vehicle can occur.◀
Screw thread
Press on the mark of the cover to push it out.
Tow-starting
Automatic transmission
Do not tow-start the vehicle.
Due to the automatic transmission, the engine
cannot be started by tow-starting.
Have the cause of the starting difficulties rem‐
edied.
Seite 243Breakdown assistanceMobility243
Online Edition for Part no. 01 40 2 926 740 - X/13
Page 254 of 265

Everything from A to Z
IndexA ABS, Antilock Brake Sys‐ tem 131
ACC, Active Cruise Control with Stop & Go 138
Acceleration Assistant, refer to Launch Control 80
Activated-charcoal filter 168
Active Blind Spot Detec‐ tion 126
Active Cruise Control with Stop & Go, ACC 138
Active Protection 128
Active roll stabilization 135
Active seat ventilation, front 53
Active Steering 134
Adaptive brake lights, refer to Brake force display 128
Adaptive Light Control 100
Additives, oil 225
Adjustments, seats/head re‐ straints 50
After washing vehicle 245
Airbags 104
Airbags, indicator/warning light 105
Air circulation, refer to Recir‐ culated-air mode 167
Air, dehumidifying, refer to Cooling function 167
Air distribution, manual 166
Air flow, automatic climate control 166
Air pressure, tires 211
Air vents, refer to Ventila‐ tion 168
Alarm system 45
Alarm, unintentional 46 All around the center con‐
sole 16
All around the headliner 17
All around the steering wheel 14
All-season tires, refer to Win‐ ter tires 219
All-wheel-drive 133
Alternating-code hand-held transmitter 176
Alternative oil types 226
Antifreeze, washer fluid 77
Antilock Brake System, ABS 131
Anti-slip control, refer to DSC 132
Approved axle load 250
Approved engine oils 225
Arrival time 94
Ashtray 177
Ashtray, front 177
Assistance, Roadside Assis‐ tance 240
Assistance when driving off 131
Assist system, refer to Intelli‐ gent Safety 112
Attentiveness assistant 128
AUTO H button, refer to Au‐ tomatic Hold 72
AUTO intensity 166
Automatic car wash 244
Automatic climate con‐ trol 165
Automatic Cruise Control with Stop & Go 138
Automatic Curb Monitor 60
Automatic deactivation, front passenger airbags 106
Automatic headlamp con‐ trol 100 Automatic Hold 72
Automatic locking 44
Automatic recirculated-air control 167
Automatic Soft Closing, doors 40
Automatic tailgate 40
Automatic transmission with Steptronic 78
AUTO program, automatic cli‐ mate control 166
AUTO program, intensity 166
Auto Start/Stop function 69
Average fuel consumption 94
Average speed 94
Axle loads, weights 250
B Backrest curvature, refer to Lumbar support 52
Backrest, width 53
Backup camera 153
Bad road trips 193
Band-aids, refer to First aid kit 240
Bar for tow-starting/ towing 243
Battery replacement, vehicle battery 237
Battery replacement, vehicle remote control 34
Battery, vehicle 237
Belts, safety belts 55
Beverage holder, cu‐ pholder 185
Blinds, sun protection 48
BMW Advanced Diesel 207
BMW Assist, see user's manual for Navigation, En‐Seite 254ReferenceEverything from A to Z254
Online Edition for Part no. 01 40 2 926 740 - X/13
Page 257 of 265

Emergency service, refer toRoadside Assistance 240
Emergency start function, en‐ gine start 35
Energy Control 90
Energy recovery 90
Engine, automatic Start/Stop function 69
Engine, automatic switch- off 69
Engine compartment 222
Engine compartment, work‐ ing in 222
Engine coolant 227
Engine idling when driving, coasting 200
Engine oil 224
Engine oil, adding 225
Engine oil additives 225
Engine oil change 226
Engine oil filler neck 225
Engine oil temperature 88
Engine oil types, alterna‐ tive 226
Engine oil types, ap‐ proved 225
Engine start during malfunc‐ tion 35
Engine start, jump-start‐ ing 241
Engine start, refer to Starting the engine 68
Engine stop 68
Engine temperature 88
Entering a car wash 244
Equipment, interior 175
ESP Electronic Stability Pro‐ gram, refer to DSC 132
Exchanging wheels/tires 218
Exhaust system 190
Exterior mirror, automatic dimming feature 61
Exterior mirrors 60
External start 241
External temperature dis‐ play 89 External temperature warn‐
ing 89
Eyes for securing cargo 195
F
Failure message, refer to Check Control 86
False alarm, refer to Uninten‐ tional alarm 46
Fan, refer to Air flow 166
Fault displays, refer to Check Control 86
Filler neck for engine oil 225
Fine wood, care 246
First aid kit 240
Fitting for towing, refer to Tow fitting 243
Flat tire, changing wheels 235
Flat Tire Monitor FTM 110
Flat tire, Tire Pressure Moni‐ tor TPM 107
Flat tire, warning lamp 108, 111
Flooding 191
Floor carpet, care 247
Floor mats, care 247
Fold-out position, windshield wipers 77
Foot brake 192
Front airbags 104
Front center armrest 183
Front cupholder 185
Front fog lamps 102
Front fog lamps/cornering lamps, bulb replace‐
ment 233
Front fog lamps, bulb replace‐ ment 234
Front lamps 233
Front passenger airbags, au‐ tomatic deactivation 106
Front passenger airbags, indi‐ cator lamp 106
FTM Flat Tire Monitor 110 Fuel 206
Fuel cap 204
Fuel consumption, current 90
Fuel consumption, refer to Average fuel consump‐
tion 94
Fuel filler flap 204
Fuel gauge 88
Fuel quality 206
Fuel recommendation 206
Fuel, tank capacity 252
Fuse 238
G
Garage door opener, refer to Universal garage door
opener 175
Gasoline 206
Gasoline quality 206
Gear change, automatic transmission 78
Gear shift indicator 91
General driving notes 190
Glare shield 181
Glasses compartment 184
Glass sunroof, refer to Panor‐ amic glass sunroof 48
Glove compartment 182
Gross vehicle weight, ap‐ proved 250
H
Handbrake, refer to Parking brake 71
Hand-held transmitter, alter‐ nating code 176
Hazard warning flashers 239
HDC Hill Descent Con‐ trol 133
Head airbags 104
Headlamp control, auto‐ matic 100
Headlamp courtesy delay fea‐ ture 99 Seite 257Everything from A to ZReference257
Online Edition for Part no. 01 40 2 926 740 - X/13
Page 258 of 265

Headlamp flasher 75
Headlamp glass 233
Headlamps 233
Headlamps, care 245
Headlamp washer system 75
Headliner 17
Head restraints 50
Head restraints, front 57
Head restraints, rear 58
Head-up Display 97
Head-up Display, care 247
Heating, refer to Parked-car heating 171
Heavy cargo, stowing 195
High-beam Assistant 101
High beams 75
High beams/low beams, refer to High-beam Assistant 101
Hill Descent Control HDC 133
Hills 192
Hill start assistant, refer to Drive-off assistant 131
Hints 6
Holder for beverages 185
Homepage 6
Hood 222
Horn 14
Hot exhaust system 190
HUD Head-up Display 97
Hydroplaning 191
I Ice warning, refer to External temperature warning 89
Icy roads, refer to External temperature warning 89
Identification marks, tires 216
Identification number, refer to Important features in the en‐
gine compartment 222
iDrive 18
Ignition key, refer to Remote control 34
Ignition off 67 Ignition on 67
Indication of a flat tire 108 , 111
Indicator and warning lamps 86
Individual air distribution 166
Individual settings, refer to Personal Profile 35
Inflation pressure, tires 211
Inflation pressure warning FTM, tires 110
Info display, refer to Com‐ puter 93
Initialize, Tire Pressure Moni‐ tor TPM 108
Initializing, Flat Tire Monitor FTM 111
Instrument cluster 82
Instrument cluster, electronic displays 84
Instrument lighting 102
Integrated key 34
Intelligent Emergency Re‐ quest 239
Intelligent Safety 112
Intensity, AUTO pro‐ gram 166
Interior equipment 175
Interior lamps 102
Interior lamps via remote con‐ trol 38
Interior motion sensor 46
Interior rearview mirror, auto‐ matic dimming feature 61
Internet page 6
Interval display, service re‐ quirements 90
J Jacking points for the vehicle jack 235
Joystick, automatic transmis‐ sion 78
Jump-starting 241 K
Key/remote control 34
Keyless Go, refer to Comfort Access 43
Key Memory, refer to Per‐ sonal Profile 35
Kickdown, automatic trans‐ mission 78
Knee airbag 104
L
Lamp replacement 232
Lamp replacement, front 233
Lamp replacement, rear 235
Lamps 99
Lamps and bulbs 232
Lane departure warning 125
Lane margin, warning 125
Language on Control Dis‐ play 96
Lashing eyes, securing cargo 195
LATCH child restraint fixing system 65
Launch Control 80
Leather, care 245
LED front fog lamps, bulb re‐ placement 234
LEDs, light-emitting di‐ odes 232
Letters and numbers, enter‐ ing 25
Light alloy wheels, care 246
Light control 100
Light-emitting diodes, LEDs 232
Lighting 99
Lighting via remote con‐ trol 38
Light switch 99
Load 195
Loading 194
Lock, door 39 Seite 258ReferenceEverything from A to Z258
Online Edition for Part no. 01 40 2 926 740 - X/13