2014 BMW X3 XDRIVE 28I ad blue
[x] Cancel search: ad bluePage 21 of 208

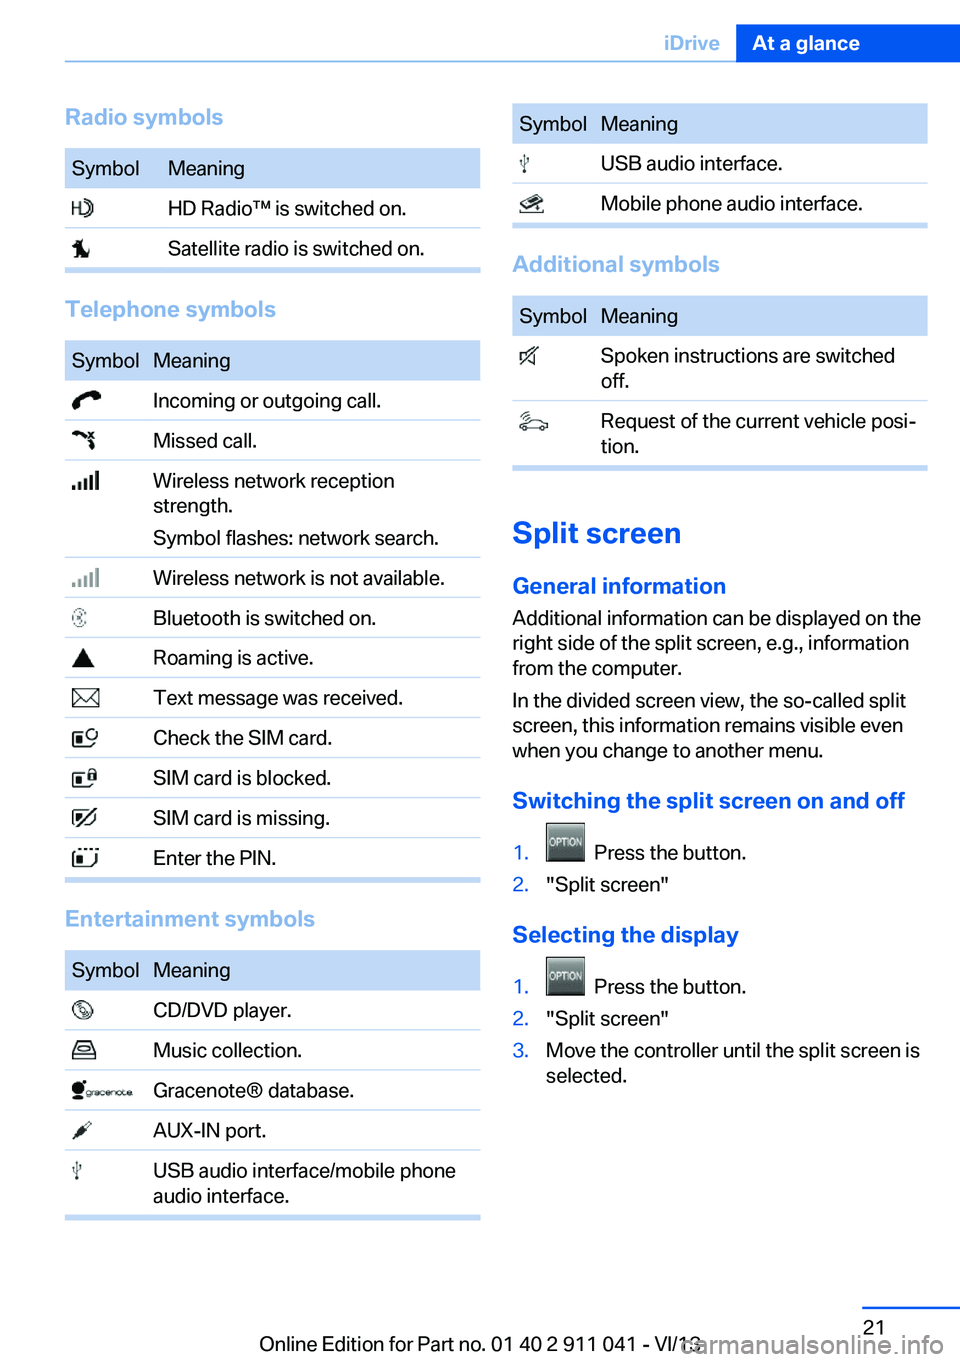
Radio symbolsSymbolMeaning HD Radio™ is switched on. Satellite radio is switched on.
Telephone symbols
SymbolMeaning Incoming or outgoing call. Missed call. Wireless network reception
strength.
Symbol flashes: network search. Wireless network is not available. Bluetooth is switched on. Roaming is active. Text message was received. Check the SIM card. SIM card is blocked. SIM card is missing. Enter the PIN.
Entertainment symbols
SymbolMeaning CD/DVD player. Music collection. Gracenote® database. AUX-IN port. USB audio interface/mobile phone
audio interface.SymbolMeaning USB audio interface. Mobile phone audio interface.
Additional symbols
SymbolMeaning Spoken instructions are switched
off. Request of the current vehicle posi‐
tion.
Split screen
General information Additional information can be displayed on the
right side of the split screen, e.g., information
from the computer.
In the divided screen view, the so-called split
screen, this information remains visible even when you change to another menu.
Switching the split screen on and off
1. Press the button.2."Split screen"
Selecting the display
1. Press the button.2."Split screen"3.Move the controller until the split screen is
selected.Seite 21iDriveAt a glance21
Online Edition for Part no. 01 40 2 911 041 - VI/13
Page 90 of 208

Setting the duration1."Settings"2."Lighting"3."Pathway lighting:"4.Set the duration.
The setting is stored for the remote control
currently in use.
Automatic headlamp control
Switch position
: the low beams are
switched on and off automatically, e.g., in tun‐
nels, in twilight or if there is precipitation. The
indicator lamp in the instrument cluster lights
up.
A blue sky with the sun low on the horizon can
cause the lights to be switched on.
The low beams always stay on when the fog
lamps are switched on.
Personal responsibility
The automatic headlamp control cannot
serve as a substitute for your personal judg‐
ment in determining when the lamps should be
switched on in response to ambient lighting
conditions.
For example, the sensors are unable to detect
fog or hazy weather. To avoid safety risks, you
should always switch on the lamps manually
under these conditions.◀
Daytime running lights With the ignition switched on, the daytime run‐
ning lights light up in position 0,
or .
After the ignition is switched off, the parking
lamps light up in position
.
Activating/deactivating
In some countries, daytime running lights are
compulsory, so it may not be possible to deac‐
tivate the daytime running lights.
1."Settings"2."Lighting"3."Daytime running lamps"
The setting is stored for the remote control
currently in use.
Roadside parking lamps
The vehicle can be illuminated on one side.
Switching on With the ignition switched off, press the lever
either up or down past the resistance point for
approx. 2 seconds.
Switching off Briefly press the lever to the resistance point in
the opposite direction.
Adaptive light control The concept Adaptive Light Control is a variable headlamp
control system that enables dynamic illumina‐
tion of the road surface.
Depending on the steering angle and other pa‐ rameters, the light from the headlamp follows
the course of the road.
Activating Switch position
with the ignition switched
on.
The turning lamps are automatically switched
on depending on the steering angle or the use
of turn signals.
Seite 90ControlsLamps90
Online Edition for Part no. 01 40 2 911 041 - VI/13
Page 91 of 208

To avoid blinding oncoming traffic, the Adap‐
tive Light Control does not swivel to the driv‐
er's side when the vehicle is at a standstill.
When driving in reverse, only the turning lamp
is active.
Self-leveling headlamps The self-leveling headlamps compensate for
acceleration and braking operations in order
not to blind the oncoming traffic and to achieve
optimum illumination of the roadway.
Malfunction
A Check Control message is displayed.
Adaptive light control is malfunctioning or has
failed. Have the system checked as soon as
possible.
Headlamp range control
With halogen headlamps, the headlamp range
of the low beams can be manually adjusted for
the vehicle load to avoid blinding oncoming
traffic.
The values following the slash apply to trailer
operation.
0 / 1 = 1 to 2 people without luggage.
1 / 1 = 5 people without luggage.
1 / 2 = 5 people with luggage.
2 / 2 = 1 person, full cargo area.
High-beam Assistant
The concept If while in switch position
or the low
beams are automatically switched on, this sys‐
tem automatically switches the high beams on
and then off. The procedure is controlled by a
sensor on the front of the interior rearview mir‐
ror. The assistant ensures that the high beams
are switched on whenever the traffic situation
allows. The driver can intervene at any time
and switch the high beams on and off as usual.
Activating1.Turn the light switch to or .2.Press the button on the turn signal lever,
arrow.
The indicator lamp in the instrument
cluster lights up.
When the lights are switched on, the
high beams are switched on and off automati‐
cally.
The system responds to light from oncoming
traffic and traffic driving ahead of you, and to
adequate illumination, e.g., in towns and cities.
The blue indicator lamp in the instru‐
ment cluster lights up when the system
switches on the high beams.
Switching the high beams on and off manually
▷High beams on, arrow 1.▷High beams off/headlamp flasher, arrow 2.Seite 91LampsControls91
Online Edition for Part no. 01 40 2 911 041 - VI/13
Page 129 of 208

Switching the system on/off
Switching off Press and hold the left button until the
control switches off.
Switching on
Press any button except:▷ALL program.▷Rear window defroster.▷Left side of Air volume button.▷Seat heating.
Microfilter/activated-charcoal filter
In external and recirculated air mode the mi‐
crofilter/activated charcoal filter filters dust,
pollen, and gaseous pollutants out of the air.
This filter should be replaced during scheduled
maintenance, refer to page 172, of your vehi‐
cle.
Ventilation
Front ventilation
▷Lever for changing the air flow direction,
arrow 1.▷Thumbwheels for opening and closing the
vents continuously, arrows 2.▷Thumbwheel to vary the temperature, ar‐
row 3.
Toward blue: colder.Toward red: warmer.
Adjusting the ventilation
▷Ventilation for cooling:
Adjust the vent to direct the air in your di‐
rection, such as if the vehicle interior is hot
from the sun.▷Draft-free ventilation:
Adjust the vent to let the air flow past you.
Ventilation in the rear
▷Thumbwheel for continuous opening and
closing of the vents, arrow 1.▷Thumbwheel to vary the temperature, ar‐
row 2.
Toward blue: colder.
Toward red: warmer.▷Lever for changing the air flow direction,
arrow 3.
Parked-car ventilation
The concept The parked-car ventilation ventilates the vehi‐
cle interior and lowers its temperature, if nec‐
essary.
The system can be switched on and off at any
external temperature, either directly or by us‐
ing two preset switch-on times. It remains
switched on for 30 minutes.
Open the vents to allow air to flow out.
Seite 129Climate controlControls129
Online Edition for Part no. 01 40 2 911 041 - VI/13
Page 152 of 208

ECO PRO Tip▷"Tip at:":
Set ECO Pro speed at which an ECO PRO
Tip is to be displayed.▷"ECO PRO speed warning":
A reminder is displayed if the set ECO PRO
speed is exceeded.
ECO PRO climate control
"ECO PRO climate control"
The climate control is adjusted to be fuel-effi‐
cient.
By making a slight change to the set tempera‐
ture, or slowly adjusting the rate of heating or
cooling of the passenger compartment, fuel
consumption can be economized.
The outputs of the seat heater and the exterior
mirror heating are also reduced.
The exterior mirror heating is made available
when outside temperatures are very cold.
ECO PRO potentialThe percentage of potential savings that can
be achieved with the current configuration is
displayed.
Display in the instrument cluster
ECO PRO bonus range An extension of the range can
be achieved by an adjusted driv‐
ing style.
This may be displayed as the
bonus range in the instrument
cluster.
The bonus range is shown in the range display.
The bonus range is automatically reset every
time the vehicle is refueled.
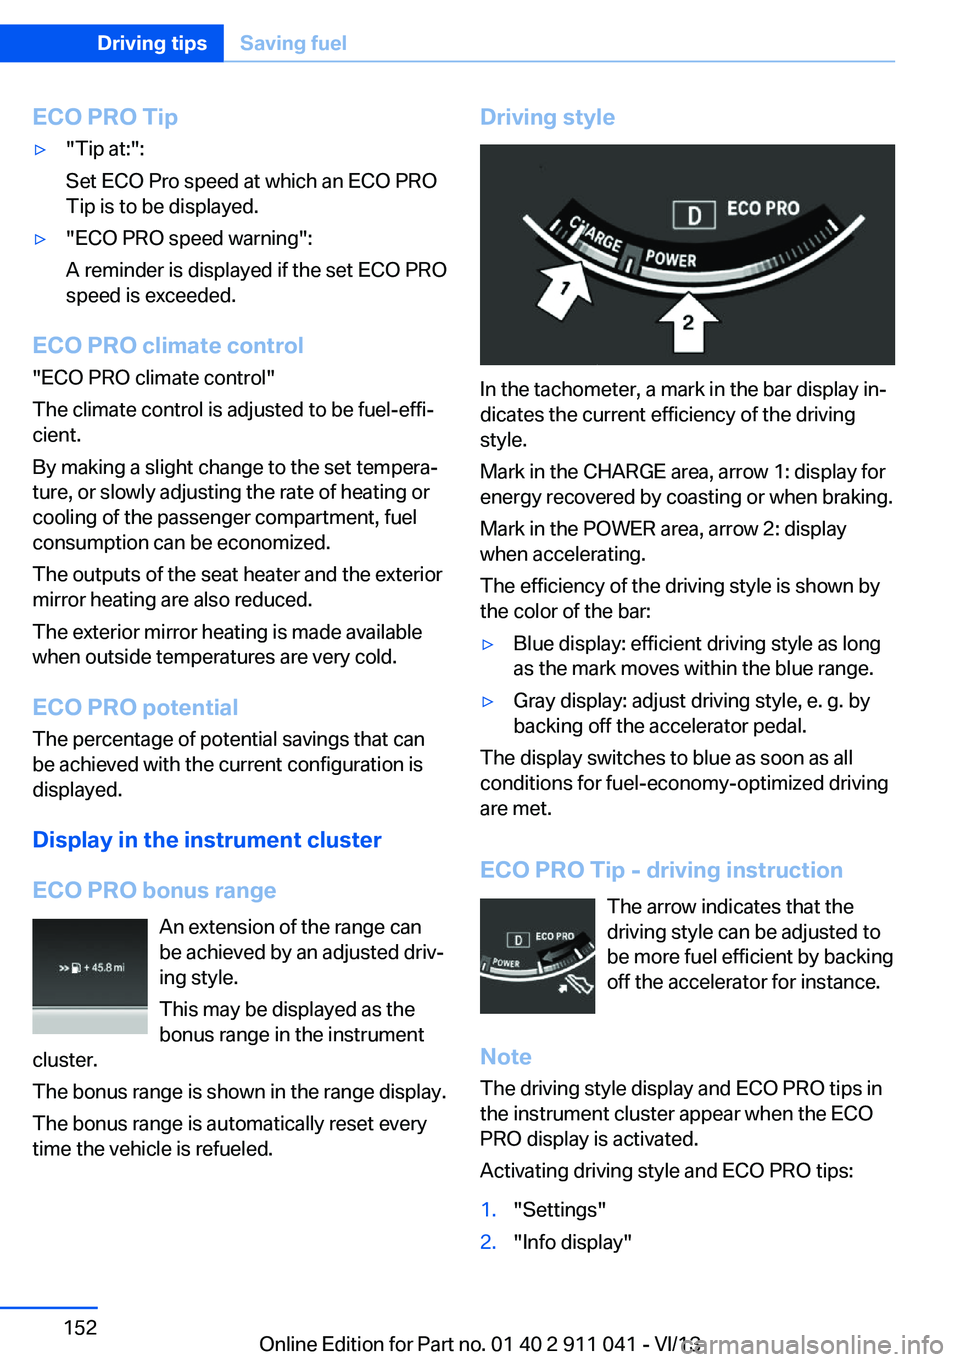
Driving style
In the tachometer, a mark in the bar display in‐
dicates the current efficiency of the driving
style.
Mark in the CHARGE area, arrow 1: display for
energy recovered by coasting or when braking.
Mark in the POWER area, arrow 2: display
when accelerating.
The efficiency of the driving style is shown by
the color of the bar:
▷Blue display: efficient driving style as long
as the mark moves within the blue range.▷Gray display: adjust driving style, e. g. by
backing off the accelerator pedal.
The display switches to blue as soon as all
conditions for fuel-economy-optimized driving
are met.
ECO PRO Tip - driving instruction The arrow indicates that the
driving style can be adjusted to
be more fuel efficient by backing off the accelerator for instance.
Note The driving style display and ECO PRO tips in
the instrument cluster appear when the ECO
PRO display is activated.
Activating driving style and ECO PRO tips:
1."Settings"2."Info display"Seite 152Driving tipsSaving fuel152
Online Edition for Part no. 01 40 2 911 041 - VI/13