2014 BMW X1 SDRIVE28I Lamps
[x] Cancel search: LampsPage 84 of 295

Headlamp courtesy delay feature
The low beams stay lit for a short while after
the ignition is switched off, if the lamps are
switched off and the headlamp flasher is
switched on.
Setting the duration1."Settings"2."Lighting"3."Pathway light.: s"4.Set the duration.
The setting is stored for the remote control
currently in use.
Automatic headlamp control
Switch position
: the low beams are
switched on and off automatically, e.g., in tun‐
nels, in twilight or if there is precipitation. The
LED next to the symbol lights up.
A blue sky with the sun low on the horizon can
cause the lights to be switched on.
The low beams remain switched on independ‐
ent of the ambient lighting conditions when
you switch on the front fog lamps.
Personal responsibility
The automatic headlamp control cannot
serve as a substitute for your personal judg‐
ment in determining when the lamps should be
switched on in response to ambient lighting
conditions.
For example, the sensors are unable to detect
fog or hazy weather. To avoid safety risks, you
should always switch on the lamps manually
under these conditions.◀
Daytime running lights The daytime running lights light up in posi‐
tion 0,
and . After the ignition is
switched off, the parking lamps light up in po‐
sition
.
Activating/deactivating
1."Settings"2."Lighting"3."Daytime running lamps"
The setting is stored for the remote control
currently in use.
Adaptive Light Control
The concept Adaptive Light Control is a variable headlamp
control system that enables dynamic illumina‐
tion of the road surface.
Depending on the steering angle and other pa‐
rameters, the light from the headlamp follows
the course of the road.
In sharp curves, e.g. serpentines, or during
turning, up to a certain speed one of the two
front fog lamps is switched on as a turning
lamp. This provides improved illumination of
the area inside the curve.
Seite 84ControlsLamps84
Online Edition for Part no. 01 40 2 911 269 - VI/13
Page 85 of 295

Controls
Activating Switch position
with the ignition switched
on.
The turning lamps are automatically switched
on depending on the steering angle or the use
of turn signals.
To avoid blinding oncoming traffic, the Adap‐
tive Light Control does not swivel to the driv‐
er's side when the vehicle is at a standstill.
When driving in reverse, both turning lamps
are active.
Malfunction The warning lamp lights up.A mes‐
sage appears on the Control Display.
Adaptive Light Control is malfunc‐
tioning or has failed. Have the system checked
as soon as possible.
High beams/roadside
parking lamps
1High beams2Headlamp flasher3Roadside parking lamps
Left and right roadside parking lamps
The vehicle can be illuminated on one side.
Switching onAfter parking the vehicle, press the lever up ordown beyond the resistance point for ap‐
prox. 2 seconds, arrow 3.
The roadside parking lamps drain the battery.
Therefore, do not leave them on for unduly
long periods of time; otherwise, the battery
might not have enough power to start the en‐
gine.
Switching off
Briefly press the lever in the opposite direction
to the pressure point, arrow 3.
High-beam Assistant
The concept When the lights are switched on, this systemautomatically switches the high beams on and
off. The procedure is controlled by a sensor on
the front of the interior rearview mirror. The as‐
sistant ensures that the high beams are
switched on whenever the traffic situation al‐
lows. The driver can intervene at any time and
switch the high beams on and off as usual.
Activating the High-beam Assistant1.Turn the light switch to .2.With the low beams switched on, briefly
push the turn indicator lever in the direc‐
tion of the high beam.
The indicator lamp in the instrument
cluster lights up. The high beams are
switched on and off automatically.
The system responds to light from oncoming
traffic and traffic driving ahead of you, and to
adequate illumination, e.g., in towns and cities.
Seite 85LampsControls85
Online Edition for Part no. 01 40 2 911 269 - VI/13
Page 86 of 295

Switching the high beams on and off
manually▷High beams on, arrow 1.▷High beams off/headlamp flasher, arrow 2.
To reactivate the High-beam Assistant, briefly
push the turn indicator lever toward the high
beams.
Activating/deactivating via iDrive
1."Settings"2."Lighting"3."High beam assistant"
The setting is stored for the remote control
currently in use.
System limits Personal responsibility
The High-beam Assistant cannot serve
as a substitute for the driver's personal judg‐
ment of when to use the high beams. There‐
fore, manually switch off the high beams in sit‐
uations where this is required to avoid a safety
risk.◀
The system is not fully functional in situations
such as the following, and driver intervention
may be necessary:▷In very unfavorable weather conditions,
such as fog or heavy precipitation.▷In detecting poorly-lit road users, such as
pedestrians, cyclists, horseback riders and
wagons; when driving close to train or ship
traffic; and at animal crossings.▷In tight curves, on hilltops or in depres‐
sions, in cross traffic or half-obscured on‐
coming traffic on freeways.▷In poorly-lit towns and cities and in the
presence of highly reflective signs.▷At low speeds.▷When the windshield in front of the interior
rearview mirror is fogged over, dirty or cov‐
ered with stickers, etc.▷If the sensor view field is dirty.
The view field of the sensor is located on
the front of the interior rearview mirror.
Do not cover this area with stickers, etc.
Clean the sensor view field with a cloth
moistened with a small amount of glass
cleaner.
Fog lamps
Front fog lamps
The parking lamps or low beams must be
switched on.
Press the button. The green indicator
lamp in the instrument cluster lights
up.
If the automatic headlamp control, refer to
page 84, is activated, the low beams will come
on automatically when you switch on the fog
lamps.
Seite 86ControlsLamps86
Online Edition for Part no. 01 40 2 911 269 - VI/13
Page 87 of 295

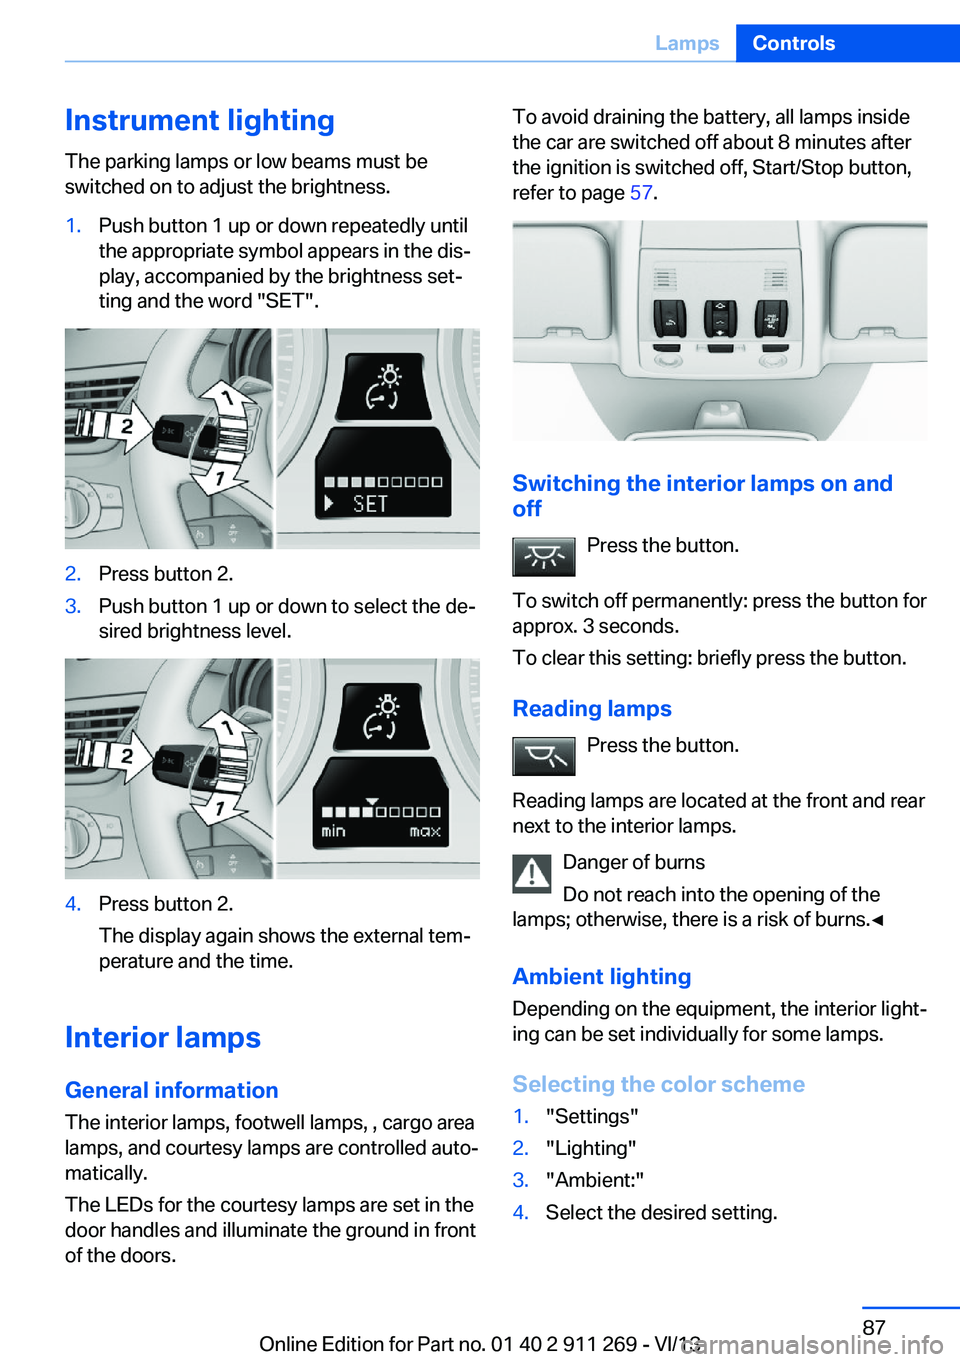
Instrument lightingThe parking lamps or low beams must be
switched on to adjust the brightness.1.Push button 1 up or down repeatedly until
the appropriate symbol appears in the dis‐
play, accompanied by the brightness set‐
ting and the word "SET".2.Press button 2.3.Push button 1 up or down to select the de‐
sired brightness level.4.Press button 2.
The display again shows the external tem‐
perature and the time.
Interior lamps
General information
The interior lamps, footwell lamps, , cargo area
lamps, and courtesy lamps are controlled auto‐
matically.
The LEDs for the courtesy lamps are set in the
door handles and illuminate the ground in front
of the doors.
To avoid draining the battery, all lamps inside
the car are switched off about 8 minutes after
the ignition is switched off, Start/Stop button,
refer to page 57.
Switching the interior lamps on and
off
Press the button.
To switch off permanently: press the button for
approx. 3 seconds.
To clear this setting: briefly press the button.
Reading lamps Press the button.
Reading lamps are located at the front and rear
next to the interior lamps.
Danger of burns
Do not reach into the opening of the
lamps; otherwise, there is a risk of burns.◀
Ambient lighting
Depending on the equipment, the interior light‐
ing can be set individually for some lamps.
Selecting the color scheme
1."Settings"2."Lighting"3."Ambient:"4.Select the desired setting.Seite 87LampsControls87
Online Edition for Part no. 01 40 2 911 269 - VI/13
Page 96 of 295

ficiency and tire tread life, and may affect the
vehicle's handling and stopping ability.
Please note that the TPMS is not a substitute
for proper tire maintenance, and it is the driv‐
er's responsibility to maintain correct tire pres‐
sure, even if under-inflation has not reached
the level to trigger illumination of the TPMS
low tire pressure telltale.
Your vehicle has also been equipped with a
TPMS malfunction indicator to indicate when
the system is not operating properly. The
TPMS malfunction indicator is combined with
the low tire pressure telltale. When the system
detects a malfunction, the telltale will flash for
approximately one minute and then remain
continuously illuminated. This sequence will
continue upon subsequent vehicle startups as
long as the malfunction exists. When the mal‐
function indicator is illuminated, the system
may not be able to detect or signal low tire
pressure as intended. TPMS malfunctions may
occur for a variety of reasons, including the in‐
stallation of replacement or alternate tires or
wheels on the vehicle that prevent the TPMS
from functioning properly. Always check the
TPMS malfunction telltale after replacing one
or more tires or wheels on your vehicle to en‐
sure that the replacement or alternate tires and
wheels allow the TPMS to continue to function
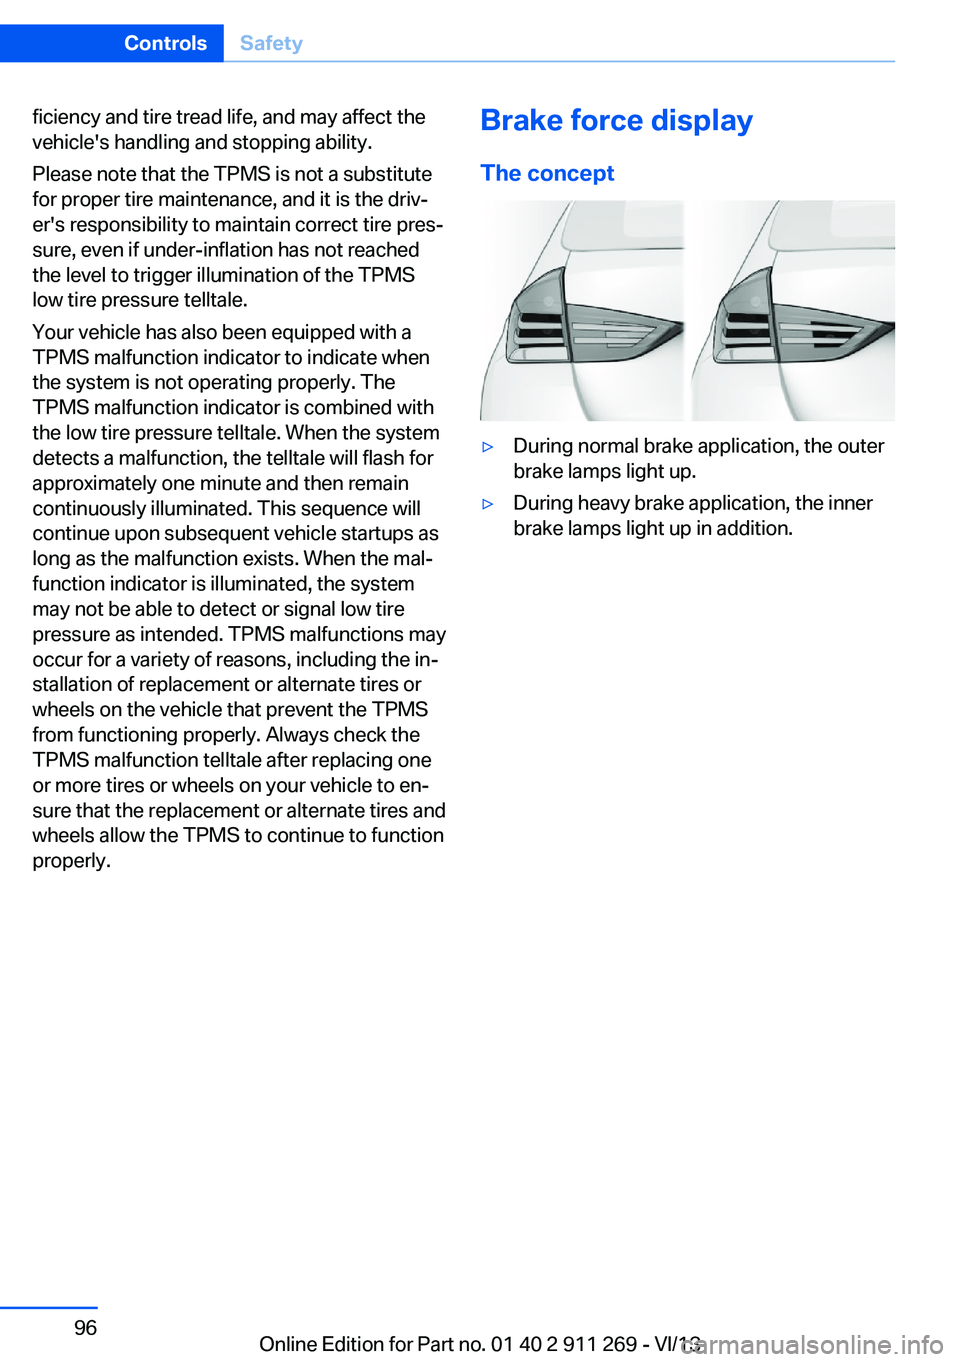
properly.Brake force display
The concept▷During normal brake application, the outer
brake lamps light up.▷During heavy brake application, the inner
brake lamps light up in addition.Seite 96ControlsSafety96
Online Edition for Part no. 01 40 2 911 269 - VI/13
Page 123 of 295

Storage compartmentsVehicle equipmentThis chapter describes all series equipment as
well as country-specific and special equipment
offered for this model series.Therefore, it also
describes equipment that may not be found in
your vehicle, for instance due to the selected
special equipment or the country version. This
also applies to safety-related functions and
systems.
Notes No loose objects in the passenger com‐
partment
Do not stow any objects in the passenger
compartment without securing them; other‐
wise, they may present a danger to occupants
for instance during braking and avoidance ma‐ neuvers.◀
No non-slip mats on the dashboard
Do not use non-slip materials, such as
non-slip mats, on the dashboard, or it could be
damaged by the substances in the materials.◀
Glove compartmentOpening
Pull the handle.
The light in the glove compartment switches
on.
Close the glove compartment again im‐
mediately
Close the glove compartment immediately af‐
ter use while driving; otherwise, injury may oc‐
cur during accidents.◀
ClosingFold up the cover.
USB interface for data transfer
Port for importing and exporting data, such as
music collections, refer to page 179, on USB
devices.
Observe the following when connecting:
▷Do not use force when plugging the con‐
nector into the USB interface.▷Do not connect devices such as fans or
lamps to the USB interface.▷Do not connect a USB hard drive.▷Do not use the USB interface to recharge
external devices.Seite 123Storage compartmentsControls123
Online Edition for Part no. 01 40 2 911 269 - VI/13
Page 187 of 295

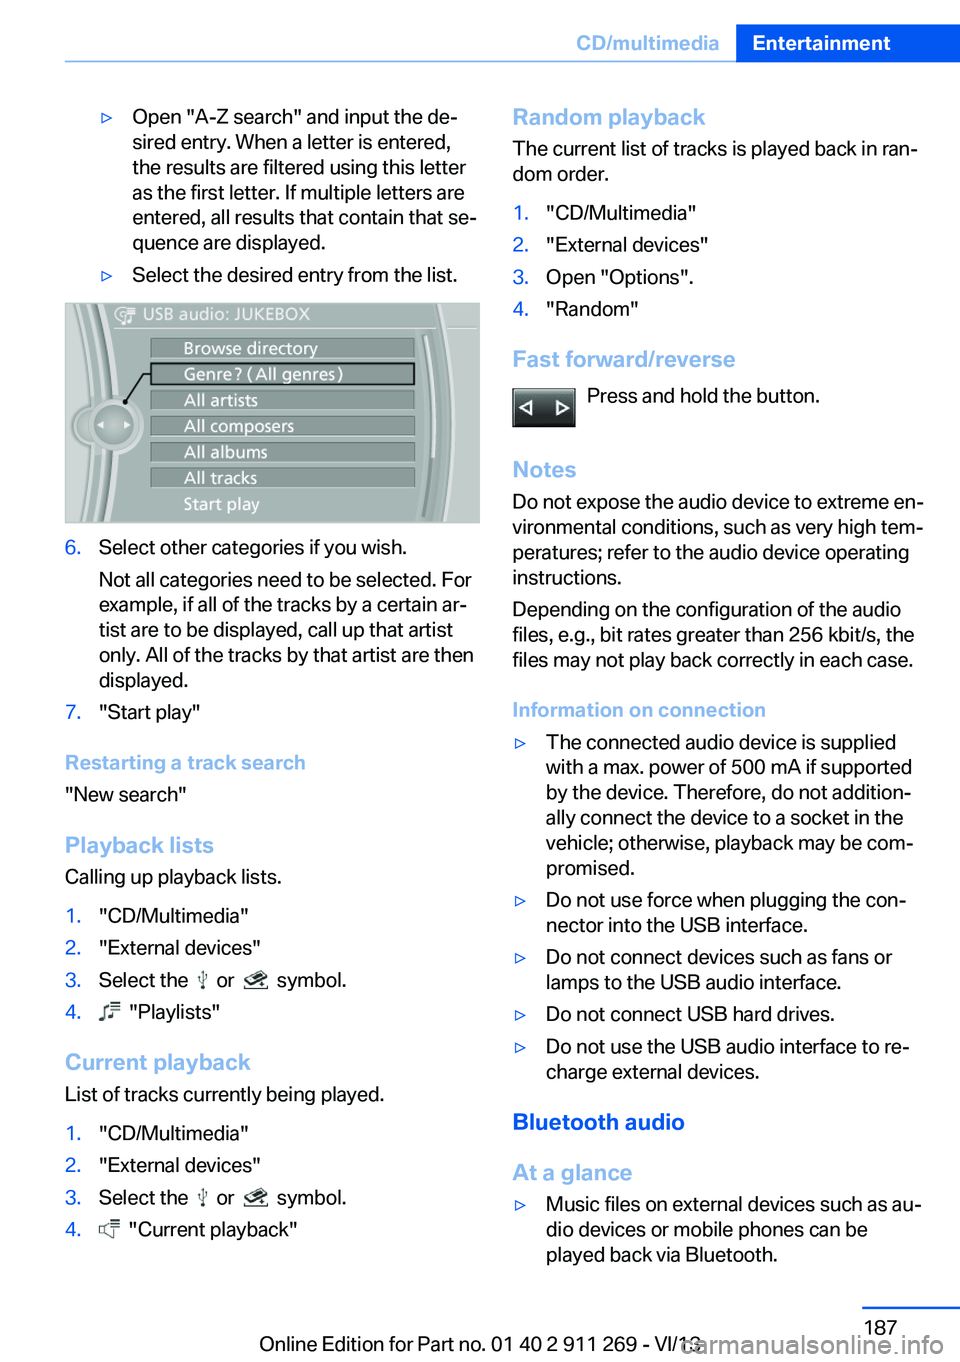
▷Open "A-Z search" and input the de‐
sired entry. When a letter is entered,
the results are filtered using this letter
as the first letter. If multiple letters are
entered, all results that contain that se‐
quence are displayed.▷Select the desired entry from the list.6.Select other categories if you wish.
Not all categories need to be selected. For
example, if all of the tracks by a certain ar‐
tist are to be displayed, call up that artist
only. All of the tracks by that artist are then
displayed.7."Start play"
Restarting a track search
"New search"
Playback lists Calling up playback lists.
1."CD/Multimedia"2."External devices"3.Select the or symbol.4. "Playlists"
Current playbackList of tracks currently being played.
1."CD/Multimedia"2."External devices"3.Select the or symbol.4. "Current playback"Random playbackThe current list of tracks is played back in ran‐dom order.1."CD/Multimedia"2."External devices"3.Open "Options".4."Random"
Fast forward/reverse
Press and hold the button.
Notes Do not expose the audio device to extreme en‐
vironmental conditions, such as very high tem‐
peratures; refer to the audio device operating
instructions.
Depending on the configuration of the audio
files, e.g., bit rates greater than 256 kbit/s, the
files may not play back correctly in each case.
Information on connection
▷The connected audio device is supplied
with a max. power of 500 mA if supported
by the device. Therefore, do not addition‐
ally connect the device to a socket in the
vehicle; otherwise, playback may be com‐
promised.▷Do not use force when plugging the con‐
nector into the USB interface.▷Do not connect devices such as fans or
lamps to the USB audio interface.▷Do not connect USB hard drives.▷Do not use the USB audio interface to re‐
charge external devices.
Bluetooth audio
At a glance
▷Music files on external devices such as au‐
dio devices or mobile phones can be
played back via Bluetooth.Seite 187CD/multimediaEntertainment187
Online Edition for Part no. 01 40 2 911 269 - VI/13
Page 250 of 295

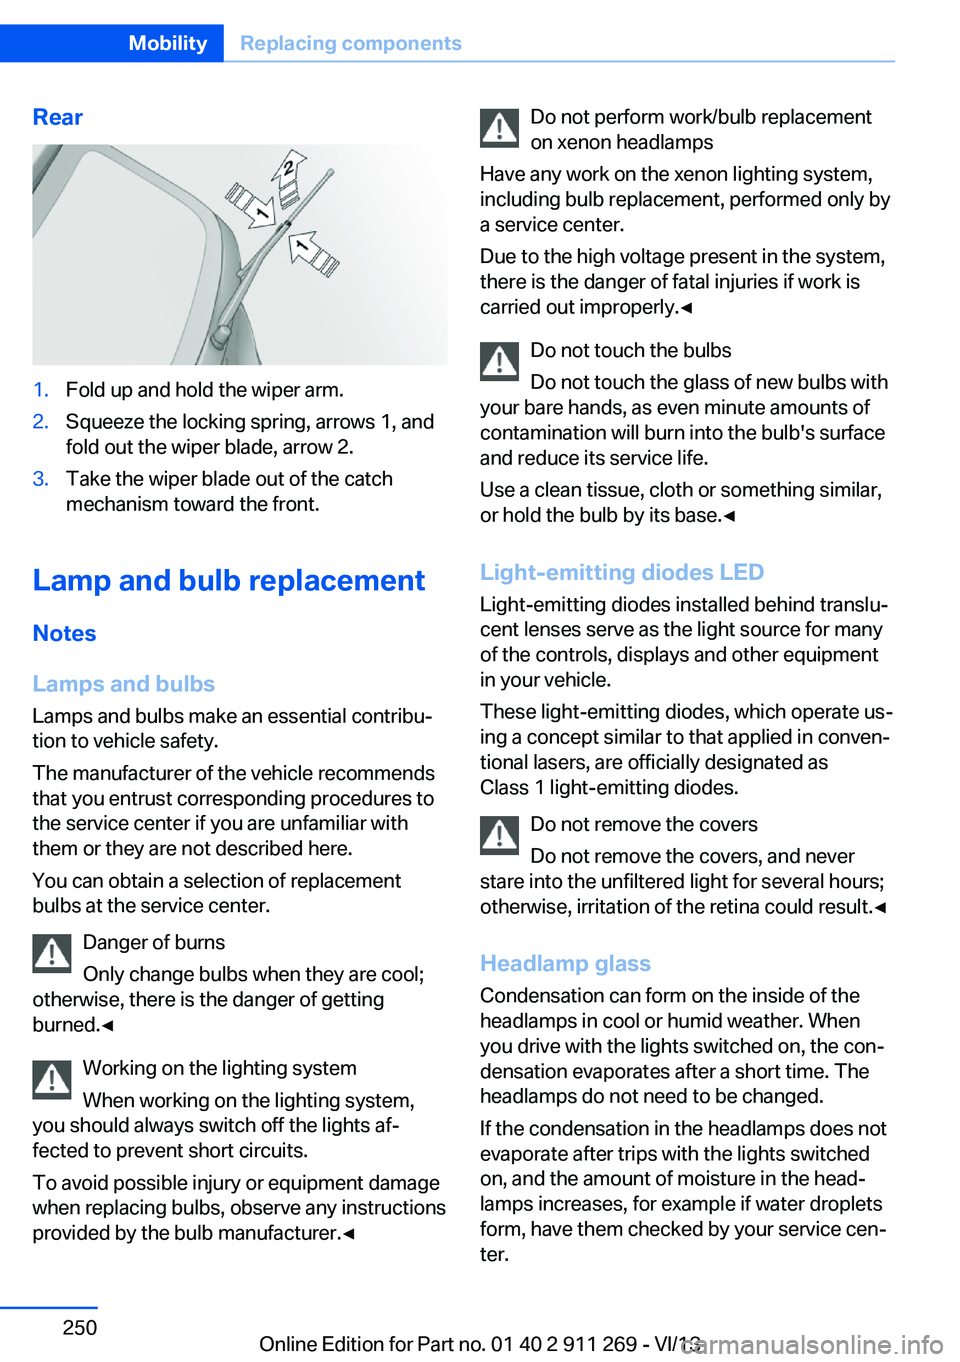
Rear1.Fold up and hold the wiper arm.2.Squeeze the locking spring, arrows 1, and
fold out the wiper blade, arrow 2.3.Take the wiper blade out of the catch
mechanism toward the front.
Lamp and bulb replacement
Notes
Lamps and bulbs
Lamps and bulbs make an essential contribu‐
tion to vehicle safety.
The manufacturer of the vehicle recommends
that you entrust corresponding procedures to
the service center if you are unfamiliar with them or they are not described here.
You can obtain a selection of replacement
bulbs at the service center.
Danger of burns
Only change bulbs when they are cool;
otherwise, there is the danger of getting
burned.◀
Working on the lighting system
When working on the lighting system,
you should always switch off the lights af‐
fected to prevent short circuits.
To avoid possible injury or equipment damage
when replacing bulbs, observe any instructions
provided by the bulb manufacturer.◀
Do not perform work/bulb replacement
on xenon headlamps
Have any work on the xenon lighting system,
including bulb replacement, performed only by
a service center.
Due to the high voltage present in the system,
there is the danger of fatal injuries if work is
carried out improperly.◀
Do not touch the bulbs
Do not touch the glass of new bulbs with
your bare hands, as even minute amounts of
contamination will burn into the bulb's surface
and reduce its service life.
Use a clean tissue, cloth or something similar,
or hold the bulb by its base.◀
Light-emitting diodes LED
Light-emitting diodes installed behind translu‐
cent lenses serve as the light source for many
of the controls, displays and other equipment
in your vehicle.
These light-emitting diodes, which operate us‐
ing a concept similar to that applied in conven‐
tional lasers, are officially designated as
Class 1 light-emitting diodes.
Do not remove the covers
Do not remove the covers, and never
stare into the unfiltered light for several hours; otherwise, irritation of the retina could result.◀
Headlamp glass
Condensation can form on the inside of the
headlamps in cool or humid weather. When
you drive with the lights switched on, the con‐
densation evaporates after a short time. The
headlamps do not need to be changed.
If the condensation in the headlamps does not
evaporate after trips with the lights switched
on, and the amount of moisture in the head‐
lamps increases, for example if water droplets
form, have them checked by your service cen‐
ter.Seite 250MobilityReplacing components250
Online Edition for Part no. 01 40 2 911 269 - VI/13