2014 BMW M6 CONVERTIBLE window
[x] Cancel search: windowPage 52 of 228

▷The trunk lid is closed.▷The external temperature is above
14 ℉/-10 ℃.▷The voltage of the vehicle electrical system
is sufficient.▷The convertible top drive is not overheat‐
ing.▷The vehicle speed is not too high.▷The windows can be lowered.
If this requirement is not met, a check control
message is displayed.
Safety information Do not open convertible top at low tem‐
peratures
With temperatures below +14 ℉/-10 ℃ do not
open the convertible top; otherwise damages
could result.◀
Allow wet convertible top to dry
Do not leave the open convertible top in
the convertible top well longer than one day
while the top is still wet; otherwise, damage
could result due to moisture.◀
Note the swivel range of the convertible
top
The convertible top pivots up during opening
and closing. When the top is moved, e.g., in
garages, make sure that there is a minimum
height of 79 inches/2 meters; otherwise, it
damages may result.◀
Do not place objects on the convertible
top
Do not place any objects on the convertible
top, otherwise, they could fall and cause dam‐
age or injuries.◀
No convertible top movement when roll‐
over protection is activated
Do not move the convertible top when rollover
protection is activated; otherwise, it may result
in damage to the convertible top.◀
Open and close convertible top com‐
pletely
Always open or close the convertible top com‐
pletely. Convertible top and convertible top
well storage cover are locked in the final posi‐
tions. Driving with the convertible top or
convertible top well storage cover unlocked
can result in damage.◀
Do not reach into the convertible top
mechanism
Do not reach into the convertible top mecha‐
nism during the opening and closing operation.
Keep children away from the opening path of
the convertible top, otherwise, there is a risk of
injury.◀
Observe traffic during operation
When the convertible top is opened while
driving, be alert to traffic; otherwise, it may re‐
sult in an accident. If possible, do not move the
convertible top while driving in reverse be‐
cause rearward vision is severely impaired
while the convertible top is in motion. During
windy conditions, do not operate the
convertible top while driving.
Do not drive faster than 30 mph/50 km/h; oth‐
erwise, vehicle damage may occur.◀
Do not attach any roof carrier systems to
the convertible top
Do not attach any roof carrier systems; other‐
wise, an accident may occur.◀
Do not operate convertible top on un‐
even sections or road
Do not open or close convertible top on un‐
even sections of road. Otherwise, the vibra‐
tions can result in damage to the convertible
top.◀
Before opening and closing▷Follow the safety instructions for the
convertible top.Seite 48ControlsOpening and closing48
Online Edition for Part no. 0140 2 956 361 - X/14
Page 53 of 228

▷Make sure that the cargo area partition in
the cargo area is folded down.▷Make sure that the cargo does not push
against the cargo area partition from be‐
low.▷Make sure that the trunk lid is closed.
Opening and closing from the inside
In order to protect the battery, move the
convertible top only when the engine is run‐
ning if possible.
Before closing the convertible top, remove any
foreign objects from the windshield frame; oth‐
erwise, closing may be prevented.
▷Press and hold the reel. The win‐
dows are rolled down, and the
convertible top opens as longs as the reel
is pressed.▷Pull the reel and hold it. The win‐
dows are lowered, the convertible
top closes and the windows are raised
again as long as the reel is pulled.
Push or pull reel until the convertible top is
completely open or closed and the end of the
procedure is indicated by a corresponding
Check Control message. Always make sure
that the convertible top well storage cover is
completely closed. If the convertible top is
completely open or closed, convertible top and
convertible top well storage cover are latched.
LEDs
▷Left LED lights up green: convertible top is
opened or closed. If the operation is com‐
pleted, the LED goes out and a corre‐
sponding Check Control message is dis‐
played.▷Right LED flashes red after the reel is re‐
leased: operating sequence has not yet
concluded.▷Right LED comes on red when the reel is
pressed: cargo area partition is flipped up,
trunk lid is not closed or there is a malfunc‐
tion. Convertible top cannot be moved.In addition to the red LED, a check control
message is displayed.
Interruption Always open/close the convertible top
completely
A convertible top that is not opened or closed
completely is not locked and represents a haz‐
ard.◀
The convertible top movement is interrupted if
the reel is released. The sequence can be con‐
tinued in the desired direction using the reel.
If there is a longer interruption with the ignition
switched on, convertible top and convertible
top well storage cover remain approx. 10 mi‐
nutes in the current position before they slowly
go down. If the ignition is switched off,
convertible top and convertible top well stor‐
age cover lower already after a short waiting
period.
The convertible top and the convertible top
well storage cover are not locked. Operate reel
again until the convertible operation is termi‐
nated.
Convenient operation from outside
When equipped with Comfort Access the
convertible top can also be operated from out‐
side.▷Convenient opening, refer to page 37, via
the remote control.▷Convenient closing, refer to page 38, via
the remote control.▷Closing by means of Comfort Access, refer
to page 41.Seite 49Opening and closingControls49
Online Edition for Part no. 0140 2 956 361 - X/14
Page 54 of 228

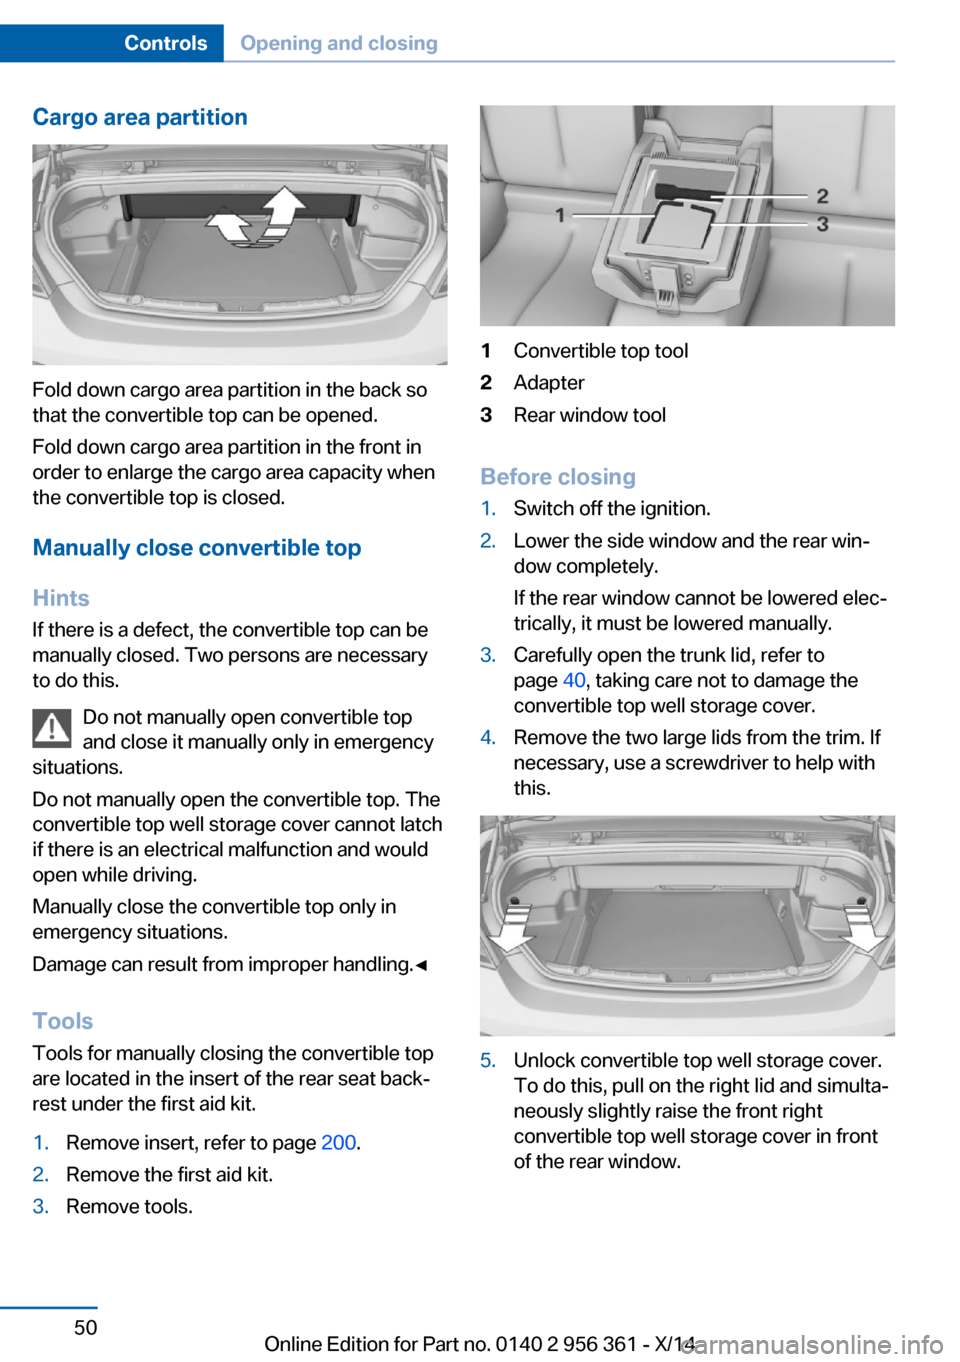
Cargo area partition
Fold down cargo area partition in the back so
that the convertible top can be opened.
Fold down cargo area partition in the front in
order to enlarge the cargo area capacity when
the convertible top is closed.
Manually close convertible top
Hints
If there is a defect, the convertible top can be
manually closed. Two persons are necessary
to do this.
Do not manually open convertible top
and close it manually only in emergency
situations.
Do not manually open the convertible top. The
convertible top well storage cover cannot latch
if there is an electrical malfunction and would
open while driving.
Manually close the convertible top only in
emergency situations.
Damage can result from improper handling.◀
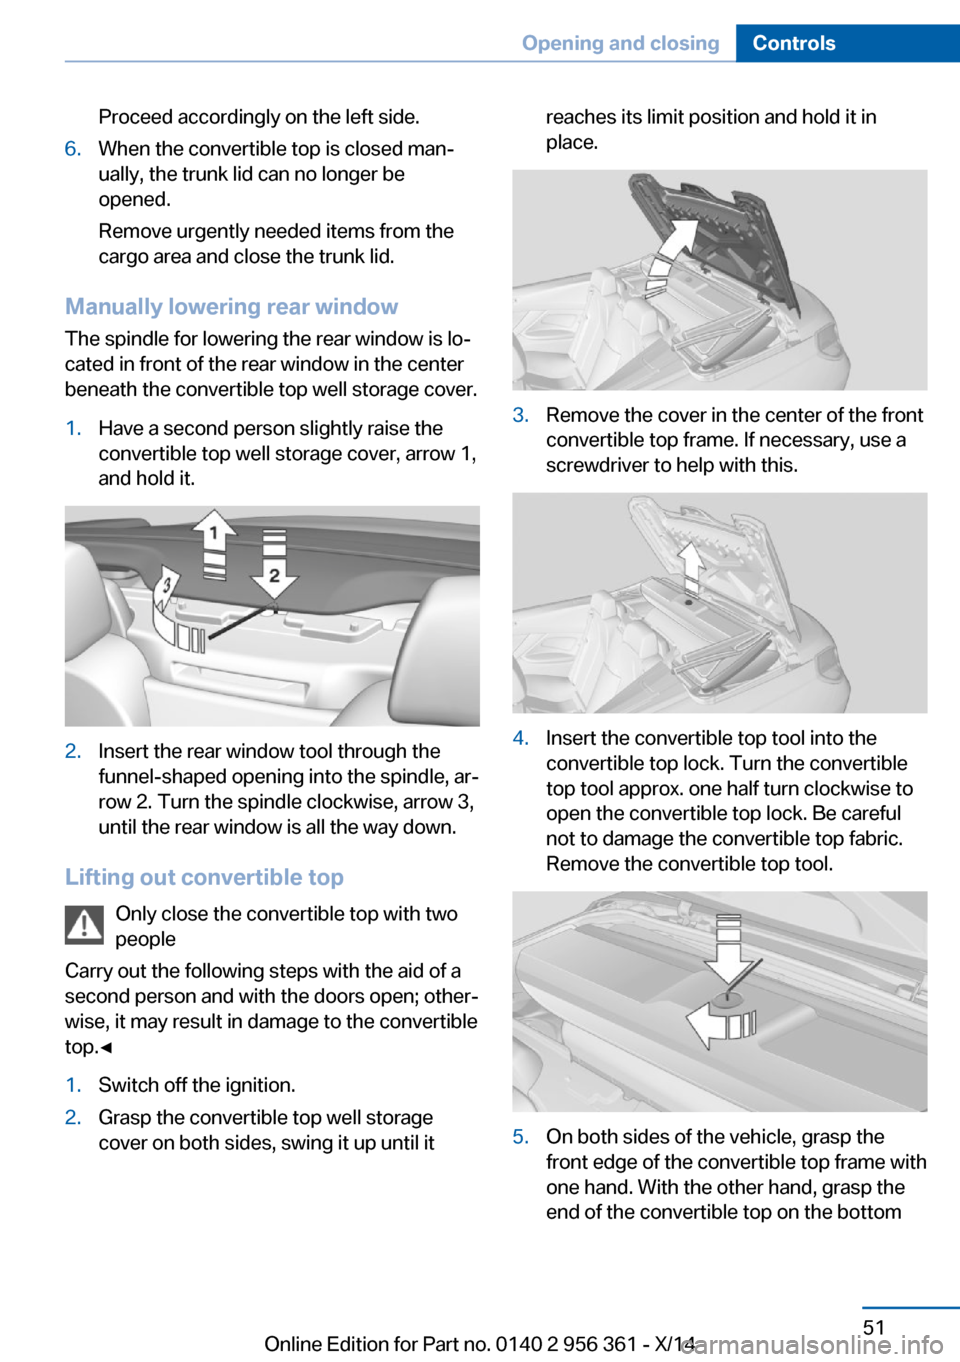
ToolsTools for manually closing the convertible top
are located in the insert of the rear seat back‐
rest under the first aid kit.
1.Remove insert, refer to page 200.2.Remove the first aid kit.3.Remove tools.1Convertible top tool2Adapter3Rear window tool
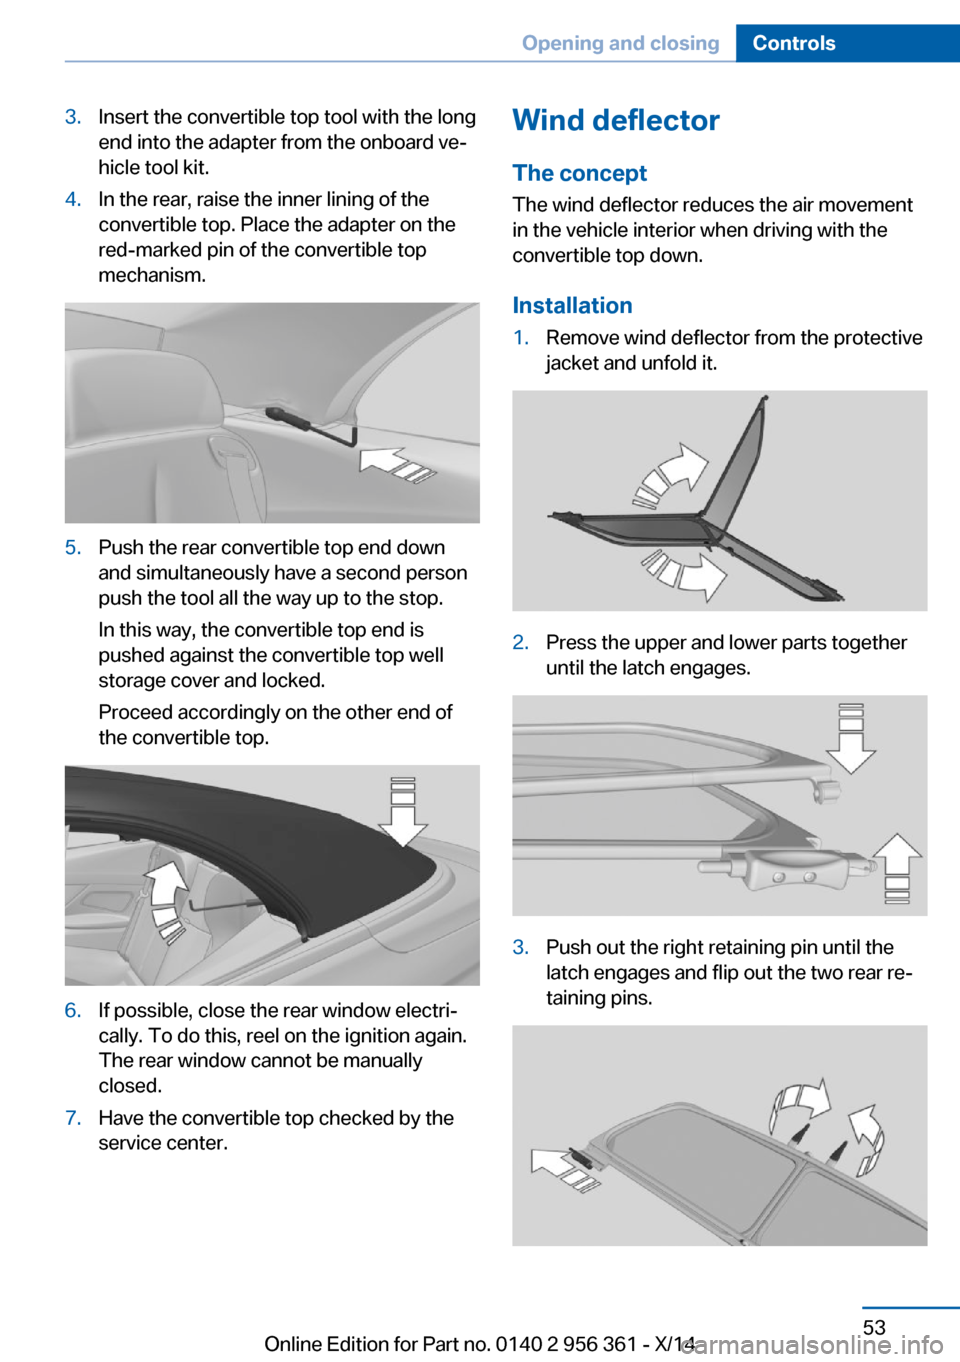
Before closing
1.Switch off the ignition.2.Lower the side window and the rear win‐
dow completely.
If the rear window cannot be lowered elec‐
trically, it must be lowered manually.3.Carefully open the trunk lid, refer to
page 40, taking care not to damage the
convertible top well storage cover.4.Remove the two large lids from the trim. If
necessary, use a screwdriver to help with
this.5.Unlock convertible top well storage cover.
To do this, pull on the right lid and simulta‐
neously slightly raise the front right
convertible top well storage cover in front
of the rear window.Seite 50ControlsOpening and closing50
Online Edition for Part no. 0140 2 956 361 - X/14
Page 55 of 228

Proceed accordingly on the left side.6.When the convertible top is closed man‐
ually, the trunk lid can no longer be
opened.
Remove urgently needed items from the
cargo area and close the trunk lid.
Manually lowering rear window
The spindle for lowering the rear window is lo‐
cated in front of the rear window in the center
beneath the convertible top well storage cover.
1.Have a second person slightly raise the
convertible top well storage cover, arrow 1,
and hold it.2.Insert the rear window tool through the
funnel-shaped opening into the spindle, ar‐
row 2. Turn the spindle clockwise, arrow 3,
until the rear window is all the way down.
Lifting out convertible top
Only close the convertible top with two
people
Carry out the following steps with the aid of a second person and with the doors open; other‐
wise, it may result in damage to the convertible
top.◀
1.Switch off the ignition.2.Grasp the convertible top well storage
cover on both sides, swing it up until itreaches its limit position and hold it in
place.3.Remove the cover in the center of the front
convertible top frame. If necessary, use a
screwdriver to help with this.4.Insert the convertible top tool into the
convertible top lock. Turn the convertible
top tool approx. one half turn clockwise to
open the convertible top lock. Be careful
not to damage the convertible top fabric.
Remove the convertible top tool.5.On both sides of the vehicle, grasp the
front edge of the convertible top frame with
one hand. With the other hand, grasp the
end of the convertible top on the bottomSeite 51Opening and closingControls51
Online Edition for Part no. 0140 2 956 361 - X/14
Page 57 of 228

3.Insert the convertible top tool with the long
end into the adapter from the onboard ve‐
hicle tool kit.4.In the rear, raise the inner lining of the
convertible top. Place the adapter on the
red-marked pin of the convertible top
mechanism.5.Push the rear convertible top end down
and simultaneously have a second person
push the tool all the way up to the stop.
In this way, the convertible top end is
pushed against the convertible top well
storage cover and locked.
Proceed accordingly on the other end of
the convertible top.6.If possible, close the rear window electri‐
cally. To do this, reel on the ignition again.
The rear window cannot be manually
closed.7.Have the convertible top checked by the
service center.Wind deflector
The concept The wind deflector reduces the air movement
in the vehicle interior when driving with the
convertible top down.
Installation1.Remove wind deflector from the protective
jacket and unfold it.2.Press the upper and lower parts together
until the latch engages.3.Push out the right retaining pin until the
latch engages and flip out the two rear re‐
taining pins.Seite 53Opening and closingControls53
Online Edition for Part no. 0140 2 956 361 - X/14
Page 65 of 228

Controls▷Press and hold this button until the seat
has moved to the desired position. Releas‐
ing the button stops window/roof move‐
ment.▷Press button briefly. The seat automati‐
cally moves to the respective end position.
Pressing again stops the motion.
Folding back and locking the backrest
After entering the rear, fold the backrest back
and lock it.
Press button. The seat moves to its origi‐
nal position. Pressing again stops the
motion.
Seat, mirror, and steering
wheel memory
The concept
Two driver's seat and exterior mirror positions
can be stored per profile, refer to page 35, and
called up. Settings for the backrest width and
lumbar support are not stored in memory.
Hints Do not retrieve the memory while driving
Do not retrieve the memory setting while
driving, as an unexpected movement of the
seat could result in an accident.◀
Keep the movement area unobstructed
When changing the seat position, keep
the seat's area of movement unobstructed;
otherwise, people might get injured or objects
damaged.◀
At a glance
Storing
1.Switch on the ignition.2.Set the desired position.3. Press button. The LED in the but‐
ton lights up.4.Press selected button 1 or 2 while the LED
is lit. The LED goes out.
If the SET button is pressed accidentally:
Press button again.
The LED goes out.
Calling up settings
Comfort function
1.Open the driver's door.2.Switch off the ignition.3.Briefly press the desired button 1 or 2.
The corresponding seat position is performed
automatically.
The procedure stops when a reel for adjusting
the seat or one of the buttons is pressed.
Seite 61AdjustingControls61
Online Edition for Part no. 0140 2 956 361 - X/14
Page 76 of 228

▷The engine is not yet at operating temper‐
ature.▷The wheels are at a sharp angle or the
steering wheel is being turned.▷After driving in reverse.▷Fogging of the windows when the auto‐
matic climate control is switched on.▷Vehicle battery is heavily discharged.▷At higher elevations.▷The engine compartment lid is unlocked.▷Stop-and-go traffic.▷Use of fuel with high ethanol content.
Starting the engine
The engine starts automatically under the fol‐
lowing conditions:
▷M double-clutch transmission:
By releasing the brake pedal.▷Manual transmission:
The clutch pedal is pressed.
After the engine starts, accelerate as usual.
Safety mode
After the engine switches off automatically, it
will not start again automatically if any one of
the following conditions are met.
▷The driver's safety belt is unbuckled and
the driver's door is open.▷The hood was unlocked.
Some indicator lights light up for a varied
length of time.
The engine can only be started via the Start/
Stop button.
Note Even if driving off was not intended, the deacti‐
vated engine starts up automatically in the fol‐
lowing situations:
▷Excessive warming of the car's interior
when the cooling function is switched on.▷The steering wheel is turned.▷Double-clutch transmission: Change from
selector lever position D to N, R or D/S.▷M double-clutch transmission: Accelerat‐
ing while simultaneously applying the
brake.▷The vehicle begins rolling.▷Fogging of the windows when the auto‐
matic climate control is switched on.▷Vehicle battery is heavily discharged.▷Excessive cooling of the car's interior when
the heating is switched on.▷Low brake vacuum pressure; this can oc‐
cur, e.g., if the brake pedal is depressed a
number of times in succession.
Preventing an automatic engine stop with aM double-clutch transmission
The concept To make it possible to drive off very quickly,
such as at an intersection, the automatic en‐
gine stop can be actively prevented.
Preventing an engine stop using the
brake pedal
The engine stop can be actively prevented
within one second after the vehicle comes to a
standstill.
▷Immediately after the vehicle comes to a
standstill, briefly press the brake pedal
forcefully.▷Then press the brake pedal with normal
braking force.Seite 72ControlsDriving72
Online Edition for Part no. 0140 2 956 361 - X/14
Page 82 of 228

All washer nozzles are supplied from one res‐
ervoir.
Fill with a mixture of windshield washer con‐
centrate and tap water and – if required – with a
washer antifreeze, according to the manufac‐
turer's recommendations.
Mix the washer fluid before adding to find the
right mixture.
Do not add windshield washer concentrate and
antifreeze undiluted and do not fill with pure
water; this could damage the wiper system.
Do not mix window washer concentrates of dif‐
ferent manufacturers because they can clog
the windshield washer nozzles.
Recommended minimum fill quantity:
0.2 US gal/1 liter.
M double-clutch
transmission with Drivelogic
General information The M double-clutch transmission with Drive‐
logic is an automatic shift transmission with
two clutches and partial transmissions in which
the gears can be changed without interrupting
the tractive force.
The operation is via the selector lever or two
shift paddles on the steering wheel.
Functions
▷Drive mode or Sequential mode.▷Various drive programs, Drivelogic.▷Upshifting display, Shift Lights, refer to
page 100.▷Automatic downshifting and protection
from misshifting even in sequential mode.▷Launch Control.▷Low Speed Assistant.
Selector lever, selector lever positions
At a glance
▷R: reverse gear.▷N: neutral.▷ Center position, forward position.▷+: manual upshifting.▷-: manual downshifting.▷D/S: reel between drive mode and sequen‐
tial mode.
Engaging a selector lever position
Press on the brake pedal and pull or push the
selector lever in the corresponding direction.
As soon as the selector lever is released, it re‐
verts to the center position. In position R, the
selector lever locks.
The engaged selector lever position is dis‐
played in the instrument cluster and on the se‐
lector lever.
If a selector lever position is engaged, the vehi‐
cle may start rolling, after the brake is released,
e.g. on downhill slopes. Thus, drive off immedi‐
ately after releasing the brake.
Use the Slow Speed Assistant for maneuver‐
ing and during stop-and-go traffic.
Seite 78ControlsDriving78
Online Edition for Part no. 0140 2 956 361 - X/14