2014 BMW M235I rear view mirror
[x] Cancel search: rear view mirrorPage 107 of 218

Prewarning sensitivityDepending on the set prewarning time, this
may result in increased false warnings.
Pedestrian warning with citybraking function
The concept
The system can help to prevent accidents with
pedestrians.
The system issues a warning in the city driving
speed area if there is imminent danger of a col‐
lision with pedestrians and includes a braking
function.
The system is controlled via the camera in the
base of the interior mirror.
General information The system issues a warning with brightness
staring at approx. 6 mph/10 km/h to approx.
35 mph/60 km/h regarding a possible risk of
collision with pedestrians and assists with a
brake intervention shortly before a collision.
It responds to persons that are within the de‐
tection range of the system.
Detection range
The detection area in front of the vehicle is div‐
ided into two areas.
▷Central area, arrow 1, directly in front of the
vehicle.▷Expanded area, arrow 2, to the right and
left.A collision is imminent if pedestrians are lo‐
cated within the central area. A warning is is‐
sued about pedestrians who are located within
the extended area only if they are moving in
the direction of the central area.
At a glance
Button in the vehicle
Intelligent Safety button
Camera
The camera is located near the base of the
mirror.
Keep the windshield in the area behind the in‐
terior rear view mirror clean and clear.
Switching on/off
Switching on automatically The system is automatically active every time
the engine is started using the Start/Stop but‐
ton.
Seite 107SafetyControls107
Online Edition for Part no. 01 40 2 924 974 - X/13
Page 109 of 218

▷Up to 10 seconds after the start of the en‐
gine, via the Start/Stop knob.▷During calibration of the camera immedi‐
ately after vehicle shipment.▷When it is dark outside.
Lane departure warning
The concept Starting at a specific speed, this system alerts
you when the vehicle on streets with lane
markings is about to leave the lane. This
speed, depending on the country version, is
between 35 mph/55 km/h and
45 mph/70 km/h.
When switching on the system below this
speed, a message is displayed in the instru‐
ment cluster.
The steering wheel begins vibrating gently in
the event of warnings. The time of the warning
may vary depending on the current driving sit‐
uation.
The system does not provide a warning if the
turn signal is set before leaving the lane.
Notes Personal responsibility
The system cannot serve as a substitute
for the driver's personal judgment of the
course of the road and the traffic situation.
In the event of a warning, do not jerk the steer‐
ing wheel, as you may lose control of the vehi‐
cle.◀
At a glance
Button in the vehicle
Lane departure warning
Camera
The camera is located near the base of the
mirror.
Keep the windshield in the area behind the in‐
terior rear view mirror clean and clear.
Switching on/off Press the button.
▷On: the LED lights up.▷Off: the LED goes out.
The state is stored for the remote control cur‐
rently in use.
Display in the instrument cluster
▷Lines: system is activated.Seite 109SafetyControls109
Online Edition for Part no. 01 40 2 924 974 - X/13
Page 110 of 218

▷Arrows: at least one lane marking was de‐
tected and warnings can be issued.
Issued warning
If you leave the lane and if a lane marking has
been detected, the steering wheel begins vi‐
brating.
If the turn signal is set before changing the
lane, a warning is not issued.
End of warning
The warning ends:
▷Automatically after approx. 3 seconds.▷When returning to your own lane.▷When braking hard.▷When using the turn signal.
System limits
The system may not be fully functional in the
following situations:
▷In heavy fog, rain or snowfall.▷In the event of worn, poorly visible, merg‐
ing, diverging, or multiple lane markings
such as in construction areas.▷When lane markings are covered in snow,
ice, dirt or water.▷In tight curves or on narrow lanes.▷When the lane markings are covered by
objects.▷When driving very close to the vehicle in
front of you.▷When driving toward bright lights.▷When the windshield in front of the interior
rearview mirror is fogged over, dirty or cov‐
ered with stickers, etc.▷During calibration of the camera immedi‐
ately after vehicle shipment.Brake force display
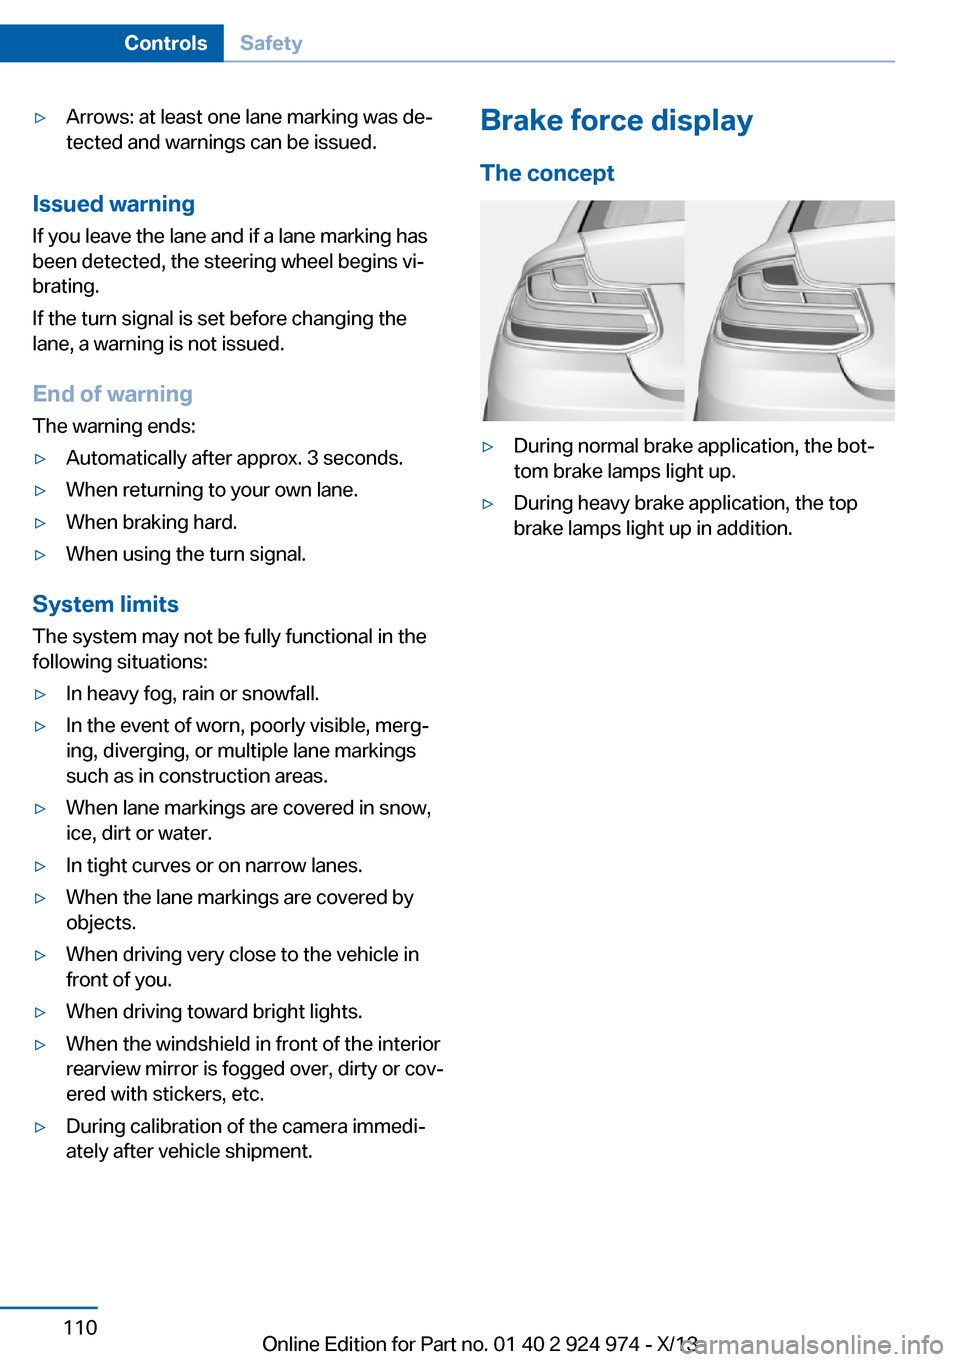
The concept▷During normal brake application, the bot‐
tom brake lamps light up.▷During heavy brake application, the top
brake lamps light up in addition.Seite 110ControlsSafety110
Online Edition for Part no. 01 40 2 924 974 - X/13
Page 134 of 218

Interior equipmentVehicle equipmentAll standard, country-specific and optional
equipment that is offered in the model series is
described in this chapter. Therefore, equip‐
ment is also described that is not available in a
vehicle, e. g., because of the selected optional
equipment or country variant. This also applies
for safety-related functions and systems.
Universal garage door
opener
The concept
The universal garage door opener can operate
up to 3 functions of remote-controlled sys‐
tems such as garage door drives or lighting
systems. The universal garage door opener re‐
places up to 3 different hand-held transmitters.
To operate the remote control, the buttons on
the interior rearview mirror must be program‐
med with the desired functions. The hand-held
transmitter for the particular system is required
in order to program the remote control.
During programming
During programming and before activat‐
ing a device using the integrated universal re‐
mote control, ensure that there are no people,
animals, or objects in the range of movement
of the remote-controlled device; otherwise,
there is a risk of injury or damage.
Also follow the safety instructions of the hand-
held transmitter.◀
Before selling the vehicle, delete the stored
functions for the sake of security.
Compatibility If this symbol is printed on the packag‐
ing or in the instructions of the system
to be controlled, the system is gener‐ally compatible with the universal garage door
opener.
If you have any questions, please contact:▷Your service center.▷www.homelink.com on the Internet.
HomeLink is a registered trademark of John‐
son Controls, Inc.
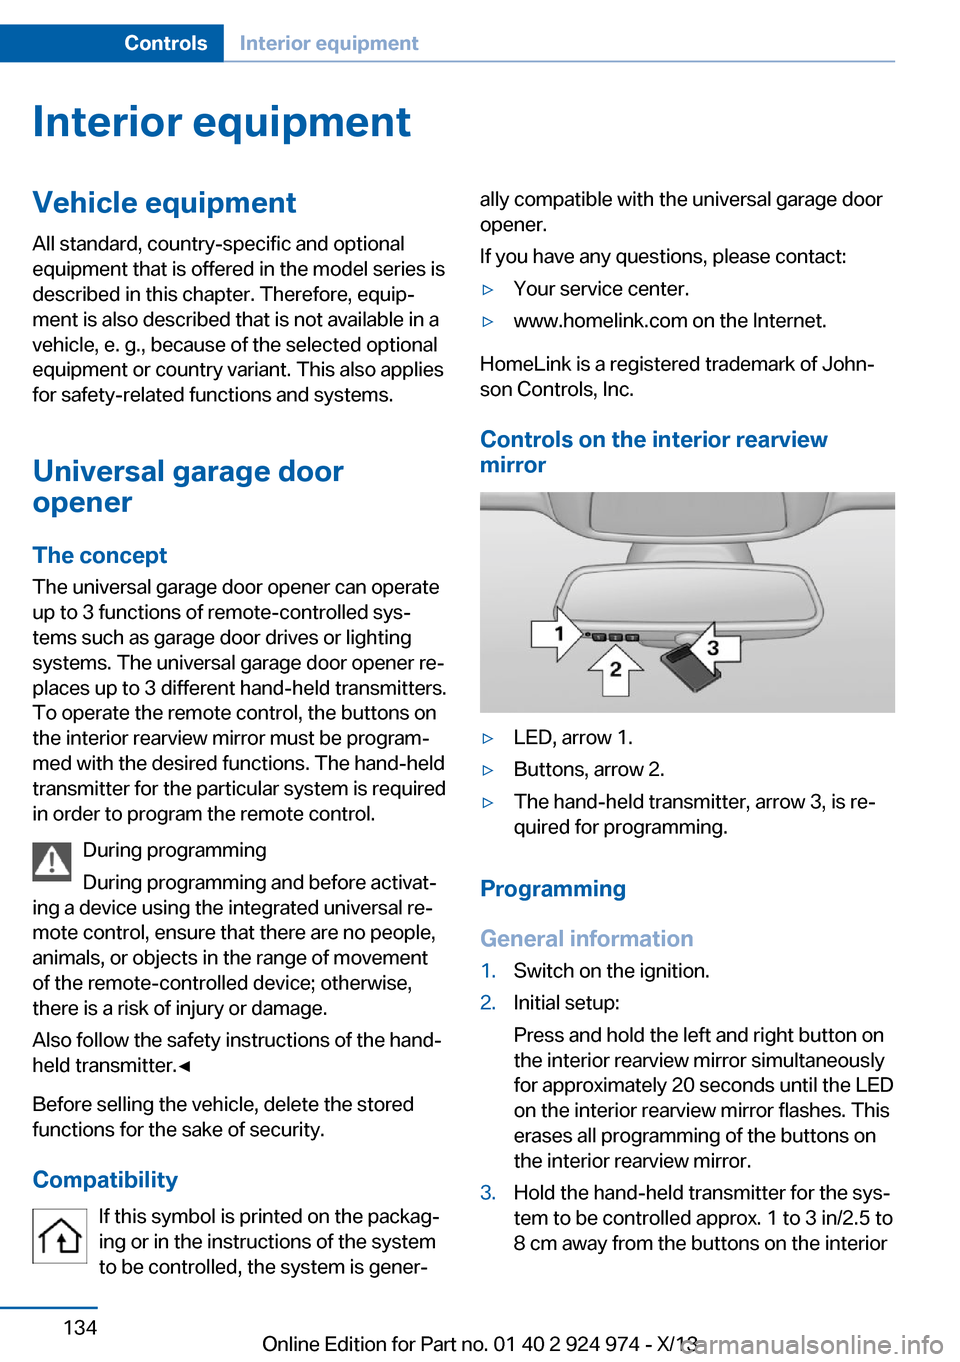
Controls on the interior rearview
mirror
▷LED, arrow 1.▷Buttons, arrow 2.▷The hand-held transmitter, arrow 3, is re‐
quired for programming.
Programming
General information
1.Switch on the ignition.2.Initial setup:
Press and hold the left and right button on
the interior rearview mirror simultaneously
for approximately 20 seconds until the LED
on the interior rearview mirror flashes. This
erases all programming of the buttons on
the interior rearview mirror.3.Hold the hand-held transmitter for the sys‐
tem to be controlled approx. 1 to 3 in/2.5 to
8 cm away from the buttons on the interiorSeite 134ControlsInterior equipment134
Online Edition for Part no. 01 40 2 924 974 - X/13
Page 135 of 218

rearview mirror. The required distance de‐
pends on the manual transmitter.4.Simultaneously press and hold the button
of the desired function on the hand-held
transmitter and the button to be program‐
med on the interior rearview mirror. The
LED on the interior rearview mirror will be‐
gin flashing slowly.5.Release both buttons as soon as the LED
flashes more rapidly. When the LED is
flashing faster, this indicates that the but‐
ton on the interior rearview mirror has been
programmed.
If the LED does not flash faster after at
least 60 seconds, change the distance be‐
tween the interior rearview mirror and the
hand-held transmitter and repeat the step.
Several more attempts at different distan‐
ces may be necessary. Wait at least
15 seconds between attempts.
Canada: if programming with the hand-
held transmitter was interrupted, hold
down the interior rearview mirror button
and repeatedly press and release the
hand-held transmitter button for 2 sec‐
onds.6.To program other functions on other but‐
tons, repeat steps 3 to 5.
The systems can be controlled using the inte‐
rior rearview mirror buttons.
Special feature of the alternating-
code wireless system
If you are unable to operate the system after
repeated programming, please check if the
system to be controlled features an alternat‐
ing-code system.
Read the system's operating manual, or press
the programmed button on the interior rear‐
view mirror longer. If the LED on the interior
rearview mirror starts flashing rapidly and then
stays lit constantly for 2 seconds, the system
features an alternating-code system. Flashing
and continuous illumination of the LED will re‐
peat for approximately 20 seconds.
For systems with an alternating-code system,
the universal garage door opener and the sys‐
tem also have to be synchronized.
Please read the operating manual of the sys‐
tem being set up for information on how to
synchronize the system.
Synchronizing is easier with the aid of a sec‐
ond person.
To synchronize:1.Park the vehicle within range of the re‐
mote-controlled system.2.Program the relevant button on the interior
rearview mirror as described.3.Locate and press the synchronizing button
on the system being programmed. You
have approx. 30 seconds for the next step.4.Hold down the programmed button on the
interior rearview mirror for approximately
3 seconds and then release it. If necessary,
repeat this work step up to three times in
order to finish synchronization. Once syn‐
chronization is complete, the programmed
function will be carried out.
Reprogramming individual buttons
1.Switch on the ignition.2.Press and hold the interior rearview mirror
button to be programmed.3.As soon as the interior rearview mirror LED
starts flashing slowly, hold the hand-held
transmitter for the system to be controlled
approx. 1 to 3 in/2.5 to 8 cm away from the
buttons on the interior rearview mirror. The
required distance depends on the manual
transmitter.4.Likewise, press and hold the button of the
desired function on the hand-held trans‐
mitter.5.Release both buttons as soon as the inte‐
rior rearview mirror LED flashes more rap‐
idly. When the LED is flashing faster, thisSeite 135Interior equipmentControls135
Online Edition for Part no. 01 40 2 924 974 - X/13
Page 136 of 218

indicates that the button on the interior
rearview mirror has been programmed.
The system can then be controlled by the
button on the interior rearview mirror.
If the LED does not flash faster after at
least 60 seconds, change the distance and
repeat the step. Several more attempts at
different distances may be necessary. Wait
at least 15 seconds between attempts.
Canada: if programming with the hand-
held transmitter was interrupted, hold
down the interior rearview mirror button
and repeatedly press and release the
hand-held transmitter button for 2 sec‐
onds.
Controls
Before operation
Before operating a system using the
integrated universal remote control, ensure
that there are no people, animals, or objects
within the range of movement of the remote- controlled system; otherwise, there is a risk of
injury or damage.
Also follow the safety instructions of the hand-
held transmitter.◀
The system, such as the garage door, can be
operated using the button on the interior rear‐
view mirror while the engine is running or when
the ignition is started. To do this, hold down
the button within receiving range of the system
until the function is activated. The interior rear‐ view mirror LED stays lit while the wireless sig‐
nal is being transmitted.
Deleting stored functions Press and hold the left and right button on the
interior rearview mirror simultaneously for ap‐
proximately 20 seconds until the LED flashes
rapidly. All stored functions are deleted. The
functions cannot be deleted individually.
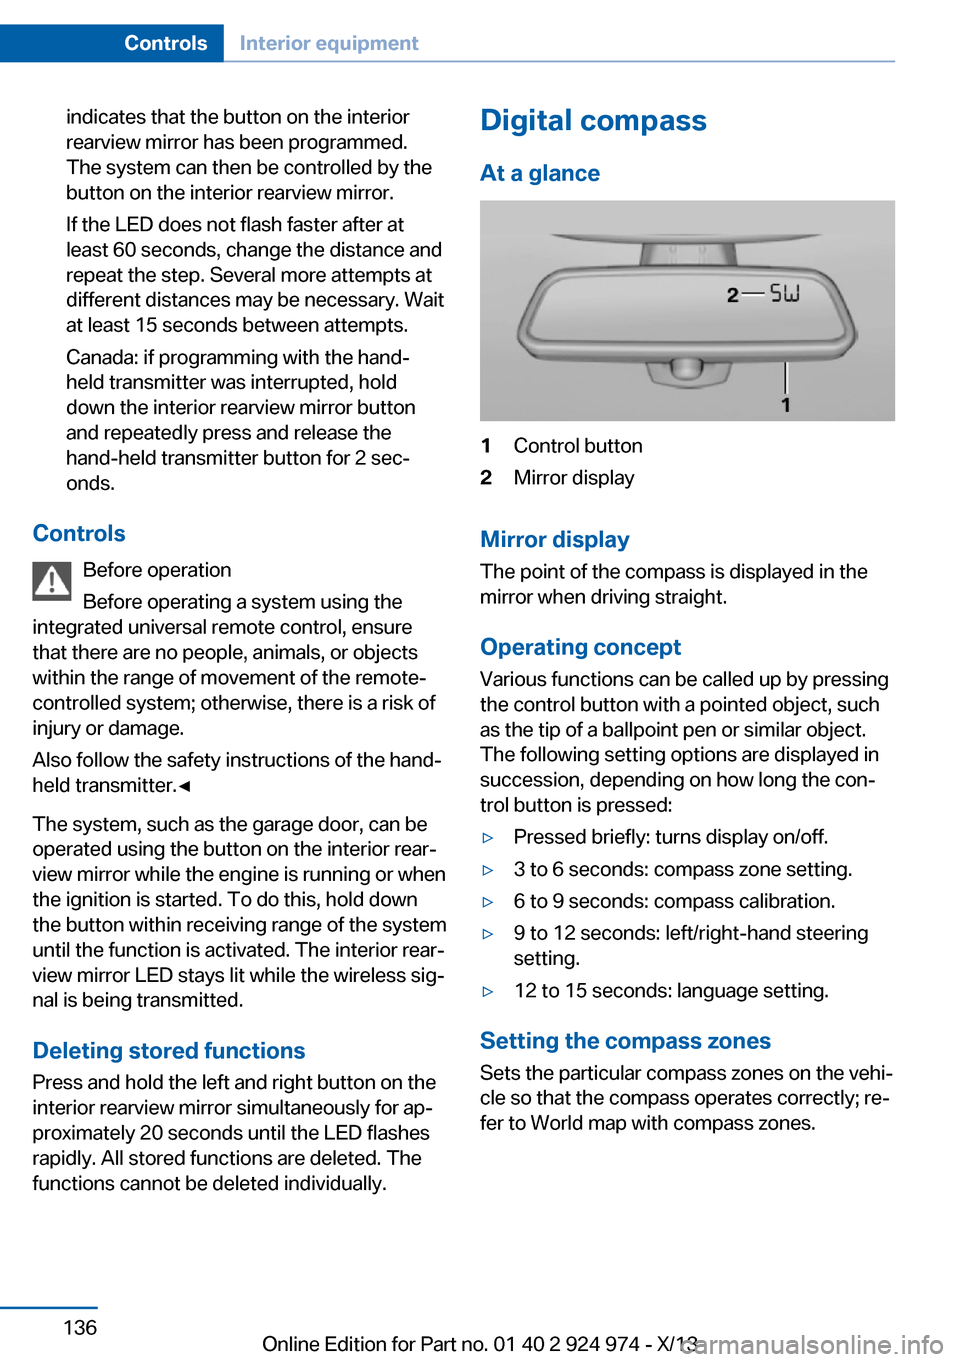
Digital compass
At a glance1Control button2Mirror display
Mirror display
The point of the compass is displayed in the
mirror when driving straight.
Operating concept
Various functions can be called up by pressing
the control button with a pointed object, such
as the tip of a ballpoint pen or similar object.
The following setting options are displayed in
succession, depending on how long the con‐
trol button is pressed:
▷Pressed briefly: turns display on/off.▷3 to 6 seconds: compass zone setting.▷6 to 9 seconds: compass calibration.▷9 to 12 seconds: left/right-hand steering
setting.▷12 to 15 seconds: language setting.
Setting the compass zones
Sets the particular compass zones on the vehi‐
cle so that the compass operates correctly; re‐
fer to World map with compass zones.
Seite 136ControlsInterior equipment136
Online Edition for Part no. 01 40 2 924 974 - X/13
Page 210 of 218

Date 81
Daytime running lights 91
Defrosting, refer to defrosting the windows 128
Defrosting, refer to Windows, defrosting 131
Defrosting the windows 128
Dehumidifying, air 128, 130
Destination distance 86
Digital clock 81
Digital compass 136
Dimensions 206
Dimmable exterior mirrors 57
Dimmable interior rearview mirror 57
Direction indicator, refer to Turn signals 68
Display lighting, refer to In‐ strument lighting 93
Displays 75
Displays, cleaning 202
Disposal, coolant 180
Disposal, vehicle battery 190
Distance control, refer to PDC 117
Distance to destination 86
Divided screen view, split screen 24
Door lock, refer to Remote control 34
Drive-off assistant 114
Drive-off assistant, refer to DSC 111
Driver assistance, see Intelli‐ gent Safety 103
Driving Assistant, see Intelli‐ gent Safety 103
Driving Dynamics Con‐ trol 112
Driving instructions, breaking in 148
Driving mode 112
Driving notes, general 148
Driving stability control sys‐ tems 111
Driving style analysis 159 Driving tips 148
DSC Dynamic Stability Con‐ trol 111
DTC Dynamic Traction Con‐ trol 112
Dynamic Stability Control DSC 111
Dynamic Traction Control DTC 112
E
ECO PRO 155
ECO PRO, bonus range 156
ECO PRO display 155
ECO PRO driving mode 155
ECO PRO driving style analy‐ sis 159
ECO PRO mode 155
ECO PRO Tip - driving in‐ struction 157
EfficientDynamics 157
Electronic displays, instru‐ ment cluster 77
Electronic Stability Program ESP, refer to DSC 111
Emergency detection, remote control 35
Emergency release, door lock 39
Emergency release, fuel filler flap 162
Emergency Request 193
Emergency service, refer to Roadside Assistance 194
Emergency start function, en‐ gine start 35
Emergency unlocking, trunk lid 41
Energy Control 81
Energy recovery 82
Engine, automatic Start/Stop function 65
Engine, automatic switch- off 65
Engine compartment 175 Engine compartment, work‐
ing in 175
Engine coolant 180
Engine idling when driving, coasting 158
Engine oil 177
Engine oil, adding 178
Engine oil additives 178
Engine oil change 179
Engine oil filler neck 178
Engine oil types, alterna‐ tive 179
Engine oil types, ap‐ proved 178
Engine start during malfunc‐ tion 35
Engine start, jump-start‐ ing 194
Engine start, refer to Starting the engine 64
Engine stop 64
Entering a car wash 199
Equipment, interior 134
ESP Electronic Stability Pro‐ gram, refer to DSC 111
Exchanging wheels/tires 172
Exhaust system 149
Exterior mirror, automatic dimming feature 57
Exterior mirrors 56
External start 194
External temperature dis‐ play 81
External temperature warn‐ ing 81
Eyes for securing cargo 152
F
Failure message, refer to Check Control 78
False alarm, refer to Uninten‐ tional alarm 44
Fan, refer to Air flow 128, 131 Seite 210ReferenceEverything from A to Z210
Online Edition for Part no. 01 40 2 924 974 - X/13
Page 212 of 218

Integrated key 34
Intelligent Emergency Re‐ quest 193
Intelligent Safety 103
Intensity, AUTO pro‐ gram 130
Interior equipment 134
Interior lamps 94
Interior lamps via remote con‐ trol 38
Interior motion sensor 44
Interior rearview mirror, auto‐ matic dimming feature 57
Interior rearview mirror, com‐ pass 136
Interior rearview mirror, man‐ ually dimmable 57
Internet page 6
Interval display, service re‐ quirements 82
J Jacking points for the vehicle jack 190
Joystick, automatic transmis‐ sion 72
Jump-starting 194
K
Key/remote control 34
Keyless Go, refer to Comfort Access 41
Key Memory, refer to Per‐ sonal Profile 35
Kickdown, automatic trans‐ mission 71
Knee airbag 95
L
Lamp replacement 183
Lamp replacement, front 184
Lamp replacement, rear 188
Lamps 90 Lamps and bulbs 183
Lane departure warning 109
Lane margin, warning 109
Language on Control Dis‐ play 88
Lashing eyes, securing cargo 152
LATCH child restraint fixing system 60
Launch Control 73
Leather, care 200
LEDs, light-emitting di‐ odes 184
Letters and numbers, enter‐ ing 25
Light alloy wheels, care 201
Light control 91
Light-emitting diodes, LEDs 184
Lighter 138
Lighting 90
Lighting via remote con‐ trol 38
Light switch 90
Load 152
Loading 151
Lock, door 39
Locking/unlocking from in‐ side 40
Locking/unlocking via door lock 39
Locking/unlocking with re‐ mote control 38
Locking, automatic 43
Locking, central 37
Locking, settings 42
Low beams 90
Low beams, automatic, refer to High-beam Assistant 92
Lower back support 50
Luggage rack, refer to Roof- mounted luggage rack 153
Lumbar support 50 M
Maintenance 181
Maintenance require‐ ments 181
Maintenance, service require‐ ments 82
Maintenance system, BMW 181
Malfunction displays, refer to Check Control 78
Manual air distribu‐ tion 128, 131
Manual air flow 128, 131
Manual mode, transmis‐ sion 72
Manual operation, door lock 39
Manual operation, exterior mirrors 56
Manual operation, fuel filler flap 162
Manual operation, Park Dis‐ tance Control PDC 118
Manual operation, rearview camera 120
Manual transmission 71
Marking on approved tires 173
Marking, run-flat tires 174
Master key, refer to Remote control 34
Maximum cooling 130
Maximum speed, display 83
Maximum speed, winter tires 173
Measure, units of 88
Medical kit 194
Memory, seat, mirror 55
Menu, EfficientDynamics 157
Menu in instrument clus‐ ter 84
Menus, operating, iDrive 18
Menus, refer to iDrive operat‐ ing concept 20
Microfilter 129, 132 Seite 212ReferenceEverything from A to Z212
Online Edition for Part no. 01 40 2 924 974 - X/13