2014 BMW 650I CONVERTIBLE steering wheel
[x] Cancel search: steering wheelPage 12 of 243

CockpitVehicle equipment
All standard, country-specific and optional
equipment that is offered in the model series is
described in this chapter. Therefore, equip‐ment is also described that is not available in a
vehicle, e. g., because of the selected optional
equipment or country variant. This also applies
for safety-related functions and systems.
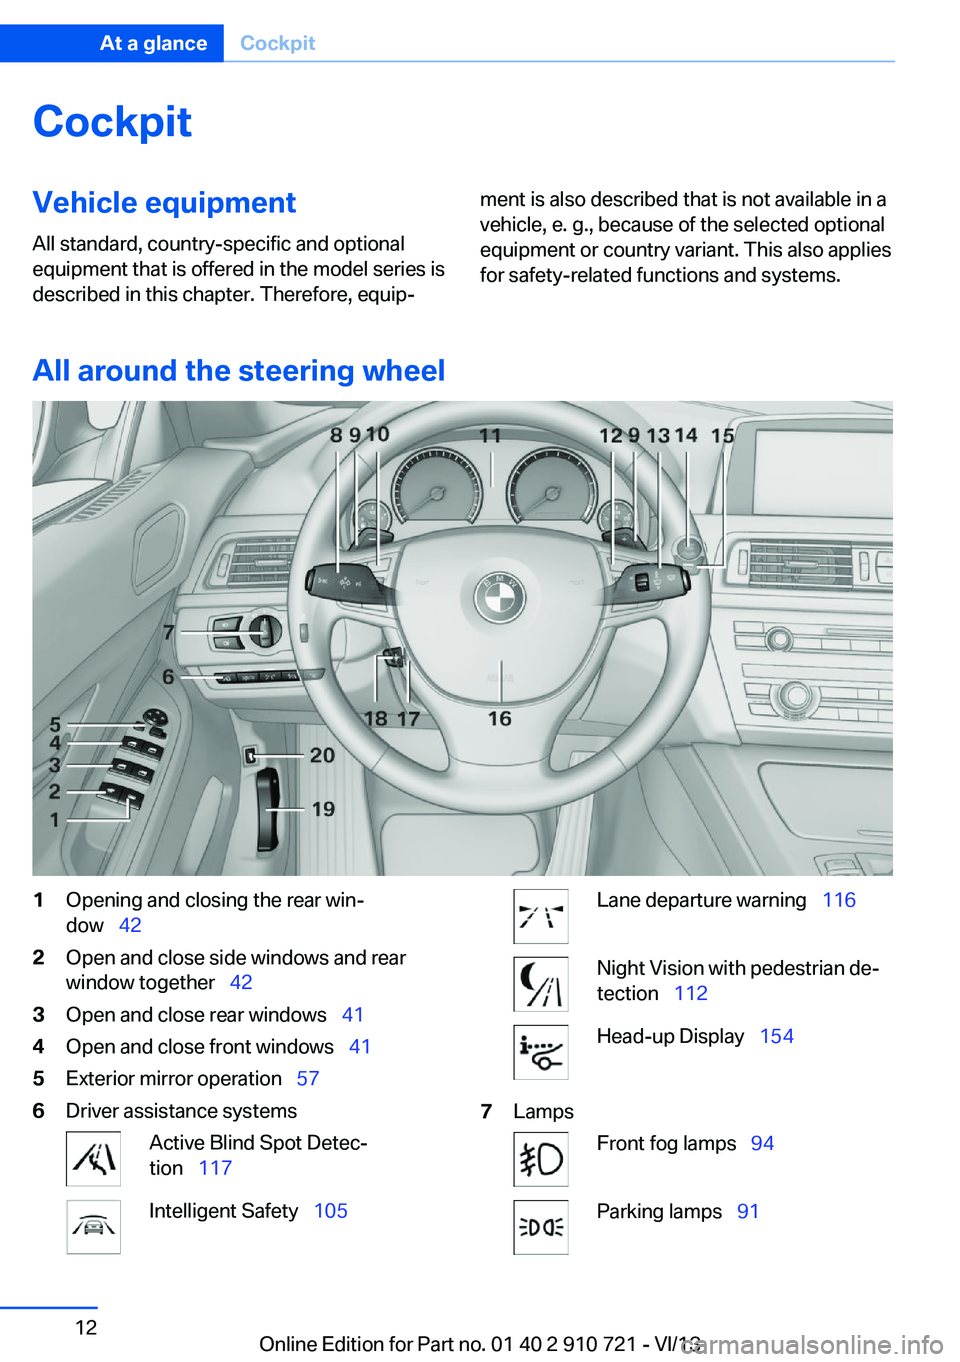
All around the steering wheel
1Opening and closing the rear win‐
dow 422Open and close side windows and rear
window together 423Open and close rear windows 414Open and close front windows 415Exterior mirror operation 576Driver assistance systemsActive Blind Spot Detec‐
tion 117Intelligent Safety 105Lane departure warning 116Night Vision with pedestrian de‐
tection 112Head-up Display 1547LampsFront fog lamps 94Parking lamps 91Seite 12At a glanceCockpit12
Online Edition for Part no. 01 40 2 910 721 - VI/13
Page 13 of 243

Low beams 91Automatic headlamp con‐
trol 92
Daytime running lights 92
Adaptive Light Control 92
High-beam Assistant 93Instrument lighting 948Steering column stalk, leftTurn signal 69High beams, head‐
lamp flasher 69High-beam Assistant 93Roadside parking lamps 92Computer 879Shift paddles 7410Steering wheel buttons, leftStore speed 139, 130Resume speed 141, 133Cruise control on/off, interrupt‐
ing 131Cruise control on/off, interrupt‐
ing 139Reduce distance 133Increase distance 133Congestion Assistant ON/OFF,
Pause 136Congestion Assistant: setting
cruise control distance 130Cruise control rocker switch 141, 13211Instrument cluster 7612Steering wheel buttons, rightEntertainment sourceVolumeVoice activation 22Telephone, see user's manual for
Navigation, Entertainment and
CommunicationThumbwheel for selection lists 8713Steering column stalk, rightWindshield wipers 70Rain sensor 71Clean the windshields and head‐
lamps 7114Start/stop the engine and switch
the ignition on/off 6415Automatic Engine Start/Stop
Function 6516Horn17Steering wheel heating 5918Adjust the steering wheel 5919Unlocking the hoodSeite 13CockpitAt a glance13
Online Edition for Part no. 01 40 2 910 721 - VI/13
Page 22 of 243

Voice activation systemVehicle equipment
All standard, country-specific and optional
equipment that is offered in the model series is
described in this chapter. Therefore, equip‐
ment is also described that is not available in a
vehicle, e. g., because of the selected optional
equipment or country variant. This also applies
for safety-related functions and systems.
The concept▷Most functions that are displayed on the
Control Display can be operated by spoken
commands via the voice activation system.
The system prompts you to make your en‐
tries.▷Functions that can only be used when the
vehicle is stationary cannot be operated
using the voice activation system.▷The system uses a special microphone on
the driver's side.▷›...‹ Verbal instructions in the Owner's
Manual to use with the voice activation
system.
Requirements
Via the Control Display, set a language that is
also supported by the voice activation system
so that the spoken commands can be identi‐
fied.
Set the language, refer to page 90.
Using voice activation
Activating the voice activation system1. Press the button on the steering
wheel.2.Wait for the signal.3.Say the command.
The command is displayed in the instru‐
ment cluster.
This symbol in the instrument cluster indi‐
cates that the voice activation system is active.
If no other commands are available, operate
the function in this case via iDrive.
Terminating the voice activation
system
Briefly press the button on the steer‐
ing wheel or ›Cancel‹.
Possible commands Most menu items on the Control Display can
be voiced as commands.
The available commands depend on which
menu is currently displayed on the Control Dis‐
play.
Short commands exist for many functions.
Some list entries, e.g., Phone book entries, can
also be selected via the voice activation sys‐
tem. Speak these list entries exactly as they
are displayed in the respective list.
Having possible commands read aloud
You can have the available commands read out
loud for you: ›Voice commands‹
For example, if the "Settings" menu is dis‐
played, the commands for the settings are
read out loud.
Seite 22At a glanceVoice activation system22
Online Edition for Part no. 01 40 2 910 721 - VI/13
Page 23 of 243

Executing functions using short
commands
Functions on the main menu can be performed
directly by means of short commands, nearly
irrespective of which menu item is currently
selected, e.g., ›Vehicle status‹.
List of short commands of the voice activation
system, see Navigation, Entertainment, Com‐
munication Owner's Manual.
Help dialog for the voice activation
system
Calling up help dialog: ›Help‹
Additional commands for the help dialog:▷›Help with examples‹: information about the
current operating options and the most im‐
portant commands for them are an‐
nounced.▷›Help with voice activation‹: information
about the principle of operation for the
voice activation system is announced.
Example: playing back a CD
Via the main menu The commands of the menu items are spoken
just as they are selected via the controller.
1.Switch on the Entertainment sound output
if necessary.2. Press the button on the steering
wheel.3.›Multimedia‹
The medium last played is played back.4.›C D‹5.›C D drive‹6.›Track ...‹, e.g., CD track 4.Via short command
Playback of the CD can also be started via a
short command.1.Switch on the Entertainment sound output
if necessary.2. Press the button on the steering
wheel.3.›C D drive track ...‹, e.g., CD track 4.
Setting the voice dialog
You can set whether the system should use
the standard dialog or a shorter version.
In the shorter variant of the voice dialog, the
announcements from the system are issued in
an abbreviated form.
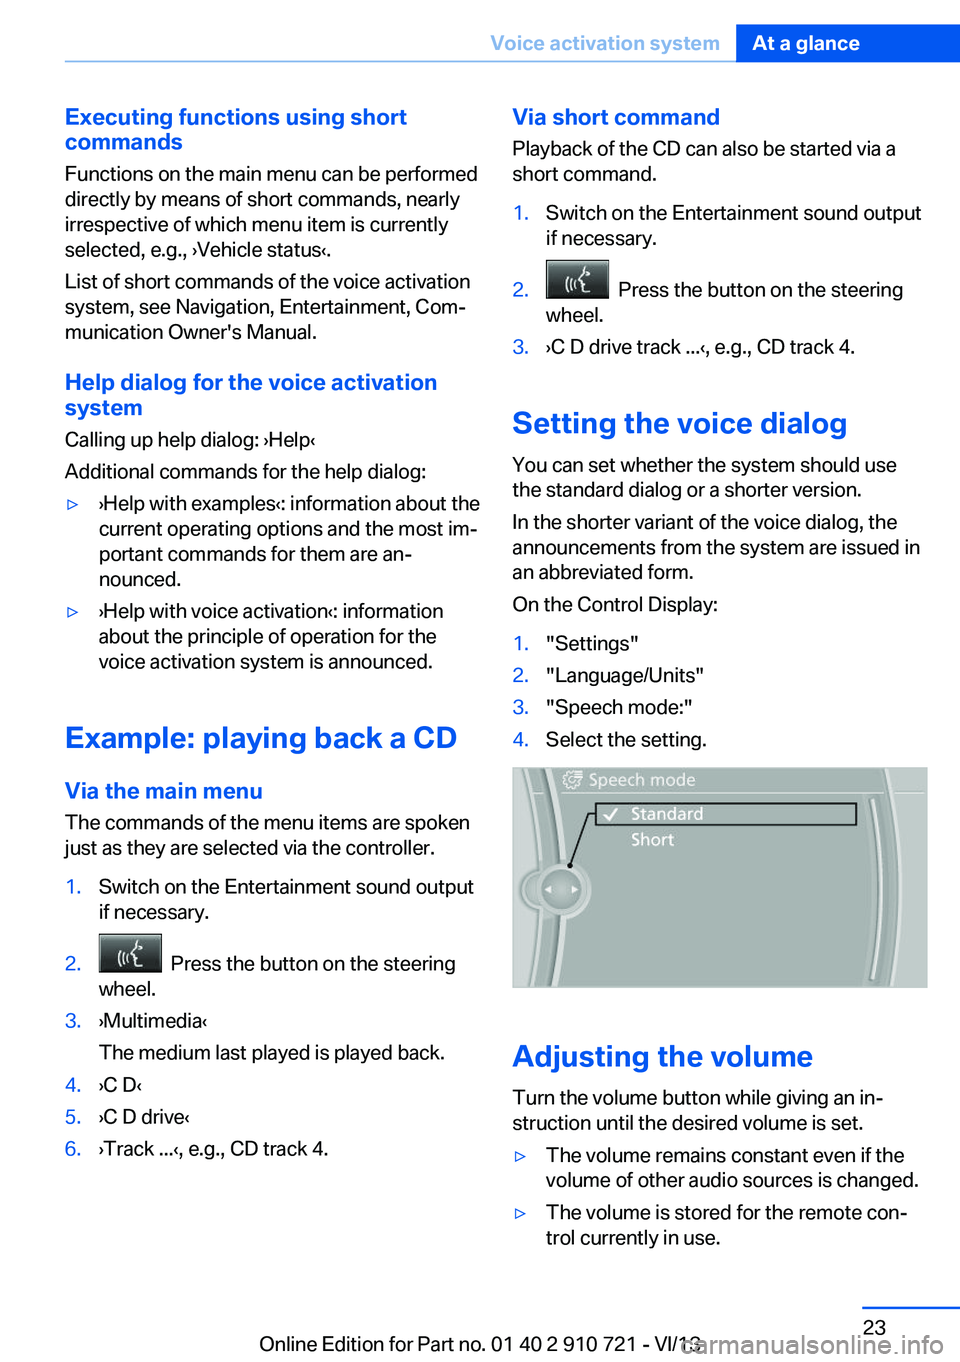
On the Control Display:
1."Settings"2."Language/Units"3."Speech mode:"4.Select the setting.
Adjusting the volume
Turn the volume button while giving an in‐
struction until the desired volume is set.
▷The volume remains constant even if the
volume of other audio sources is changed.▷The volume is stored for the remote con‐
trol currently in use.Seite 23Voice activation systemAt a glance23
Online Edition for Part no. 01 40 2 910 721 - VI/13
Page 33 of 243

▷Tone: tone settings.▷Automatic climate control: settings.▷Steering wheel position.▷Navigation: map views, route criteria, voice
output on/off.▷Night Vision with pedestrian detection.▷Intelligent Safety: individual settings.▷Park Distance Control PDC: adjusting the
signal tone volume.▷Radio: stored stations, station listened to
last, special settings.▷Rearview camera: selection of functions
and type of display.▷Side View: selection of the display type.▷Language on the Control Display.▷Lane departure warning: last setting, on/
off.▷Active Blind Spot Detection: last setting,
on/off.▷Daytime running lights: current setting.▷Triple turn signal activation.▷Locking the vehicle: after a brief period or
after starting to drive.
Central locking system
The concept The central locking system becomes active
when the driver's door is closed.
The system simultaneously engages and re‐
leases the locks on the following:
▷Doors.▷Compartment in the center armrest.▷Trunk lid.▷Fuel filler flap.
Operating from the outside
▷Via the remote control.▷Via the driver's door lock.▷Via the door handles.▷Via the button in the trunk lid.
The following takes place simultaneously
when locking/unlocking the vehicle via the re‐
mote control:
▷Depending on how the vehicle is equipped,
the theft protection is activated/deacti‐
vated. Theft protection prevents the doors
from being unlocked using the lock but‐
tons or the door opener.▷The welcome lamps, interior lamps and
courtesy lamps are switched on and off.▷The alarm system, refer to page 40, is
armed or disarmed.
Operating from the inside
Via the button for the central locking system.
If the vehicle has been locked from inside, the
fuel filler flap and the compartment in the cen‐
ter armrest remain unlocked.
If an accident of a certain severity occurs, the
central locking system unlocks automatically.
The hazard warning system and interior lamps
come on.
Seite 33Opening and closingControls33
Online Edition for Part no. 01 40 2 910 721 - VI/13
Page 39 of 243

Unlocking the trunk lid separately
Press on the top half of the BMW emblem on
the trunk lid.
This corresponds to pressing the
but‐
ton on the remote control.
Do not place the remote control in the
cargo area
Take the remote control with you and do not
leave it in the cargo area; otherwise, the re‐
mote control is locked inside the vehicle when
the trunk lid is closed.◀
Malfunction
Comfort Access may not function properly if it
experiences interference from external sour‐
ces such as mobile phones, metal objects,
overhead power lines, transmission towers,
etc.
In this case, open or close the vehicle using the
buttons on the remote control or use the
integrated key in the door lock.
Adjusting
Unlocking The setting is stored for the remote control
currently in use.
1."Settings"2."Doors/key"3. Select symbol or "Unlock button:"4.Select the desired function:▷"Driver's door only"
Only the driver's door and the fuel filler
flap are unlocked. Pressing again un‐
locks the entire vehicle.▷"All doors"
The entire vehicle is unlocked.
Depending on how the vehicle is equipped or
the country-specific variant, you can set
whether the doors are also unlocked with the
button on the remote control.
Confirmation signals from the vehicle
1."Settings"2."Doors/key"3.Deactivate or activate the desired confir‐
mation signals.▷"Acoustic sig. lock/unlock"▷"Flash when lock/unlock"
Automatic locking
The setting is stored for the remote control
currently in use.
1."Settings"2."Doors/key"3.Select the desired function:▷"Lock if no door opened"
The vehicle locks automatically after a
short period of time if a door is not
opened.▷"Lock after start driving"
The vehicle locks automatically after
you drive away.
Retrieving the seat, mirror, and
steering wheel settings
The driver's seat, exterior mirror, and steering
wheel positions selected last are stored for the
currently used remote control.
When the vehicle is unlocked, these positions
are automatically retrieved if this function was
activated.
Pinch hazard when moving back the seat
If this function is used, first make sure
that the footwell behind the driver's seat is
empty. Otherwise, people can be injured or ob‐
jects damaged when the seat is moved back.◀
The adjustment procedure is interrupted:
▷When a seat position switch is pressed.Seite 39Opening and closingControls39
Online Edition for Part no. 01 40 2 910 721 - VI/13
Page 40 of 243

▷When a button of the seat, mirror, and
steering wheel memory is pressed briefly.
Activating the setting
1."Settings"2."Doors/key"3."Last seat position autom."
Alarm system
The conceptThe vehicle alarm system responds to:
▷Opening of a door, the hood or the trunk
lid.▷Movements in the vehicle.▷Changes in the vehicle tilt, e.g., during at‐
tempts to steal a wheel or when towing the
car.▷Interruptions in battery voltage.
The alarm system briefly indicates tampering:
▷By sounding an acoustic alarm.▷By switching on the hazard warning sys‐
tem.▷By flashing the high beams.
Arming and disarming the alarm
system
General information
When you lock or unlock the vehicle, either
with the remote control, Comfort Access or at
the door lock the alarm system is armed or dis‐
armed at the same time.
Door lock and armed alarm systemUnlocking via the door lock will trigger the
alarm on some country-specific versions.
In order to terminate this alarm, unlock vehicle
with the remote control or switch on the igni‐
tion, if necessary, by emergency detection of
the remote control.
Trunk lid and armed alarm system
The trunk lid can be opened even when the
alarm system is armed.
Press the button on the remote con‐
trol for approx. 1 second.
After the trunk lid is closed, it is locked and
monitored again if the doors are locked. The
hazard warning system flashes once.
In some vehicle equipment variants, the trunk
lid can only be opened using the remote con‐
trol if the vehicle was unlocked first.
Panic mode
You can trigger the alarm system if you find
yourself in a dangerous situation.
Press the button on the remote con‐
trol for at least 3 seconds.
To switch off the alarm: press any button.
Switching off the alarm▷Unlock the vehicle using the remote con‐
trol.▷With Comfort Access: If you are carrying
the remote control with you, pull on the
driver side or front passenger side door
handle.
Indicator lamp on the interior rearview
mirror
▷The indicator lamp flashes briefly every
2 seconds:
The system is armed.Seite 40ControlsOpening and closing40
Online Edition for Part no. 01 40 2 910 721 - VI/13
Page 51 of 243

AdjustingVehicle equipment
All standard, country-specific and optional
equipment that is offered in the model series is
described in this chapter. Therefore, equip‐
ment is also described that is not available in a
vehicle, e. g., because of the selected optional
equipment or country variant. This also applies
for safety-related functions and systems.
Sitting safely The ideal seating position can make a vital
contribution to relaxed, fatigue-free driving.
The seating position plays an important role in
an accident in combination with:▷Safety belts, refer to page 54.▷Head restraints, refer to page 55.▷Airbags, refer to page 96.
Seats
Adjusting
General information Do not adjust the seat while driving
Do not adjust the driver's seat while driv‐
ing, or the seat could respond with unexpected
movement and the ensuing loss of vehicle
control could lead to an accident.◀
Do not incline the backrest too far to the
rear
Also on the front passenger side, do not incline
the backrest on the front passenger side too
far to the rear during driving, or there is a risk of
slipping under the safety belt in the event of an
accident. This would eliminate the protection
normally provided by the belt.◀
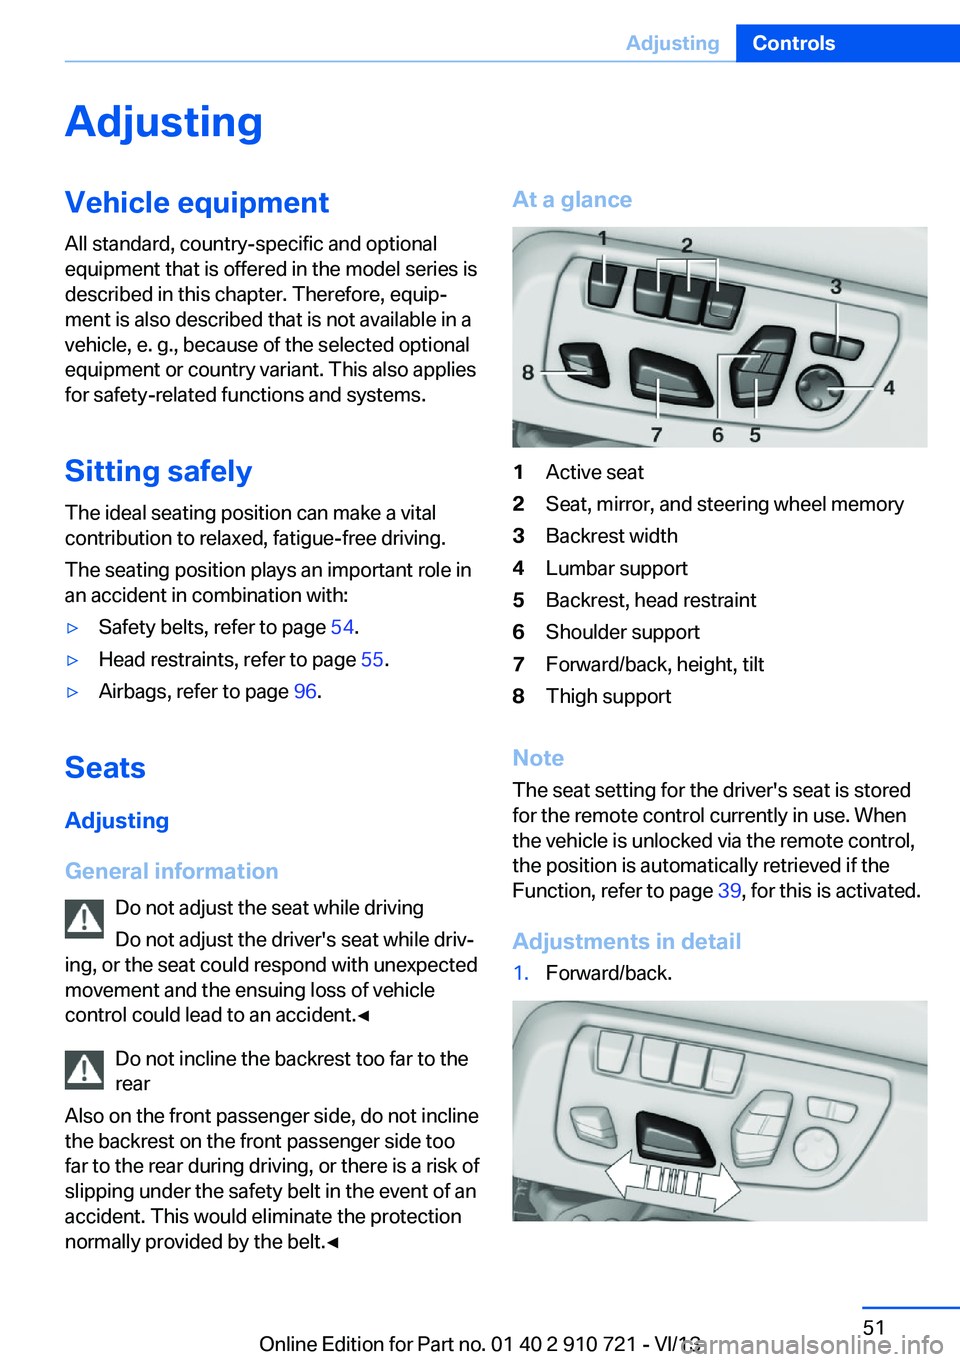
At a glance1Active seat2Seat, mirror, and steering wheel memory3Backrest width4Lumbar support5Backrest, head restraint6Shoulder support7Forward/back, height, tilt8Thigh support
Note
The seat setting for the driver's seat is stored
for the remote control currently in use. When
the vehicle is unlocked via the remote control,
the position is automatically retrieved if the
Function, refer to page 39, for this is activated.
Adjustments in detail
1.Forward/back.Seite 51AdjustingControls51
Online Edition for Part no. 01 40 2 910 721 - VI/13