2014 BMW 640I CONVERTIBLE transmission
[x] Cancel search: transmissionPage 183 of 243
Coasting
The concept The system helps to conserve fuel.
To do this, under certain conditions the engine
is automatically decoupled from the transmis‐
sion when transmission position D is engaged.
The vehicle continues traveling with the engine
idling to reduce fuel consumption. Transmis‐
sion position D remains engaged.
This driving condition is referred to as coast‐
ing.
As soon as the brake or accelerator pedal is depressed, the engine is automatically coupled
to the transmission again.
Hints
Coasting is a component of the ECO PRO, re‐
fer to page 180, driving mode.
The function is available in a certain speed
range.
A forward-looking driving style helps the driver
to use the function as often as possible and
supports the fuel-conserving effect of coast‐
ing.
Safety mode
The function is not available if one of the fol‐
lowing conditions is satisfied.▷DSC OFF or TRACTION activated.▷Driving in the dynamic limit range and on
steep uphill or downhill grades.▷Battery charge status temporarily too low
or vehicle electrical system drawing exces‐
sive current.▷Cruise control activated.
Functional requirements
In ECO PRO mode, this function is available in
a speed range from approximately 30 mph, ap‐
prox. 50 km/h to 100 mph, approx. 160 km/h, if
the following conditions are satisfied:
▷Accelerator pedal and brake pedal are not
operated.▷The selector lever is in transmission posi‐
tion D.▷Engine and transmission are at operating
temperature.
Display
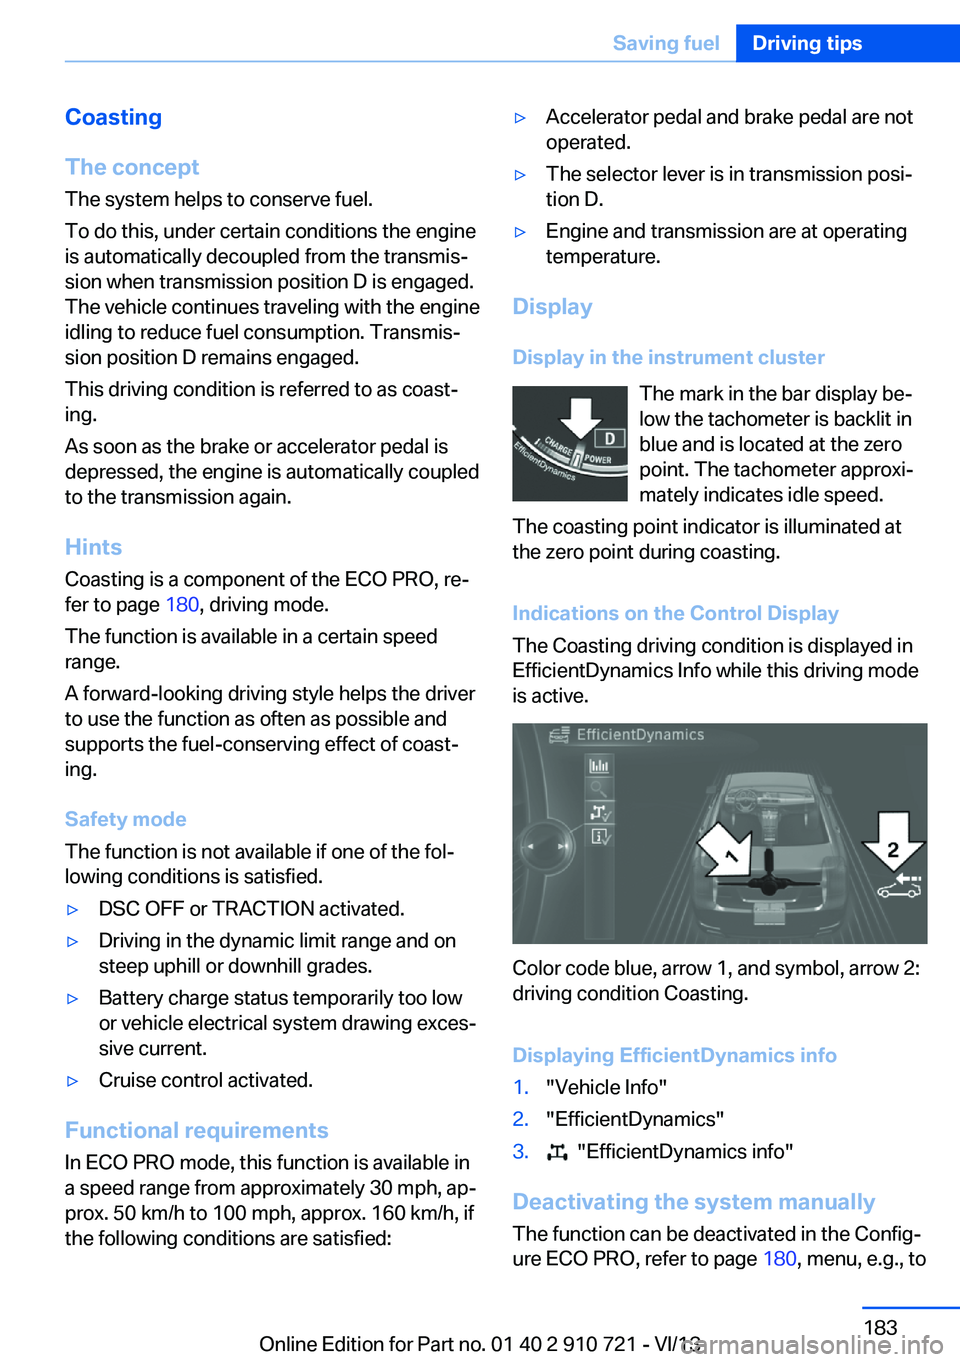
Display in the instrument cluster The mark in the bar display be‐
low the tachometer is backlit in
blue and is located at the zero
point. The tachometer approxi‐
mately indicates idle speed.
The coasting point indicator is illuminated at
the zero point during coasting.
Indications on the Control Display
The Coasting driving condition is displayed in
EfficientDynamics Info while this driving mode
is active.
Color code blue, arrow 1, and symbol, arrow 2:
driving condition Coasting.
Displaying EfficientDynamics info
1."Vehicle Info"2."EfficientDynamics"3. "EfficientDynamics info"
Deactivating the system manually The function can be deactivated in the Config‐
ure ECO PRO, refer to page 180, menu, e.g., to
Seite 183Saving fuelDriving tips183
Online Edition for Part no. 01 40 2 910 721 - VI/13
Page 205 of 243
Engine oilVehicle equipment
All standard, country-specific and optional
equipment that is offered in the model series is
described in this chapter. Therefore, equip‐
ment is also described that is not available in a
vehicle, e. g., because of the selected optional
equipment or country variant. This also applies
for safety-related functions and systems.
General information The engine oil consumption is dependent on
the driving style and driving conditions. When
a sporty driving style is used, the engine oil
consumption, for example, is clearly higher.
Therefore, regularly check the engine oil level
after refueling.
Checking the oil level
electronically
Status display
The concept The oil level is monitored electronically during
driving and shown on the Control Display.
If the oil level reaches the minimum level, a
check control message is displayed.
Requirements Depending on the previous displays, the status
display is displayed when the engine is running
or after the vehicle has been driven for at least
30 minutes.
Displaying the oil level1."Vehicle Info"2."Vehicle status"3. "Engine oil level"
Oil level display messages
Different messages appear on the display de‐
pending on the oil level. Pay attention to these
messages.
If oil level is too low, immediately add 1 US
quart/liter of oil.
Take care not to add too much engine oil.
Too much engine oil
Have the vehicle checked immediately;
otherwise, surplus oil can lead to engine dam‐
age.◀
Detailed measurement
The concept
In the detailed measurement the oil level is
checked and displayed via a scale.
During the measurement, the idle speed is in‐
creased somewhat.
General information
A detailed measurement is only possible with
certain engines.
Requirements
▷Automatic transmission: selector lever in
transmission position N or P and accelera‐
tor not depressed.▷Vehicle is on a level road and the engine is
running at operating temperature.
Performing a detailed measurement
In order to perform a detailed measurement of
the engine oil level:
1."Vehicle Info"2."Vehicle status"Seite 205Engine oilMobility205
Online Edition for Part no. 01 40 2 910 721 - VI/13
Page 219 of 243
corresponding engine or body ground of
the vehicle to be started.
Starting the engine
Never use spray fluids to start the engine.
1.Start the engine of the assisting vehicle
and let it run for several minutes at an in‐
creased idle speed.2.Start the engine of the vehicle being
started in the usual way.
If the first starting attempt is not success‐
ful, wait a few minutes before making an‐
other attempt in order to allow the dis‐
charged battery to recharge.3.Let both engines run for several minutes.4.Disconnect the jumper cables in the re‐
verse order.
Check the battery and recharge if necessary.
Tow-starting and towing Automatic transmission: transporting
your vehicle
Note
Your vehicle is not permitted to be towed.
Therefore, contact a service center in the
event of a breakdown.
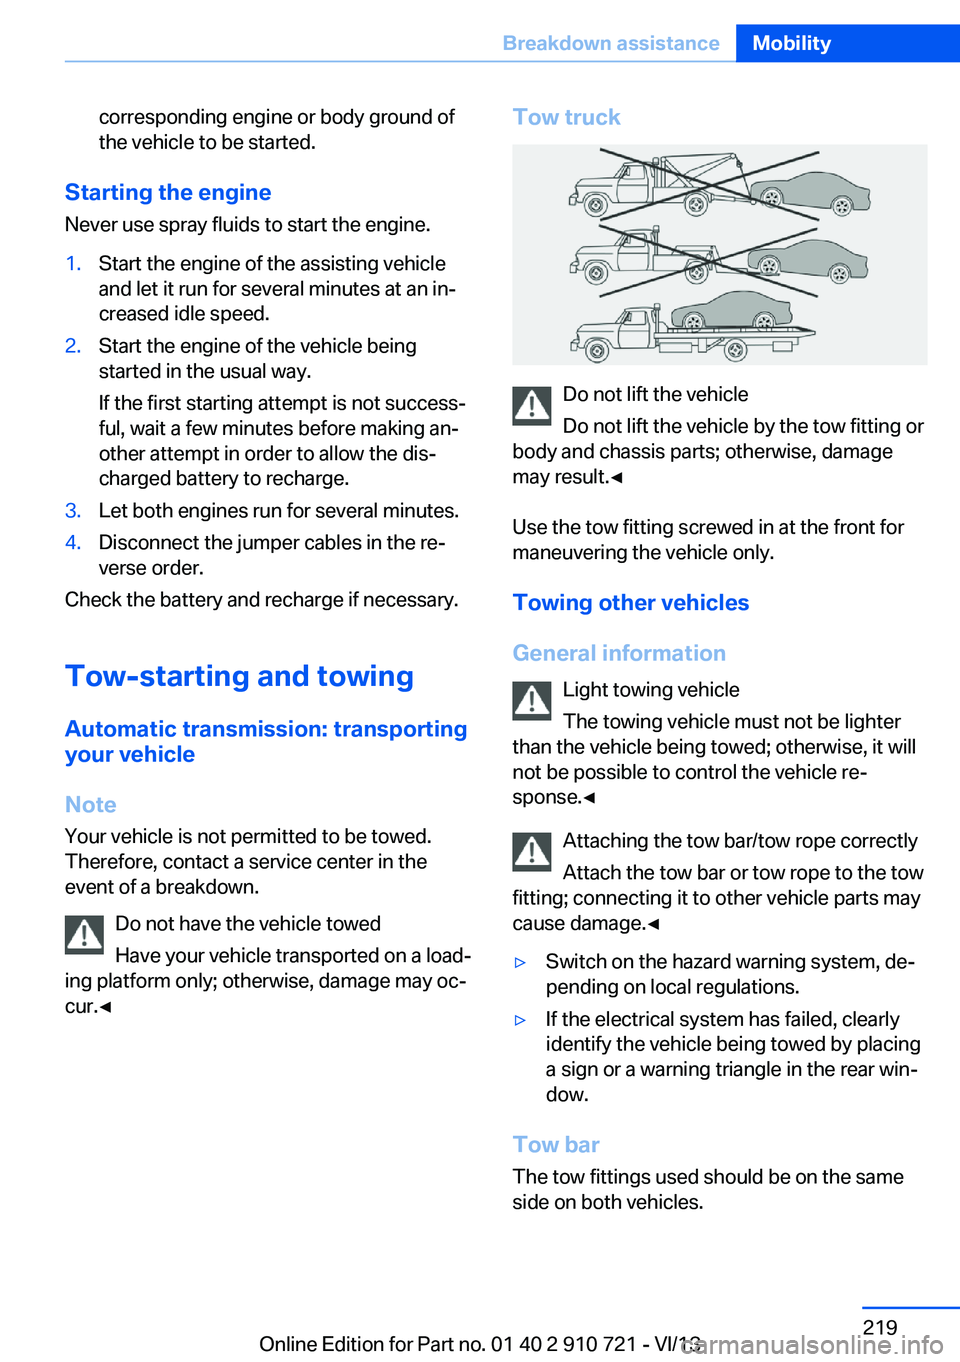
Do not have the vehicle towed
Have your vehicle transported on a load‐
ing platform only; otherwise, damage may oc‐
cur.◀
Tow truck
Do not lift the vehicle
Do not lift the vehicle by the tow fitting or
body and chassis parts; otherwise, damage
may result.◀
Use the tow fitting screwed in at the front for
maneuvering the vehicle only.
Towing other vehicles
General information Light towing vehicle
The towing vehicle must not be lighter
than the vehicle being towed; otherwise, it will
not be possible to control the vehicle re‐
sponse.◀
Attaching the tow bar/tow rope correctly
Attach the tow bar or tow rope to the tow
fitting; connecting it to other vehicle parts may
cause damage.◀
▷Switch on the hazard warning system, de‐
pending on local regulations.▷If the electrical system has failed, clearly
identify the vehicle being towed by placing
a sign or a warning triangle in the rear win‐
dow.
Tow bar
The tow fittings used should be on the same
side on both vehicles.
Seite 219Breakdown assistanceMobility219
Online Edition for Part no. 01 40 2 910 721 - VI/13
Page 220 of 243
Should it prove impossible to avoid mounting
the tow bar at an offset angle, please observe
the following:▷Maneuvering capability is limited during
cornering.▷The tow bar will generate lateral forces if it
is secured with an offset.
Tow rope
When starting to tow the vehicle, make sure
that the tow rope is taut.
To avoid jerking and the associated stresses
on the vehicle components when towing, al‐
ways use nylon ropes or nylon straps.
Attaching the tow rope correctly
Only secure the tow rope on the tow fit‐
ting; otherwise, damage can occur when it is
secured on other parts of the vehicle.◀
Tow fitting
The screw-in tow fitting should always be car‐
ried in the vehicle. It can be screwed in at the
front or rear of the BMW. It is contained in the
onboard vehicle tool kit under the cargo floor
cover.
Tow fitting, information on use
▷Use only the tow fitting provided with
the vehicle and screw it all the way in.▷Use the tow fitting for towing on paved
roads only.▷Avoid lateral loading of the tow fitting, e.g.,
do not lift the vehicle by the tow fitting.
Otherwise, damage to the tow fitting and the
vehicle can occur.◀
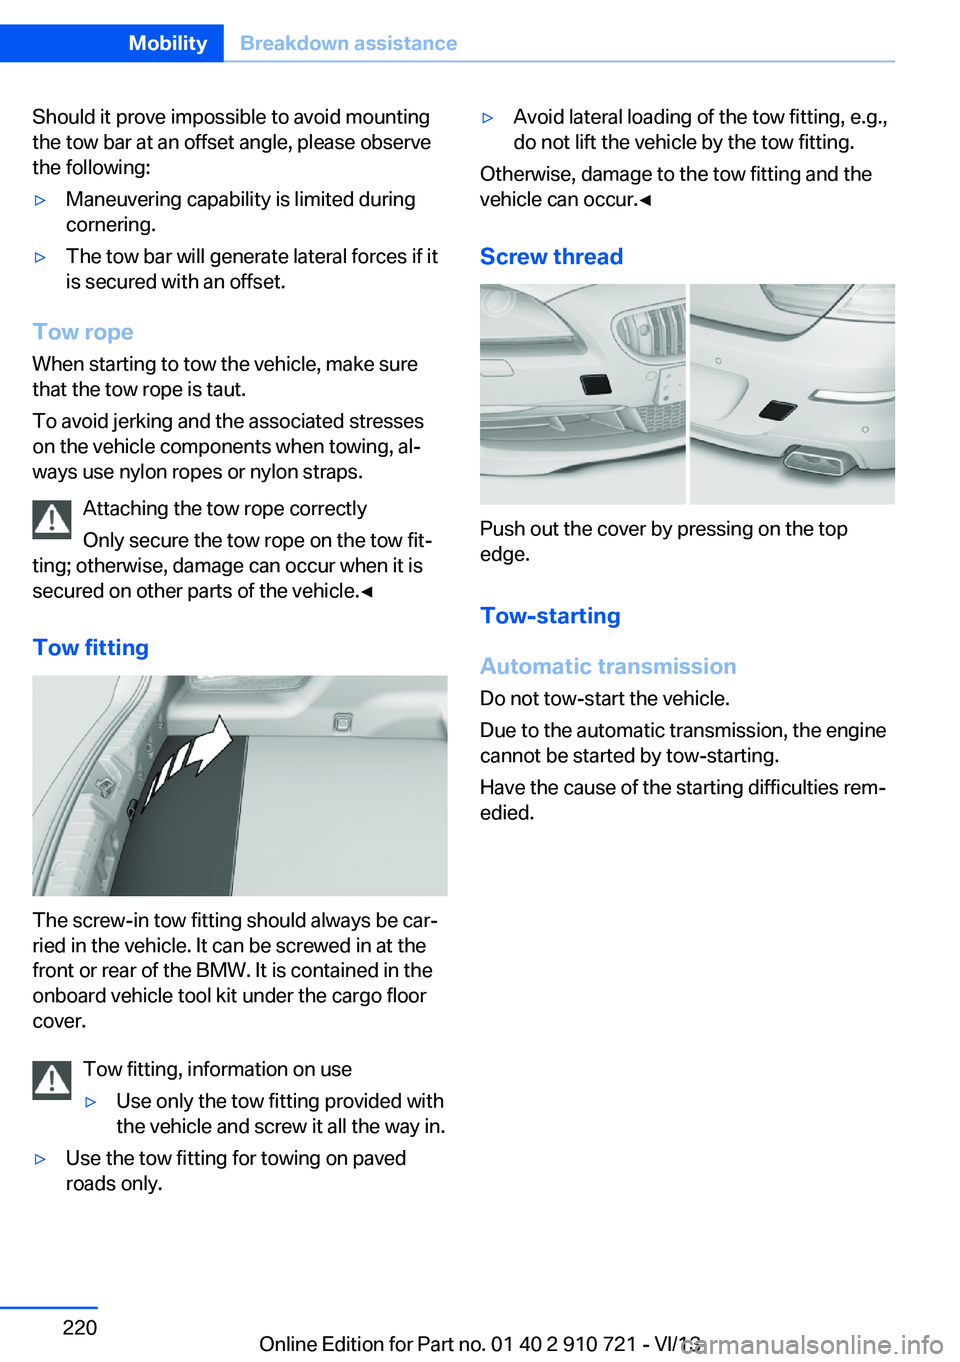
Screw thread
Push out the cover by pressing on the top
edge.
Tow-starting
Automatic transmission Do not tow-start the vehicle.
Due to the automatic transmission, the engine
cannot be started by tow-starting.
Have the cause of the starting difficulties rem‐
edied.
Seite 220MobilityBreakdown assistance220
Online Edition for Part no. 01 40 2 910 721 - VI/13
Page 221 of 243

CareVehicle equipmentAll standard, country-specific and optional
equipment that is offered in the model series is
described in this chapter. Therefore, equip‐
ment is also described that is not available in a
vehicle, e. g., because of the selected optional
equipment or country variant. This also applies
for safety-related functions and systems.
Car washes Hints Steam jets or high-pressure washers
When using steam jets or high-pressure
washers, hold them a sufficient distance away and use a maximum temperature of
140 ℉/60 ℃.
Holding them too close or using excessively
high pressures or temperatures can cause
damage or preliminary damage that may then lead to long-term damage.
Follow the user's manual for the high-pressure
washer.◀
Cleaning sensors/cameras with high-
pressure washers
When using high-pressure washers, do not
spray the exterior sensors and cameras, e.g., Park Distance Control, for extended periods of
time and only from a distance of at least
12 in/30 cm.◀
Regularly remove foreign items such as leaves
in the area below the windshield when the
hood is raised.
Wash your vehicle frequently, particularly in
winter.
Intense soiling and road salt can damage the
vehicle.Automatic car washes
Hints Do not use high pressure washing sys‐
tems
With washing systems operating at high pres‐
sures and nozzle positions close to the win‐
dows, drops of water can penetrate.◀
Note the following:▷Give preference to cloth car washes or
those that use soft brushes in order to
avoid paint damage.▷Make sure that the wheels and tires are not
damaged by the transport mechanisms.▷Fold in the exterior mirrors; otherwise, they
may be damaged, depending on the width
of the vehicle.▷Deactivate the rain sensor, refer to
page 71, to avoid unintentional wiper acti‐
vation.▷Do not treat the convertible top with wax.
Ensure that a cycle without wax or a spe‐
cial cycle for convertibles is available.▷In some cases, an unintentional alarm can
be triggered by the interior motion sensor
of the alarm system. Follow the instruc‐
tions on avoiding an unintentional alarm,
refer to page 41.
Guide rails in car washes
Avoid car washes with guide rails higher
than 4 in/10 cm; otherwise, the vehicle body
could be damaged.◀
Before driving into a car wash In order to ensure that the vehicle can roll in a
car wash, take the following steps:
Automatic transmission:
1.Drive into the car wash.Seite 221CareMobility221
Online Edition for Part no. 01 40 2 910 721 - VI/13
Page 222 of 243
2.Engage transmission position N.3.Switch the engine off.
In this way, the ignition remains switched
on, and a Check-Control message is dis‐
played.
Do not turn off the ignition in the car
wash
Do not turn off the ignition in the car wash;
otherwise, the transmission position P is
engaged and damages can result.◀
To start the engine:
1.Depress the brake pedal.2.Press the Start/Stop button.
Pressing the Start/Stop button without step‐
ping on the brake turns the ignition off.
The vehicle cannot be locked from the outside
when in transmission position N. A signal is
sounded when an attempt is made to lock the
vehicle.
Transmission position
Transmission position P is engaged automati‐
cally:
▷When the ignition is switched off.▷After approx. 15 minutes.
Headlamps
▷Do not rub dry and do not use abrasive or
caustic cleansers.▷Soak areas that have been soiled e.g. due
to insects, with shampoo and wash off with
water.▷Thaw ice with deicing spray; do not use an
ice scraper.
After washing the vehicle
After washing the vehicle, apply the brakes
briefly to dry them; otherwise, braking action
can be reduced and corrosion of the brake
discs can occur.
Completely remove all residues on the win‐
dows, to minimize loss of visibility due to
smearing and to reduce wiper noises and
wiper blade wear.
Vehicle care
Car care products BMW recommends using cleaning and care
products from BMW, since these have been
tested and approved.
Car care and cleaning products
Follow the instructions on the container.
When cleaning the interior, open the doors or
windows.
Only use products intended for cleaning vehi‐
cles.
Cleansers can contain substances that are
dangerous and harmful to your health.◀
Vehicle paint
Regular care contributes to driving safety and
value retention. Environmental influences in
areas with elevated air pollution or natural con‐
taminants, such as tree resin or pollen can af‐
fect the vehicle's paintwork. Tailor the fre‐
quency and extent of your car care to these
influences.
Aggressive substances, such as spilled fuel,
oil, grease or bird droppings, must be removed
immediately to prevent the finish from being
altered or discolored.
Caring for the convertible top
The appearance and life of the convertible top
depend on correct care and operation.
Note the following instructions:▷To prevent water stains, mildew spots, and
chafe marks, do not enclose the
convertible top in the convertible top well
for a long period and do not fold and stowSeite 222MobilityCare222
Online Edition for Part no. 01 40 2 910 721 - VI/13
Page 230 of 243

640i xiDriveApproved gross vehicle weightlbs/kg5,310/2,409Loadlbs/kg770/349Approved front axle loadlbs/kg2,625/1,191Approved rear axle loadlbs/kg2,890/1,311Cargo area capacity
With cargo area partition flipped up
cu ft/l
cu ft/l
10.6/300
12.4/350
650iApproved gross vehicle weightManual transmission
Sport automatic transmission
lbs/kg
lbs/kg
5,425/2,461
5,425/2,461
Loadlbs/kg770/349Approved front axle loadlbs/kg2,700/1,225Approved rear axle loadlbs/kg2,910/1,320Cargo area capacity
With cargo area partition flipped up
cu ft/l
cu ft/l
10.6/300
12.4/350
650i xDriveApproved gross vehicle weightlbs/kg5,465/2,479Loadlbs/kg750/340Approved front axle loadlbs/kg2,755/1,250Approved rear axle loadlbs/kg2,975/1,349Cargo area capacity
With cargo area partition flipped up
cu ft/l
cu ft/l
10.6/300
12.4/350
Seite 230ReferenceTechnical data230
Online Edition for Part no. 01 40 2 910 721 - VI/13
Page 232 of 243
Everything from A to Z
IndexA ABS, Antilock Brake Sys‐ tem 122
ACC, Active Cruise Control with Stop & Go 130
Activated-charcoal filter 160
Active Blind Spot Detec‐ tion 117
Active Cruise Control with Stop & Go, ACC 130
Active Protection 119
Active roll stabilization, see Dynamic Drive 125
Active seat, front 53
Active seat ventilation, front 53
Active Steering, integral 125
Adaptive brake assistant 122
Adaptive brake lights, refer to Brake force display 119
Adaptive drive 125
Adaptive light control 92
Additives, oil 206
Adjusting, steering wheel 59
Adjustments, seats/head re‐ straints 51
After washing vehicle 222
Airbags 96
Airbags, indicator/warning light 97
Air circulation, refer to Recir‐ culated-air mode 159
Air distribution, manual 158
Air drying, refer to Cooling function 159
Air flow, automatic climate control 158
Air pressure, tires 191
Air vents, refer to Ventila‐ tion 160 Alarm system 40
Alarm, unintentional 41
All around the center con‐ sole 14
All around the interior rear‐ view mirror 15
All around the steering wheel 12
All-season tires, refer to Win‐ ter tires 200
All-wheel-drive 124
Alternating-code hand-held transmitter 165
Alternative oil types 206
Ambient light 94
Antifreeze, washer fluid 72
Antilock Brake System, ABS 122
Anti-slip control, refer to DSC 122
Approved engine oils 206
Armrest, refer to Front center armrest 170
Arrival time 88
Ashtray 166
Assistance, Roadside Assis‐ tance 217
Assistance when driving off 122
Attentiveness assistant 119
AUTO H button, refer to Au‐ tomatic Hold 68
AUTO intensity 158
Automatic car wash 221
Automatic Cruise Control with Stop & Go 130
Automatic Curb Monitor 58
Automatic deactivation, front passenger airbags 98
Automatic headlamp con‐ trol 92 Automatic Hold 68
Automatic locking 39
Automatic recirculated-air control 159
Automatic Soft Closing, doors 36
Automatic transmission with Steptronic 72
AUTO program, automatic cli‐ mate control 158
AUTO program, intensity 158
Auto Start/Stop function 65
Average fuel consumption 88
Average speed 88
Axle loads, weights 229
B Backrest curvature, refer to Lumbar support 52
Backrest, seats 51
Backrest, width 52
Backup camera 144
Band-aids, refer to First aid kit 217
Bar for tow-starting/ towing 219
Battery replacement, remote control for parked-car heat‐
ing/ventilation 162
Battery replacement, vehicle battery 214
Battery replacement, vehicle remote control 30
Battery, vehicle 214
Belts, safety belts 54
Beverage holder, cu‐ pholder 171
BMW Assist, see user's manual for Navigation, En‐Seite 232ReferenceEverything from A to Z232
Online Edition for Part no. 01 40 2 910 721 - VI/13