2014 BMW 528I XDRIVE SEDAN warning light
[x] Cancel search: warning lightPage 18 of 273
CockpitVehicle features and options
This chapter describes all standard, country-
specific and optional features offered with the
series. It also describes features that are notnecessarily available in your car, e. g., due to
the selected options or country versions. This
also applies to safety-related functions and
systems.
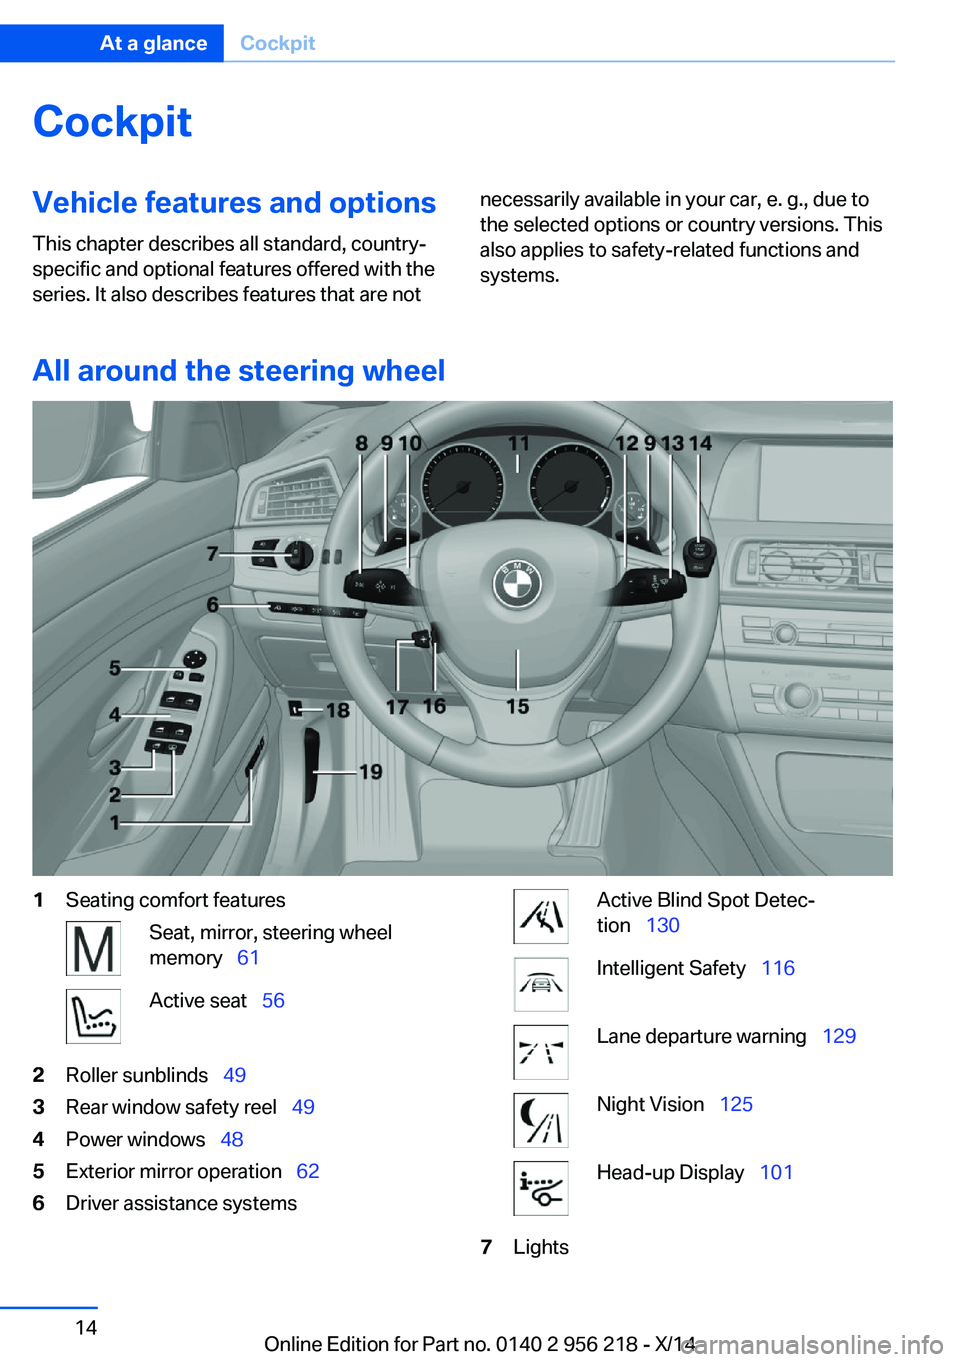
All around the steering wheel
1Seating comfort featuresSeat, mirror, steering wheel
memory 61Active seat 562Roller sunblinds 493Rear window safety reel 494Power windows 485Exterior mirror operation 626Driver assistance systemsActive Blind Spot Detec‐
tion 130Intelligent Safety 116Lane departure warning 129Night Vision 125Head-up Display 1017LightsSeite 14At a glanceCockpit14
Online Edition for Part no. 0140 2 956 218 - X/14
Page 42 of 273
Switching on interior lights and
courtesy lights
Press button on the remote control with
the vehicle locked.
This function is not available, if the interior
lamps were switched off manually.
If the button is pressed again within 10 sec‐
onds after vehicle was locked, the interior mo‐
tion sensor and tilt alarm sensor of the anti-
theft warning system, refer to page 48, are
turned off. After locking, wait 10 seconds be‐
fore pressing the button again.
Panic mode
You can trigger the alarm system if you find
yourself in a dangerous situation.
Press button on the remote control for
at least 3 seconds.
To reel off the alarm: press any button.
Opening the trunk lid Press button on the remote control for
approx. 1 second.
The trunk lid opens, regardless of whether the
vehicle was previously locked or unlocked.
During opening, the trunk lid pivots back and
up. Ensure that adequate clearance is available
before opening.
Depending on the features and the country
version, it is also possible to have door un‐
locked. Create the settings, refer to page 46.
If the doors were not unlocked, the trunk lid is
locked again as soon as it closes.
Do not place the remote control in the
cargo area
Take the remote control with you and do not
leave it in the cargo area; otherwise, the re‐
mote control is locked inside the vehicle when
the trunk lid is closed.◀Switching on the headlight courtesy
delay feature
Briefly press the button on the remote
control.
The duration can be set in the Control Display.
Malfunction
Remote control detection by the vehicle can
among others be malfunctioning under the fol‐
lowing circumstances:▷Interference of the radio connection from
transmission towers or other equipment
with high transmit power.▷Shielding of the remote control due to
metal objects.▷Interference of the radio connection from
mobile phones or other electronic devices
in direct proximity.
Do not transport the remote control together
with metal objects or electronic devices.
In the case of interference, the vehicle can also
be unlocked and locked from the outside with‐
out remote control, refer to page 39.
For US owners only
The transmitter and receiver units comply with
part 15 of the FCC/Federal Communication
Commission regulations. Operation is gov‐
erned by the following:
FCC ID:
▷LX8766S.▷LX8766E.▷LX8CAS.▷LX8CAS2.▷MYTCAS4.
Compliance statement:
This device complies with part 15 of the FCC
Rules. Operation is subject to the following
two conditions:
▷This device may not cause harmful inter‐
ference, andSeite 38ControlsOpening and closing38
Online Edition for Part no. 0140 2 956 218 - X/14
Page 43 of 273
▷this device must accept any interference
received, including interference that may
cause undesired operation.
Any unauthorized modifications or changes to
these devices could void the user's authority to
operate this equipment.
Without remote control
From the outside Locking from the outside
Do not lock the vehicle from the outside
with people inside the car, as the vehicle can‐
not be unlocked from inside without special
knowledge.◀
Remove the key before pulling the door
handle
Before pulling the outside door handle, remove
the key to avoid damaging the paintwork and
the key.◀
Unlock or lock the driver's door via the door
lock using the integrated key, refer to page 34.
In some vehicle equipment versions, only the
driver's door can be unlocked or locked via the
door lock. In this case, the other doors must be
unlocked or locked from the inside.
Alarm system
With some country versions, the alarm system
is not armed if the vehicle is locked with the
integrated key.
In some country-specific versions, the alarm
system is triggered when the vehicle is un‐
locked via the door lock.
In order to terminate this alarm, unlock vehicle
with the remote control or reel on the ignition,
if needed, through emergency detection of the
remote control, refer to page 35.
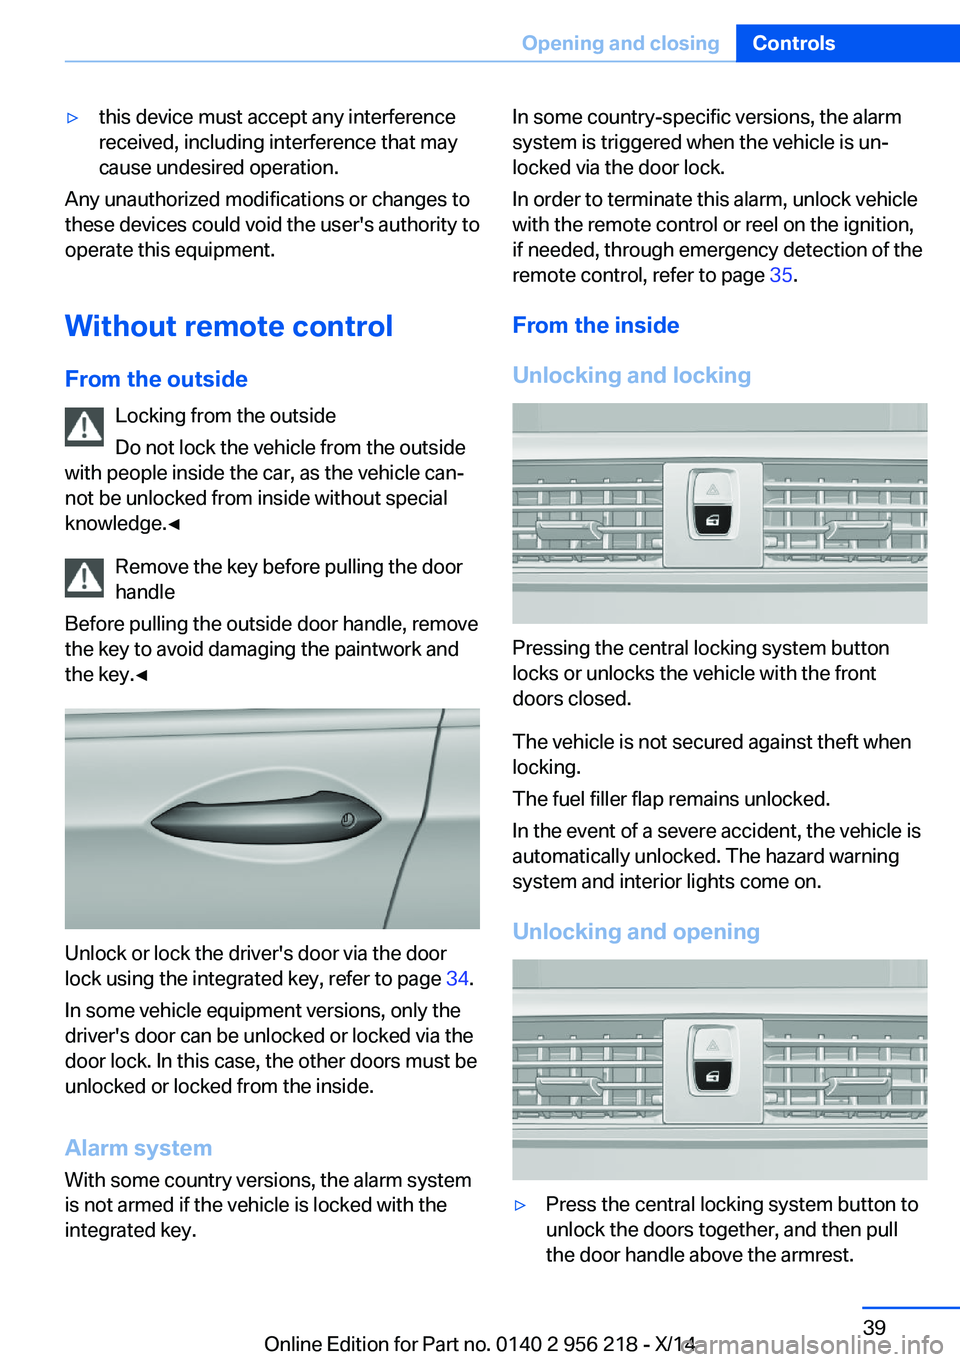
From the inside
Unlocking and locking
Pressing the central locking system button
locks or unlocks the vehicle with the front
doors closed.
The vehicle is not secured against theft when
locking.
The fuel filler flap remains unlocked.
In the event of a severe accident, the vehicle is
automatically unlocked. The hazard warning
system and interior lights come on.
Unlocking and opening
▷Press the central locking system button to
unlock the doors together, and then pull
the door handle above the armrest.Seite 39Opening and closingControls39
Online Edition for Part no. 0140 2 956 218 - X/14
Page 51 of 273

objects damaged when the seat is moved
back.◀
The adjustment procedure is interrupted:▷When a seat position reel is pressed.▷When a button of the seat, mirror, and
steering wheel memory is pressed briefly.
Activating the setting
1."Settings"2."Doors/key"3."Last seat position autom."
Alarm system
The conceptWhen the vehicle is locked, the vehicle alarm
system responds to:
▷Opening a door, the hood or the trunk lid.▷Movements in the interior.▷Changes in the vehicle tilt, e. g., during at‐
tempts at stealing a wheel or when towing
the car.▷Disconnected battery voltage.
The alarm system briefly signals tampering:
▷By sounding an acoustic alarm.▷By switching on the hazard warning sys‐
tem.▷By flashing the daytime running lights.
Arming and disarming the alarm
system
When you unlock or lock the vehicle, either
with the remote control, Comfort Access or at
the door lock the alarm system is disarmed or
armed at the same time.
Door lock and armed alarm systemUnlocking via the door lock will trigger the
alarm on some country-specific versions.
Trunk lid and armed alarm system
The trunk lid can be opened even when the
alarm system is armed.
After the trunk lid is closed, it is locked and
monitored again when the doors are locked.
The hazard warning system flashes once.
Panic mode
You can trigger the alarm system if you find
yourself in a dangerous situation.
Press button on the remote control for
at least 3 seconds.
To reel off the alarm: press any button.
Indicator lamp on the interior rearview
mirror▷The indicator lamp flashes briefly every
2 seconds:
The system is armed.▷The indicator lamp flashes after locking:
The doors, hood or trunk lid is not closed
properly, but the rest of the vehicle is se‐
cured.
After 10 seconds, the indicator lamp
flashes continuously. Interior motion sen‐
sor and tilt alarm sensor are not active.
When the still open access is closed, inte‐
rior motion sensor and tilt alarm sensor will
be switched on.▷The indicator lamp goes out after unlock‐
ing:
The vehicle has not been tampered with.Seite 47Opening and closingControls47
Online Edition for Part no. 0140 2 956 218 - X/14
Page 73 of 273
DrivingVehicle features and options
This chapter describes all standard, country-
specific and optional features offered with the
series. It also describes features that are not
necessarily available in your car, e. g., due to
the selected options or country versions. This
also applies to safety-related functions and
systems.
Start/Stop button
The concept Pressing the Start/Stop button
switches the ignition on or off
and starts the engine.
Steptronic transmission: The
engine starts if the brakes are
stepped on while pressing the Start/Stop but‐
ton.
Manual transmission: The engine starts with
the clutch pedal pressed when the Start/Stop
button is pressed.
Ignition onSteptronic transmission: Press the Start/Stop
button without stepping on the brake.
Manual transmission: Press the Start/Stop but‐
ton without stepping on the clutch pedal.
All vehicle systems are ready for operation.
Most of the indicator and warning lights in the
instrument cluster light up for a varied length
of time.
To save battery power when the engine is off,
reel off the ignition and any unnecessary elec‐
tronic systems/power consumers.Note
If the engine is switched off and the ignition is
switched on, the system automatically
switches to the radio-ready state if the lights
are turned off or, if correspondingly equipped,
the daytime running lights are activated.
Ignition off Steptronic transmission: Press the Start/Stop
button again without stepping on the brake.
Manual transmission: Press the Start/Stop but‐
ton again without stepping on the clutch pedal.
All indicator lights in the instrument cluster go
out.
To save battery power when the engine is off,
reel off the ignition and any unnecessary elec‐
tronic systems/power consumers.
P when the ignition is switched off
P is engaged automatically when the ig‐
nition is switched off. When in an automatic car
wash, e.g., ensure that the ignition is not
switched off accidentally.◀
The ignition automatically cuts off while the
vehicle is stationary and the engine is stopped:▷When locking the vehicle, and when the
low beams are activated.▷Shortly before the battery is discharged
completely, so that the engine can still be
started. This function is only available
when the low beams are turned off.▷When opening or closing the driver door, if
the driver's safety belt is unbuckled and
the low beams are turned off.▷While the driver's safety belt is unbuckled
with driver's door open and low beams off.
The low beams reel to parking lights after ap‐
prox. 15 minutes of no use.
Seite 69DrivingControls69
Online Edition for Part no. 0140 2 956 218 - X/14
Page 89 of 273
▷Messages, e.g. Check Control, refer to
page 88.▷Current fuel consumption, refer to
page 93.▷Navigation display, see User's manual for
Navigation, Entertainment and Communi‐
cation.▷Range, refer to page 93.▷Status, Driving Dynamics Control, refer to
page 139.▷Service requirements, refer to page 94.▷Speed limit detection, refer to page 95.▷Time, refer to page 93.
Multifunctional instrument display
The concept
The instrument display is a variable display. In
the event of a program change, the display
rendition adapts to the respective program
through the Driving Dynamics Control. The
change of appearance can be deactivated on
the Control Display.Some of the displays in the instrument display
may differ from the way they are shown in this
Owner's Manual.
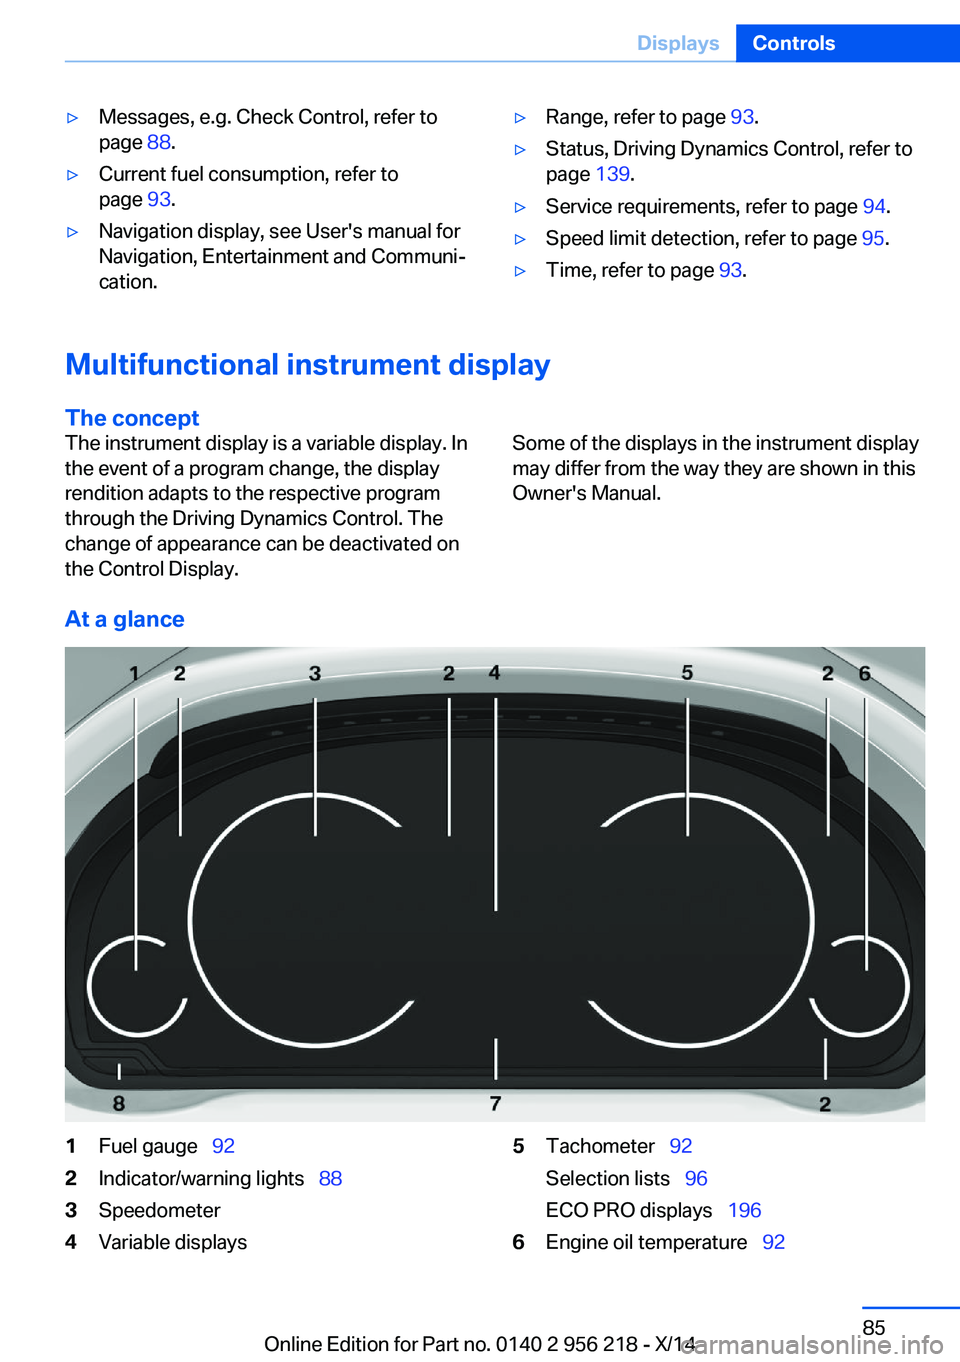
At a glance
1Fuel gauge 922Indicator/warning lights 883Speedometer4Variable displays5Tachometer 92
Selection lists 96
ECO PRO displays 1966Engine oil temperature 92Seite 85DisplaysControls85
Online Edition for Part no. 0140 2 956 218 - X/14
Page 92 of 273
General information
Steptronic Sport transmission: shift lights are
shown, when the SPORT+ driving program is
activated.
Manual transmission: shift lights are shown,
when the SPORT or SPORT+ driving program
is activated.
Switching on shift lightsSteptronic Sport transmission:1.Select Sport+ using the Driving Dynamics
Control.2.Activate the M/S manual mode of the
transmission.
Manual transmission:
1.Select SPORT or SPORT+ using the Driv‐
ing Dynamics Control.2.Deactivate DSC if needed.
Display in the instrument display
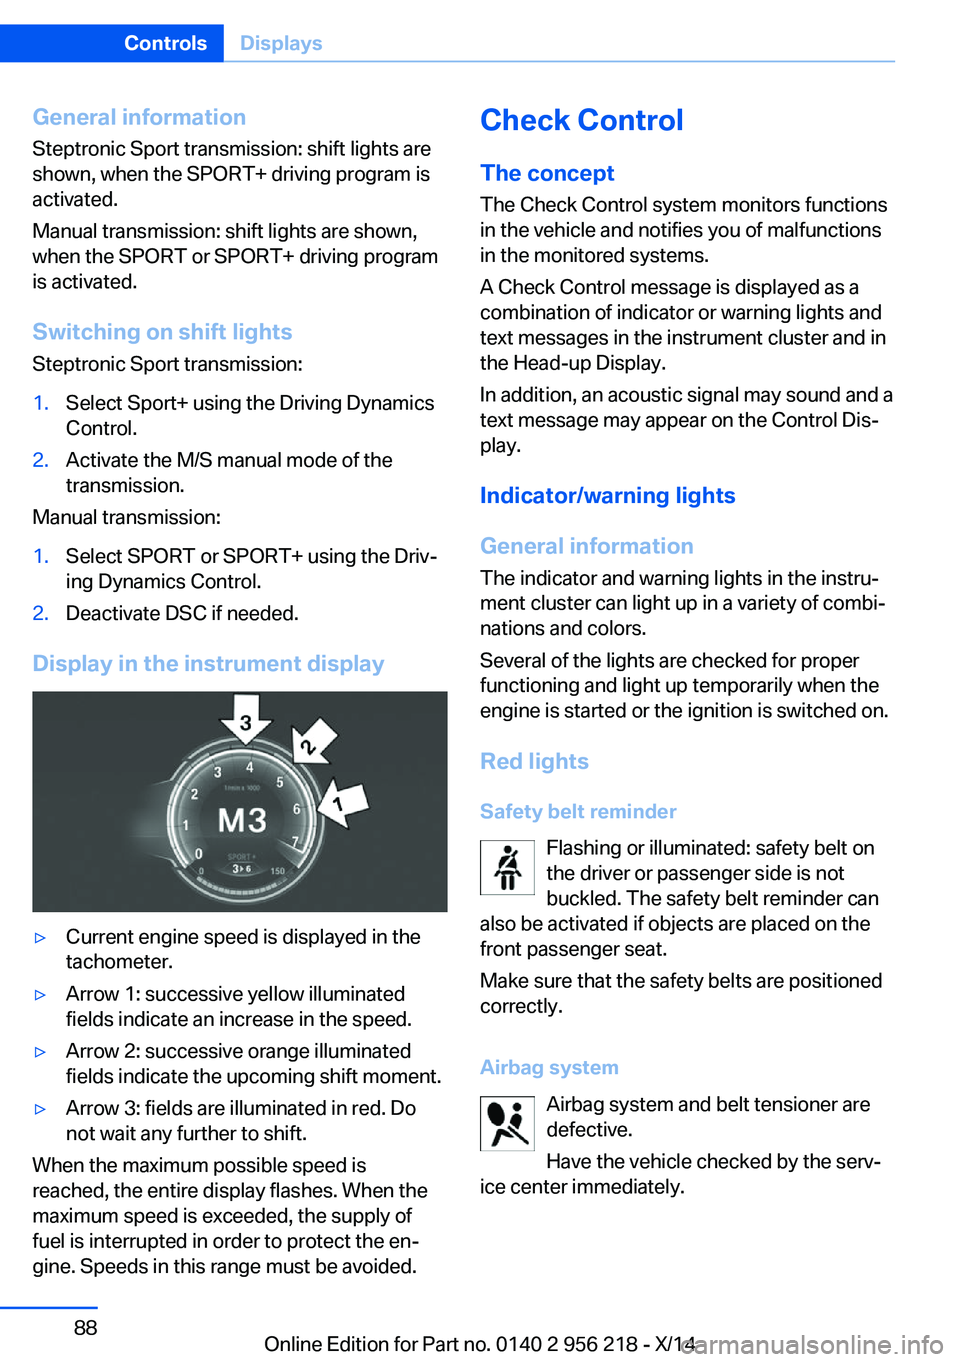
▷Current engine speed is displayed in the
tachometer.▷Arrow 1: successive yellow illuminated
fields indicate an increase in the speed.▷Arrow 2: successive orange illuminated
fields indicate the upcoming shift moment.▷Arrow 3: fields are illuminated in red. Do
not wait any further to shift.
When the maximum possible speed is
reached, the entire display flashes. When the
maximum speed is exceeded, the supply of
fuel is interrupted in order to protect the en‐
gine. Speeds in this range must be avoided.
Check Control
The concept The Check Control system monitors functions
in the vehicle and notifies you of malfunctions
in the monitored systems.
A Check Control message is displayed as a
combination of indicator or warning lights and
text messages in the instrument cluster and in
the Head-up Display.
In addition, an acoustic signal may sound and a text message may appear on the Control Dis‐
play.
Indicator/warning lights
General information
The indicator and warning lights in the instru‐
ment cluster can light up in a variety of combi‐
nations and colors.
Several of the lights are checked for proper
functioning and light up temporarily when the
engine is started or the ignition is switched on.
Red lights Safety belt reminder Flashing or illuminated: safety belt onthe driver or passenger side is not
buckled. The safety belt reminder can
also be activated if objects are placed on the
front passenger seat.
Make sure that the safety belts are positioned
correctly.
Airbag system Airbag system and belt tensioner aredefective.
Have the vehicle checked by the serv‐
ice center immediately.Seite 88ControlsDisplays88
Online Edition for Part no. 0140 2 956 218 - X/14
Page 93 of 273
Parking brakeThe parking brake is set.
For additional information, refer to Release
parking brake, refer to page 74.
Brake system Continue to drive moderately.
Have the vehicle checked by the serv‐
ice center immediately.
Front-end collision warning Illuminated: advance warning is issued,
e.g., when there is the impending dan‐
ger of a collision or the distance to the
vehicle ahead is too small.
Increase distance.
Flashing: acute warning of the imminent dan‐
ger of a collision when the vehicle approaches
another vehicle at a relatively high differential
speed.
Intervention by braking or make an evasive ma‐
neuver.
Pedestrian warning Symbol in the instrument cluster.
Symbol in the instrument display.
If a collision with a person detected in this way
is imminent, the symbol lights up and a signal sounds.Orange lights
Active Cruise Control The number bars shows the selected
distance from the vehicle driving
ahead.
For additional information, refer to Active
Cruise Control with Stop & Go function, ACC,
refer to page 143.
Vehicle detection, Active Cruise Control Illuminated: vehicle driving ahead de‐
tected.
Flashing: the conditions are not ade‐
quate for operating the system.
The system was deactivated but applies the
brakes until you actively resume control by
pressing on the brake pedal or accelerator
pedal.
Yellow lights
Antilock Brake System ABS It reduces the braking distance to a
minimum during emergency stops.
Illuminated: avoid abrupt braking if pos‐
sible. Braking force boost in some
cases defective. Stop carefully. Take
into account longer brake travel. Have this
checked by the service center immediately.
DSC Dynamic Stability Control Flashing: DSC controls the drive and
braking forces. The vehicle is stabi‐
lized. Reduce speed and adapt driving
profile to the driving circumstances.
Illuminated: DSC failed. Have the system
checked by the service center.
For additional information, refer to Dynamic
Stability Control DSC, refer to page 135.Seite 89DisplaysControls89
Online Edition for Part no. 0140 2 956 218 - X/14