2014 BMW 5 SERIES GRAN TURISMO lights
[x] Cancel search: lightsPage 172 of 259
Parked-car ventilation
The concept The parked-car ventilation ventilates the vehi‐
cle interior and lowers its temperature, if
needed.
Operation can be performed via iDrive.
Functional requirements
Parked-car ventilation▷Using the preset reel-on time or when op‐
erated directly: any external temperature.
Open the vents to allow air to flow out.
Switching on/off directly
On the Control Display:
1."Settings"2."Climate"3."Activate comf. ventilation"
The symbol on the automatic climate con‐
trol flashes if the system is switched on.
The system continues to run for some time af‐
ter being switched off.
Preselecting the reel-on time On the Control Display:
1."Settings"2."Climate"3."Timer 1:" or "Timer 2:"4.Set the desired time.
Activating the reel-on time
On the Control Display:
1."Settings"2."Climate"3."Activate timer 1" or "Activate timer 2"
The symbol on the automatic climate con‐
trol lights up when the reel-on time is acti‐
vated.
The symbol on the automatic climate con‐
trol flashes when the system has been
switched on.
The system will only be switched on within the
next 24 hours. After that, it needs to be reacti‐
vated.Seite 168ControlsClimate control168
Online Edition for Part no. 01 40 2 956 191 - X/14
Page 177 of 259
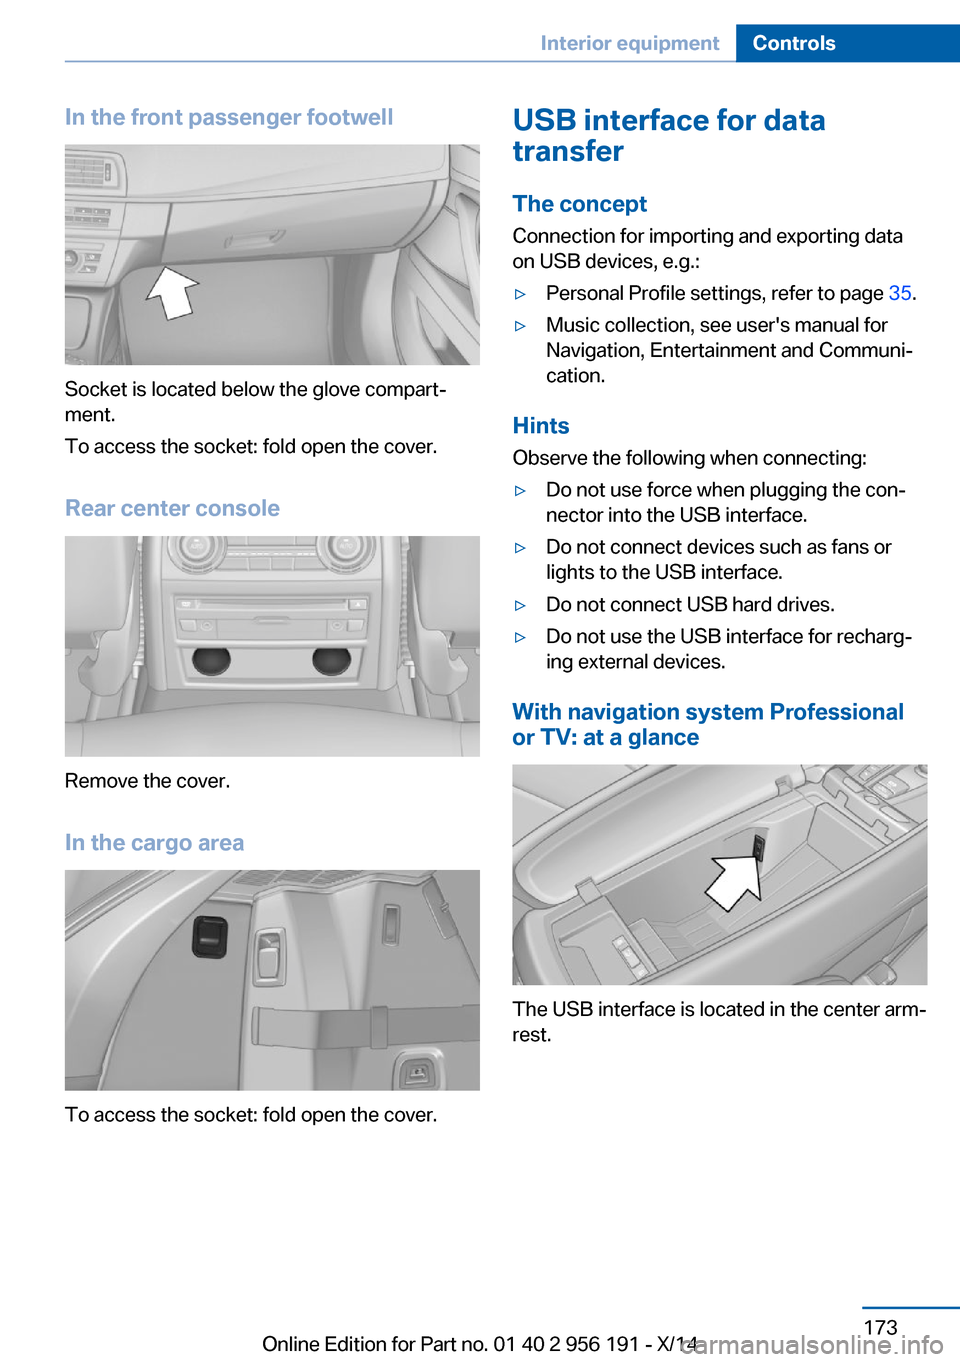
In the front passenger footwell
Socket is located below the glove compart‐
ment.
To access the socket: fold open the cover.
Rear center console
Remove the cover.
In the cargo area
To access the socket: fold open the cover.
USB interface for data
transfer
The concept Connection for importing and exporting data
on USB devices, e.g.:▷Personal Profile settings, refer to page 35.▷Music collection, see user's manual for
Navigation, Entertainment and Communi‐
cation.
Hints
Observe the following when connecting:
▷Do not use force when plugging the con‐
nector into the USB interface.▷Do not connect devices such as fans or
lights to the USB interface.▷Do not connect USB hard drives.▷Do not use the USB interface for recharg‐
ing external devices.
With navigation system Professional
or TV: at a glance
The USB interface is located in the center arm‐
rest.
Seite 173Interior equipmentControls173
Online Edition for Part no. 01 40 2 956 191 - X/14
Page 195 of 259
Avoid high engine speeds
As a rule: driving at low engine speeds lowers
fuel consumption and reduces wear.
If necessary, observe the gear shift indicator of
the vehicle, refer to page 94.
Use coasting
When approaching a red light, take your foot
off the accelerator and let the vehicle coast to
a halt.
For going downhill take your foot off the accel‐
erator and let the vehicle roll.
The flow of fuel is interrupted while coasting.
Switch off the engine during longer stops
Switch off the engine during longer stops, e.g.,
at traffic lights, railroad crossings or in traffic
congestion.
Auto Start/Stop function The Auto Start/Stop function of your vehicle
automatically switches off the engine during a
stop.
If the engine is switched off and then restarted
rather than leaving the engine running con‐
stantly, fuel consumption and emissions are
reduced. Savings can begin within a few sec‐
onds of switching off the engine.
In addition, fuel consumption is also deter‐
mined by other factors, such as driving style,
road conditions, maintenance or environmental
factors.
Switch off any functions that
are not currently needed
Functions such as seat heating and the rear
window defroster require a lot of energy andreduce the range, especially in city and stop-
and-go traffic.
Reel off these functions if they are not needed. The ECO PRO driving program supports the
energy conserving use of comfort features.
These functions are automatically deactivated
partially or completely.
Have maintenance carriedout
Have vehicles maintained regularly to achieve
optimal vehicle efficiency and operating life.
The maintenance should be carried out by
your service center.
Also note the BMW Maintenance System, refer
to page 219.
ECO PRO
The concept ECO PRO supports a driving style that saves
on fuel consumption. For this purpose, the en‐
gine control and comfort features, e. g. the cli‐
mate control output, are adjusted.
Under certain conditions the engine is auto‐
matically decoupled from the transmission in
the D selector lever position. The vehicle con‐
tinues traveling with the engine idling to re‐
duce fuel consumption. Selector lever position
D remains engaged.
In addition, context-sensitive instructions are
displayed to assist with an optimized fuel con‐
sumption driving style.
The achieved extended range is displayed in
the instrument cluster as bonus range.
At a glance The system includes the following
EfficientDynamics functions and displays:▷ECO PRO bonus range, refer to page 192.Seite 191Saving fuelDriving tips191
Online Edition for Part no. 01 40 2 956 191 - X/14
Page 224 of 259
correspondingly trained personnel and other
authorized persons. Otherwise, use may result
in operating problems for the vehicle.◀
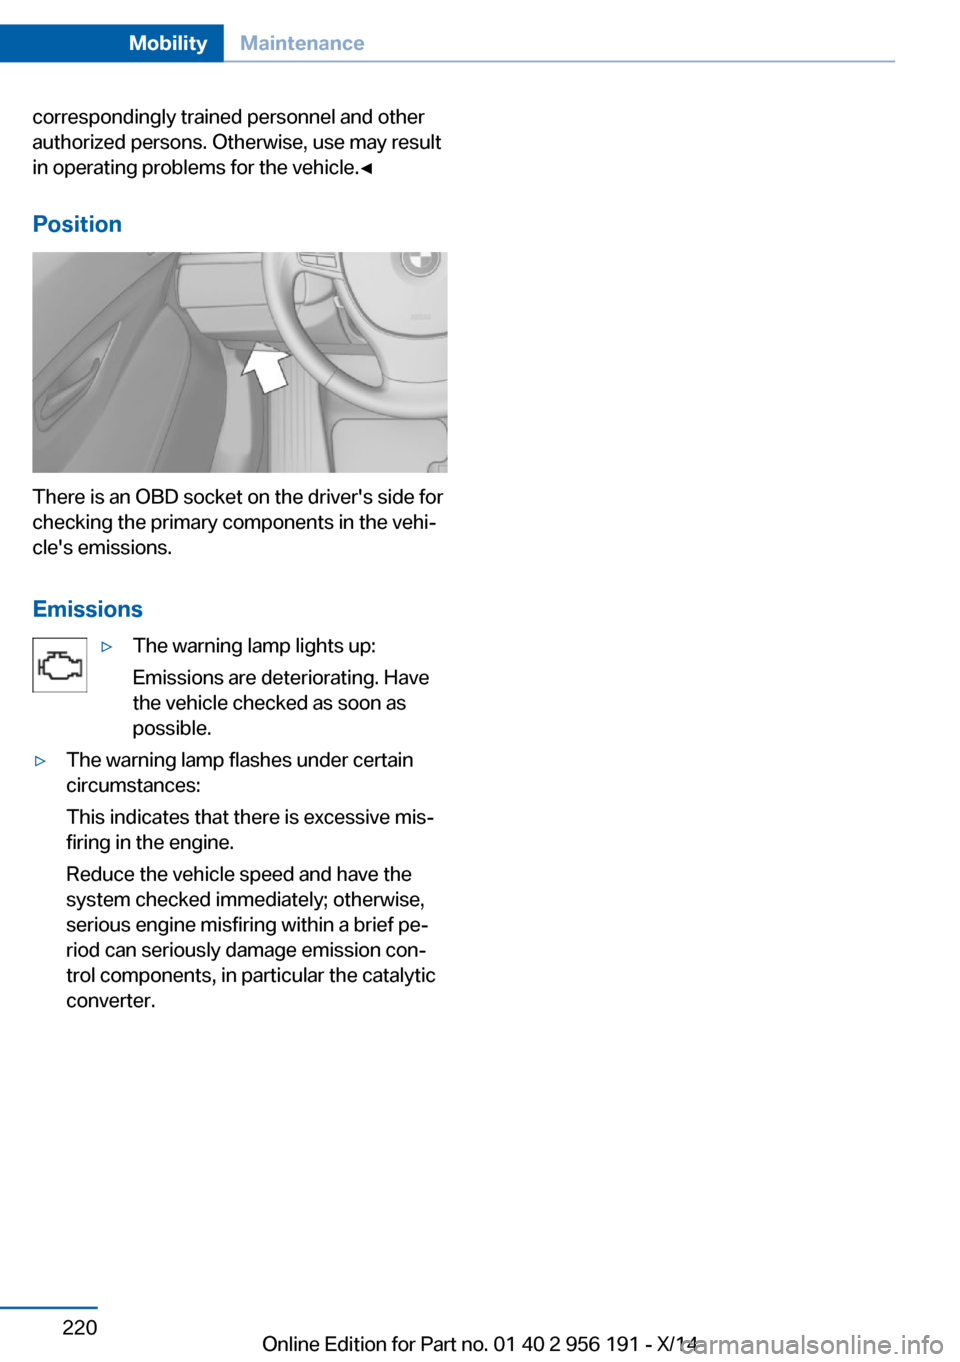
Position
There is an OBD socket on the driver's side for
checking the primary components in the vehi‐
cle's emissions.
Emissions
▷The warning lamp lights up:
Emissions are deteriorating. Have
the vehicle checked as soon as
possible.▷The warning lamp flashes under certain
circumstances:
This indicates that there is excessive mis‐
firing in the engine.
Reduce the vehicle speed and have the
system checked immediately; otherwise,
serious engine misfiring within a brief pe‐
riod can seriously damage emission con‐
trol components, in particular the catalytic
converter.Seite 220MobilityMaintenance220
Online Edition for Part no. 01 40 2 956 191 - X/14
Page 225 of 259
Replacing componentsVehicle features and optionsThis chapter describes all standard, country-
specific and optional features offered with the
series. It also describes features that are not
necessarily available in your car, e. g., due to
the selected options or country versions. This
also applies to safety-related functions and
systems.
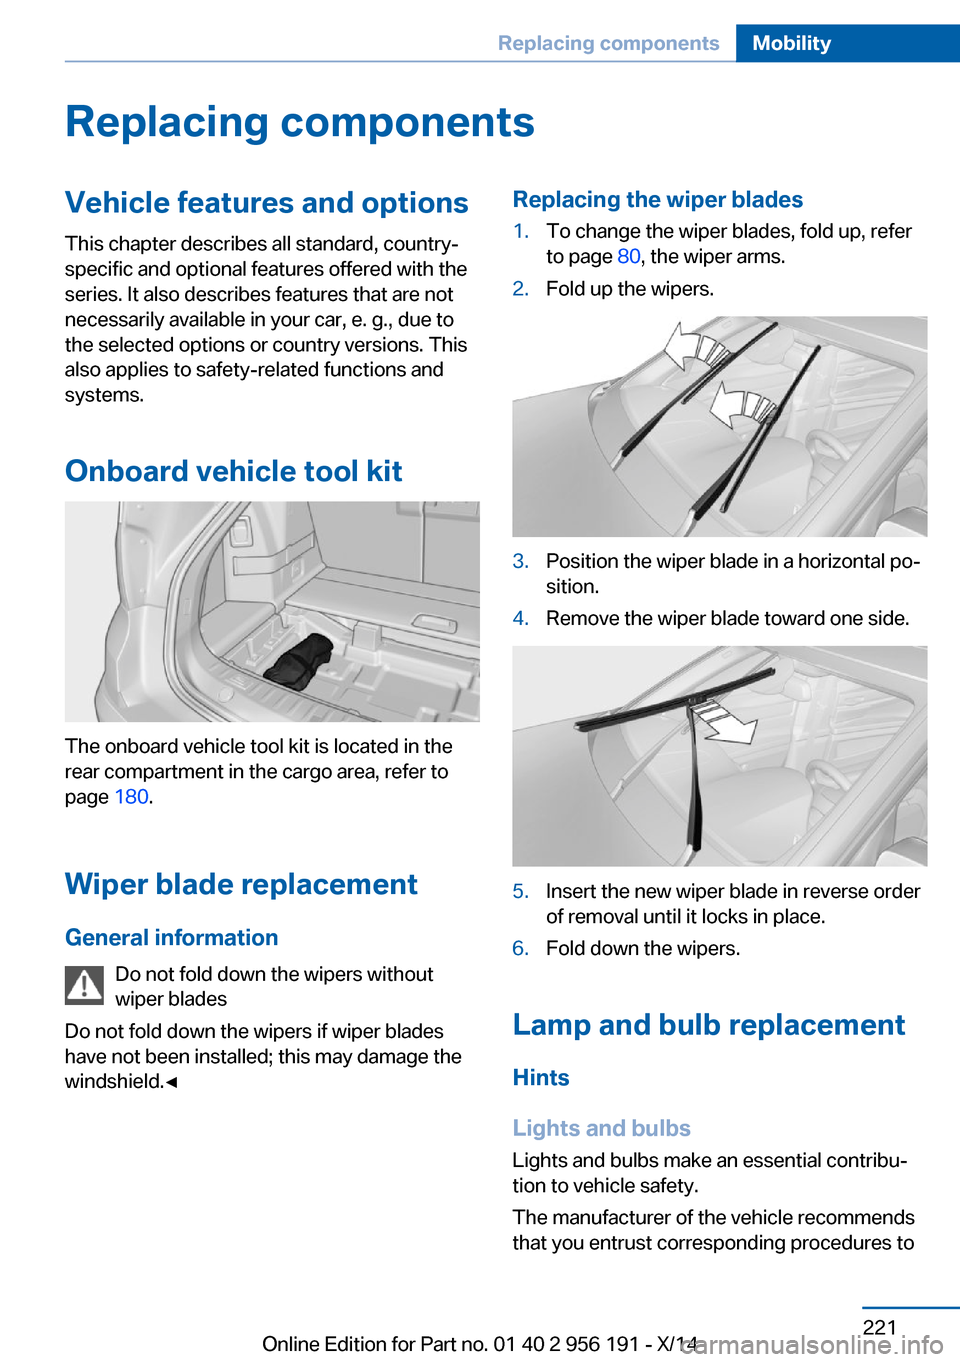
Onboard vehicle tool kit
The onboard vehicle tool kit is located in the
rear compartment in the cargo area, refer to
page 180.
Wiper blade replacement General information Do not fold down the wipers without
wiper blades
Do not fold down the wipers if wiper blades
have not been installed; this may damage the
windshield.◀
Replacing the wiper blades1.To change the wiper blades, fold up, refer
to page 80, the wiper arms.2.Fold up the wipers.3.Position the wiper blade in a horizontal po‐
sition.4.Remove the wiper blade toward one side.5.Insert the new wiper blade in reverse order
of removal until it locks in place.6.Fold down the wipers.
Lamp and bulb replacement
Hints
Lights and bulbs
Lights and bulbs make an essential contribu‐
tion to vehicle safety.
The manufacturer of the vehicle recommends
that you entrust corresponding procedures to
Seite 221Replacing componentsMobility221
Online Edition for Part no. 01 40 2 956 191 - X/14
Page 226 of 259
the service center if you are unfamiliar those or
if they have not been described here.
You can obtain a selection of replacement
bulbs at the service center.
Danger of burns
Only change bulbs when they are cool;
otherwise, there is a danger of getting
burned.◀
Working on the lighting system
When working on the lighting system,
you should always reel off the lights affected to
prevent short circuits.
To avoid possible injury or equipment damage
when replacing bulbs, observe any instructions
provided by the bulb manufacturer.◀
Do not perform work/bulb replacement
on xenon headlights
Have any work on the xenon lighting system,
including bulb replacement, performed only by
a service center. Due to the high voltage
present in the system, there is a danger of fatal
injuries if work is carried out improperly.◀
Do not touch the bulbs
Do not touch the glass of new bulbs with
your bare hands, as even minute amounts of
contamination will burn into the bulb's surface
and reduce its service life.
Use a clean tissue, cloth or something similar,
or hold the bulb by its base.◀
Light-emitting diodes (LEDs)
Some items of equipment use light-emitting
diodes installed behind a cover as a light
source.
These light-emitting diodes, which are related
to conventional lasers, are officially designated as Class 1 light-emitting diodes.Do not remove the covers
Do not remove the covers, and never
stare into the unfiltered light for several hours;
otherwise, irritation of the retina could result.◀
Headlight glass
Condensation can form on the inside of the ex‐
ternal lights in cool or humid weather. When
driving with the light switched on, the conden‐
sation evaporates after a short time. The head‐
light glass does not need to be changed.
If the headlights do not dim despite driving
with the light switched on, increasing humidity
forms, e. g. water droplets in the light, have the service center check this.
Headlight setting The headlight adjustments can be affected by
changing lights and bulbs. Have the head‐
lights' settings checked and corrected by serv‐
ice after a replacement.
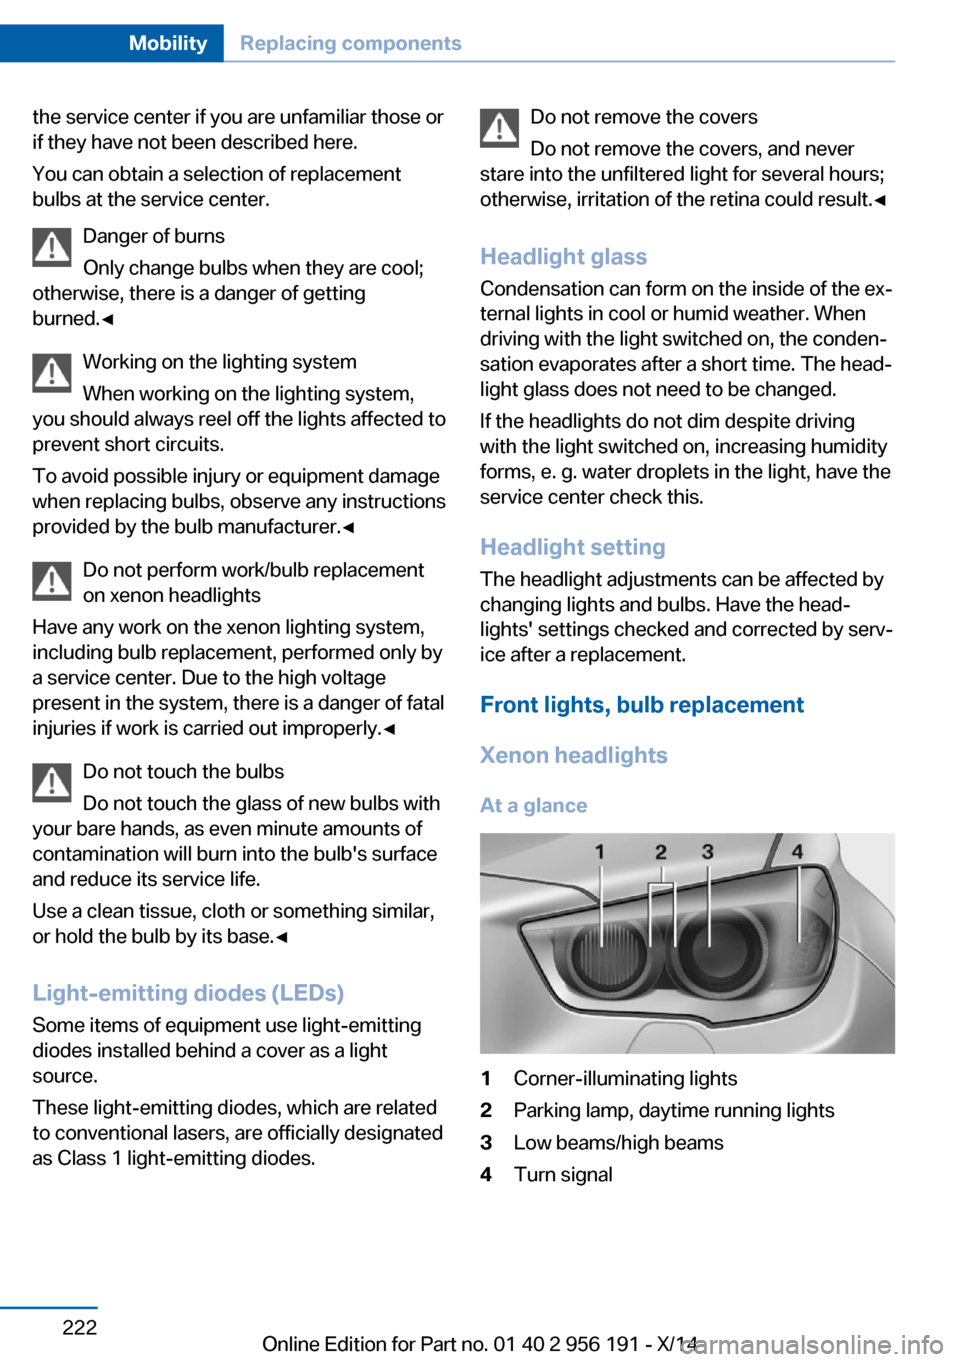
Front lights, bulb replacement
Xenon headlights
At a glance1Corner-illuminating lights2Parking lamp, daytime running lights3Low beams/high beams4Turn signalSeite 222MobilityReplacing components222
Online Edition for Part no. 01 40 2 956 191 - X/14
Page 227 of 259
Hints
Because of the long life of these bulbs, the
likelihood of failure is very low. Switching the
lights on and off frequently shortens their life.
If a bulb fails, reel on the front fog lights and
continue the trip with great care. Comply with
local regulations.
Do not perform work/bulb replacement
on xenon headlights
Have any work on the xenon lighting system,
including bulb replacement, performed only by
a service center. Due to the high voltage
present in the system, there is a danger of fatal
injuries if work is carried out improperly.◀
For checking and adjusting headlamp aim,
please contact your BMW center.
Parking lights and roadside parking lamp,
turn signal lights
Follow general instructions, refer to page 221.
These lights feature LED technology.
Contact your service center in the event of a
malfunction.
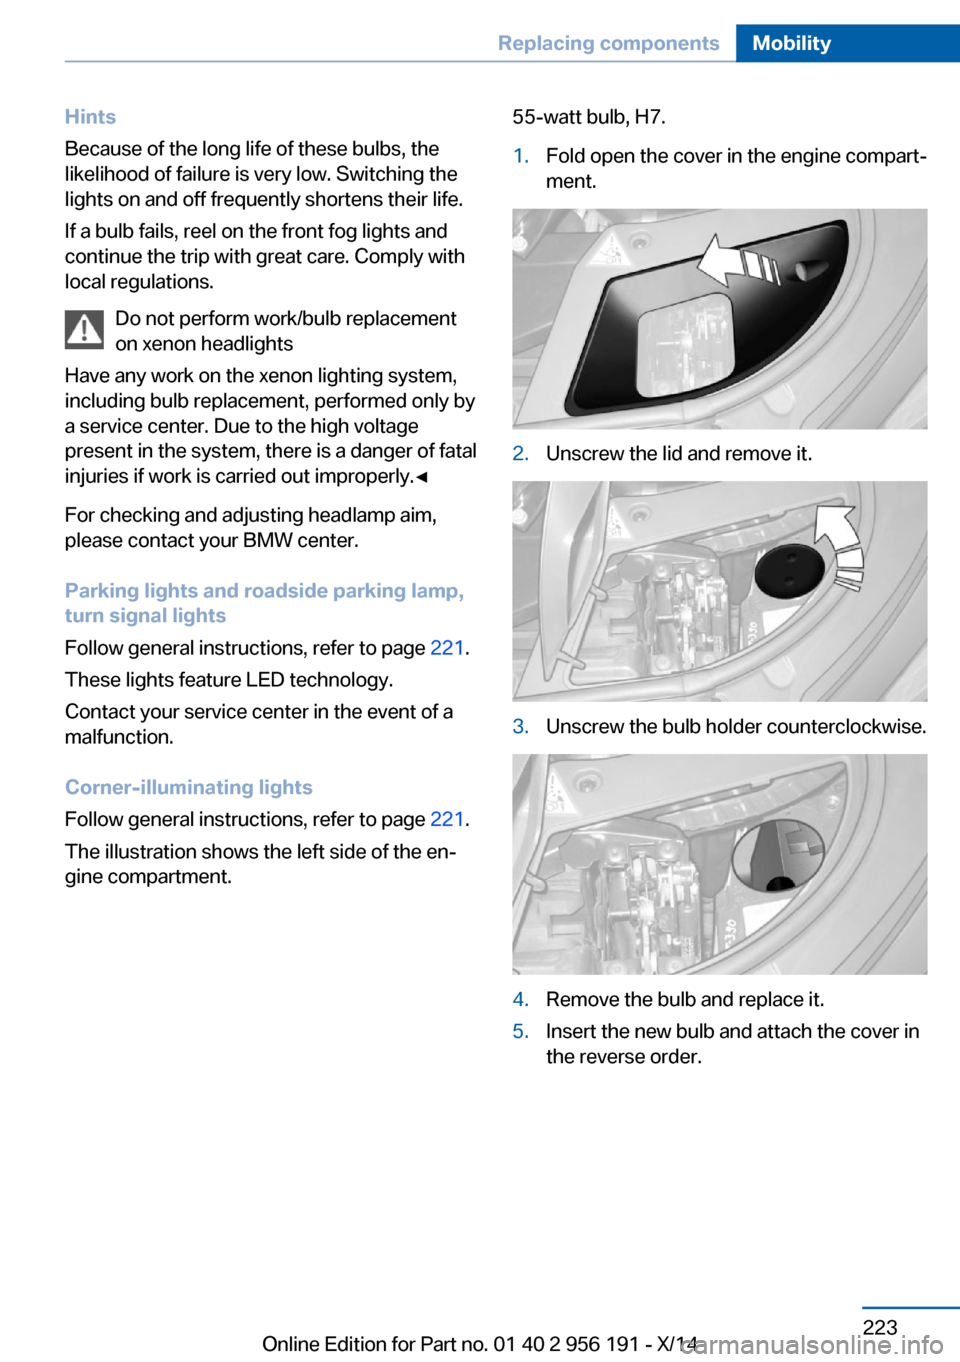
Corner-illuminating lights
Follow general instructions, refer to page 221.
The illustration shows the left side of the en‐
gine compartment.55-watt bulb, H7.1.Fold open the cover in the engine compart‐
ment.2.Unscrew the lid and remove it.3.Unscrew the bulb holder counterclockwise.4.Remove the bulb and replace it.5.Insert the new bulb and attach the cover in
the reverse order.Seite 223Replacing componentsMobility223
Online Edition for Part no. 01 40 2 956 191 - X/14
Page 228 of 259
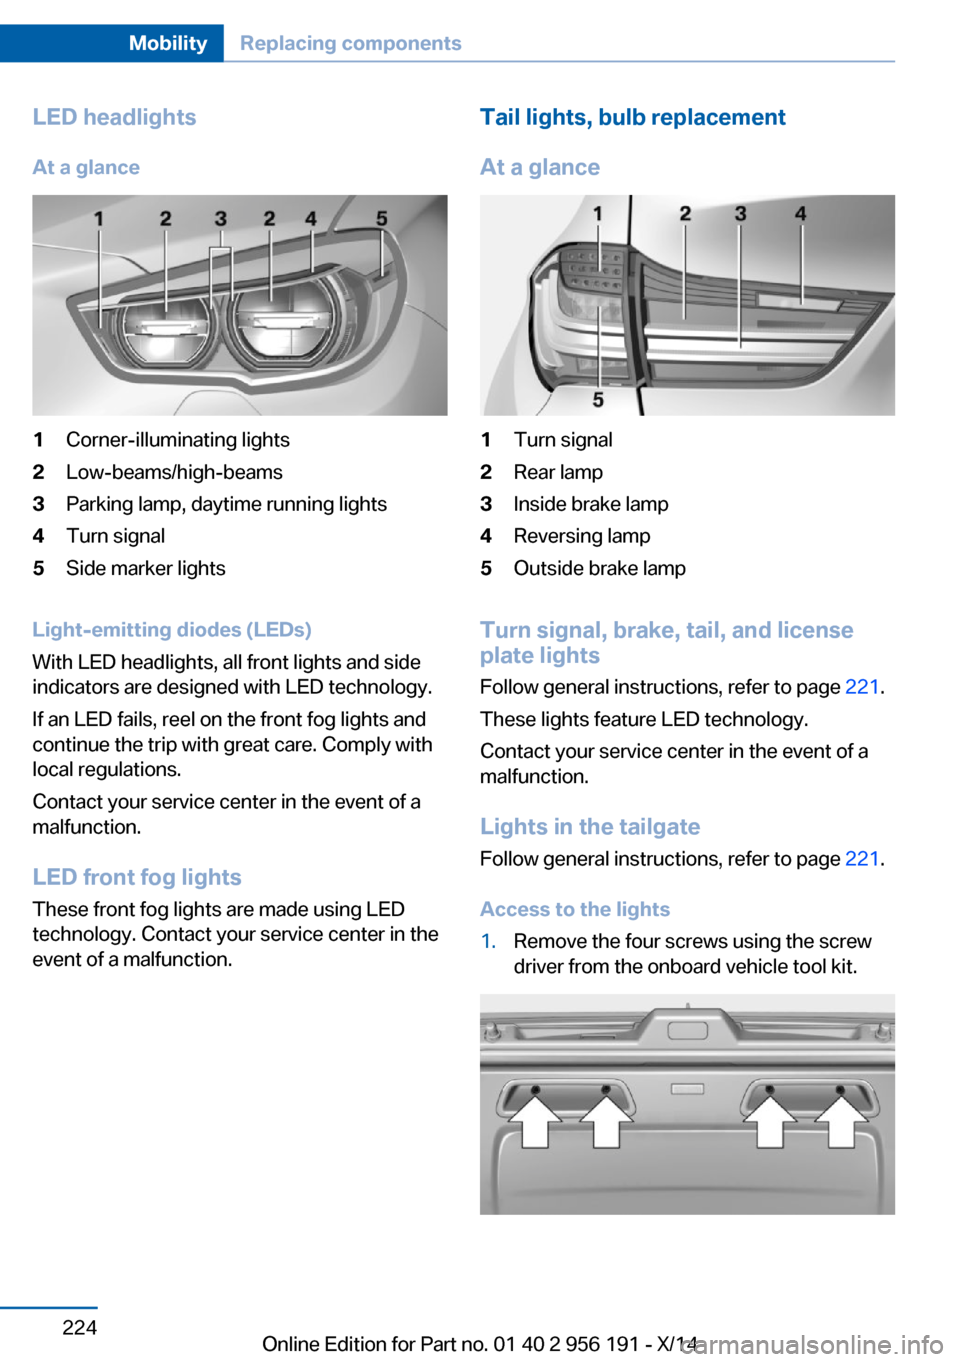
LED headlightsAt a glance1Corner-illuminating lights2Low-beams/high-beams3Parking lamp, daytime running lights4Turn signal5Side marker lights
Light-emitting diodes (LEDs)
With LED headlights, all front lights and side
indicators are designed with LED technology.
If an LED fails, reel on the front fog lights and
continue the trip with great care. Comply with
local regulations.
Contact your service center in the event of a
malfunction.
LED front fog lights
These front fog lights are made using LED
technology. Contact your service center in the
event of a malfunction.
Tail lights, bulb replacement
At a glance1Turn signal2Rear lamp3Inside brake lamp4Reversing lamp5Outside brake lamp
Turn signal, brake, tail, and license
plate lights
Follow general instructions, refer to page 221.
These lights feature LED technology.
Contact your service center in the event of a
malfunction.
Lights in the tailgate Follow general instructions, refer to page 221.
Access to the lights
1.Remove the four screws using the screw
driver from the onboard vehicle tool kit.Seite 224MobilityReplacing components224
Online Edition for Part no. 01 40 2 956 191 - X/14