2014 BMW 435I COUPE headlamp
[x] Cancel search: headlampPage 92 of 236
The system is not fully functional in situations
such as the following, and driver intervention
may be necessary:▷In very unfavorable weather conditions,
such as fog or heavy precipitation.▷In detecting poorly-lit road users, such as
pedestrians, cyclists, horseback riders and
wagons; when driving close to train or ship
traffic; and at animal crossings.▷In tight curves, on hilltops or in depres‐
sions, in cross traffic or half-obscured on‐
coming traffic on freeways.▷In poorly-lit towns and cities and in the
presence of highly reflective signs.▷At low speeds.▷When the windshield in front of the interior
rearview mirror is fogged over, dirty or cov‐
ered with stickers, etc.
Camera
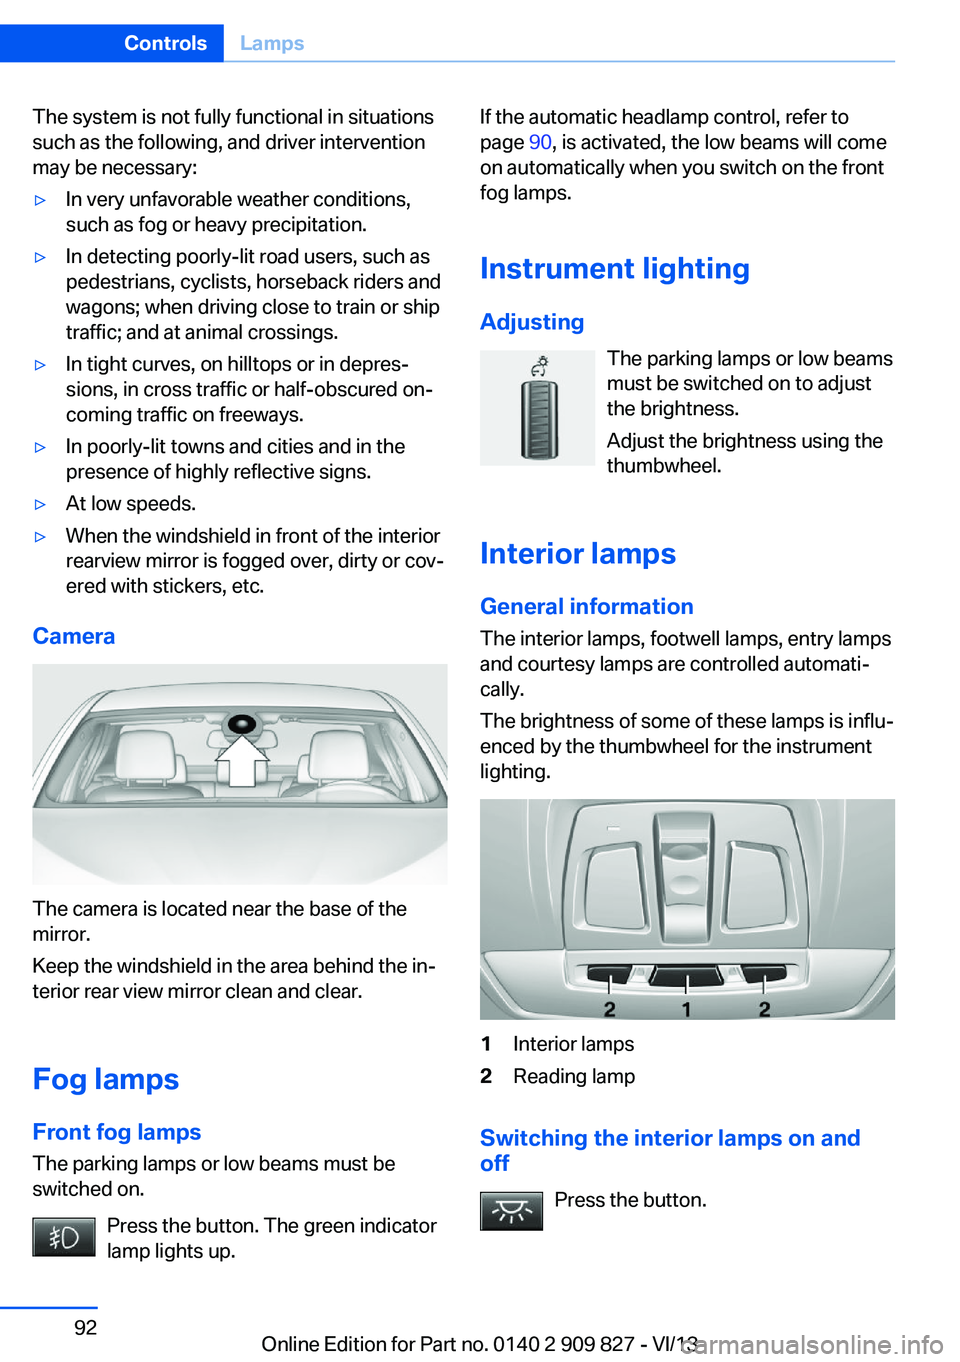
The camera is located near the base of the
mirror.
Keep the windshield in the area behind the in‐
terior rear view mirror clean and clear.
Fog lamps
Front fog lamps The parking lamps or low beams must be
switched on.
Press the button. The green indicator
lamp lights up.
If the automatic headlamp control, refer to
page 90, is activated, the low beams will come
on automatically when you switch on the front
fog lamps.
Instrument lighting Adjusting The parking lamps or low beams
must be switched on to adjust
the brightness.
Adjust the brightness using the
thumbwheel.
Interior lamps
General information
The interior lamps, footwell lamps, entry lamps
and courtesy lamps are controlled automati‐
cally.
The brightness of some of these lamps is influ‐
enced by the thumbwheel for the instrument
lighting.1Interior lamps2Reading lamp
Switching the interior lamps on and
off
Press the button.
Seite 92ControlsLamps92
Online Edition for Part no. 0140 2 909 827 - VI/13
Page 199 of 236
Danger of burns
Only change bulbs when they are cool;
otherwise, there is the danger of getting
burned.◀
Working on the lighting system
When working on the lighting system,
you should always switch off the lights af‐
fected to prevent short circuits.
To avoid possible injury or equipment damage
when replacing bulbs, observe any instructions
provided by the bulb manufacturer.◀
Do not perform work/bulb replacement
on xenon headlamps
Have any work on the xenon lighting system,
including bulb replacement, performed only by
a service center. Due to the high voltage
present in the system, there is the danger of
fatal injuries if work is carried out improperly.◀
Do not touch the bulbs
Do not touch the glass of new bulbs with
your bare hands, as even minute amounts of
contamination will burn into the bulb's surface
and reduce its service life.
Use a clean tissue, cloth or something similar,
or hold the bulb by its base.◀
Light-emitting diodes (LEDs)
Light-emitting diodes installed behind a cover
serve as the light source for controls, display
elements and other equipment.
These light-emitting diodes, which are related
to conventional lasers, are officially designated as Class 1 light-emitting diodes.
Do not remove the covers
Do not remove the covers, and never
stare into the unfiltered light for several hours; otherwise, irritation of the retina could result.◀Headlamp glass
Condensation can form on the inside of the ex‐
ternal lamps in cool or humid weather. When
driving with the light switched on, the conden‐
sation evaporates after a short time. The head‐
lamp glasses do not need to be changed.
If the headlamps do not dim despite driving
with the light switched on, increasing humidity
forms, e. g. water droplets in the light, have the
service center check this.
Headlamp setting
The headlamp adjustments can be affected by
changing lamps and bulbs. Therefore after a
change, have the headlamp setting checked
and corrected by Service.
Front lamps, bulb replacement
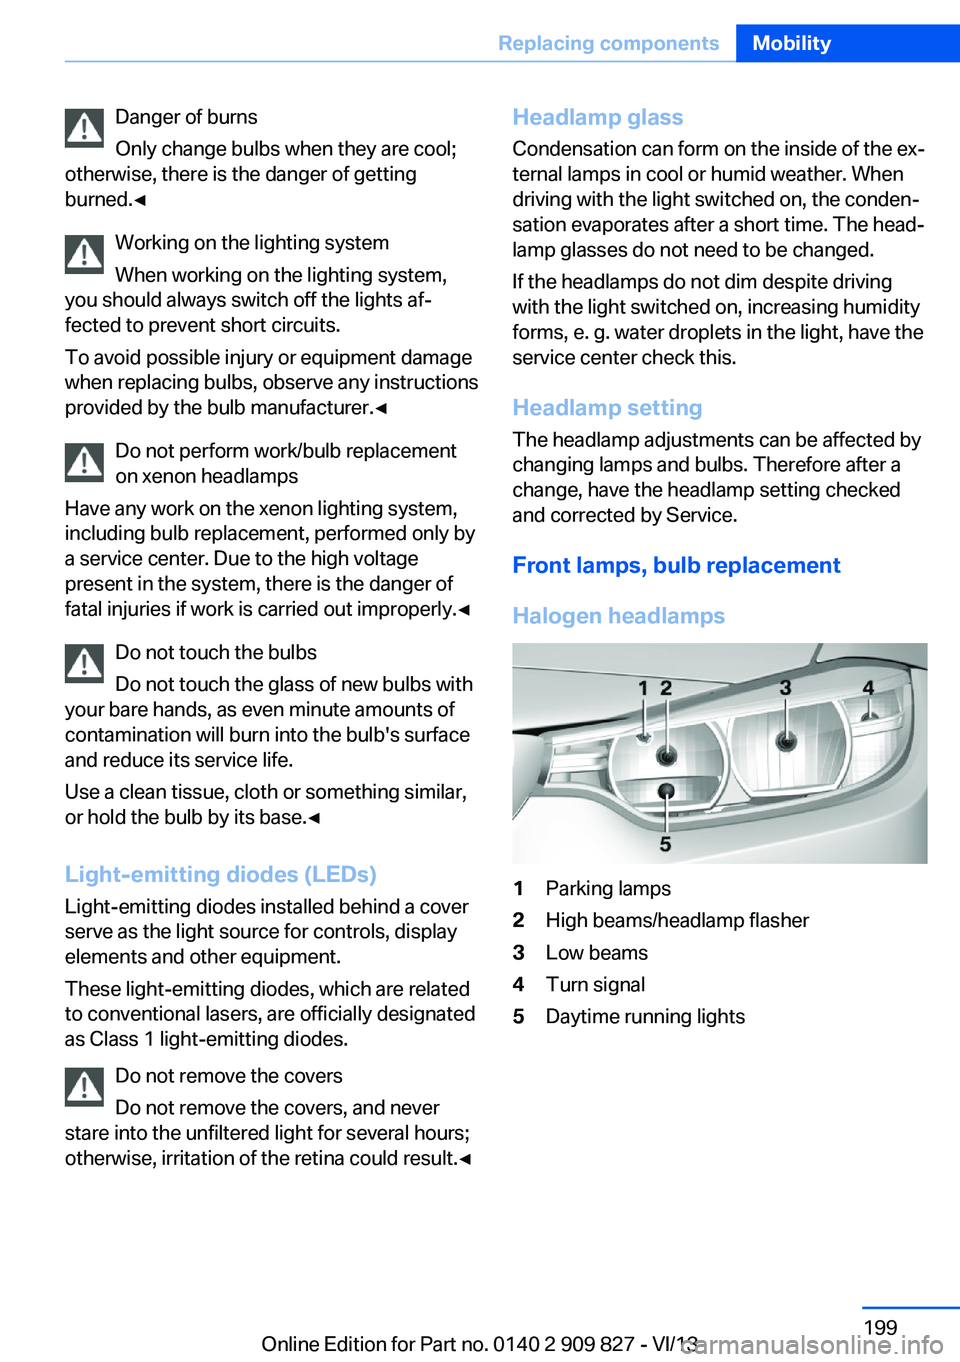
Halogen headlamps1Parking lamps2High beams/headlamp flasher3Low beams4Turn signal5Daytime running lightsSeite 199Replacing componentsMobility199
Online Edition for Part no. 0140 2 909 827 - VI/13
Page 200 of 236
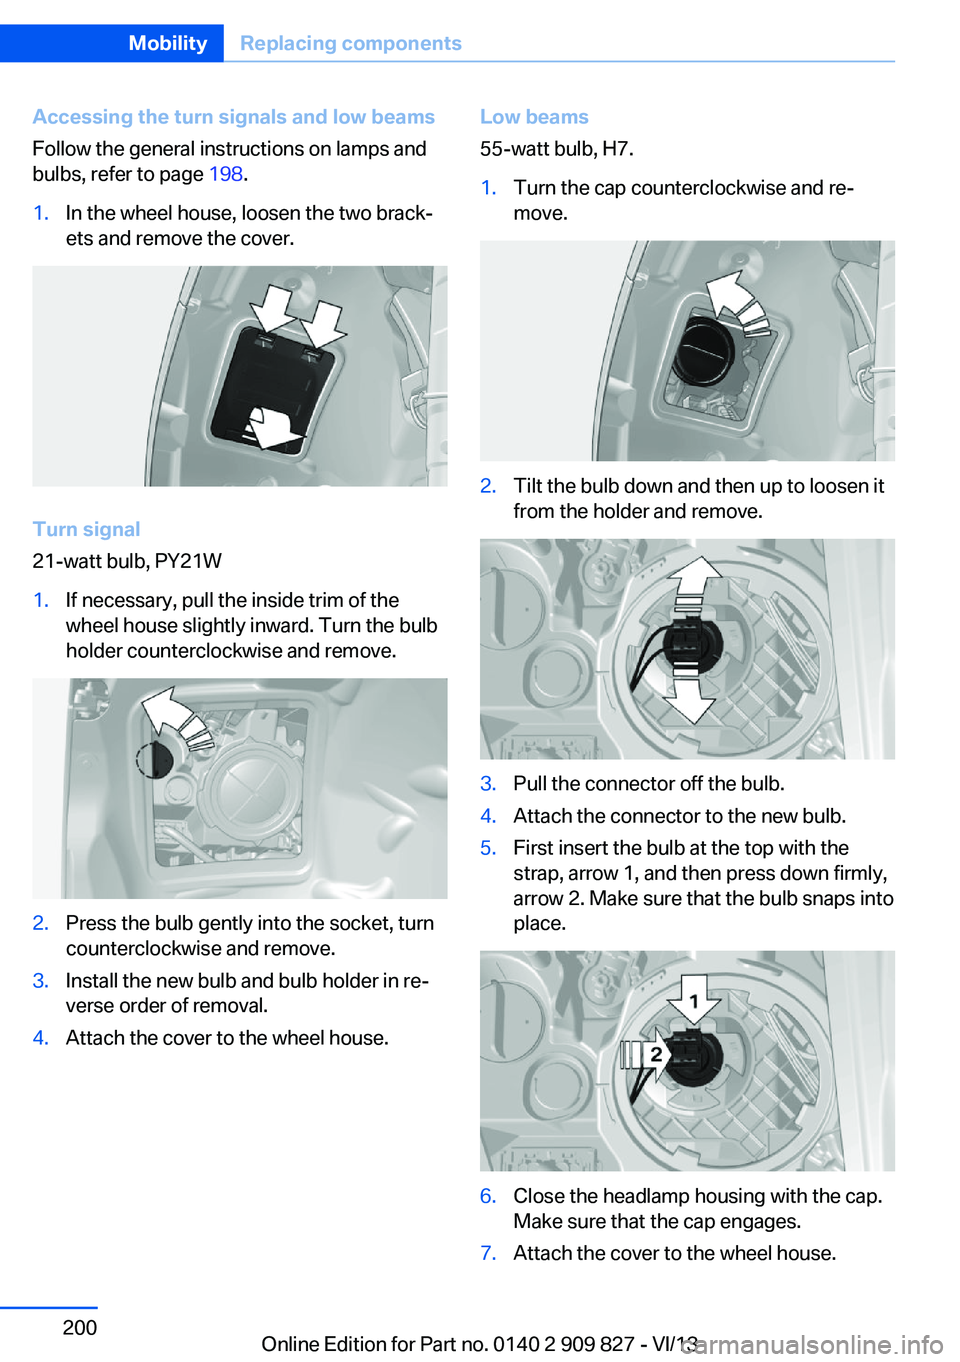
Accessing the turn signals and low beams
Follow the general instructions on lamps and
bulbs, refer to page 198.1.In the wheel house, loosen the two brack‐
ets and remove the cover.
Turn signal
21-watt bulb, PY21W
1.If necessary, pull the inside trim of the
wheel house slightly inward. Turn the bulb
holder counterclockwise and remove.2.Press the bulb gently into the socket, turn
counterclockwise and remove.3.Install the new bulb and bulb holder in re‐
verse order of removal.4.Attach the cover to the wheel house.Low beams
55-watt bulb, H7.1.Turn the cap counterclockwise and re‐
move.2.Tilt the bulb down and then up to loosen it
from the holder and remove.3.Pull the connector off the bulb.4.Attach the connector to the new bulb.5.First insert the bulb at the top with the
strap, arrow 1, and then press down firmly,
arrow 2. Make sure that the bulb snaps into
place.6.Close the headlamp housing with the cap.
Make sure that the cap engages.7.Attach the cover to the wheel house.Seite 200MobilityReplacing components200
Online Edition for Part no. 0140 2 909 827 - VI/13
Page 201 of 236
Accessing the daytime running lights, high
beams/headlamp flasher and parking
lamps
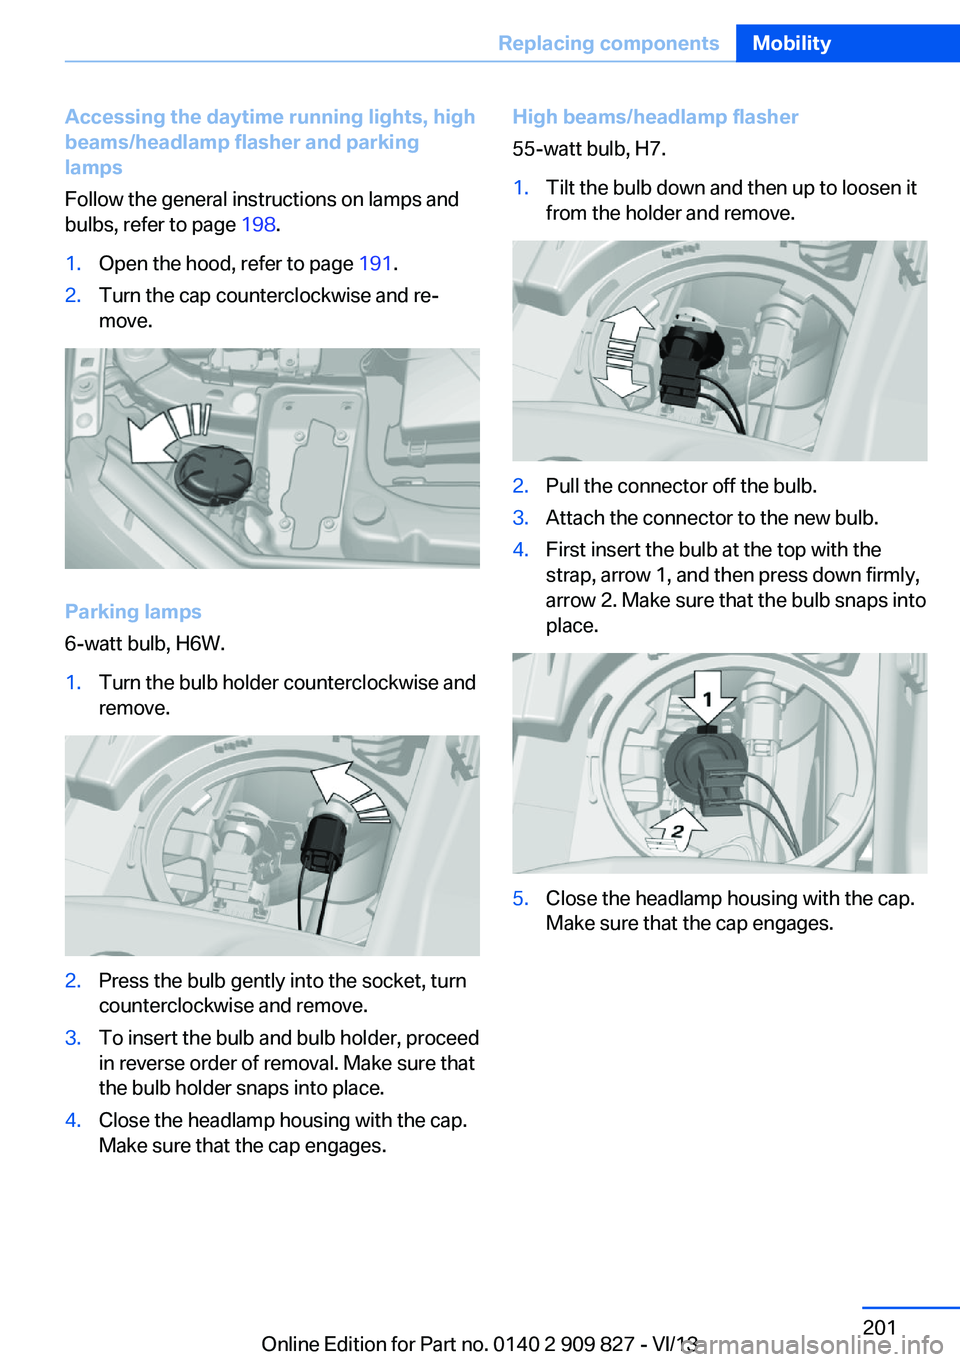
Follow the general instructions on lamps and
bulbs, refer to page 198.1.Open the hood, refer to page 191.2.Turn the cap counterclockwise and re‐
move.
Parking lamps
6-watt bulb, H6W.
1.Turn the bulb holder counterclockwise and
remove.2.Press the bulb gently into the socket, turn
counterclockwise and remove.3.To insert the bulb and bulb holder, proceed
in reverse order of removal. Make sure that
the bulb holder snaps into place.4.Close the headlamp housing with the cap.
Make sure that the cap engages.High beams/headlamp flasher
55-watt bulb, H7.1.Tilt the bulb down and then up to loosen it
from the holder and remove.2.Pull the connector off the bulb.3.Attach the connector to the new bulb.4.First insert the bulb at the top with the
strap, arrow 1, and then press down firmly,
arrow 2. Make sure that the bulb snaps into
place.5.Close the headlamp housing with the cap.
Make sure that the cap engages.Seite 201Replacing componentsMobility201
Online Edition for Part no. 0140 2 909 827 - VI/13
Page 202 of 236
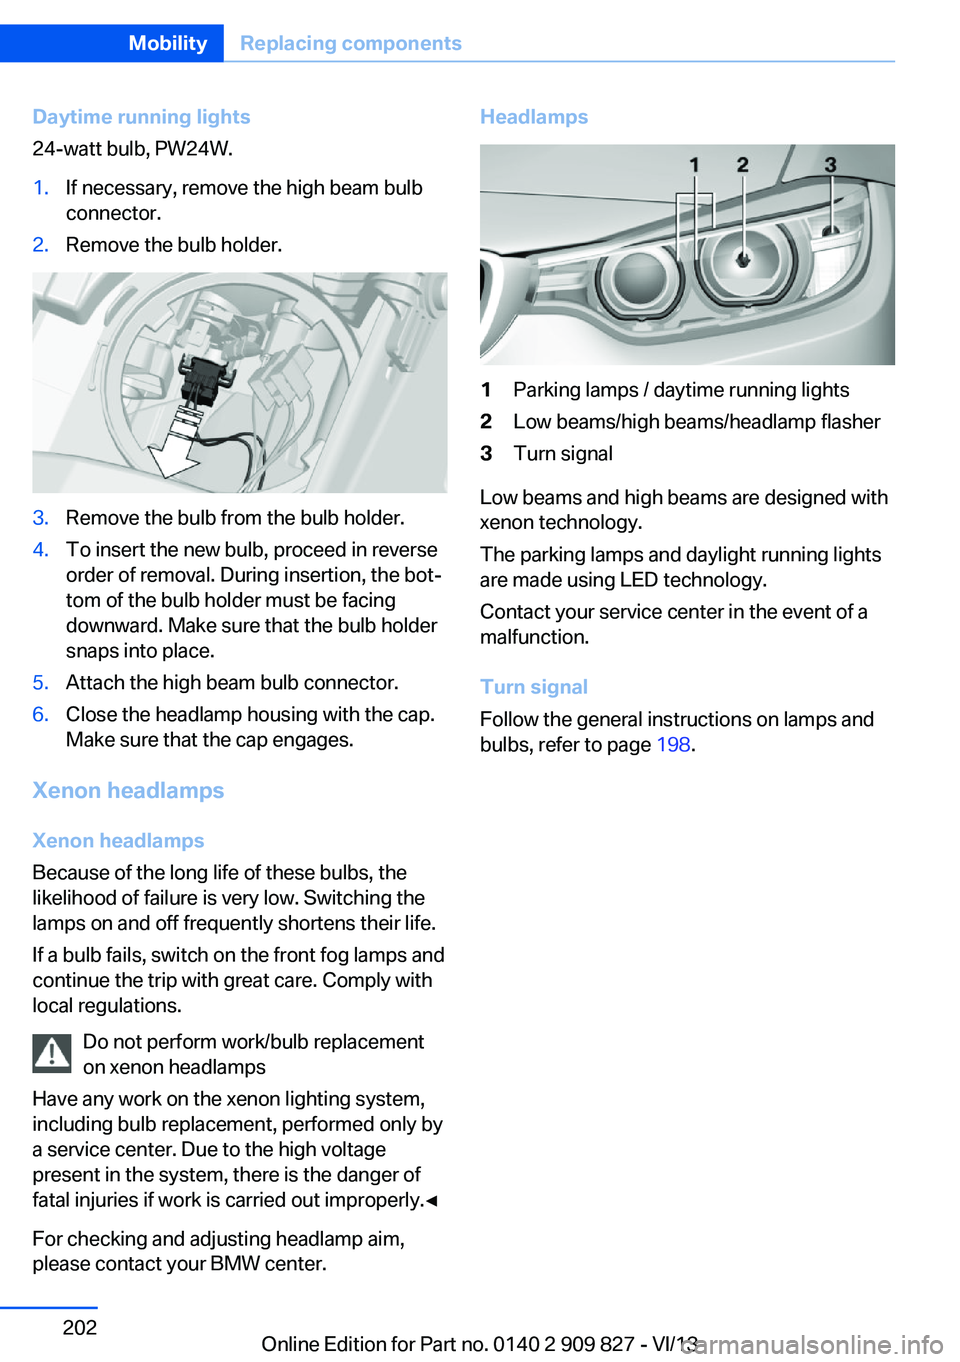
Daytime running lights
24-watt bulb, PW24W.1.If necessary, remove the high beam bulb
connector.2.Remove the bulb holder.3.Remove the bulb from the bulb holder.4.To insert the new bulb, proceed in reverse
order of removal. During insertion, the bot‐
tom of the bulb holder must be facing
downward. Make sure that the bulb holder
snaps into place.5.Attach the high beam bulb connector.6.Close the headlamp housing with the cap.
Make sure that the cap engages.
Xenon headlamps
Xenon headlamps
Because of the long life of these bulbs, the
likelihood of failure is very low. Switching the
lamps on and off frequently shortens their life.
If a bulb fails, switch on the front fog lamps and
continue the trip with great care. Comply with
local regulations.
Do not perform work/bulb replacement
on xenon headlamps
Have any work on the xenon lighting system,
including bulb replacement, performed only by
a service center. Due to the high voltage
present in the system, there is the danger of
fatal injuries if work is carried out improperly.◀
For checking and adjusting headlamp aim,
please contact your BMW center.
Headlamps1Parking lamps / daytime running lights2Low beams/high beams/headlamp flasher3Turn signal
Low beams and high beams are designed with
xenon technology.
The parking lamps and daylight running lights
are made using LED technology.
Contact your service center in the event of a
malfunction.
Turn signal
Follow the general instructions on lamps and
bulbs, refer to page 198.
Seite 202MobilityReplacing components202
Online Edition for Part no. 0140 2 909 827 - VI/13
Page 203 of 236
21-watt bulb, PY21W1.In the wheel house, loosen the two brack‐
ets and remove the cover.2.If necessary, pull the inside trim of the
wheel house slightly inward. Turn the bulb
holder counterclockwise and remove.3.Press the bulb gently into the socket, turn
counterclockwise and remove.4.Install the new bulb and bulb holder in re‐
verse order of removal.5.Attach the cover to the wheel house.
LED headlamps
Light-emitting diodes (LEDs)
Follow the general instructions on Lamps and
bulbs, refer to page 198.
With LED headlamps, all front lamps and side
indicators are designed with LED technology.
If an LED fails, switch on the front fog lamps
and continue the trip with great care. Comply with local regulations.
Contact your service center in the event of a
malfunction.
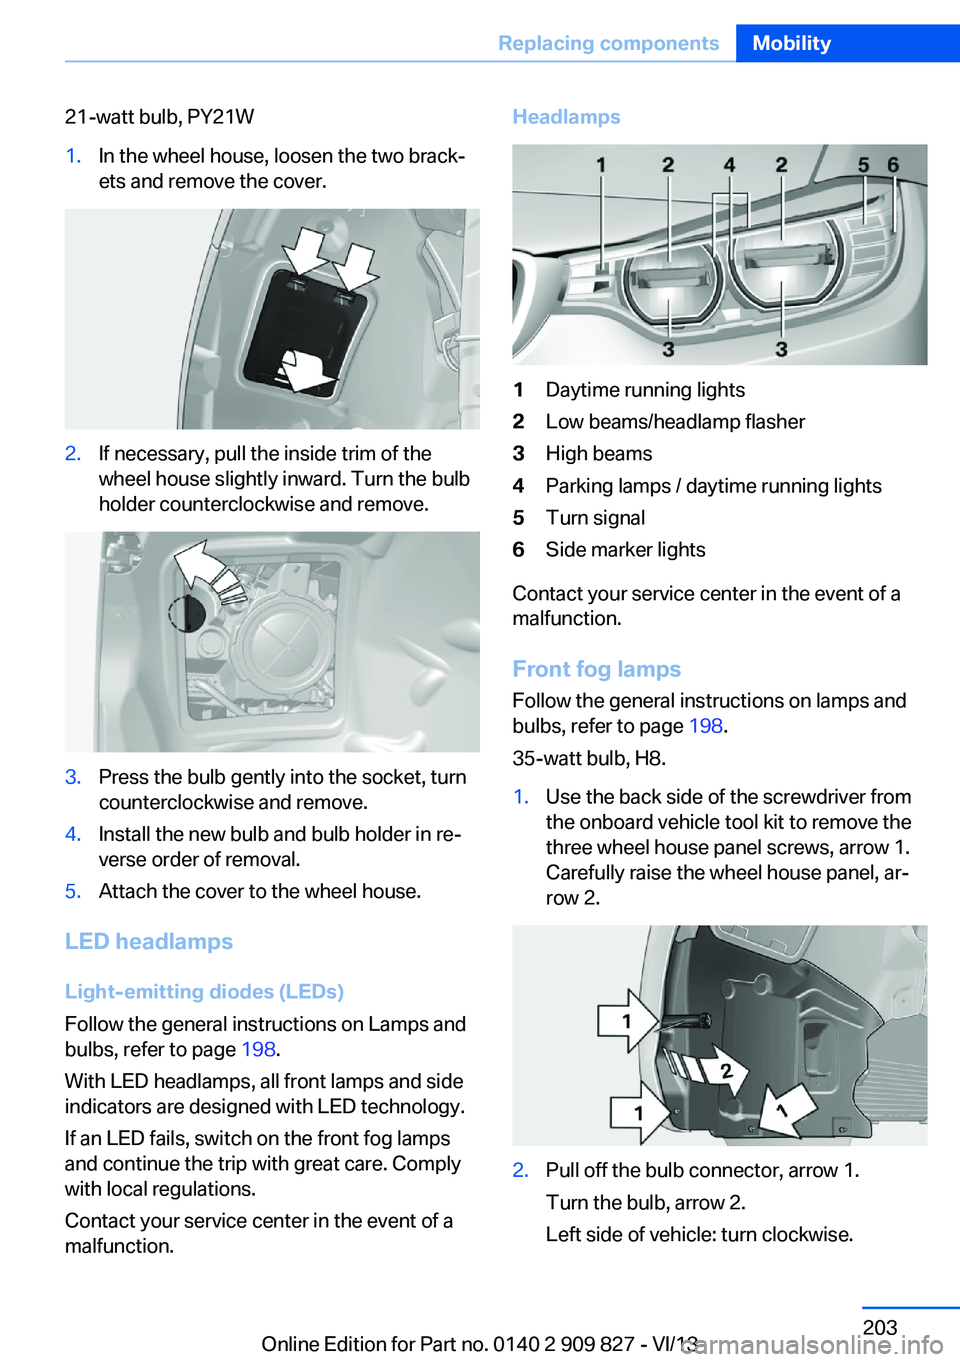
Headlamps1Daytime running lights2Low beams/headlamp flasher3High beams4Parking lamps / daytime running lights5Turn signal6Side marker lights
Contact your service center in the event of a
malfunction.
Front fog lamps
Follow the general instructions on lamps and
bulbs, refer to page 198.
35-watt bulb, H8.
1.Use the back side of the screwdriver from
the onboard vehicle tool kit to remove the
three wheel house panel screws, arrow 1.
Carefully raise the wheel house panel, ar‐
row 2.2.Pull off the bulb connector, arrow 1.
Turn the bulb, arrow 2.
Left side of vehicle: turn clockwise.Seite 203Replacing componentsMobility203
Online Edition for Part no. 0140 2 909 827 - VI/13
Page 217 of 236
Automatic transmission:1.Drive into the car wash.2.Engage transmission position N.3.Switch the engine off.
In this way, the ignition remains switched
on, and a Check-Control message is dis‐
played.
Do not turn off the ignition in the car
wash
Do not turn off the ignition in the car wash;
otherwise, the transmission position P is
engaged and damages can result.◀
To start the engine:
1.Depress the brake pedal.2.Press the Start/Stop button.
Pressing the Start/Stop button without step‐
ping on the brake turns the ignition off.
The vehicle cannot be locked from the outside
when in transmission position N. A signal is
sounded when an attempt is made to lock the
vehicle.
Transmission position
Transmission position P is engaged automati‐
cally:
▷When the ignition is switched off.▷After approx. 15 minutes.
Headlamps
▷Do not rub dry and do not use abrasive or
caustic cleansers.▷Soak areas that have been soiled e.g. due
to insects, with shampoo and wash off with
water.▷Thaw ice with deicing spray; do not use an
ice scraper.
After washing the vehicle
After washing the vehicle, apply the brakes
briefly to dry them; otherwise, braking action
can be reduced and corrosion of the brake
discs can occur.
Completely remove all residues on the win‐
dows, to minimize loss of visibility due to
smearing and to reduce wiper noises and
wiper blade wear.
Vehicle care
Car care products BMW recommends using cleaning and care
products from BMW, since these have been
tested and approved.
Car care and cleaning products
Follow the instructions on the container.
When cleaning the interior, open the doors or
windows.
Only use products intended for cleaning vehi‐
cles.
Cleansers can contain substances that are
dangerous and harmful to your health.◀
Vehicle paint
Regular care contributes to driving safety and
value retention. Environmental influences in
areas with elevated air pollution or natural con‐
taminants, such as tree resin or pollen can af‐
fect the vehicle's paintwork. Tailor the fre‐
quency and extent of your car care to these
influences.
Aggressive substances, such as spilled fuel,
oil, grease or bird droppings, must be removed
immediately to prevent the finish from being
altered or discolored.
Leather care
Remove dust from the leather often, using a
cloth or vacuum cleaner.
Otherwise, particles of dust and road grime
chafe in pores and folds, and lead to increased
wear and premature degradation of the leather
surface.Seite 217CareMobility217
Online Edition for Part no. 0140 2 909 827 - VI/13
Page 225 of 236
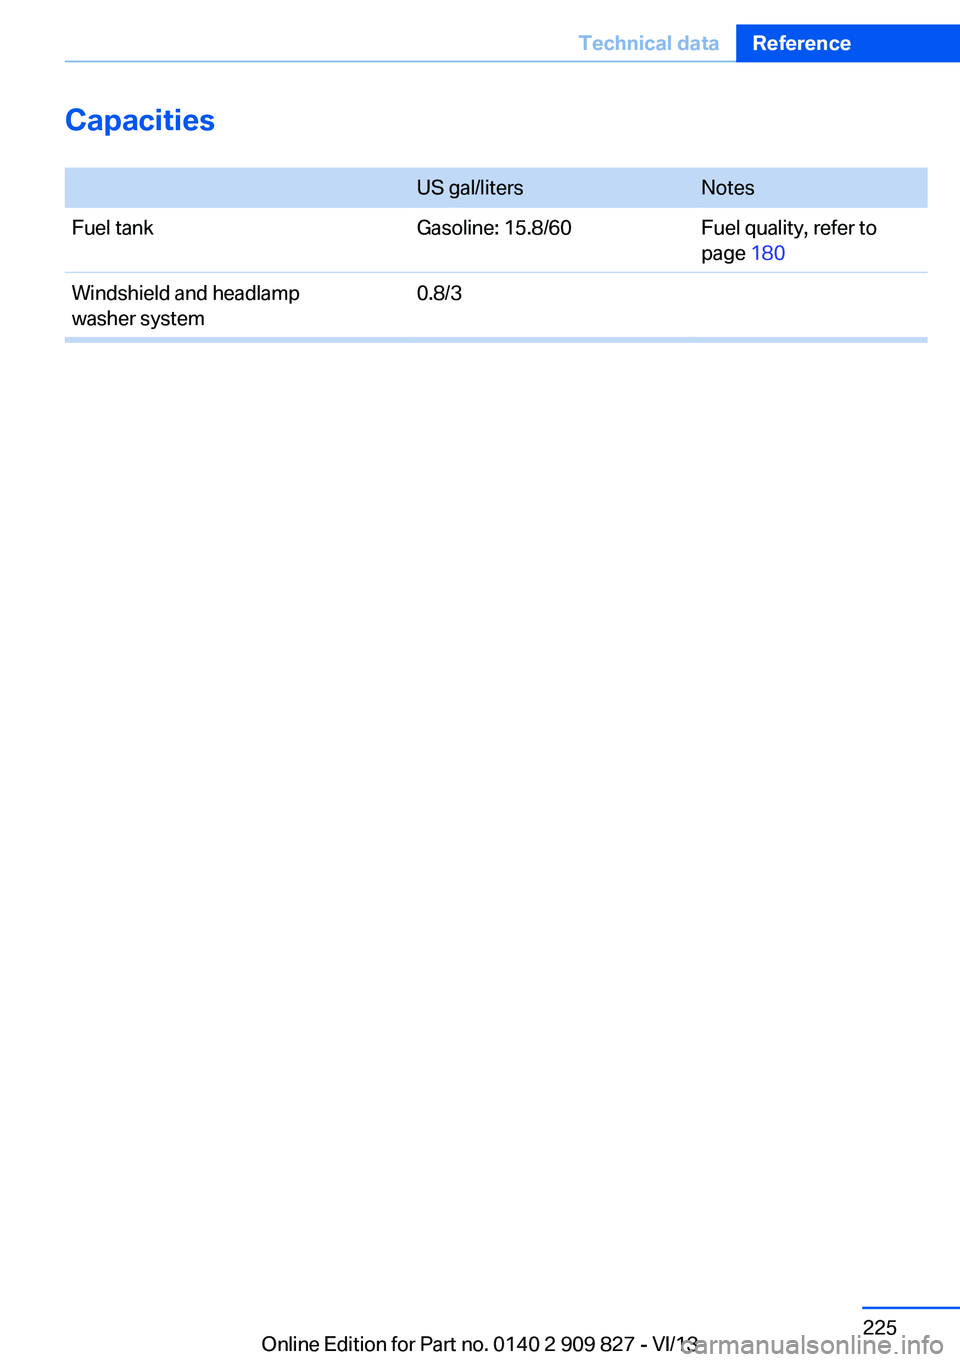
Capacities
US gal/litersNotesFuel tankGasoline: 15.8/60Fuel quality, refer to
page 180Windshield and headlamp
washer system0.8/3Seite 225Technical dataReference225
Online Edition for Part no. 0140 2 909 827 - VI/13