2014 BMW 335I XDRIVE GRAN TURISMO tires
[x] Cancel search: tiresPage 188 of 240
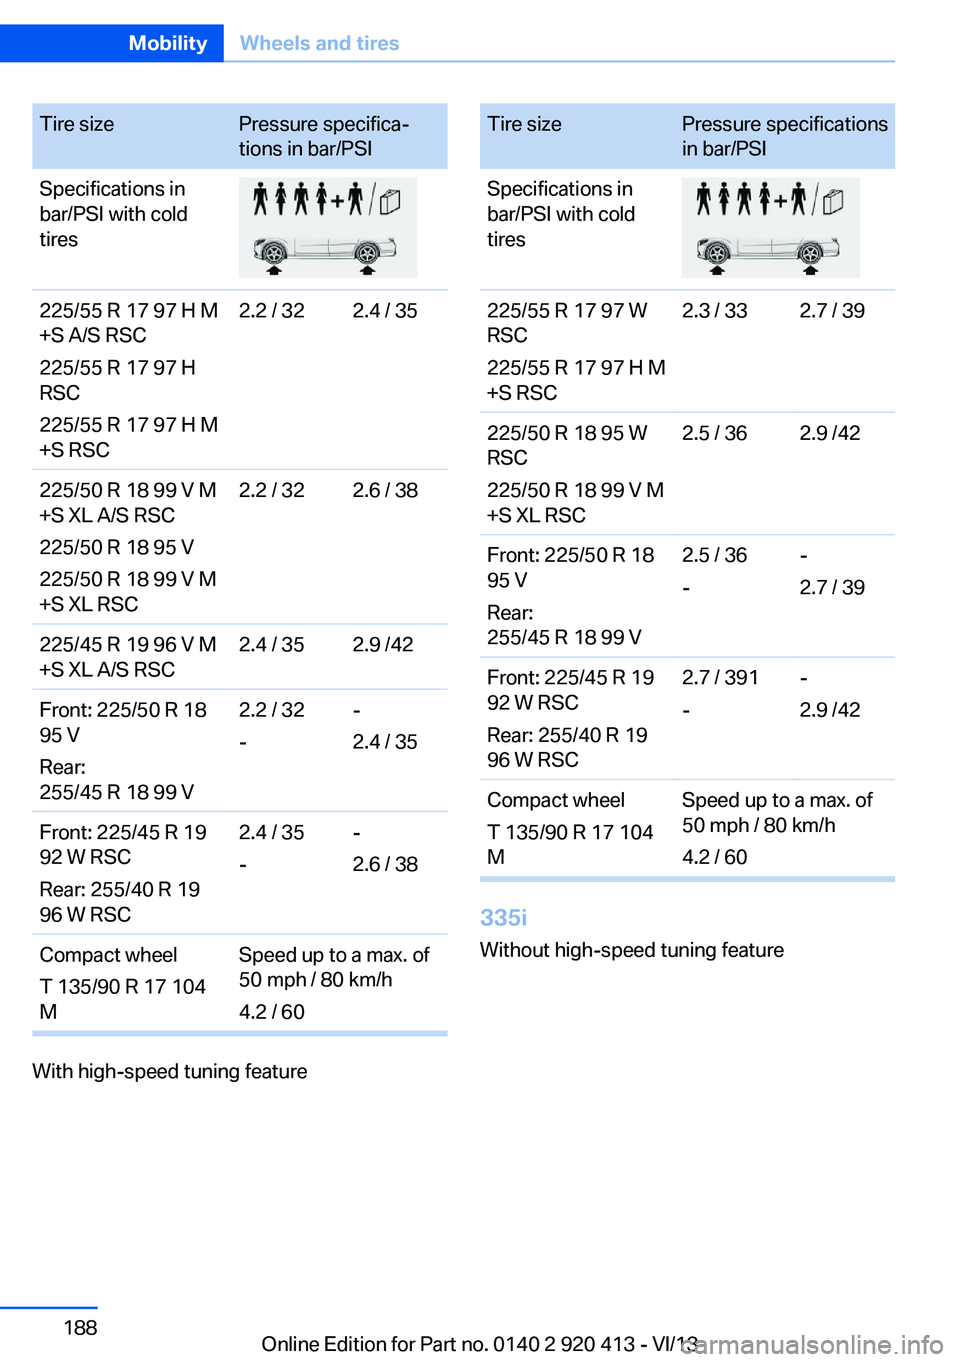
Tire sizePressure specifica‐
tions in bar/PSISpecifications in
bar/PSI with cold
tires225/55 R 17 97 H M
+S A/S RSC
225/55 R 17 97 H
RSC
225/55 R 17 97 H M
+S RSC2.2 / 322.4 / 35225/50 R 18 99 V M
+S XL A/S RSC
225/50 R 18 95 V
225/50 R 18 99 V M
+S XL RSC2.2 / 322.6 / 38225/45 R 19 96 V M
+S XL A/S RSC2.4 / 352.9 /42Front: 225/50 R 18
95 V
Rear:
255/45 R 18 99 V2.2 / 32
--
2.4 / 35Front: 225/45 R 19
92 W RSC
Rear: 255/40 R 19
96 W RSC2.4 / 35
--
2.6 / 38Compact wheel
T 135/90 R 17 104
MSpeed up to a max. of
50 mph / 80 km/h
4.2 / 60
With high-speed tuning feature
Tire sizePressure specifications
in bar/PSISpecifications in
bar/PSI with cold
tires225/55 R 17 97 W
RSC
225/55 R 17 97 H M
+S RSC2.3 / 332.7 / 39225/50 R 18 95 W
RSC
225/50 R 18 99 V M
+S XL RSC2.5 / 362.9 /42Front: 225/50 R 18
95 V
Rear:
255/45 R 18 99 V2.5 / 36
--
2.7 / 39Front: 225/45 R 19
92 W RSC
Rear: 255/40 R 19
96 W RSC2.7 / 391
--
2.9 /42Compact wheel
T 135/90 R 17 104
MSpeed up to a max. of
50 mph / 80 km/h
4.2 / 60
335i
Without high-speed tuning feature
Seite 188MobilityWheels and tires188
Online Edition for Part no. 0140 2 920 413 - VI/13
Page 189 of 240
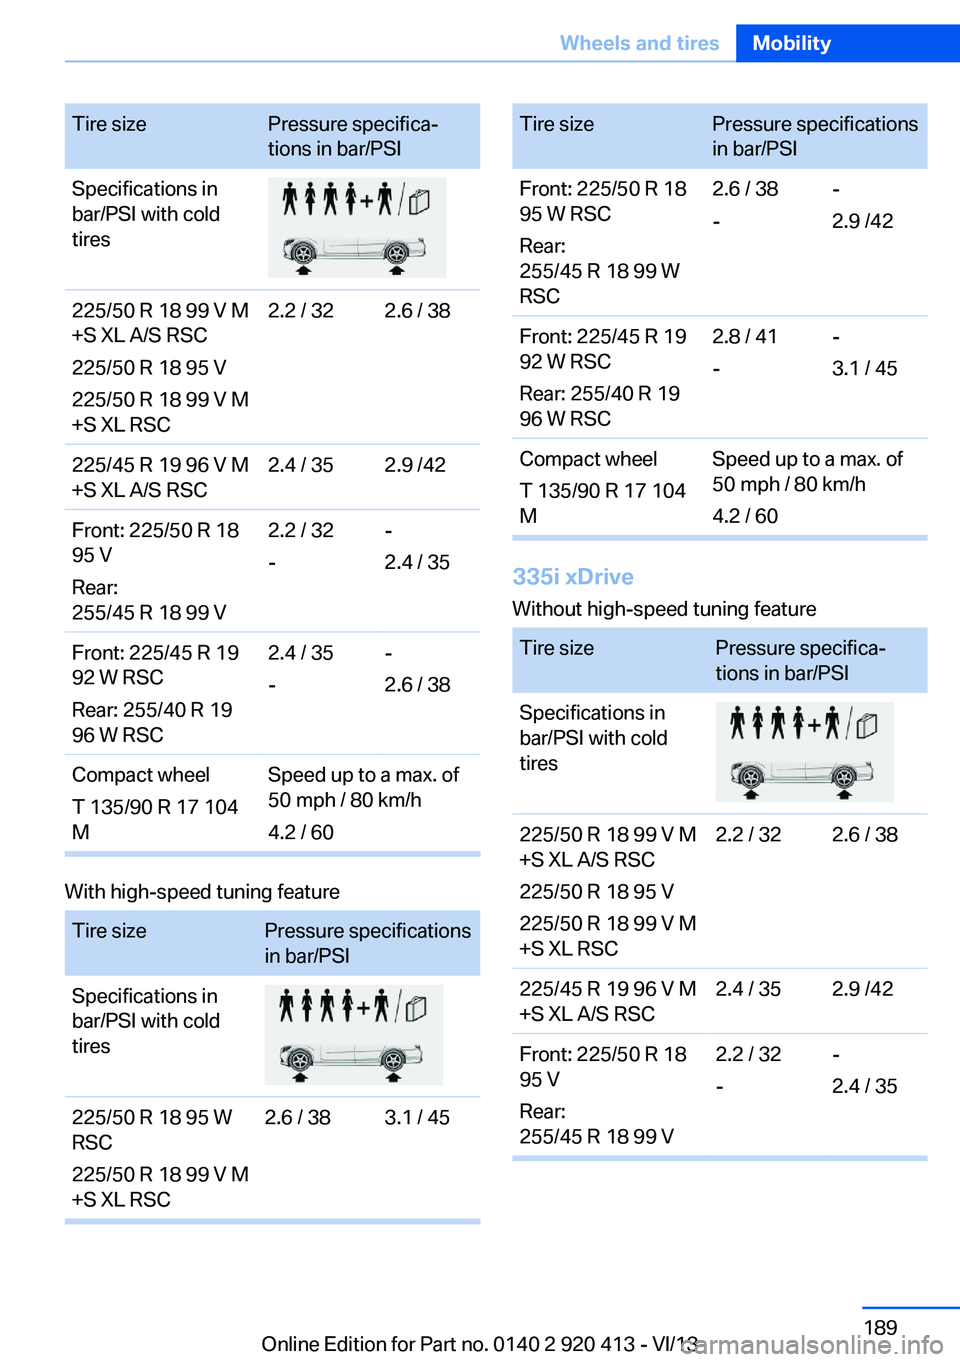
Tire sizePressure specifica‐
tions in bar/PSISpecifications in
bar/PSI with cold
tires225/50 R 18 99 V M
+S XL A/S RSC
225/50 R 18 95 V
225/50 R 18 99 V M
+S XL RSC2.2 / 322.6 / 38225/45 R 19 96 V M
+S XL A/S RSC2.4 / 352.9 /42Front: 225/50 R 18
95 V
Rear:
255/45 R 18 99 V2.2 / 32
--
2.4 / 35Front: 225/45 R 19
92 W RSC
Rear: 255/40 R 19
96 W RSC2.4 / 35
--
2.6 / 38Compact wheel
T 135/90 R 17 104
MSpeed up to a max. of
50 mph / 80 km/h
4.2 / 60
With high-speed tuning feature
Tire sizePressure specifications
in bar/PSISpecifications in
bar/PSI with cold
tires225/50 R 18 95 W
RSC
225/50 R 18 99 V M
+S XL RSC2.6 / 383.1 / 45Tire sizePressure specifications
in bar/PSIFront: 225/50 R 18
95 W RSC
Rear:
255/45 R 18 99 W
RSC2.6 / 38
--
2.9 /42Front: 225/45 R 19
92 W RSC
Rear: 255/40 R 19
96 W RSC2.8 / 41
--
3.1 / 45Compact wheel
T 135/90 R 17 104
MSpeed up to a max. of
50 mph / 80 km/h
4.2 / 60
335i xDrive Without high-speed tuning feature
Tire sizePressure specifica‐
tions in bar/PSISpecifications in
bar/PSI with cold
tires225/50 R 18 99 V M
+S XL A/S RSC
225/50 R 18 95 V
225/50 R 18 99 V M
+S XL RSC2.2 / 322.6 / 38225/45 R 19 96 V M
+S XL A/S RSC2.4 / 352.9 /42Front: 225/50 R 18
95 V
Rear:
255/45 R 18 99 V2.2 / 32
--
2.4 / 35Seite 189Wheels and tiresMobility189
Online Edition for Part no. 0140 2 920 413 - VI/13
Page 190 of 240
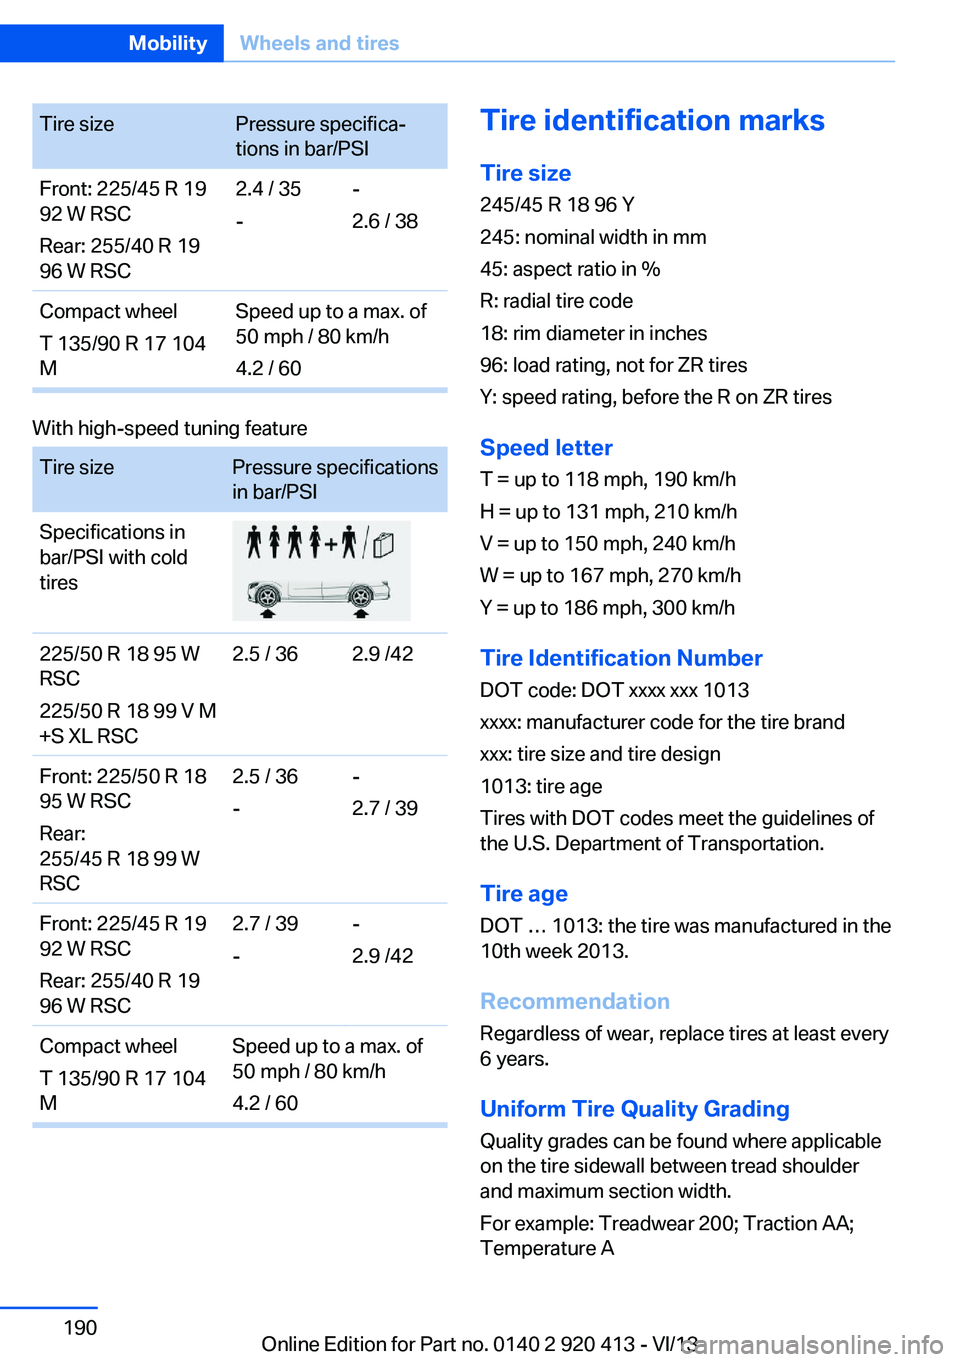
Tire sizePressure specifica‐
tions in bar/PSIFront: 225/45 R 19
92 W RSC
Rear: 255/40 R 19
96 W RSC2.4 / 35
--
2.6 / 38Compact wheel
T 135/90 R 17 104
MSpeed up to a max. of
50 mph / 80 km/h
4.2 / 60
With high-speed tuning feature
Tire sizePressure specifications
in bar/PSISpecifications in
bar/PSI with cold
tires225/50 R 18 95 W
RSC
225/50 R 18 99 V M
+S XL RSC2.5 / 362.9 /42Front: 225/50 R 18
95 W RSC
Rear:
255/45 R 18 99 W
RSC2.5 / 36
--
2.7 / 39Front: 225/45 R 19
92 W RSC
Rear: 255/40 R 19
96 W RSC2.7 / 39
--
2.9 /42Compact wheel
T 135/90 R 17 104
MSpeed up to a max. of
50 mph / 80 km/h
4.2 / 60Tire identification marks
Tire size 245/45 R 18 96 Y
245: nominal width in mm
45: aspect ratio in %
R: radial tire code
18: rim diameter in inches
96: load rating, not for ZR tires
Y: speed rating, before the R on ZR tires
Speed letter
T = up to 118 mph, 190 km/h
H = up to 131 mph, 210 km/h
V = up to 150 mph, 240 km/h
W = up to 167 mph, 270 km/h
Y = up to 186 mph, 300 km/h
Tire Identification Number
DOT code: DOT xxxx xxx 1013
xxxx: manufacturer code for the tire brand
xxx: tire size and tire design
1013: tire age
Tires with DOT codes meet the guidelines of
the U.S. Department of Transportation.
Tire age
DOT … 1013: the tire was manufactured in the
10th week 2013.
Recommendation
Regardless of wear, replace tires at least every
6 years.
Uniform Tire Quality GradingQuality grades can be found where applicable
on the tire sidewall between tread shoulder
and maximum section width.
For example: Treadwear 200; Traction AA;
Temperature ASeite 190MobilityWheels and tires190
Online Edition for Part no. 0140 2 920 413 - VI/13
Page 191 of 240
DOT Quality GradesTreadwear
Traction AA A B C
Temperature A B C
All passenger car tires must conform to Fed‐
eral Safety Requirements in addition to these
grades.
Treadwear The treadwear grade is a comparative rating
based on the wear rate of the tire when tested
under controlled conditions on a specified gov‐
ernment test course. For example, a tire
graded 150 would wear one and one-half, 1 g,
times as well on the government course as a
tire graded 100. The relative performance of
tires depends upon the actual conditions of
their use, however, and may depart signifi‐
cantly from the norm due to variations in driv‐
ing habits, service practices and differences in
road characteristics and climate.
Traction
The traction grades, from highest to lowest,
are AA, A, B, and C.
Those grades represent the tire's ability to
stop on wet pavement as measured under
controlled conditions on specified government
test surfaces of asphalt and concrete. A tire
marked C may have poor traction performance.
The traction grade assigned to this tire is
based on straight-ahead braking traction tests,
and does not include acceleration, cornering,
hydroplaning, or peak traction characteristics.
Temperature The temperature grades are A, the highest, B,
and C, representing the tire's resistance to the
generation of heat and its ability to dissipate
heat when tested under controlled conditions
on a specified indoor laboratory test wheel.
Sustained high temperature can cause the ma‐
terial of the tire to degenerate and reduce tire
life, and excessive temperature can lead tosudden tire failure. The grade C corresponds
to a level of performance which all passenger
car tires must meet under the Federal Motor
Vehicle Safety Standard No. 109. Grades Band
A represent higher levels of performance on
the laboratory test wheel than the minimum re‐
quired by law.
Temperature grade for this tire
The temperature grade for this tire is es‐
tablished for a tire that is properly inflated and
not overloaded. Excessive speed, underinfla‐
tion, or excessive loading, either separately or
in combination, can cause heat buildup and
possible tire failure.
If necessary, have the vehicle towed.◀
RSC – Run-flat tires Run-flat tires, refer to page 194, are labeled
with a circular symbol containing the letters
RSC marked on the sidewall.
M+S
Winter and all-season tires with better cold
weather performance than summer tires.
Tire tread
Summer tires
Do not drive with a tire tread depth of less than
0.12 in/3 mm.
There is an increased danger of hydroplaning if
the tread depth is less than 0.12 in/3 mm.
Winter tires
Do not drive with a tire tread depth of less than
0.16 in/4 mm.
Below a tread depth of 0.16 in/4 mm, tires are
less suitable for winter operation.Seite 191Wheels and tiresMobility191
Online Edition for Part no. 0140 2 920 413 - VI/13
Page 192 of 240
Minimum tread depth
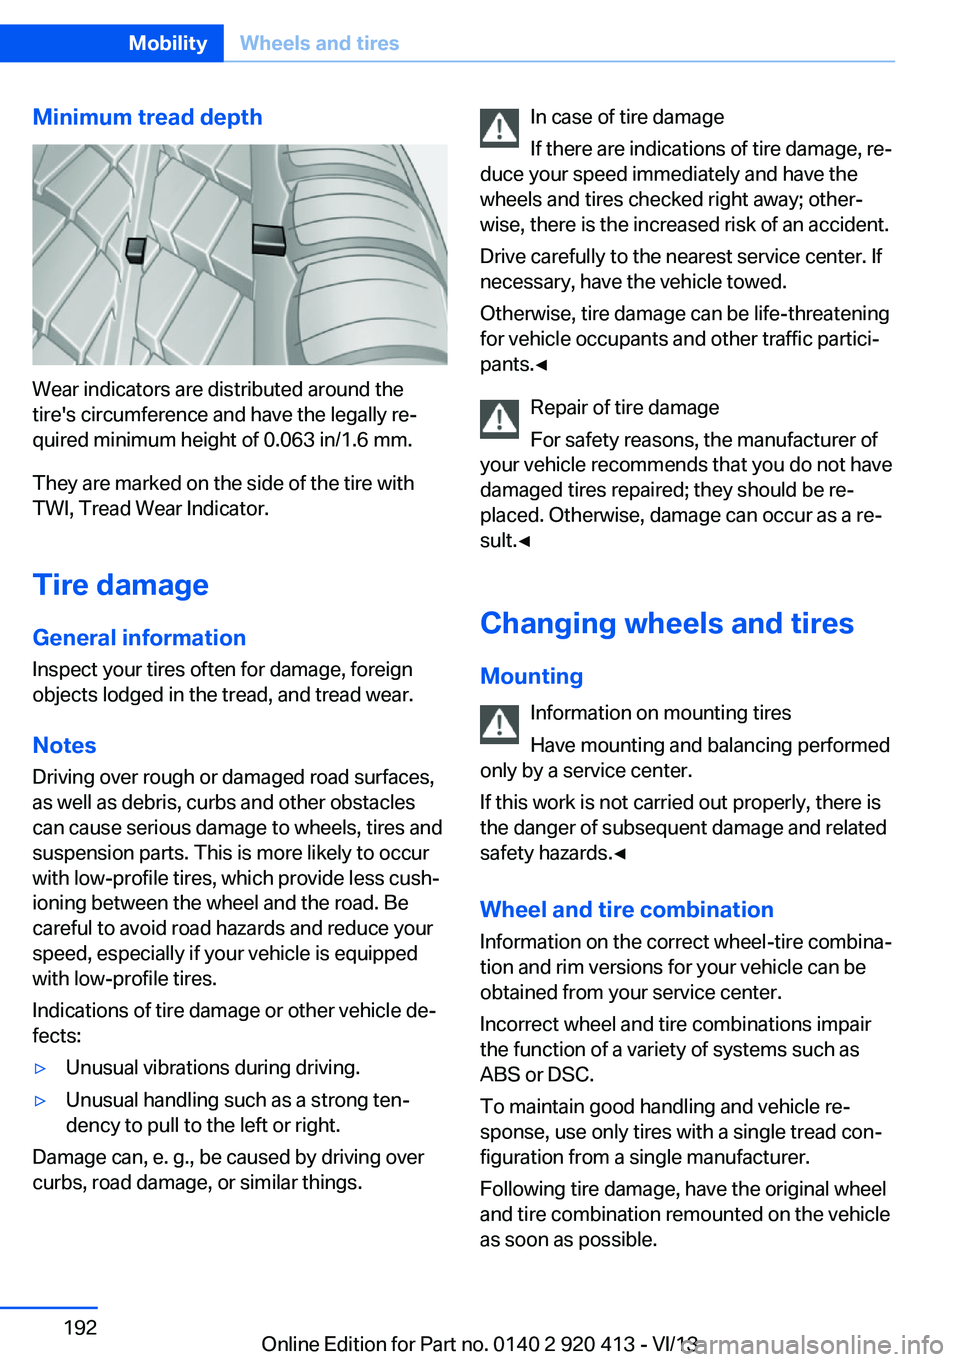
Wear indicators are distributed around the
tire's circumference and have the legally re‐
quired minimum height of 0.063 in/1.6 mm.
They are marked on the side of the tire with
TWI, Tread Wear Indicator.
Tire damage
General information
Inspect your tires often for damage, foreign
objects lodged in the tread, and tread wear.
Notes
Driving over rough or damaged road surfaces,
as well as debris, curbs and other obstacles can cause serious damage to wheels, tires and
suspension parts. This is more likely to occur
with low-profile tires, which provide less cush‐
ioning between the wheel and the road. Be
careful to avoid road hazards and reduce your
speed, especially if your vehicle is equipped
with low-profile tires.
Indications of tire damage or other vehicle de‐
fects:
▷Unusual vibrations during driving.▷Unusual handling such as a strong ten‐
dency to pull to the left or right.
Damage can, e. g., be caused by driving over
curbs, road damage, or similar things.
In case of tire damage
If there are indications of tire damage, re‐
duce your speed immediately and have the
wheels and tires checked right away; other‐
wise, there is the increased risk of an accident.
Drive carefully to the nearest service center. If
necessary, have the vehicle towed.
Otherwise, tire damage can be life-threatening
for vehicle occupants and other traffic partici‐
pants.◀
Repair of tire damage
For safety reasons, the manufacturer of
your vehicle recommends that you do not have
damaged tires repaired; they should be re‐
placed. Otherwise, damage can occur as a re‐
sult.◀
Changing wheels and tires
Mounting Information on mounting tires
Have mounting and balancing performed
only by a service center.
If this work is not carried out properly, there is
the danger of subsequent damage and related
safety hazards.◀
Wheel and tire combination
Information on the correct wheel-tire combina‐
tion and rim versions for your vehicle can be
obtained from your service center.
Incorrect wheel and tire combinations impair
the function of a variety of systems such as
ABS or DSC.
To maintain good handling and vehicle re‐
sponse, use only tires with a single tread con‐
figuration from a single manufacturer.
Following tire damage, have the original wheel
and tire combination remounted on the vehicle
as soon as possible.Seite 192MobilityWheels and tires192
Online Edition for Part no. 0140 2 920 413 - VI/13
Page 193 of 240
Approved wheels and tires
The manufacturer of your vehicle recom‐
mends that you use only wheels and tires that
have been approved for your particular vehicle
model.
For example, despite having the same official
size ratings, variations can lead to body con‐
tact and with it, the risk of severe accidents.
The manufacturer of your vehicle cannot eval‐
uate non-approved wheels and tires to deter‐
mine if they are suited for use, and therefore
cannot ensure the operating safety of the vehi‐
cle if they are mounted.◀
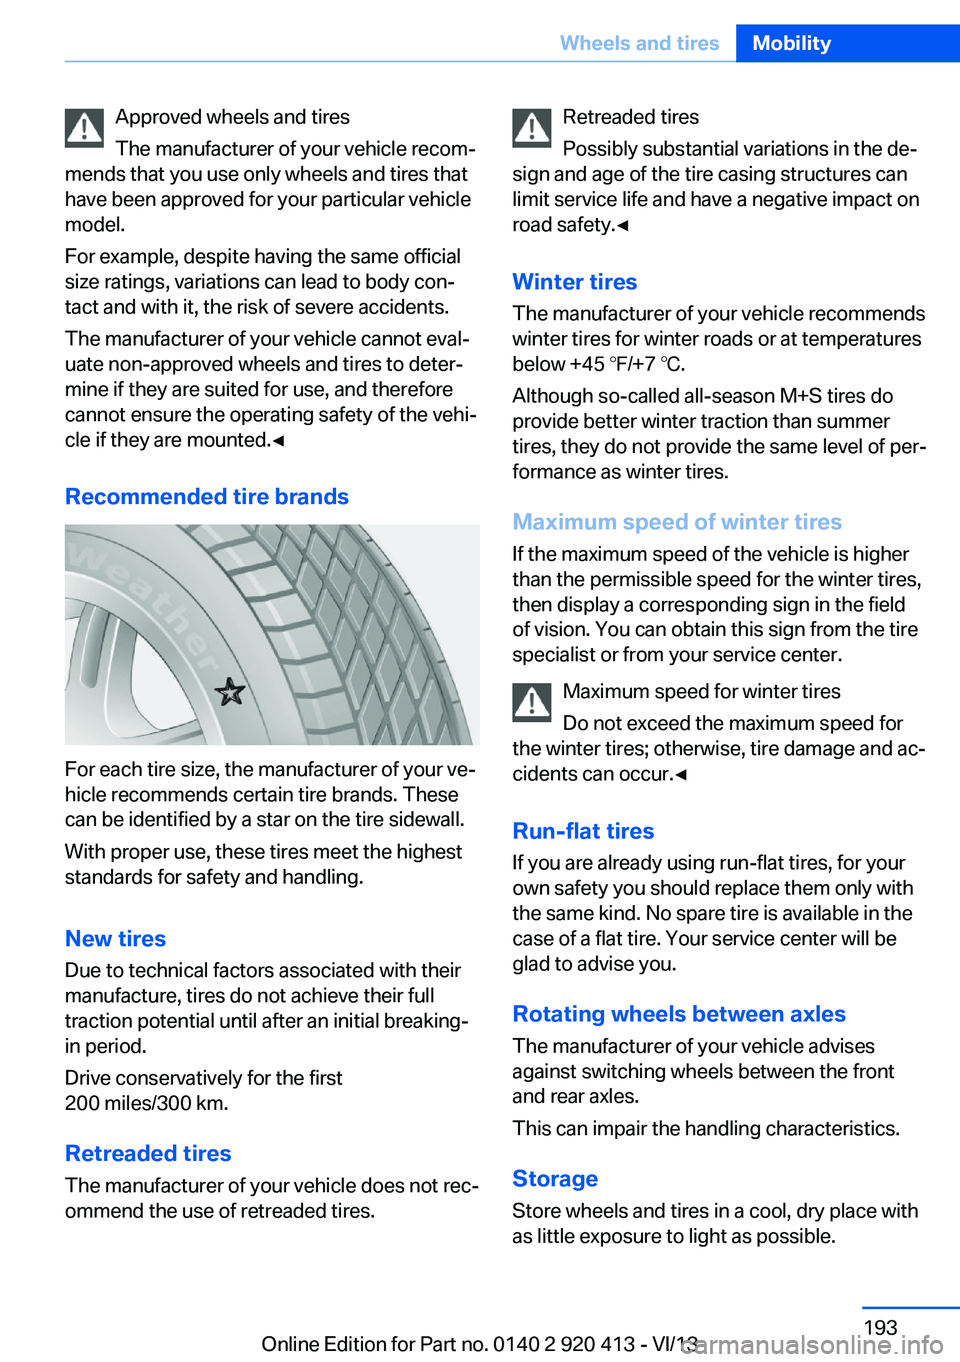
Recommended tire brands
For each tire size, the manufacturer of your ve‐
hicle recommends certain tire brands. These
can be identified by a star on the tire sidewall.
With proper use, these tires meet the highest
standards for safety and handling.
New tires Due to technical factors associated with their
manufacture, tires do not achieve their full
traction potential until after an initial breaking-
in period.
Drive conservatively for the first
200 miles/300 km.
Retreaded tires
The manufacturer of your vehicle does not rec‐
ommend the use of retreaded tires.
Retreaded tires
Possibly substantial variations in the de‐
sign and age of the tire casing structures can
limit service life and have a negative impact on
road safety.◀
Winter tires
The manufacturer of your vehicle recommends
winter tires for winter roads or at temperatures
below +45 ℉/+7 ℃.
Although so-called all-season M+S tires do
provide better winter traction than summer tires, they do not provide the same level of per‐
formance as winter tires.
Maximum speed of winter tires If the maximum speed of the vehicle is higher
than the permissible speed for the winter tires,
then display a corresponding sign in the field
of vision. You can obtain this sign from the tire
specialist or from your service center.
Maximum speed for winter tires
Do not exceed the maximum speed for
the winter tires; otherwise, tire damage and ac‐
cidents can occur.◀
Run-flat tires If you are already using run-flat tires, for your
own safety you should replace them only with
the same kind. No spare tire is available in the
case of a flat tire. Your service center will be
glad to advise you.
Rotating wheels between axles
The manufacturer of your vehicle advises
against switching wheels between the front
and rear axles.
This can impair the handling characteristics.
StorageStore wheels and tires in a cool, dry place with
as little exposure to light as possible.Seite 193Wheels and tiresMobility193
Online Edition for Part no. 0140 2 920 413 - VI/13
Page 194 of 240
Always protect tires against all contact with oil,
grease and fuels.
Do not exceed the maximum tire inflation pres‐
sure indicated on the side wall of the tire.
Run-flat tires
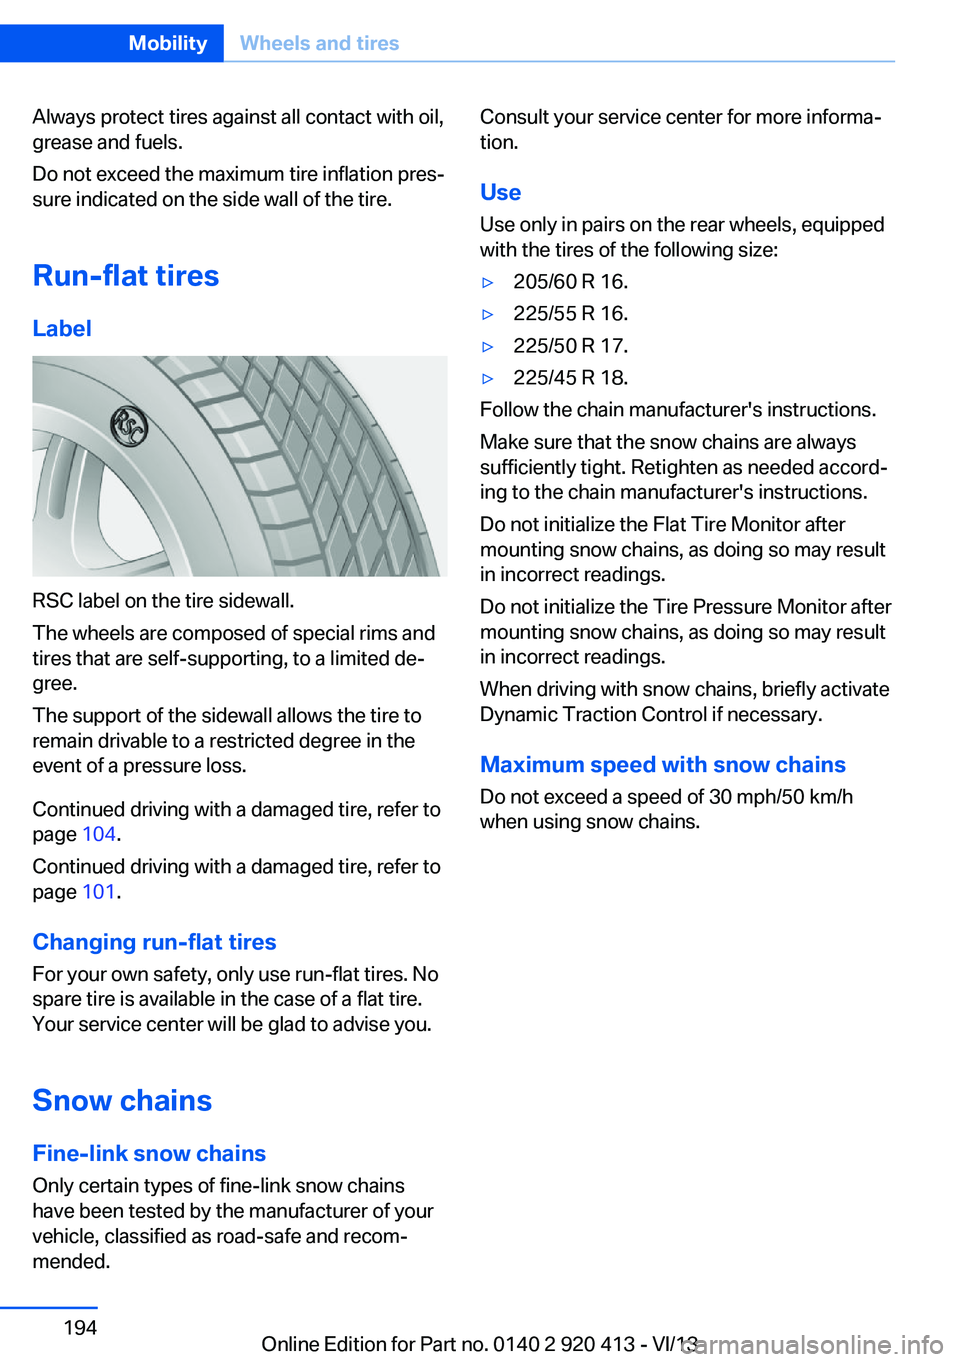
Label
RSC label on the tire sidewall.
The wheels are composed of special rims and
tires that are self-supporting, to a limited de‐
gree.
The support of the sidewall allows the tire to
remain drivable to a restricted degree in the
event of a pressure loss.
Continued driving with a damaged tire, refer to
page 104.
Continued driving with a damaged tire, refer to
page 101.
Changing run-flat tires
For your own safety, only use run-flat tires. No
spare tire is available in the case of a flat tire.
Your service center will be glad to advise you.
Snow chains
Fine-link snow chains
Only certain types of fine-link snow chains
have been tested by the manufacturer of your
vehicle, classified as road-safe and recom‐
mended.
Consult your service center for more informa‐
tion.
Use Use only in pairs on the rear wheels, equipped
with the tires of the following size:▷205/60 R 16.▷225/55 R 16.▷225/50 R 17.▷225/45 R 18.
Follow the chain manufacturer's instructions.
Make sure that the snow chains are always
sufficiently tight. Retighten as needed accord‐
ing to the chain manufacturer's instructions.
Do not initialize the Flat Tire Monitor after
mounting snow chains, as doing so may result
in incorrect readings.
Do not initialize the Tire Pressure Monitor after
mounting snow chains, as doing so may result
in incorrect readings.
When driving with snow chains, briefly activate
Dynamic Traction Control if necessary.
Maximum speed with snow chains Do not exceed a speed of 30 mph/50 km/h
when using snow chains.
Seite 194MobilityWheels and tires194
Online Edition for Part no. 0140 2 920 413 - VI/13
Page 211 of 240
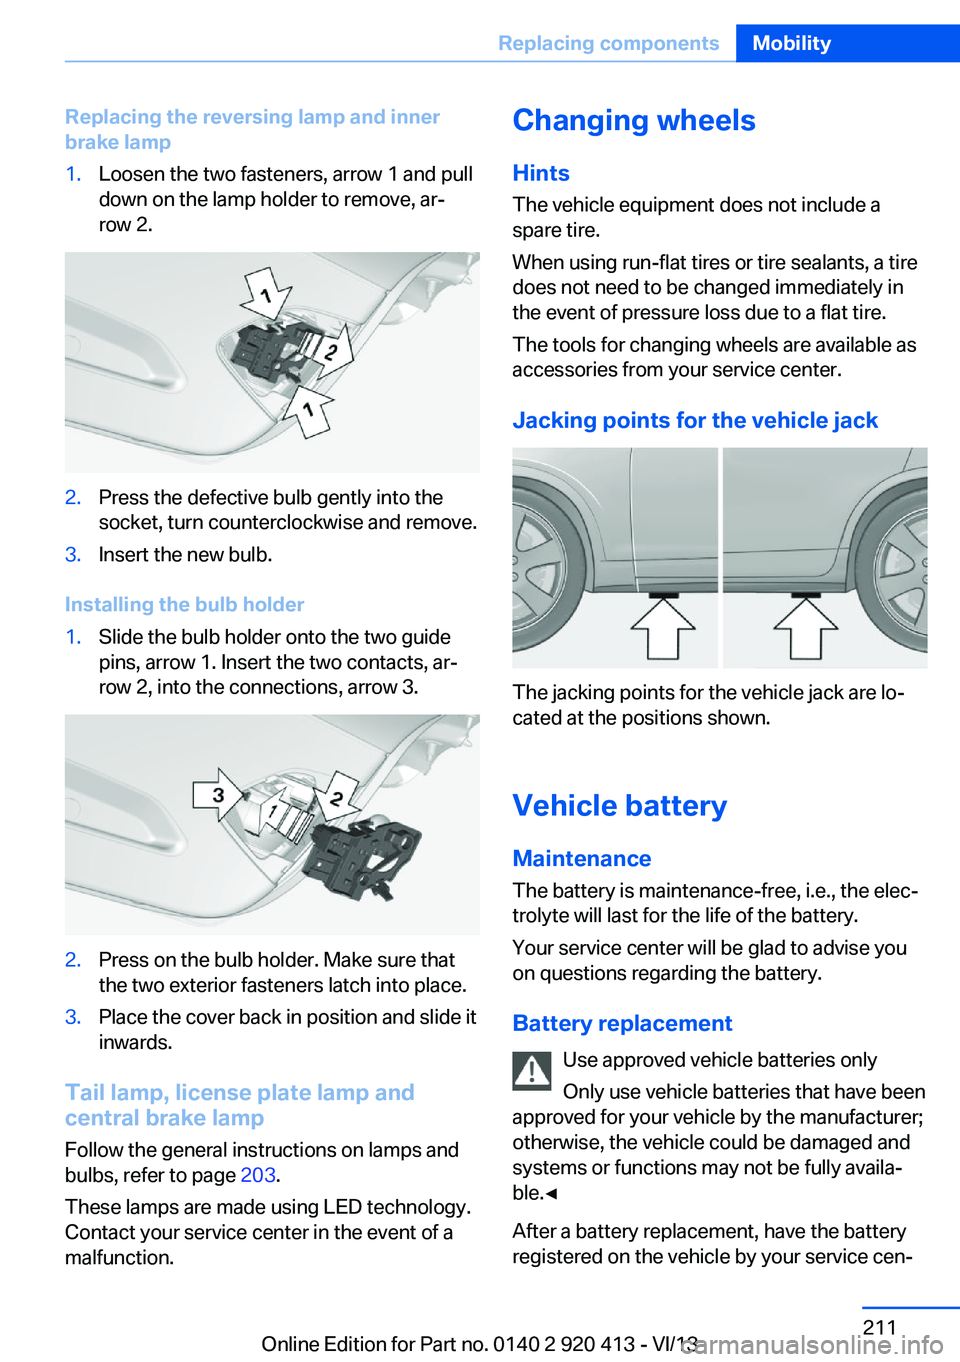
Replacing the reversing lamp and inner
brake lamp1.Loosen the two fasteners, arrow 1 and pull
down on the lamp holder to remove, ar‐
row 2.2.Press the defective bulb gently into the
socket, turn counterclockwise and remove.3.Insert the new bulb.
Installing the bulb holder
1.Slide the bulb holder onto the two guide
pins, arrow 1. Insert the two contacts, ar‐
row 2, into the connections, arrow 3.2.Press on the bulb holder. Make sure that
the two exterior fasteners latch into place.3.Place the cover back in position and slide it
inwards.
Tail lamp, license plate lamp and
central brake lamp
Follow the general instructions on lamps and
bulbs, refer to page 203.
These lamps are made using LED technology.
Contact your service center in the event of a
malfunction.
Changing wheels
Hints
The vehicle equipment does not include a
spare tire.
When using run-flat tires or tire sealants, a tire
does not need to be changed immediately in
the event of pressure loss due to a flat tire.
The tools for changing wheels are available as
accessories from your service center.
Jacking points for the vehicle jack
The jacking points for the vehicle jack are lo‐
cated at the positions shown.
Vehicle battery Maintenance
The battery is maintenance-free, i.e., the elec‐
trolyte will last for the life of the battery.
Your service center will be glad to advise you
on questions regarding the battery.
Battery replacement Use approved vehicle batteries only
Only use vehicle batteries that have been
approved for your vehicle by the manufacturer;
otherwise, the vehicle could be damaged and
systems or functions may not be fully availa‐
ble.◀
After a battery replacement, have the battery
registered on the vehicle by your service cen‐
Seite 211Replacing componentsMobility211
Online Edition for Part no. 0140 2 920 413 - VI/13