2014 BMW 328XI SPORTS WAGON Message
[x] Cancel search: MessagePage 14 of 268

Cockpit
12
Instrument cluster
1Speedometer
2Indicator lamps for turn signals
3Indicator and warning lamps13
4Displays for active cruise control
*66
5Tachometer72
6Energy Control
*73
Engine oil temperature
*73
7Display for
>Clock72
>Outside temperature72
>Indicator and warning lamps828Display for
>Position of automatic transmission
*59
>Computer74
>Date of next scheduled service, and
remaining distance to be driven77
>Odometer and trip odometer72
>Checking engine oil level
*215
>Settings and information76
> There is a Check Control
message82
9Fuel gauge73
10Resetting the trip odometer72
Page 15 of 268
At a glance
13Reference
Controls
Driving tips
Communications
Navigation
Entertainment
Mobility
Indicator and warning lamps
The concept
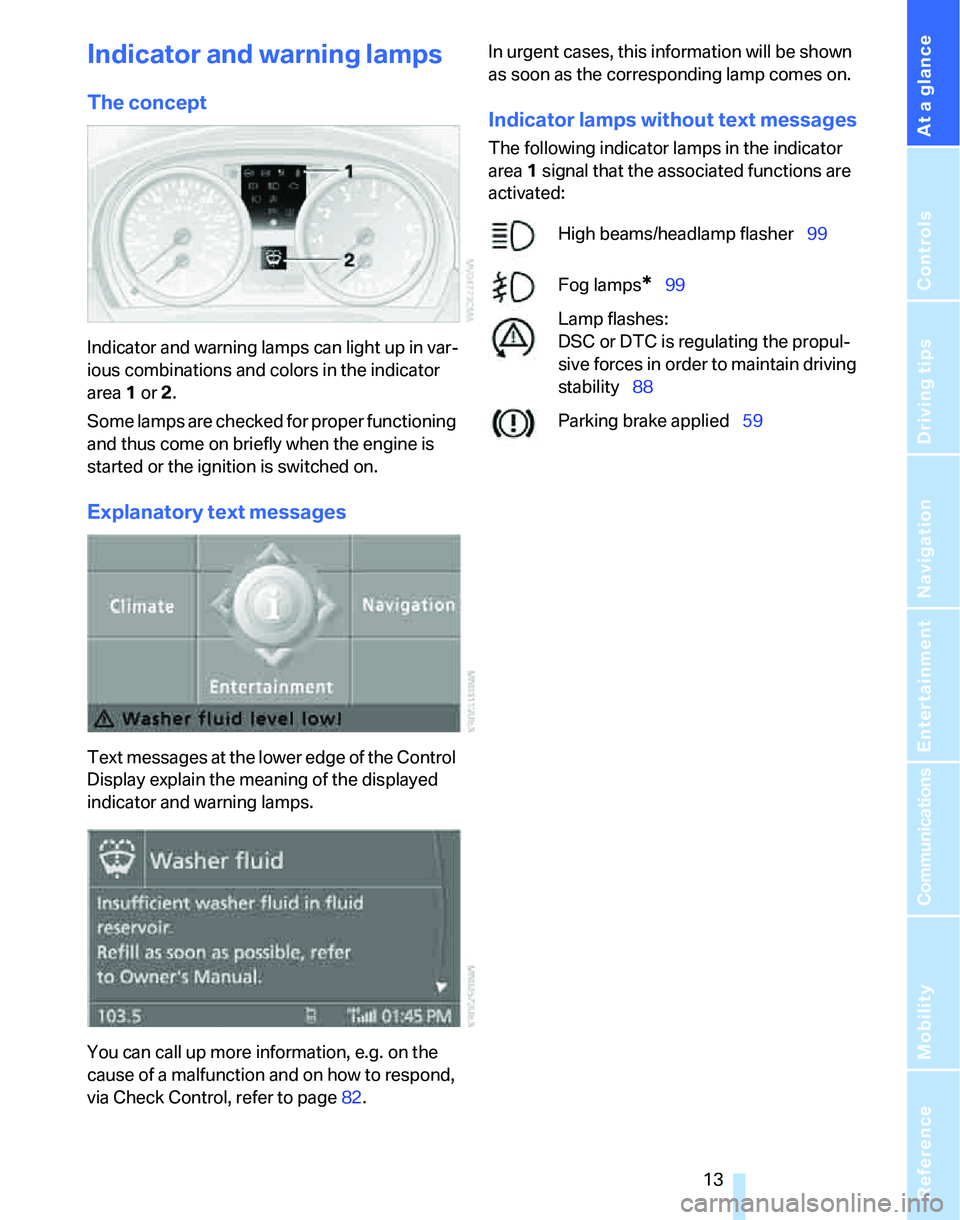
Indicator and warning lamps can light up in var-
ious combinations and colors in the indicator
area 1 or2.
Some lamps are checked for proper functioning
and thus come on briefly when the engine is
started or the ignition is switched on.
Explanatory text messages
Text messages at the lower edge of the Control
Display explain the meaning of the displayed
indicator and warning lamps.
You can call up more information, e.g. on the
cause of a malfunction and on how to respond,
via Check Control, refer to page82.In urgent cases, this information will be shown
as soon as the corresponding lamp comes on.
Indicator lamps without text messages
The following indicator lamps in the indicator
area1 signal that the associated functions are
activated:
High beams/headlamp flasher99
Fog lamps
*99
Lamp flashes:
DSC or DTC is regulating the propul-
sive forces in order to maintain driving
stability88
Parking brake applied59
Page 19 of 268

At a glance
17Reference
Controls
Driving tips
Communications
Navigation
Entertainment
Mobility
Menu overview
Communication
>Telephone*
>BMW Assist* or TeleService*
Navigation
>Navigation system
>Onboard information, e.g. for displaying the
average fuel consumption.
Entertainment
>Radio
>CD player and CD changer
*
>External audio device
Climate
>Vent settings
>Automatic programs
>Parked car operation
menu
>Switching off Control Display
>Tone and display settings
>Settings for your vehicle, e.g. for the central
locking system
>Display of service requirements and dates
for statutory emissions and vehicle inspec-
tions
>Settings for telephone
Operating principle
As of radio readiness, the following message
appears on the Control Display:
To hide the message:
Press the controller.
The start menu is displayed.
The message is automatically hidden after
approx. 10 seconds.
Start menu
All iDrive functions can be called up via five
menu items.
Opening start menu
Press the button.
To open the start menu from the menu:
Press the button twice.
Page 22 of 268

iDrive
20
Status information
1Display for:
>Entertainment:
Radio, CD or
>Telephone
* in "Communication":
Name of the connected mobile phone,
network search or no network
>"BMW Assist"
*:
Active voice connection with a
BMW Assist service
2Entertainment audio output off
3Display for traffic information*:
"TI":
Traffic information for the navigation sys-
tem can be received and the transmission is
switched on
4Display for:
> New entries present in "Missed calls"
*
> Roaming active
5 It is possible to make calls
* if the mobile
phone is paired with the vehicle
Reception strength of mobile phone
network, display depending on mobile
phone
6Time
Other displays:
Status information is temporarily hidden during
Check Control message displays or entries via
the voice command system
*.
Assistance window*
Additional information can be displayed in the
assistance window:
>The computer or the trip computer
*
>The arrow or map view in vehicles with nav-
igation system
*
>The current position*
Selecting display
1.Move the controller to the right to change to
the assistance window and press the con-
troller.
2.Select a menu item.
3.Press the controller.
Page 40 of 268
Opening and closing
38
Before driving a vehicle with automatic
transmission into a car wash
1.Insert remote control into ignition switch.
2.Depress the brake.
3.Move the selector lever to position N.
4.Switch off the engine.
The vehicle can roll.
Malfunction
Convenient access may malfunction due to
local radio waves. If this happens, open or close
the vehicle via the buttons on the remote con-
trol or using the integrated key. To start the
engine afterward, insert the remote control into
the ignition switch.
Warning lamps
The warning lamp in the instrument
cluster lights up when you attempt to
start the engine: the engine cannot
be started. The remote control is not inside the
vehicle or is malfunctioning. Take the remote
control with you inside the vehicle or have it
checked. If necessary, insert another remote
control into the ignition switch.
The warning lamp in the instrument
cluster lights up while the engine is
running: the remote control is no
longer inside the vehicle. After the engine is
switched off, the engine can only be restarted
within approx. 10 seconds.
The indicator lamp in the instrument
cluster comes on and a message
appears on the Control Display:
replace the battery in the remote control.
Replacing the battery
The remote control for convenient access con-
tains a battery that will need to be replaced from
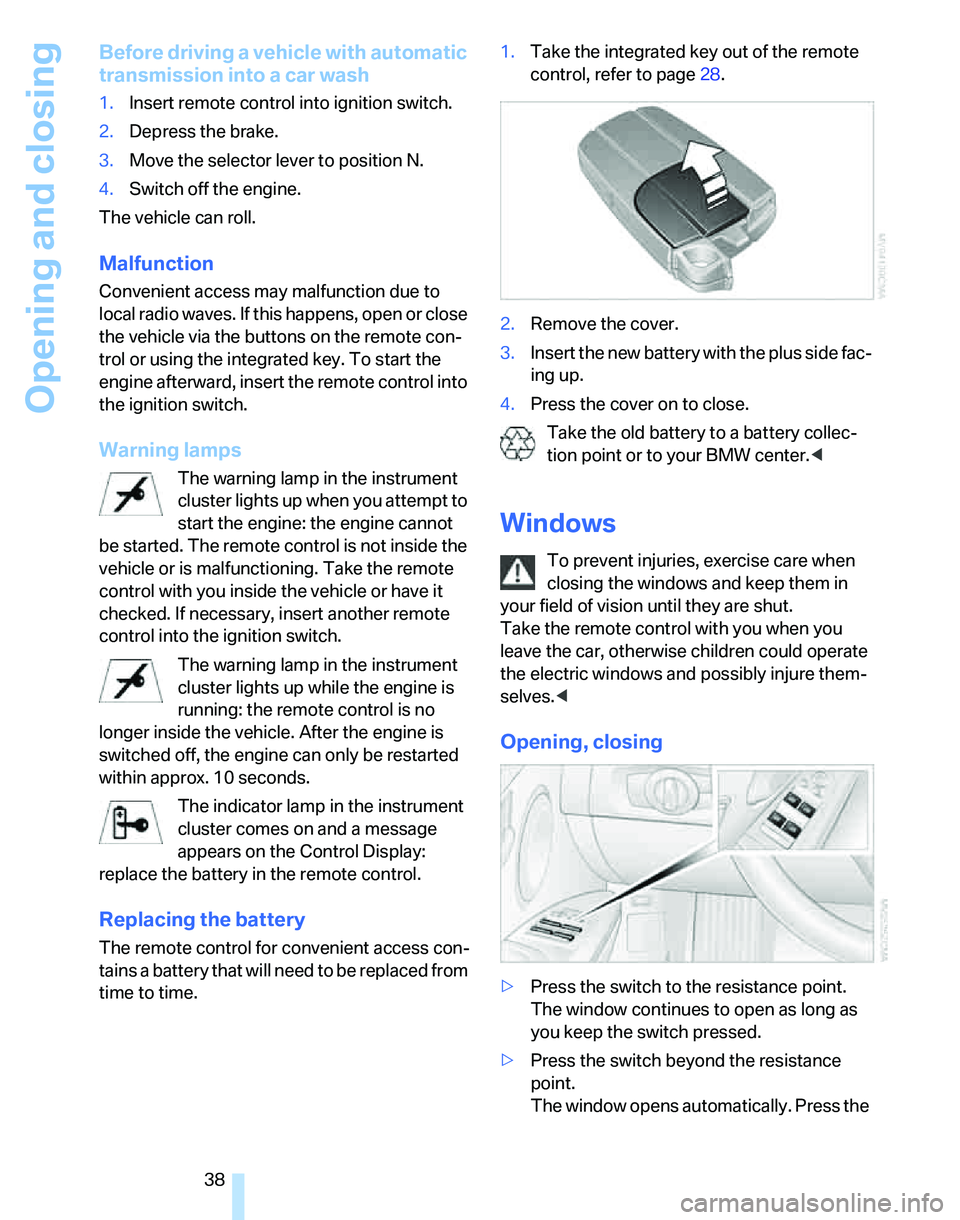
time to time.1.Take the integrated key out of the remote
control, refer to page28.
2.Remove the cover.
3.Insert the new battery with the plus side fac-
ing up.
4.Press the cover on to close.
Take the old battery to a battery collec-
tion point or to your BMW center.<
Windows
To prevent injuries, exercise care when
closing the windows and keep them in
your field of vision until they are shut.
Take the remote control with you when you
leave the car, otherwise children could operate
the electric windows and possibly injure them-
selves.<
Opening, closing
>Press the switch to the resistance point.
The window continues to open as long as
you keep the switch pressed.
>Press the switch beyond the resistance
point.
The window opens automatically. Press the
Page 51 of 268
Controls
49Reference
At a glance
Driving tips
Communications
Navigation
Entertainment
Mobility
Selecting automatic call-up
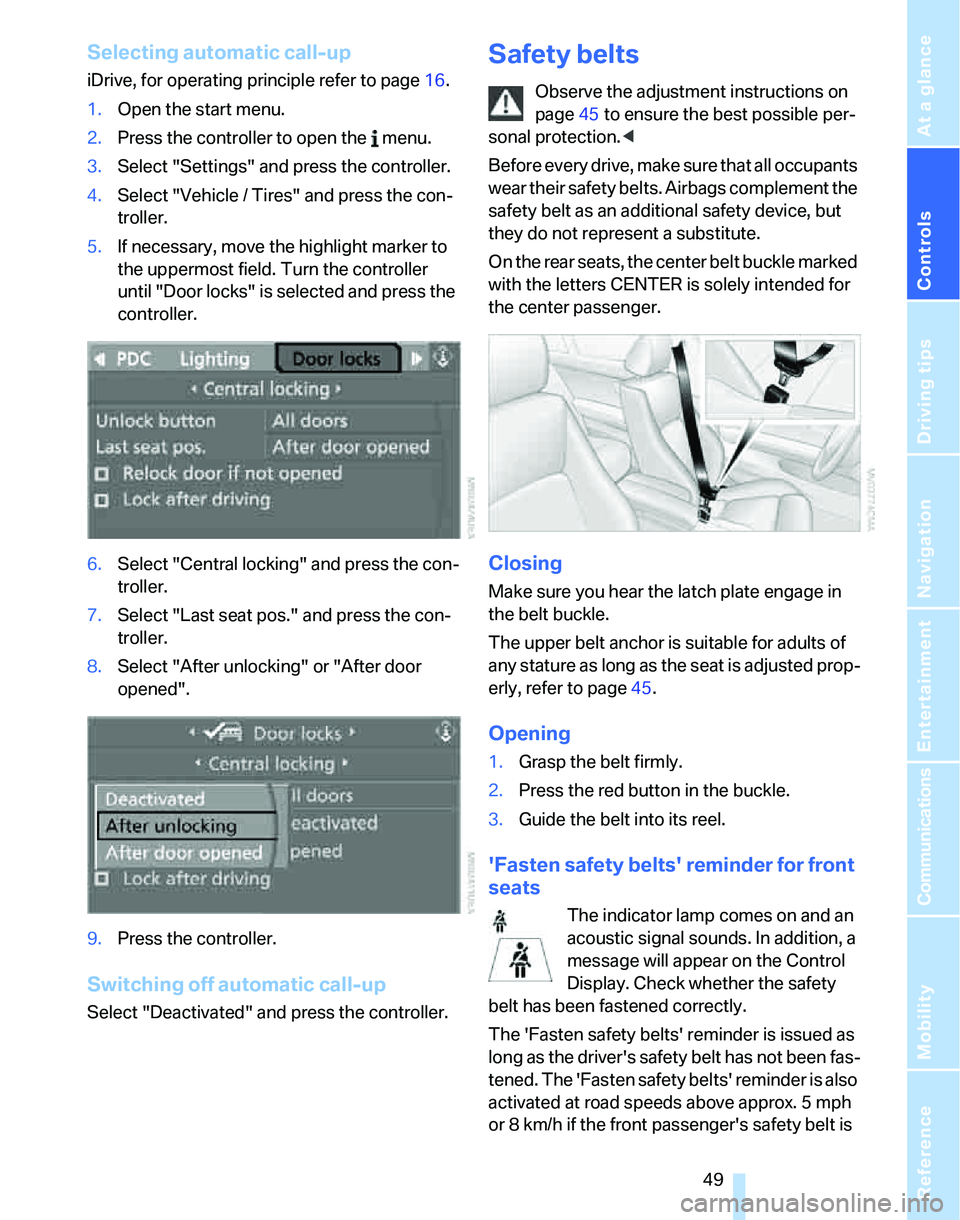
iDrive, for operating principle refer to page16.
1.Open the start menu.
2.Press the controller to open the menu.
3.Select "Settings" and press the controller.
4.Select "Vehicle / Tires" and press the con-
troller.
5.If necessary, move the highlight marker to
the uppermost field. Turn the controller
until "Door locks" is selected and press the
controller.
6.Select "Central locking" and press the con-
troller.
7.Select "Last seat pos." and press the con-
troller.
8.Select "After unlocking" or "After door
opened".
9.Press the controller.
Switching off automatic call-up
Select "Deactivated" and press the controller.
Safety belts
Observe the adjustment instructions on
page45 to ensure the best possible per-
sonal protection.<
Before every drive, make sure that all occupants
wear their safety belts. Airbags complement the
safety belt as an additional safety device, but
they do not represent a substitute.
O n t h e r e a r s e a t s , t h e c e n t e r b e l t b u c k l e m a r k e d
with the letters CENTER is solely intended for
the center passenger.
Closing
Make sure you hear the latch plate engage in
the belt buckle.
The upper belt anchor is suitable for adults of
any stature as long as the seat is adjusted prop-
erly, refer to page45.
Opening
1.Grasp the belt firmly.
2.Press the red button in the buckle.
3.Guide the belt into its reel.
'Fasten safety belts' reminder for front
seats
The indicator lamp comes on and an
acoustic signal sounds. In addition, a
message will appear on the Control
Display. Check whether the safety
belt has been fastened correctly.
The 'Fasten safety belts' reminder is issued as
long as the driver's safety belt has not been fas-
tened. The 'Fasten safety belts' reminder is also
activated at road speeds above approx. 5 mph
or 8 km/h if the front passenger's safety belt is
Page 54 of 268
Adjustments
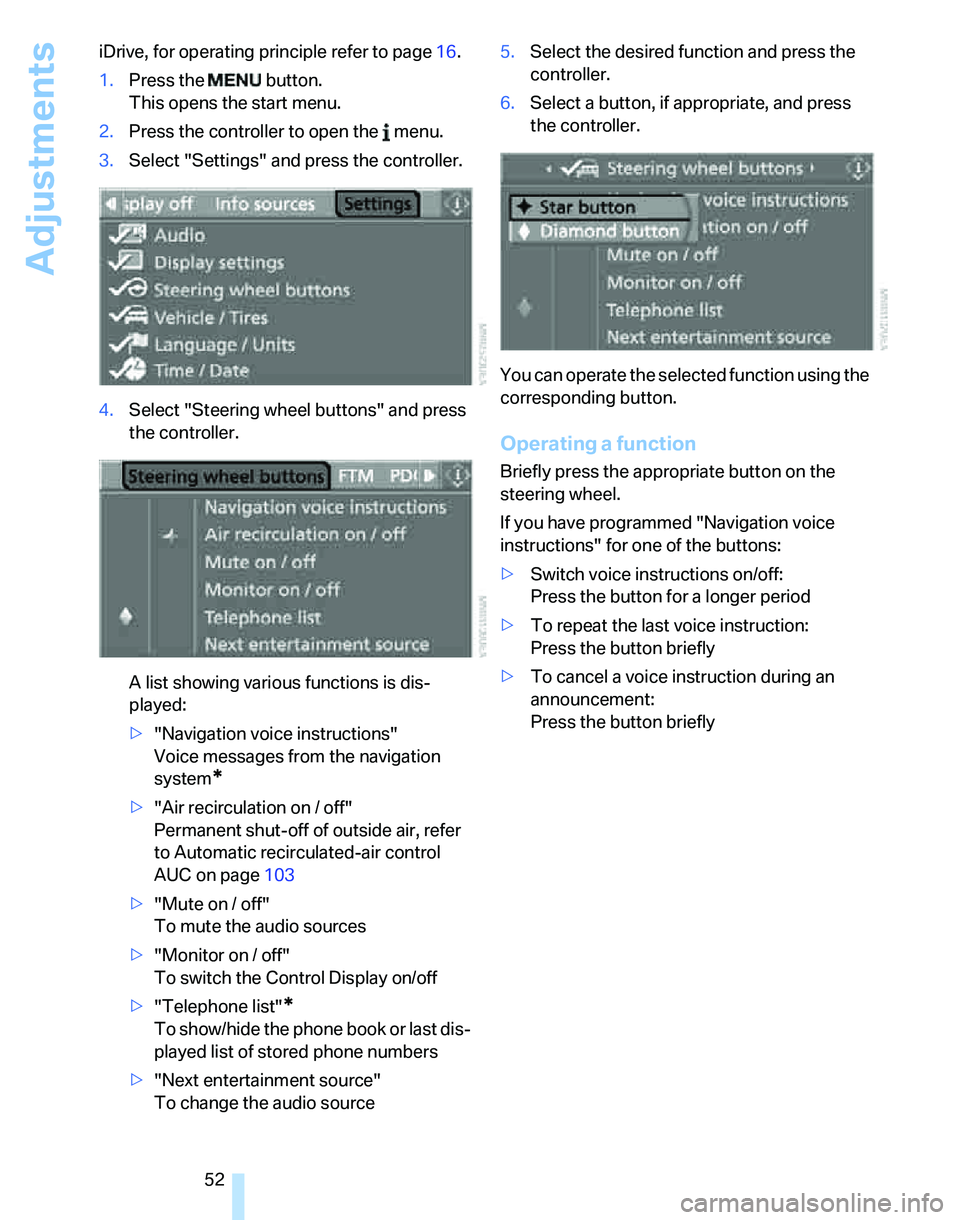
52 iDrive, for operating principle refer to page16.
1.Press the button.
This opens the start menu.
2.Press the controller to open the menu.
3.Select "Settings" and press the controller.
4.Select "Steering wheel buttons" and press
the controller.
A list showing various functions is dis-
played:
>"Navigation voice instructions"
Voice messages from the navigation
system
*
>"Air recirculation on / off"
Permanent shut-off of outside air, refer
to Automatic recirculated-air control
AUC on page103
>"Mute on / off"
To mute the audio sources
>"Monitor on / off"
To switch the Control Display on/off
>"Telephone list"
*
To show/hide the phone book or last dis-
played list of stored phone numbers
>"Next entertainment source"
To change the audio source5.Select the desired function and press the
controller.
6.Select a button, if appropriate, and press
the controller.
You can operate the selected function using the
corresponding button.
Operating a function
Briefly press the appropriate button on the
steering wheel.
If you have programmed "Navigation voice
instructions" for one of the buttons:
>Switch voice instructions on/off:
Press the button for a longer period
>To repeat the last voice instruction:
Press the button briefly
>To cancel a voice instruction during an
announcement:
Press the button briefly
Page 67 of 268
Controls
65Reference
At a glance
Driving tips
Communications
Navigation
Entertainment
Mobility
Press the lever to the resistance point, arrow 1,
until the desired speed is reached.
Accelerating significantly:
Press the lever beyond the resistance point,
arrow 1, until the desired speed is reached.
The vehicle accelerates without pressure on
the accelerator pedal. The system stores and
maintains the speed.
Decreasing desired speed
Repeatedly pull the lever to the resistance point
or beyond, arrow 2, until the desired speed is
displayed.
>Each time the lever is pulled to the resis-
tance point, the desired speed is decreased
by approx. 1 mph or 1 km/h.
>Each time the lever is pulled beyond the
resistance point, the desired speed is
reduced by up to 5 mph or 10 km/h until the
minimum speed of 20 mph or 30 km/h is
achieved.
The system stores and maintains the speed.
If the speed is to be reduced significantly,
depress the brake; otherwise, decelera-
tion may be insufficient and dangerous situa-
tions could result.<
Deactivating cruise control
Tap the lever upwards or downwards, arrow3.
The displays in the speedometer disappear.
In addition, the system is automatically deacti-
vated:
>When you brake the vehicle
>When you switch gears very slowly or shift
to idle in cars with manual transmission
>When you select the automatic transmis-
sion's neutral position N
>When you activate DTC or deactivate DSC
>When DSC or ABS is intervening
Cruise control is not deactivated by depressing
the accelerator pedal. Once the accelerator
pedal is released, the stored speed is achieved
again and maintained.
Warning lamp
The warning lamp comes on when
cruise control has been automatically
deactivated by applying the parking
brake or as a result of DSC intervening. A mes-
sage appears on the Control Display.
Resuming a speed stored beforehand
Briefly press the button, arrow 4. the stored
speed is resumed and maintained.
In the following instances, the stored speed is
deleted and can no longer be resumed:
>When driving stability control systems are
intervening
>In cars with manual transmission: when you
shift gears very slowly or shift to idle posi-
tion
>In cars with automatic transmission: when
you engage selector lever position N
>When the ignition is switched off
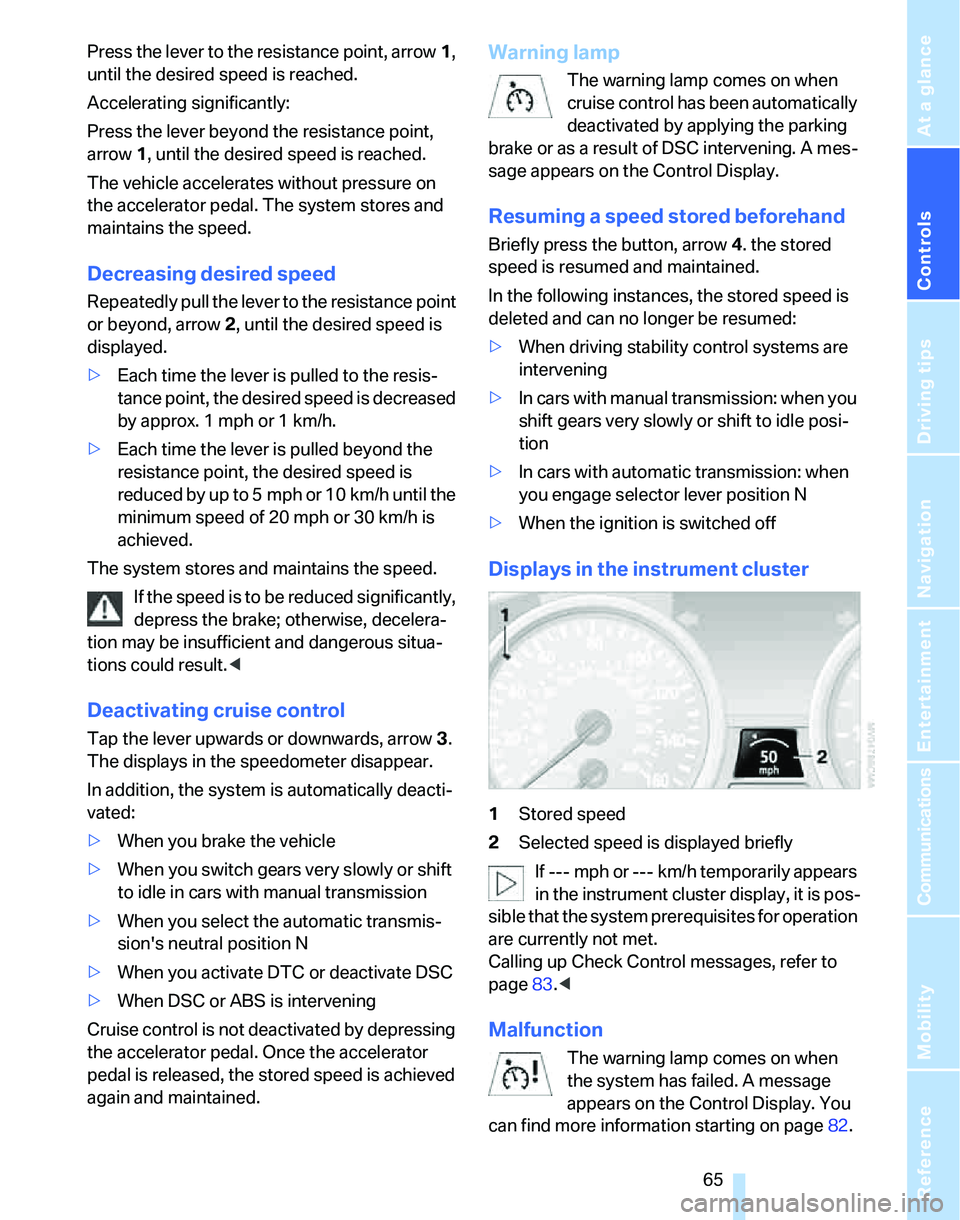
Displays in the instrument cluster
1Stored speed
2Selected speed is displayed briefly
If --- mph or --- km/h temporarily appears
in the instrument cluster display, it is pos-
sible that the system prerequisites for operation
are currently not met.
Calling up Check Control messages, refer to
page83.<
Malfunction
The warning lamp comes on when
the system has failed. A message
appears on the Control Display. You
can find more information starting on page82.