2014 BMW 328XI SPORTS WAGON navigation system
[x] Cancel search: navigation systemPage 35 of 268
Controls
33Reference
At a glance
Driving tips
Communications
Navigation
Entertainment
Mobility
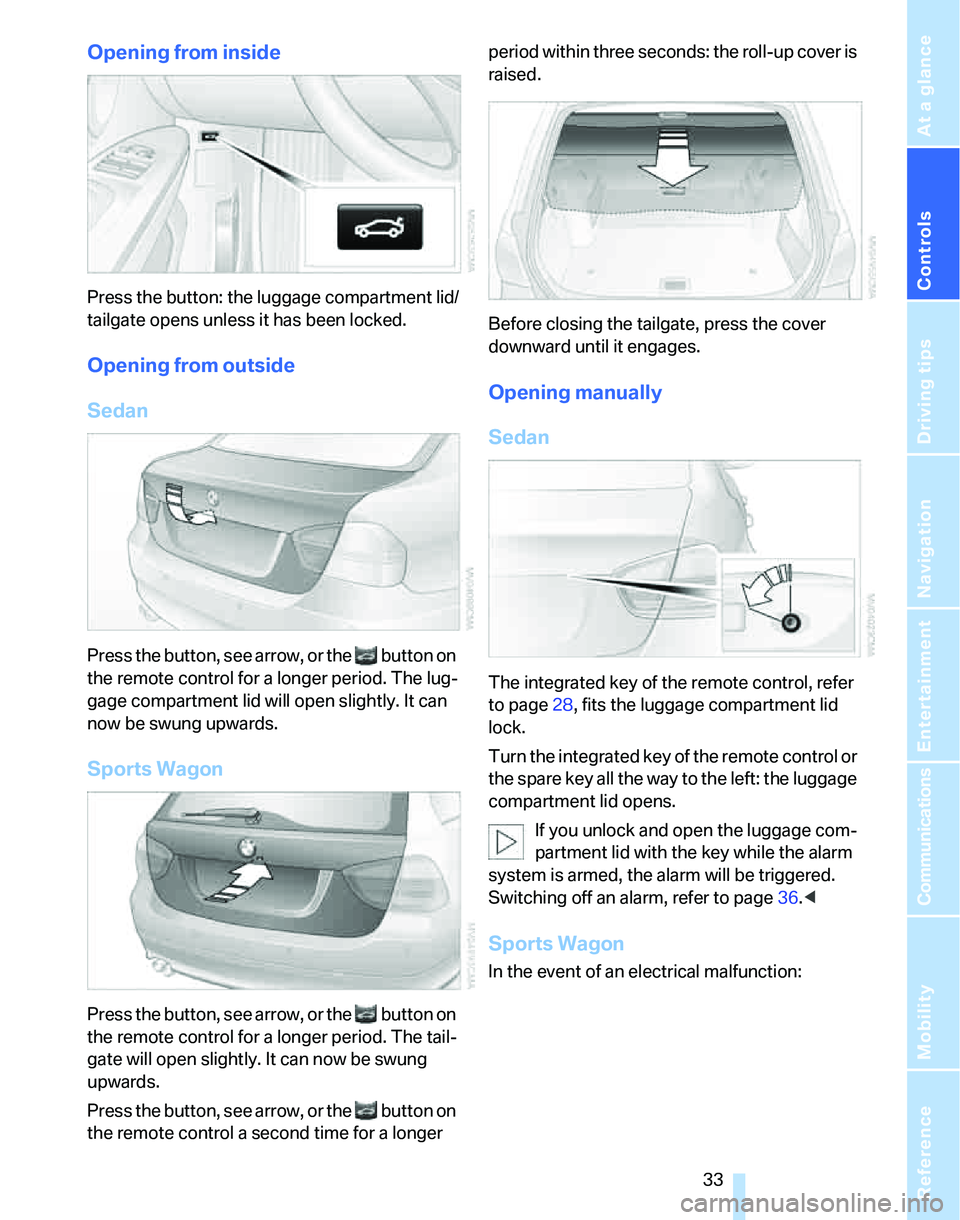
Opening from inside
Press the button: the luggage compartment lid/
tailgate opens unless it has been locked.
Opening from outside
Sedan
Press the button, see arrow, or the button on
the remote control for a longer period. The lug-
gage compartment lid will open slightly. It can
now be swung upwards.
Sports Wagon
Press the button, see arrow, or the button on
the remote control for a longer period. The tail-
gate will open slightly. It can now be swung
upwards.
Press the button, see arrow, or the button on
the remote control a second time for a longer period within three seconds: the roll-up cover is
raised.
Before closing the tailgate, press the cover
downward until it engages.
Opening manually
Sedan
The integrated key of the remote control, refer
to page28, fits the luggage compartment lid
lock.
Turn the integrated key of the remote control or
the spare key all the way to the left: the luggage
compartment lid opens.
If you unlock and open the luggage com-
partment lid with the key while the alarm
system is armed, the alarm will be triggered.
Switching off an alarm, refer to page36.<
Sports Wagon
In the event of an electrical malfunction:
Page 37 of 268

Controls
35Reference
At a glance
Driving tips
Communications
Navigation
Entertainment
Mobility
Closing
Sedan
Sports Wagon
The handle recesses on the interior trim of the
luggage compartment lid/tailgate make it easier
to pull down.
Make sure that the closing path of the
luggage compartment lid/tailgate is clear,
otherwise injuries may result.<
Sports Wagon: opening and closing the
rear window
Small items can be loaded and unloaded
quickly when the rear window is opened sepa-
rately.
The roll-up cover is raised when the rear
window is opened. Before closing the rear
window, press the roll-up cover downward until
it engages.
Press the window shut to close it.
Make sure that the corners of any pointed
or sharp-edged cargo are padded if they
could bump against the rear window while the
vehicle is in motion, otherwise the heating ele-
ments of the rear window could be damaged.<
Alarm system*
The concept
The vehicle alarm system responds:
>When a door, the hood or the luggage com-
partment lid/tailgate is opened
>To movements inside the vehicle: Interior
motion sensor, refer to page36
>When the car's inclination changes, for
instance if an attempt is made to jack it up
and steal the wheels or to raise it prior to
towing away
>When there is an interruption in the power
supply from the battery
The alarm system signals unauthorized entry
attempts for a short time by means of:
>An acoustic alarm
>Switching on the hazard warning flashers
>Flashing the high beams
Arming and disarming
When you lock or unlock the vehicle, either with
the remote control or at the door lock, the alarm
system is armed or disarmed at the same time.
Page 39 of 268
Controls
37Reference
At a glance
Driving tips
Communications
Navigation
Entertainment
Mobility
>Engine starting
>Convenient closure
Functional requirement
>The vehicle or the luggage compartment
lid/tailgate can only be locked when the
vehicle detects that the remote control cur-
rently in use is outside of the vehicle.
>The vehicle cannot be locked or unlocked
again until after approx. 2 seconds.
>The engine can only be started when the
vehicle detects that the remote control cur-
rently in use is inside the vehicle.
Comparison to standard remote
controls
In general, there is no difference between using
convenient access or pressing the buttons on
the remote control to carry out the functions
mentioned above. You should therefore first
familiarize yourself with the instructions on
opening and closing starting on page28.
Special features regarding the use of conve-
nient access are described below.
If you notice a brief delay while opening or
closing the windows or glass sunroof, the
system is checking whether a remote control is
inside the vehicle. Please repeat the opening or
closing procedure, if necessary.<
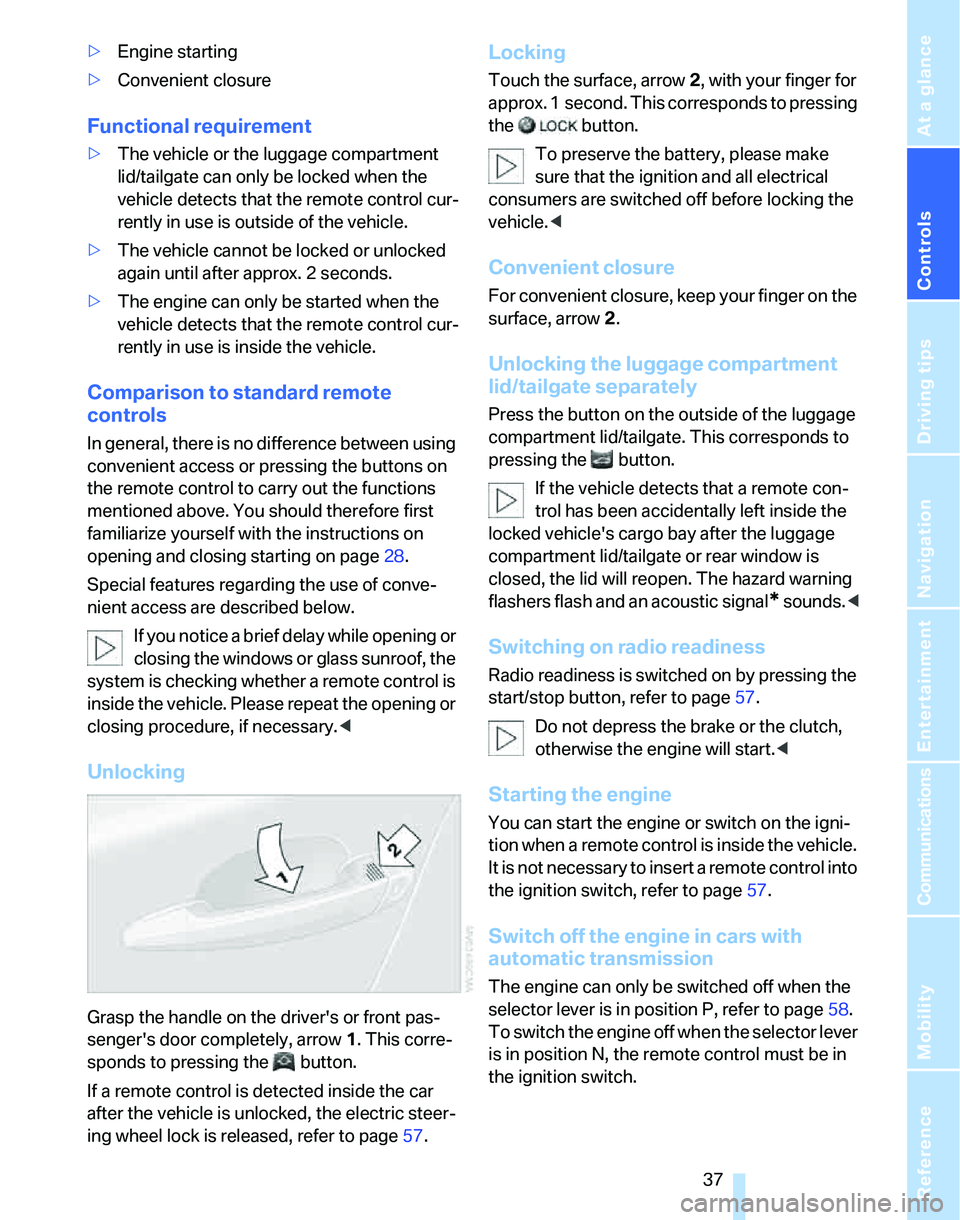
Unlocking
Grasp the handle on the driver's or front pas-
senger's door completely, arrow 1. This corre-
sponds to pressing the button.
If a remote control is detected inside the car
after the vehicle is unlocked, the electric steer-
ing wheel lock is released, refer to page57.
Locking
Touch the surface, arrow 2, with your finger for
approx. 1 second. This corresponds to pressing
the button.
To preserve the battery, please make
sure that the ignition and all electrical
consumers are switched off before locking the
vehicle.<
Convenient closure
For convenient closure, keep your finger on the
surface, arrow 2.
Unlocking the luggage compartment
lid/tailgate separately
Press the button on the outside of the luggage
compartment lid/tailgate. This corresponds to
pressing the button.
If the vehicle detects that a remote con-
trol has been accidentally left inside the
locked vehicle's cargo bay after the luggage
compartment lid/tailgate or rear window is
closed, the lid will reopen. The hazard warning
flashers flash and an acoustic signal
* sounds.<
Switching on radio readiness
Radio readiness is switched on by pressing the
start/stop button, refer to page57.
Do not depress the brake or the clutch,
otherwise the engine will start.<
Starting the engine
You can start the engine or switch on the igni-
tion when a remote control is inside the vehicle.
It is not necessary to insert a remote control into
the ignition switch, refer to page57.
Switch off the engine in cars with
automatic transmission
The engine can only be switched off when the
selector lever is in position P, refer to page58.
T o s w i t c h t h e e n g i n e o f f w h e n t h e s e l e c t o r l e v e r
is in position N, the remote control must be in
the ignition switch.
Page 41 of 268
Controls
39Reference
At a glance
Driving tips
Communications
Navigation
Entertainment
Mobility
switch again to stop the opening move-
ment.
You can close the windows in the same manner
by pulling the switch.
There are separate switches in the rear seat
armrests.
After switching off the ignition
When the remote control is removed or the igni-
tion is switched off, you can still operate the
windows for approx. 1 minute as long as no
door is opened.
For information on convenient operation via the
remote control or the door lock, refer to page30
or31. For information on closing with conve-
nient access, refer to Locking on page30.
Pinch protection system
If the closing force exceeds a specific value as a
window closes, the closing action is interrupted
and the window reopens slightly.
Despite the pinch protection system
check and clear the window's travel path
prior to closing it, otherwise the safety system
might fail to detect certain kinds of obstruc-
tions, such as thin objects, and the window
would continue closing.
Do not install any accessories that might inter-
fere with window movement. Otherwise the
pinch protection system could be impaired.<
Closing without pinch protection
If there is an external danger, or if ice on the win-
dows, etc., prevents you from closing the win-
dows normally, proceed as follows:
1.Pull the switch past the resistance point and
hold it there. Pinch protection is limited and
the window reopens slightly if the closing
force exceeds a certain value.
2.Pull the switch again past the resistance
point within approx. 4 seconds and hold it
there. The window closes without pinch
protection.
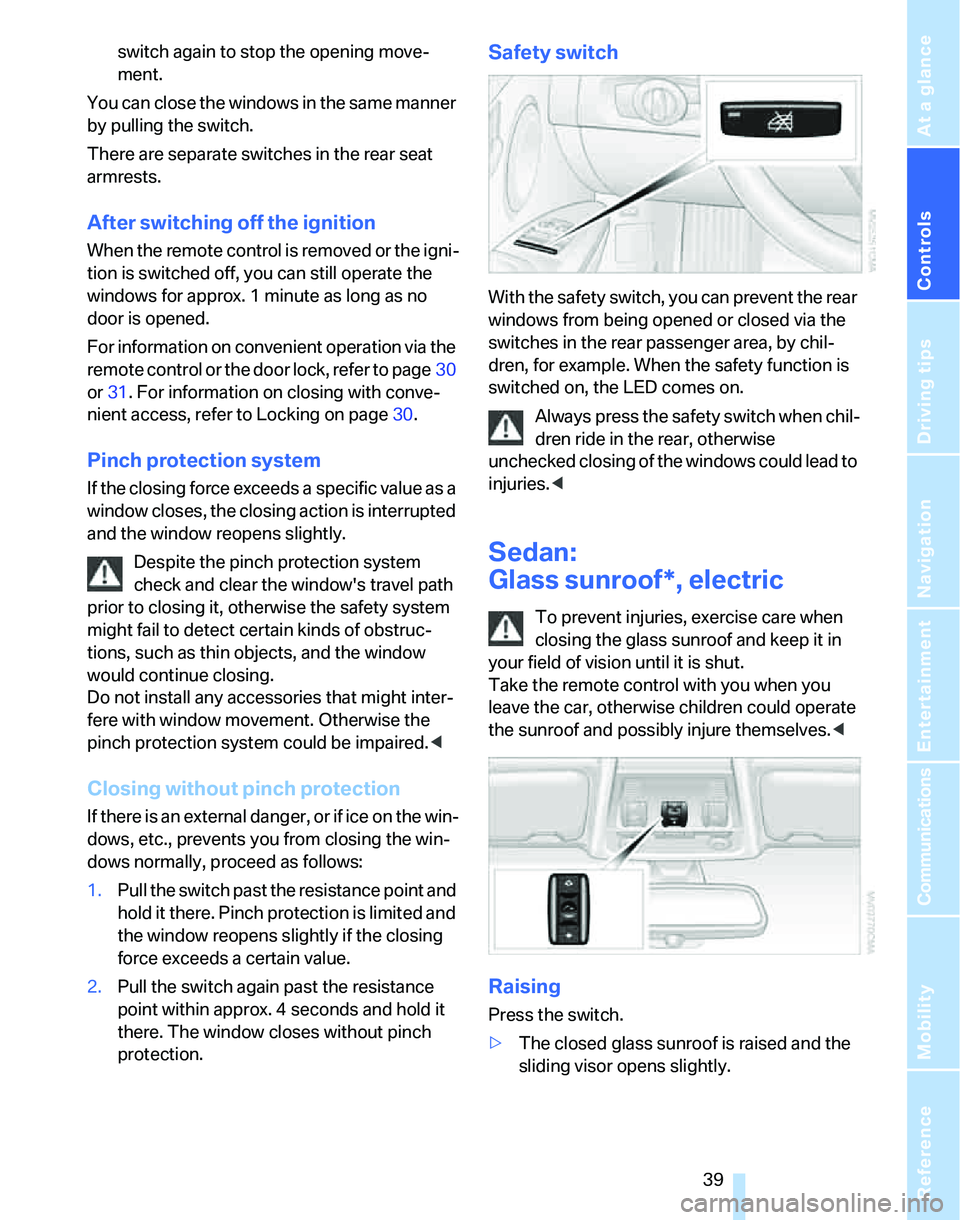
Safety switch
With the safety switch, you can prevent the rear
windows from being opened or closed via the
switches in the rear passenger area, by chil-
dren, for example. When the safety function is
switched on, the LED comes on.
Always press the safety switch when chil-
dren ride in the rear, otherwise
unchecked closing of the windows could lead to
injuries.<
Sedan:
Glass sunroof*, electric
To prevent injuries, exercise care when
closing the glass sunroof and keep it in
your field of vision until it is shut.
Take the remote control with you when you
leave the car, otherwise children could operate
the sunroof and possibly injure themselves.<
Raising
Press the switch.
>The closed glass sunroof is raised and the
sliding visor opens slightly.
Page 49 of 268
Controls
47Reference
At a glance
Driving tips
Communications
Navigation
Entertainment
Mobility
Front seats
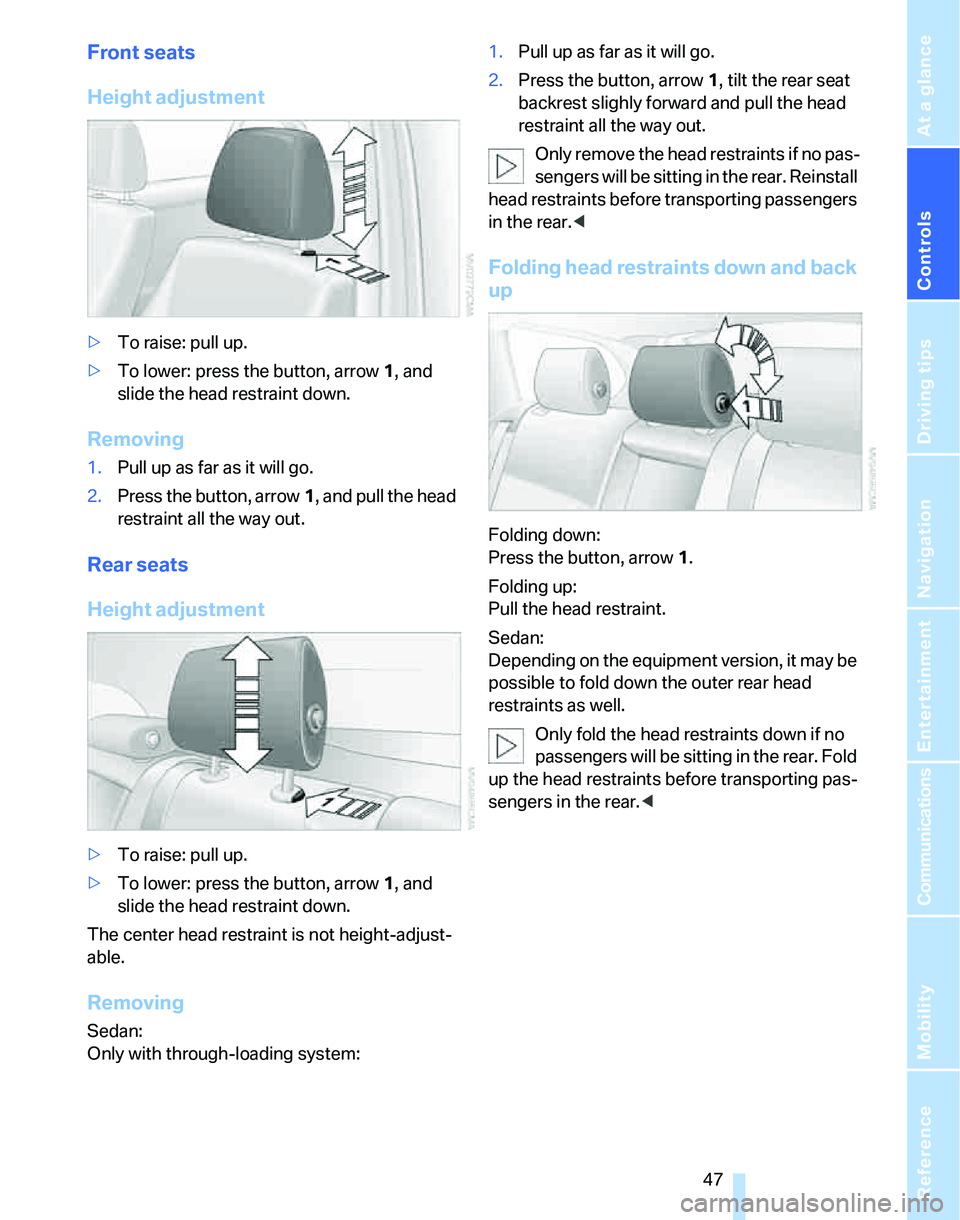
Height adjustment
>To raise: pull up.
>To lower: press the button, arrow1, and
slide the head restraint down.
Removing
1.Pull up as far as it will go.
2.Press the button, arrow1, and pull the head
restraint all the way out.
Rear seats
Height adjustment
>To raise: pull up.
>To lower: press the button, arrow1, and
slide the head restraint down.
The center head restraint is not height-adjust-
able.
Removing
Sedan:
Only with through-loading system:1.Pull up as far as it will go.
2.Press the button, arrow 1, tilt the rear seat
backrest slighly forward and pull the head
restraint all the way out.
Only remove the head restraints if no pas-
sengers will be sitting in the rear. Reinstall
head restraints before transporting passengers
in the rear.<
Folding head restraints down and back
up
Folding down:
Press the button, arrow1.
Folding up:
Pull the head restraint.
Sedan:
Depending on the equipment version, it may be
possible to fold down the outer rear head
restraints as well.
Only fold the head restraints down if no
passengers will be sitting in the rear. Fold
up the head restraints before transporting pas-
sengers in the rear.<
Page 53 of 268
Controls
51Reference
At a glance
Driving tips
Communications
Navigation
Entertainment
Mobility
Deactivating
Push the switch to the position for the passen-
ger-side mirror, arrow 2.
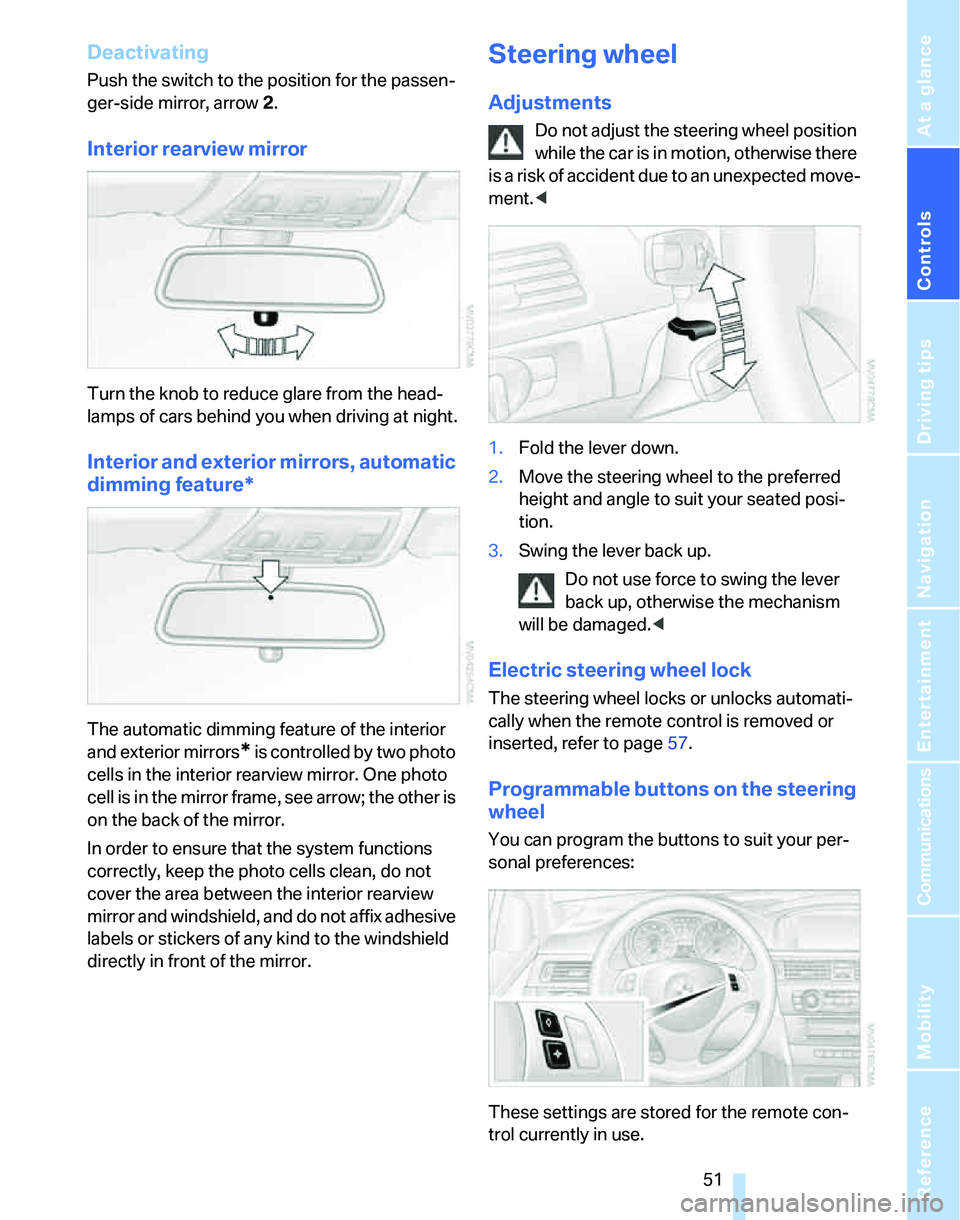
Interior rearview mirror
Turn the knob to reduce glare from the head-
lamps of cars behind you when driving at night.
Interior and exterior mirrors, automatic
dimming feature*
The automatic dimming feature of the interior
and exterior mirrors
* is controlled by two photo
cells in the interior rearview mirror. One photo
cell is in the mirror frame, see arrow; the other is
on the back of the mirror.
In order to ensure that the system functions
correctly, keep the photo cells clean, do not
cover the area between the interior rearview
mirror and windshield, and do not affix adhesive
labels or stickers of any kind to the windshield
directly in front of the mirror.
Steering wheel
Adjustments
Do not adjust the steering wheel position
while the car is in motion, otherwise there
i s a ri s k o f a c c id e n t du e t o a n un e x p e ct e d m o v e -
ment.<
1.Fold the lever down.
2.Move the steering wheel to the preferred
height and angle to suit your seated posi-
tion.
3.Swing the lever back up.
Do not use force to swing the lever
back up, otherwise the mechanism
will be damaged.<
Electric steering wheel lock
The steering wheel locks or unlocks automati-
cally when the remote control is removed or
inserted, refer to page57.
Programmable buttons on the steering
wheel
You can program the buttons to suit your per-
sonal preferences:
These settings are stored for the remote con-
trol currently in use.
Page 54 of 268
Adjustments
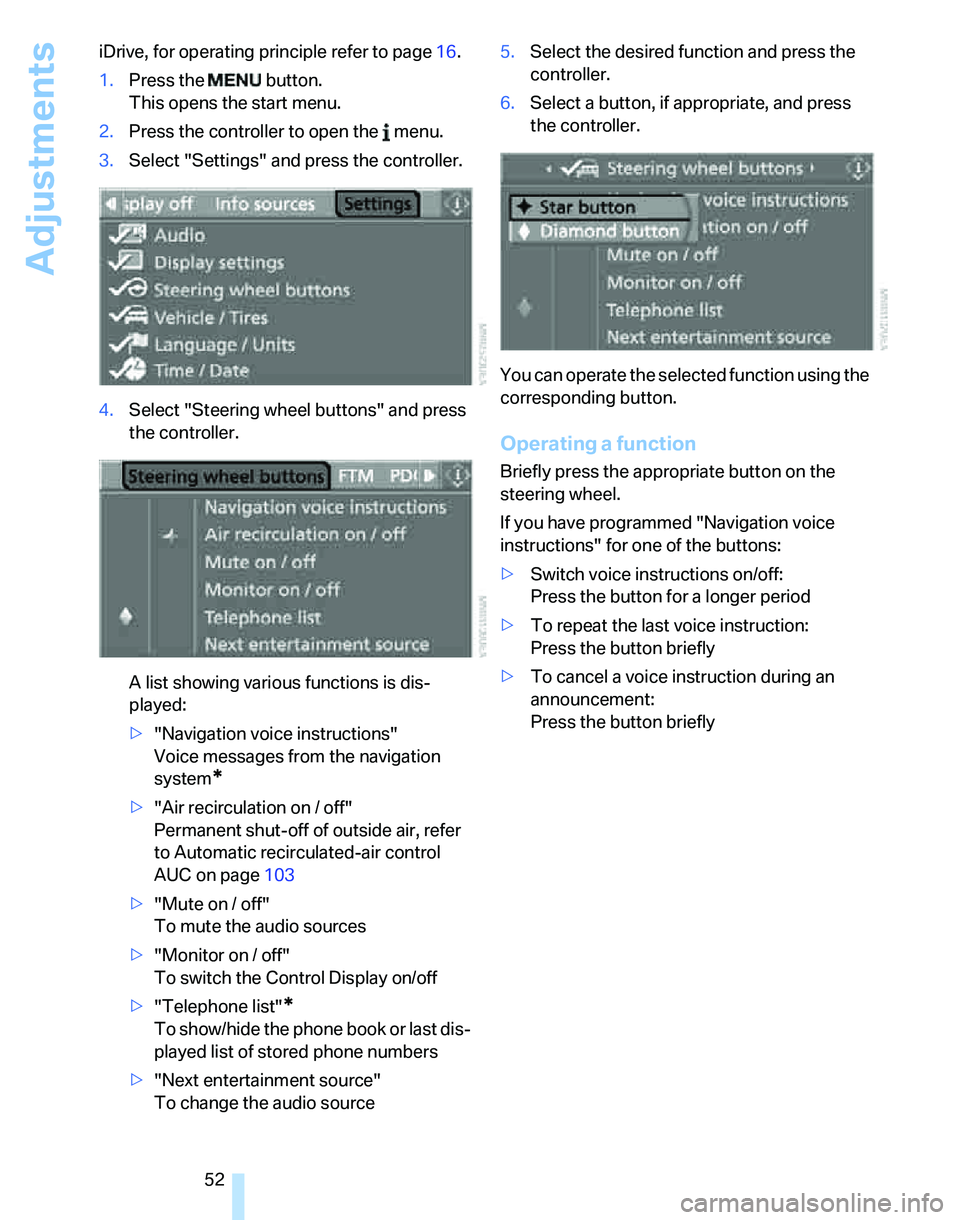
52 iDrive, for operating principle refer to page16.
1.Press the button.
This opens the start menu.
2.Press the controller to open the menu.
3.Select "Settings" and press the controller.
4.Select "Steering wheel buttons" and press
the controller.
A list showing various functions is dis-
played:
>"Navigation voice instructions"
Voice messages from the navigation
system
*
>"Air recirculation on / off"
Permanent shut-off of outside air, refer
to Automatic recirculated-air control
AUC on page103
>"Mute on / off"
To mute the audio sources
>"Monitor on / off"
To switch the Control Display on/off
>"Telephone list"
*
To show/hide the phone book or last dis-
played list of stored phone numbers
>"Next entertainment source"
To change the audio source5.Select the desired function and press the
controller.
6.Select a button, if appropriate, and press
the controller.
You can operate the selected function using the
corresponding button.
Operating a function
Briefly press the appropriate button on the
steering wheel.
If you have programmed "Navigation voice
instructions" for one of the buttons:
>Switch voice instructions on/off:
Press the button for a longer period
>To repeat the last voice instruction:
Press the button briefly
>To cancel a voice instruction during an
announcement:
Press the button briefly
Page 55 of 268
Controls
53Reference
At a glance
Driving tips
Communications
Navigation
Entertainment
Mobility
Transporting children safely
The right place for children
Do not leave children unattended in the
vehicle, otherwise they could endanger
themselves and/or other persons by opening
the doors, for example.<
The rear center seat is not suitable for installing
universal child-restraint systems for all age
groups, approved for the age group in question.
Children always in the rear
Accident research has shown that the safest
place for children is on the rear seat.
Children under the age of 13 or smaller
than 5 ft/150 cm may be transported only
in the rear in suitable child-restraint systems
appropriate for their age, weight and size. Oth-
erwise there is an increased risk of injury in the
event of an accident.<
Children 13 years of age or older must be buck-
led in with a safety belt as soon as there no
longer is any child-restraint system that is
appropriate for their age, size and weight.
The rear seats in your vehicle meet the recom-
mendations of the SAE J1819 standard for
safely mounting child-restraint systems in
motor vehicles.
Exception for front passenger seat
Should it be necessary to use a child-
restraint system on the front passenger
seat, the front and side airbags for the front pas-
senger must be deactivated. Otherwise, a child
traveling on that seat will face a significant risk
of injury if the airbags are triggered off, even
with a child-restraint system. Your BMW center
will be glad to advise you.<
For more information on automatic deactivation
of the front passenger airbags refer to page95.
Installing child-restraint
systems
Observe the child-restraint system man-
ufacturer's instructions when selecting,
installing and using child-restraint systems.
Otherwise the protective effect may be dimin-
ished.<
Standard child-restraint systems are designed
to be secured with a lap belt or with the lap-belt
section of a lap-and-shoulder belt. Incorrectly
or improperly installed child-restraint systems
can increase the risk of injury to children.
Always follow the installation instructions for
the system with the greatest care.
On the front passenger's seat
Before installing a child-restraint system
on the front passenger's seat, make sure
that the front and side airbags for the front pas-
senger are deactivated, otherwise there is an
increased risk of injury if the airbags deploy.<
Backrest width*
The backrest width of the front passen-
ger's seat must be at its widest possible
setting. Do not change the setting after install-
ing the child seat. Otherwise the child seat's
stability on the front passenger's seat is lim-
ited.<
1.Adjust the backrest width to its widest set-
ting, refer to page46.
2.Install the child seat.